1.Purpose
The WooCommerce plugin now includes an Invoice Payment Gateway. This payment method is typically used in B2B transactions with account/invoice customers where instant digital payment is impossible, making it possible to check out without immediate payment. You will be responsible for invoicing the customer and entering the invoice number on their order.
The gateway settings panel allows you to use the payment gateway on checkout or not by enabling or disabling it. The order processed through the WooCommerce invoice payment portal will be added to the selected order status. The corresponding status order emails will be sent after checkout, With the invoice number and purchase order displayed with order details.
2.Plugin Features
- Invoice based checkout
- Enable or Disable the gateway
- Invoice details in the email
- Restrict payment gateway for shipping methods and user roles
3.Requirements
- WooCommerce
3.1.Installation Guide
- Log in to your WordPress Admin Panel.
- Navigate to the WordPress Admin Dashboard → Plugins
- Click the Add New button in the top left corner of your screen.
- Next, click the Choose file button in the box that appears below.
- Select the zip file that you have downloaded and upload it.
3.2.Back-End Configuration Overview
As the plugin is installed and activated, a payment gateway titled “Invoice Payment Gateway for WooCommerce” is added in the Payments tab of WooCommerce.
- Go to Dashboard → WooCommerce → Settings.
- Go to the Payments tab.

- In the Payment methods section,
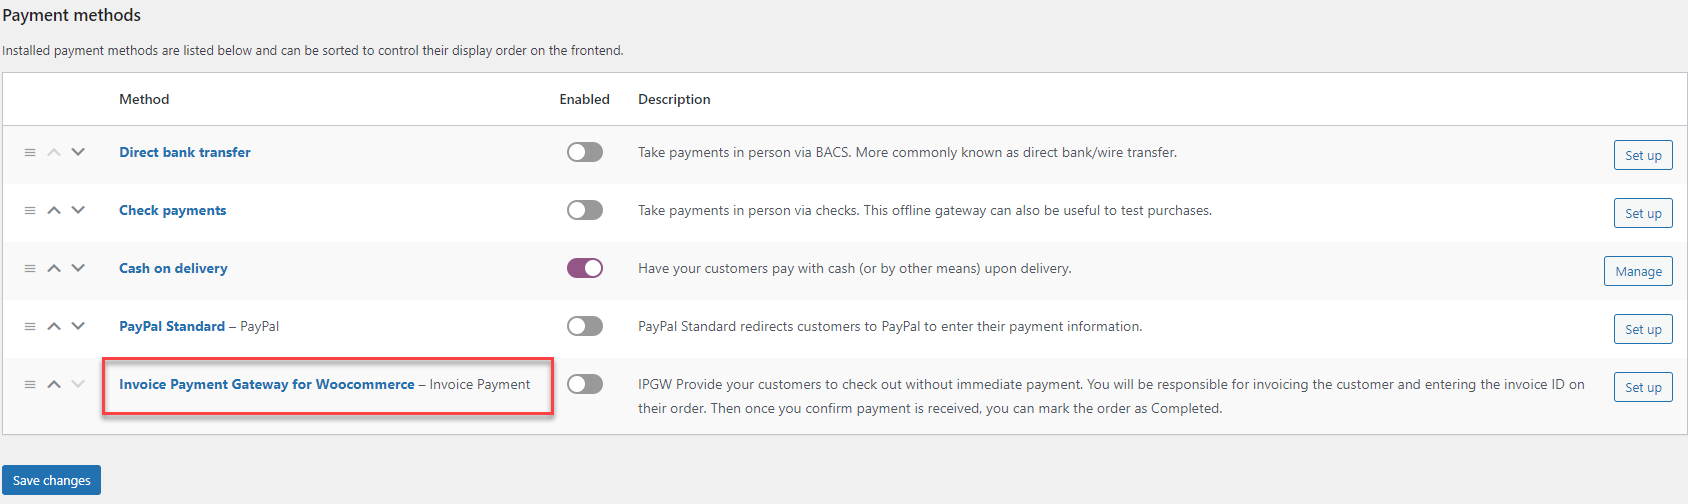
- You can enable it from this screen or click on the Setup button.
- If you click on the Setup button,
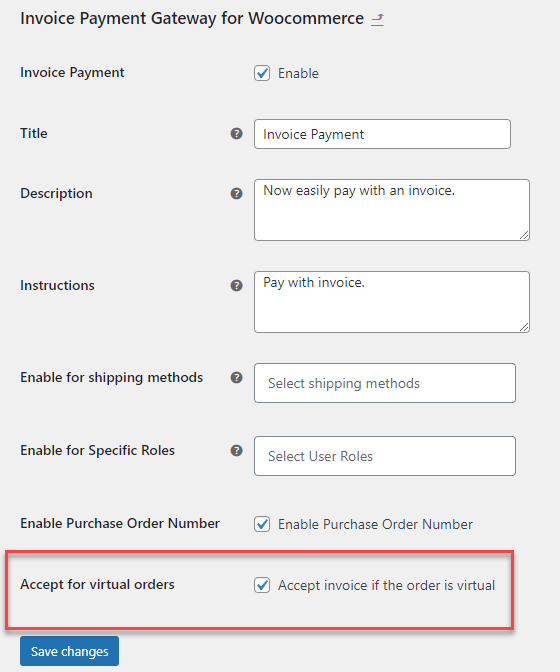
- Checkmark the Enable checkbox to activate this payment method.
- Set Title.
- Add Description.
- Add Instructions.
- Set Enable for shipping methods (Flat Rate, Free Shipping, and Local Pickup).
- Set Enable for specific user roles.
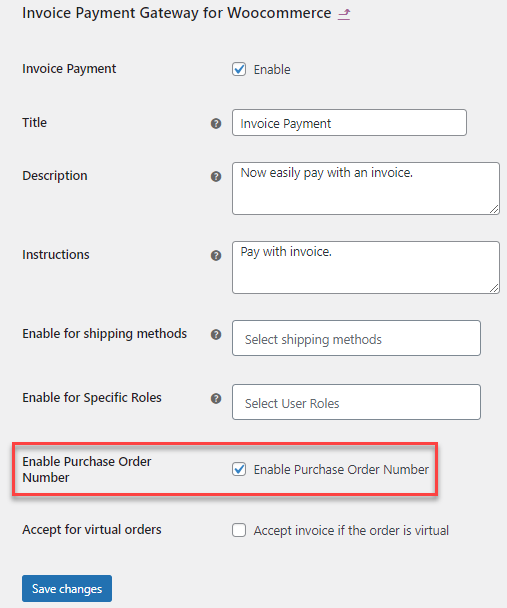
- Checkmark the Enable Purchase Order Number checkbox to activate this functionality.
- Checkmark the Accept for virtual order checkbox to activate this functionality.
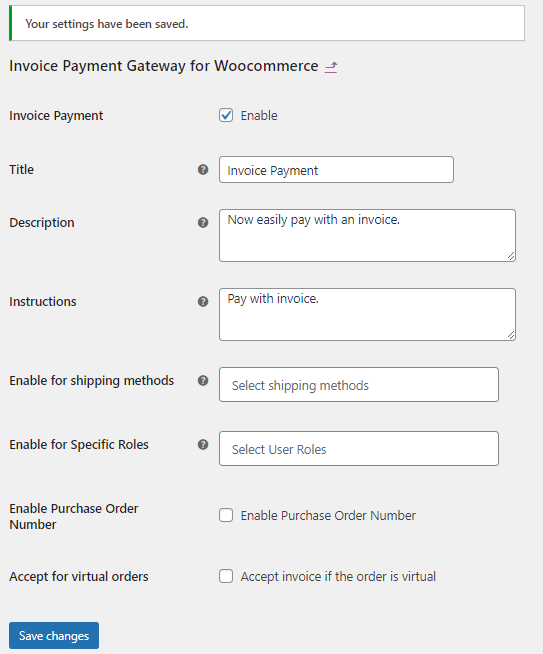
- Click on the Save changes button.
- When the operation is successful, right down the Payments tab, and you’ll receive a notification that “Your settings have been saved.”
NOTE: Once any payment method is enabled, the Setup button label changes to Manage.
3.3.Title, Description, and Instructions
- The user will go to your website, and once done with the Add to Cart process, the user will go to the Checkout page,
- Select the payment option which would appear as Invoice Payment (Title which the Admin configured)
- After selecting the Invoice Payment option, the Description would appear below it.
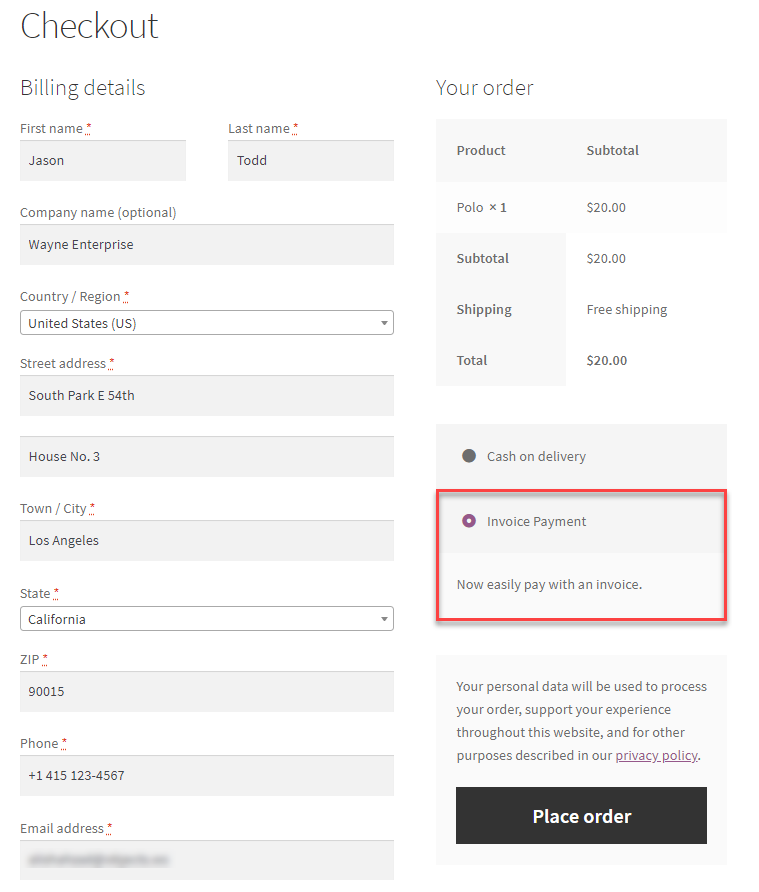
- Click on the Place Order button.
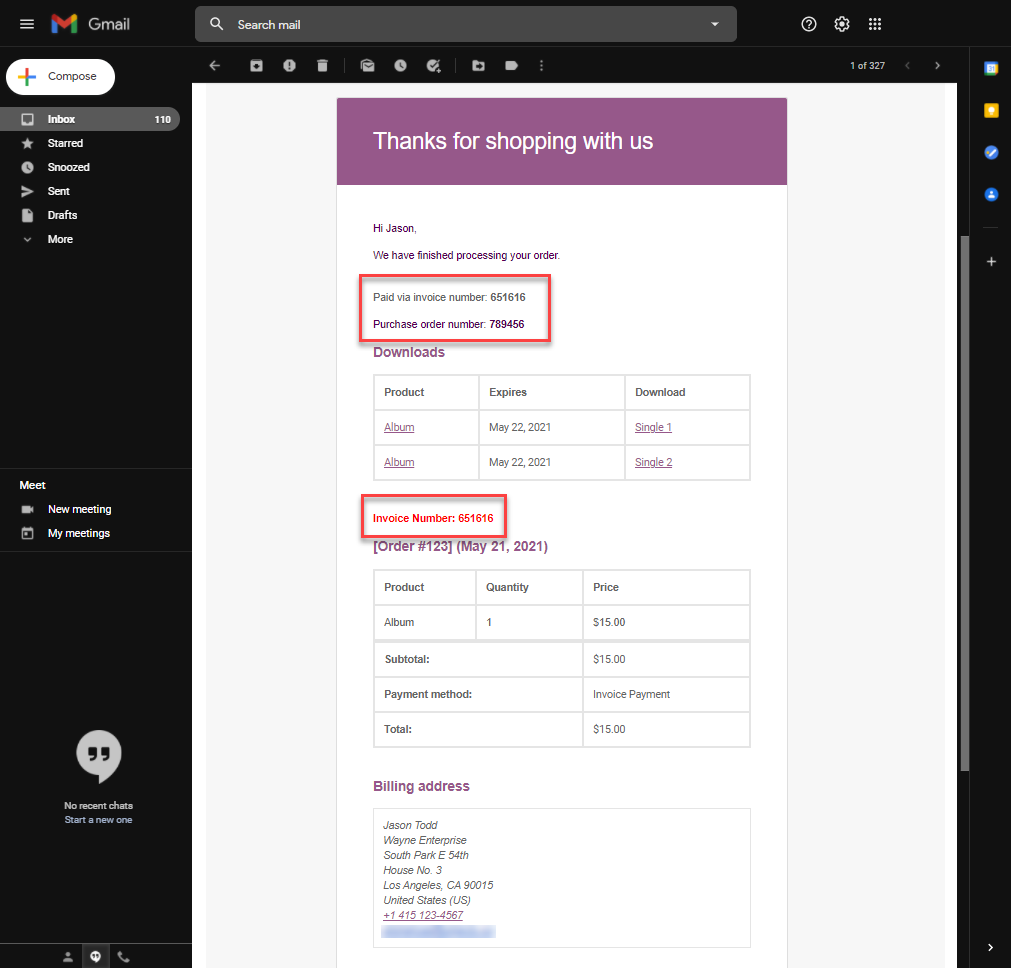
- The user will receive the email regarding his respected order
- The Instructions are mentioned in the email.

3.4.Shipping Methods
- In Invoice Payment Gateway for Woocommerce configuration,
- Select the shipping methods you want to enable in the Enable for shipping methods field.
- There are three shipping methods,
- Flat Rate
- Free Shipping
- Local Pickup
- As of now, we have selected Flat Rate and Free Shipping.
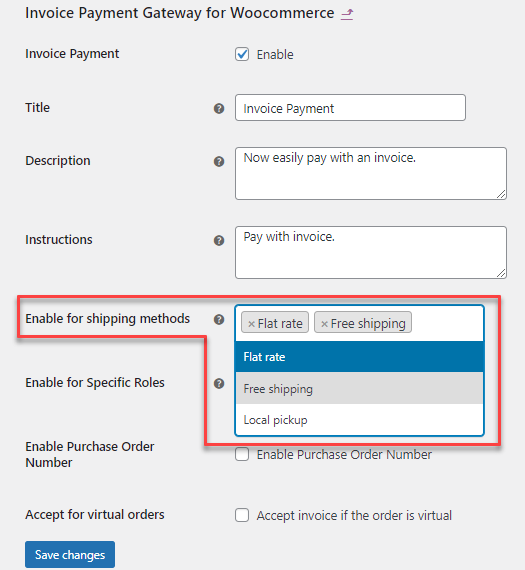
- Click on the Save changes button.
- All the shipping methods will appear when the user is on the Checkout page.
- As per our configuration, we enabled Flat Rate and Free Shipping for Invoice Payment Gateway for Woocommerce. If we select the Local Pickup shipping method, the Invoice Payment (Title of Invoice Payment Gateway for Woocommerce) will disappear.

NOTE: Leave blank to enable all methods.
NOTE: Always remember to check/configure the Shipping zones in the Shipping Tab.
3.5.User Roles
- In Invoice Payment Gateway for Woocommerce configuration,
- Select the user roles you want to allow to select this gateway in the Enable for Specific Roles.
- As of now, we have selected an Administrator.

- Click on the Save changes button.
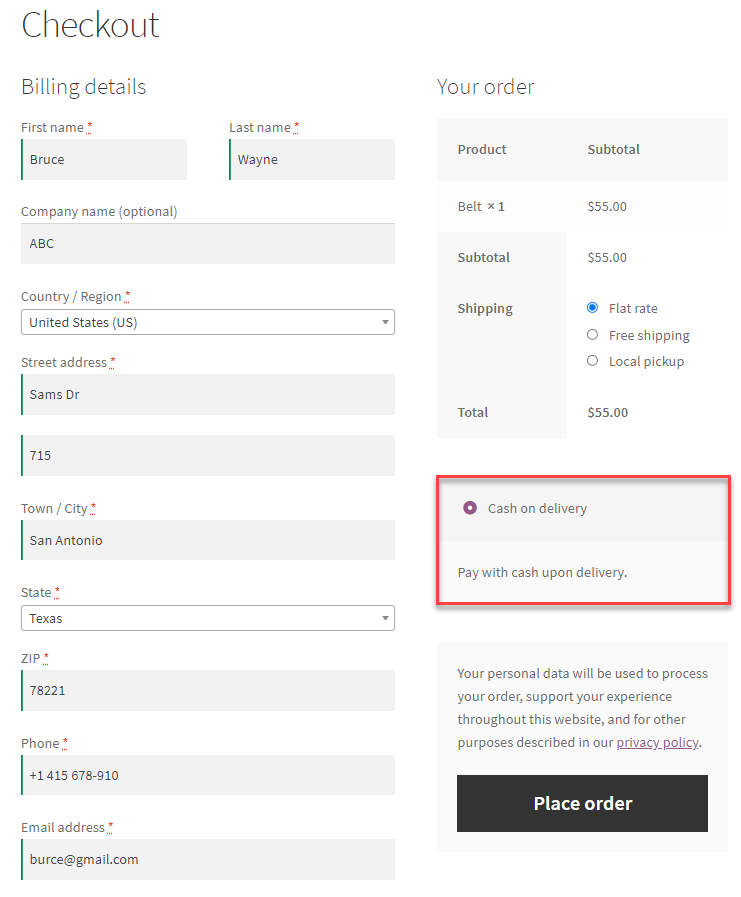
- When any user other than the Administrator goes on the Checkout page, the Invoice Payment (Title of Invoice Payment Gateway for Woocommerce) shipping method will not be visible.
- We will go through the Add to cart process and then to the Checkout page with a user named Bruce Wayne, whose role is Wholesaler – Wholesaler Role.
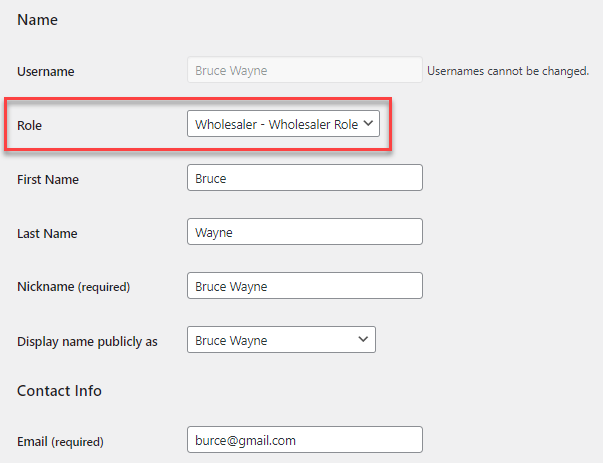
- When this user goes to the Checkout page, we can see that the Invoice Payment (Title of Invoice Payment Gateway for Woocommerce) shipping method is unavailable because of his user role.
3.6.Invoice Number and PO (Purchase Order) Number
- In Invoice Payment Gateway for Woocommerce configuration,
- Checkmark the Enable Purchase Order Number checkbox.
- This functionality of including the PO(Purchase Order) Number in the email notification has been added, which will make it easier for the customer to keep track of the purchase order.
- Click on the Save changes button.
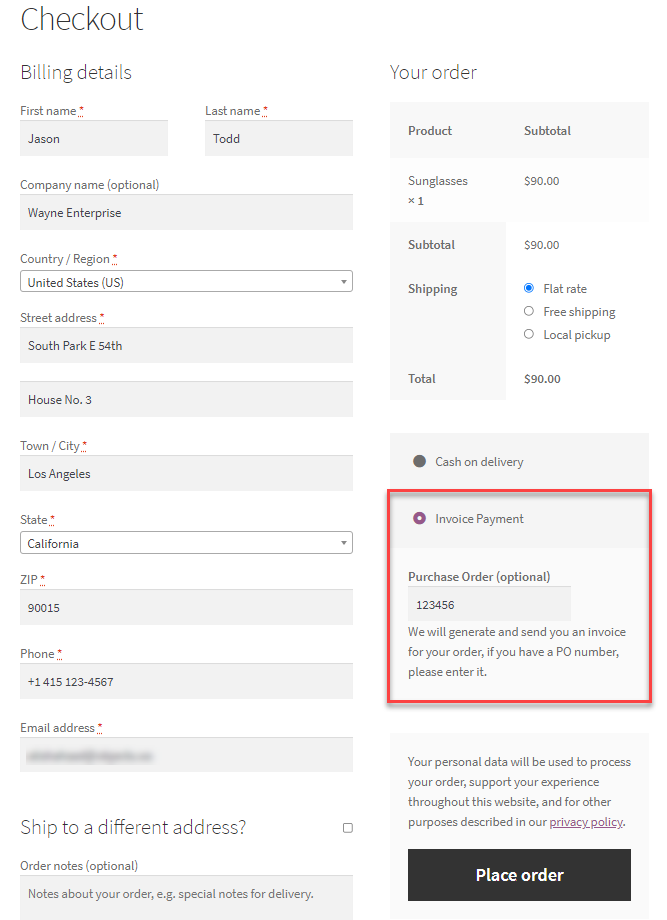
- Whenever a user will be on the checkout page, a Purchase Order field will appear whenever the user chooses the Invoice Payment (Title of Invoice Payment Gateway for Woocommerce) shipping method.
- The Admin would be notified on his WordPress Dashboard about the new order.
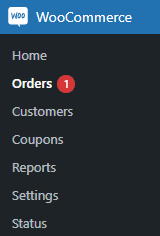
- Go to Dashboard → WooCommerce → Orders.

- Click on the respective Order to open it.

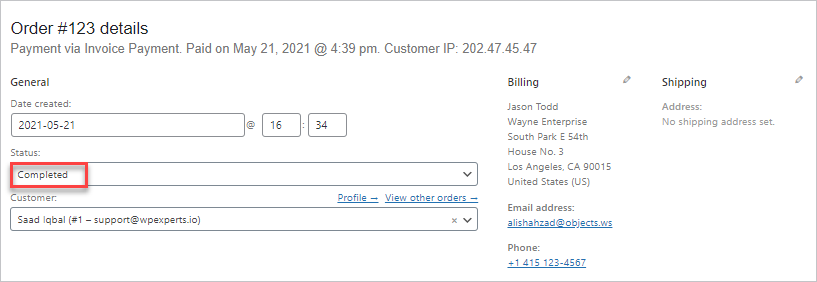
- The Order Invoice section shows that the user fills the Purchase Order Number, and the Admin can set the Invoice Number.
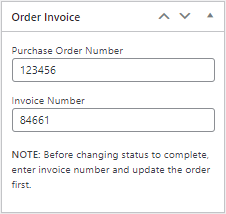
- Mark the status as Completed and click the Update button in the Order actions section.
- The User would receive an email with the Invoice Number, Purchase Order Number, and other details.

- Notes are also added in the Order Notes section.

NOTE: The description of the Invoice Payment (Title of Invoice Payment Gateway for Woocommerce) would not be visible on the Checkout page if the Purchase Order field is enabled.
3.7.Virtual Orders
- In Invoice Payment Gateway for Woocommerce configuration,
- Checkmark the Accept for virtual orders checkbox.
- This functionality will process the orders and generate an invoice number for the product that are virtual products.
- Click on the Save changes button.
- Whenever a user is on the checkout page when purchasing a Virtual Product, the User will choose the Invoice Payment (Title of Invoice Payment Gateway for Woocommerce) shipping method.
- The Admin would be notified on his WordPress Dashboard about the new order.
- Admin would go to Dashboard → WooCommerce → Orders and open the respective order.
- Admin would assign an Invoice Number.
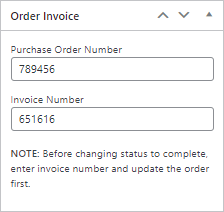
- Once the Admin marks the order status as Completed.
- Click the Update button in the Order actions section.
- The User would receive an email with the Invoice Number, Purchase Order Number, and other details of the Virtual Order.
Help Guide Powered by Documentor Invoice Payment Gateway For WooCommerce