

WooCommerce is a leading platform for building eCommerce websites, and most multi-vendor websites are built on WooCommerce. Multivendor website means that several vendors upload their products on a sharing website(s) where buyers visit and purchase products from different vendors from the same marketplace.

This means a buyer can easily add products from different vendors to their carts and shop without any disturbance. A great number of people visit the WooCommerce multi-vendor marketplaces and order a large number of products each day.
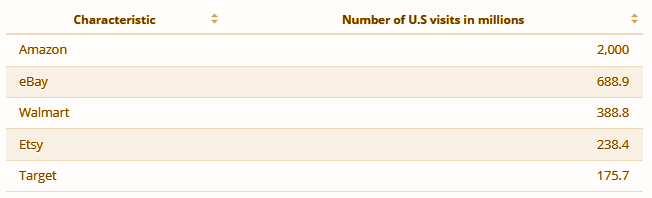
The leading marketplaces include Amazon, eBay, Alibaba, and others. According to the studies, as of April 2021, Amazon.com was the most visited online marketplace in the United States, with approximately two billion visits per month. Second place went to eBay, with about 689 million visits, followed in third place by Walmart, with 389 million.
Source: https://www.statista.com/statistics/270884/most-visited-websites-in-the-retail-sector-in-the-us/
This blog will help you build step-by-step a WooCommerce multi-vendor marketplace. Keep reading!
Do you have a domain name and hosting service? If so, you are good to go. Otherwise, you will need a domain name for your WooCommerce multi-vendor marketplace and hosting service to take your website live globally.
You can easily register a domain name from the following domain registrars.
- GoDaddy
- Namecheap
- com
- Bluehost
- HostGator
You can easily get hosting services from the following hosting providers.
- Hostinger
- Bluehost
- DreamHost
- SiteGround
- HostGator
WooCommerce Multi-Vendor Marketplace
WordPress is the most popular and well-known content management system widely used for building websites such as blogs, forums, online stores, and marketplaces. WooCommerce is a widely used WordPress plugin to build WooCommerce multi-vendor marketplace.
To create, edit, and decorate your WooCommerce multi-vendor marketplace, some website builder tools are available, such as Elementor, Divi, Beaver Builder, and a lot more.
To install WordPress, you can directly get the updated version of WordPress from your hosting service; it provides us with the WordPress installation and configuration service for building our website.
After installing and configuring your WordPress website, go to the Plugins → Add New and search for WooCommerce.
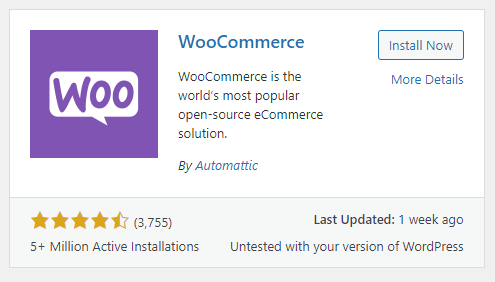
Click on the Install Now button and then activate it. Next, you will need a WooCommerce multi-vendor marketplace addon to build your website.
Multi-Vendor Marketplace Themes
To improve customers’ visual experience, explore the top-notch pixel-perfect themes for your WooCommerce multi-vendor marketplace. Some of them are listed below.
- Divi
- Shopkeeper
- Artcraft
- Flatsome
- Legenda
This blog will demonstrate how to install the WC Vendors plugin for creating your WooCommerce multi-vendor marketplace.
Turning your WooCommerce Website into a Multi-Vendor Marketplace using WC Vendors
WC Vendors is the right plugin for turning your website into a multi-vendor marketplace with all the options that should exist in marketplaces such as Amazon, eBay, Etsy, etc.
With that said, you will have the power to allow the vendors to visit your marketplace and upload their products for selling purposes. Moreover, the authority will be in your hand on which type of products you allow to upload.
To install this plugin, go to Plugins → Add New and search or WC Vendors in a search bar. The screen shown below will appear.

Now click on the Install Now button and activate this plugin. The further configuration is explained below.
Next, go to WC Vendors → Settings. In the General tab, ensure that the vendor registration checkbox is marked and other options are dependent on your choice. You can manually checkmark the options that you think you might need in your marketplace.
Once you are done with the General settings, click on the Save Changes button to save your changes.
Next, navigate to the Commission tab and set the global commission rate for your plugin. Please note that the global commission rate can be countermanded.
Next, navigate to the Capabilities tab to allow the vendors for different rules. In this tab, you will see three different sections; General, Products, and Orders.
General Tab
In this section, you have common settings for your vendors, such as add, view, and edit the products. You can easily check and mark the options that you want to continue in your WooCommerce multi-vendor marketplace.
Products Tab
In this section, you can allow your vendors to add various kinds of products, such as digital or physical products. Also, enable or disable them to use feature product options, product duplication, SKU hidden functionality, and hide taxes from the products.
Orders Tab
In this section, you will see various order options where you can enable or disable them by checkmark or uncheck the options. Set them according to your marketplace requirements.
Next, navigate to the Display tab, and here you will find some shortcodes to display your pages by using them in your created pages. Go to the pages and click on Add New to build a new page; simply paste the shortcode you have copied from the Display Settings tab in your page content area.
On the same page, if you scroll a little bit, you will find ‘Store Settings’ options at the end. Here, you can set your vendor’s shop URL prefix and checkmark on the other options as per your requirements.
Next, navigate to the Payments tab, select your payment option, and set the vendor’s payment that makes the transaction process easy for the customers. There are some payment add-ons available for your information to set up your desired payment method to your WooCommerce multi-vendor marketplace. One of the best payment plugins for your marketplace is listed below.
Square Payment Gateway For WCVendors
This plugin makes a great combination of Square payment solution with WCVendor marketplace. This integration can take place by authorizing the OATH functionality with Square Payment Application.
This plugin splits the share of each sale product showcased by the vendor on your marketplace.
Account Management Settings to build your WooCommerce Multi-Vendor Marketplace
It is very important to allow access to the customers on different activities for product purchasing, account registration, and account creation.
Go to WooCommerce → Settings. In the Accounts & Privacy tab, you will see guest checkout, account creation, etc. Tick the options that you need to enable for your marketplace.
Next, navigate to the Appearance → Menus and arrange/sort your user account and checkout page from the WordPress dashboard.
Once you are done with all the above steps, hop on to the testing process and see whether you have built your WooCommerce multi-vendor marketplace adequately or are lacking somewhere.
How to test my WooCommerce Multi-Vendor Marketplace?
Go to your website and click on the ‘My Account’ menu option to create an account for testing purposes. A window will appear to see that both customers and vendors can log in to their accounts.
You will always get a notification on new account creation on new account creation if you have enabled the notification previously in the options while making your WooCommerce multi-vendor marketplace.
To check all the users, navigate to the Users → All Users. Here you can see all the registration awaited users, and also, you can perform different actions such as view, approve, and deny options.
On the admin approval, users will be allowed to log in to their accounts and add products for selling on your WooCommerce multi-vendor marketplace.
Time to Market your Marketplace
Have you ever heard about gamification? Let me give you a brief idea about it.
Gamification refers to adding game-like mechanics to your website to build an engaging environment and grab the visitors’ attention on your website.
In such a case, myCred is one of the best gamification plugins that comes with more than fifty useful addons in which one of which is ‘myCred WCVendors.’
This add-on helps you calculate the commission for your vendors and set up the commission value for each vendor. Also, it gamifies the marketplace experience by providing your vendors with the points depending on their products’ rating.
For more info about the plugin, check WC Vendors review
Closing Words!
We have covered how you can easily build WooCommerce multi-vendor marketplaces by keeping all the important factors in your mind. Go through each step and follow them to start your marketplace business. This blog is specifically written for beginners as well as experts. If you do not have deep technical knowledge, you can still build your own WooCommerce multi-vendor marketplace by following this blog. That would be all.


