

Managing multiple sites within a WordPress Multisite network is very useful, but what if you want each subsite to have its custom domain? That’s where the WordPress Multisite domain mapping comes in!
With domain mapping, you can enjoy the benefits of a centralized network management system while allowing each subsite to have its unique domain. This means that on the back end, you can efficiently manage all your sites, but on the front end, your visitors will experience a seamless browsing experience, unaware of the underlying network structure.
In this comprehensive guide, we will walk you through the process of configuring WordPress Multisite domain mapping on the latest version of WordPress. The best part? You do not need to use any plugins (more on that later).
So, without further ado, let’s get started!
Types of WordPress Domain Mapping
When it comes to WordPress domain mapping, there are two primary methods available: subdomains and subdirectories. Each method has its characteristics and considerations, and understanding their differences is essential to make an informed decision for your WordPress multisite network. Let’s explore each method in detail:
● Subdomains
Subdomains involve creating unique URLs for each subsite within your WordPress multisite network. For example, if your main domain is “example.com” and you have a subsite named “blog,” the subdomain URL would be “blog.example.com.”
Using subdomains allows you to separate multiple sites to achieve unique branding and organization. So, if you want to create a network with different branding or targeted content for each subsite, creating subdomains is the way to go. This way, you can use your branded poster design template to create a good banner, share some images containing your brand logo, or design the other subdomains differently.
Pros of Subdomains:
- Clear separation and a unique identity for each subsite.
- Flexibility in terms of branding and customization.
- It is suitable for specific audiences or purposes.
Cons of Subdomains:
- Slightly more complex to set up and manage.
- Require additional DNS configuration for each subdomain.
- It might only work for networks with a small number of subsites.
● Subdirectories
Subdirectories, also known as path-based domain mapping, use a single domain with different path prefixes for each subsite. This method allows you to access subsites via URLs like “example.com/subsite1” and “example.com/subsite2.”
With subdirectories, WordPress multisite networks can have a unified domain structure, which makes them easier to set up and manage. Moreover, creating subdirectories can be useful when networks have a large number of subsites or when it is important to maintain consistent brand identity across all subsites.
Pros of Subdirectories:
- Simplified setup and management.
- Easy to maintain a consistent brand identity across all subsites.
- A good choice for networks with a large number of subsites.
Cons of Subdirectories:
- Less flexibility in terms of branding and customization compared to subdomains.
- Limited in terms of creating unique branding for each subsite.
- Having limitations regarding search engine optimization (SEO) and perceived site hierarchy.
IMPORTANT: By default, a WordPress Multisite network uses subdirectories for domain mapping. However, you have the flexibility to choose between subdomains and subdirectories based on your specific requirements.
Please note that you can only change this if you reinstall WordPress Multisite Network.
Difference Between Subdomains and Subdirectories [Quick Overview]
As of now, you’ve probably gained a good understanding of the differences between subdomains and subdirectories. However, let’s provide a quick rundown to give you a better overview. Here are the key differences between subdomains and subdirectories:
| Subdomains | Subdirectories |
Search Engine Indexing
| ❖ Search engines treat subdomains as separate websites | ❖ All subsites are indexed under the main domain |
Server Resources
| ❖ Subdomains can distribute server resources more evenly | ❖ Subdirectories share server resources among all subsites |
Wildcard SSL Certificate
| ❖ Requires a wildcard SSL certificate to cover all subdomains | ❖ Can use a single SSL certificate for the main domain |
Scalability
| ❖ More suitable for smaller networks with a limited number of subsites | ❖ Ideal for larger networks with many subsites |
Cookie Sharing
| ❖ Subdomains do not typically share cookies | ❖ Cookies are shared across all subdirectories |
Branding
| ❖ Allows for unique branding and separate identities | ❖ Maintains a consistent brand under the main domain |
Maintenance Requirements
| ❖ Each subdomain may require individual updates and maintenance | ❖ Updates and maintenance are centralized for all subsites |
Level of Complexity
| ❖ Requires additional DNS configuration and management | ❖ Subdirectories are easier to set up and manage |
Use Cases of WordPress Multisite Setup
As we know, WordPress Multisite is a powerful feature that allows you to manage multiple sites under a single installation. Let’s explore a few common use cases where setting up a WordPress Multisite network with custom domain mapping can be highly beneficial:
- Corporate Intranet Networks: Organizations can utilize WordPress Multisite to build an intranet network for their employees, allowing them to access multiple departments or branches with a single login, simplifying internal communication and collaboration.
- Educational Institutions: For universities and schools, it can help them to create separate subsites for each department, class, or student group, enabling the easy organization and management of course materials, events, and announcements.
- eCommerce Platforms: If you run a business having multiple online stores targeting different niches or locations. With WordPress Multisite domain mapping, you can manage your stores under a single multisite installation, simplifying, updating, and maintaining multiple eCommerce stores.
- Web Development Agencies: Managing multiple websites for a single client can be difficult. In that case, web development agencies can create a multisite network to manage client websites efficiently. This allows you to perform updates and changes more quickly, which reduces costs significantly.
- News and Magazine Websites: Many news agencies operate across many regions, so news and magazine websites can set up different sites based on different categories or places, thus enabling them to streamline content management and organization and improving the user experience for site visitors.
These use cases demonstrate the versatility of WordPress Multisite setup and the advantages of configuring custom domain mapping within the network.
You may be wondering if I need to install a plugin? to find the answer, please refer to the following section.
Good News! You Don’t Need to Install Any Domain Mapping Plugin – Here’s Why?
With WordPress 4.5, domain mapping became a built-in feature, eliminating the need for third-party plugins. So, you no longer have to rely on plugins to map domains with WordPress Multisite.
As a result of this update, many domain mapping tutorials found online are outdated, as they still reference the use of plugins. You can disregard these outdated tutorials and confidently follow this guide for domain mapping WordPress Multisite configuration.
IMPORTANT: Before making any changes to your website, always remember to create a complete backup of your site to ensure data safety.
5 Easy Steps to Configure WordPress Multisite Domain Mapping
To get started, ensure you have your hosting account’s dashboard, domain registrar, and WordPress Multisite open. With everything prepared, let’s jump right into the domain mapping process!
Step#1: Installation of WordPress Multisite Network
For domain mapping, it is necessary to have WordPress Multisite Network set up and functioning properly, ideally with at least one subsite. Once it’s done then, here is the step-by-step process that you can follow to create a Multisite Network and add subsites:
- Start by installing your WordPress site.
- In the wp-config.php file, enable the multisite function to activate Multisite in your WordPress installation.
- Then, go to Tools –> Network Setup in your WordPress dashboard to activate your Multisite network. In this step, you need to decide between subdomains or subdirectories (which structure you will use for your subsites).
- Finalize the Multisite Network activation by inserting the two code snippets you received during installation. Place the first snippet in your wp-config.php file and overwrite your .htaccess file with the second snippet.
- In your Network Admin dashboard, navigate to Sites –> Add New to create subsites within your Multisite Network.
IMPORTANT: Before proceeding with domain mapping for WordPress, double-check that your Multisite Network is running smoothly and that you can successfully create subsites.
Step#2: Set Up DNS Records for Your Custom Domain
To map your custom domain to WordPress Multisite, configure the custom domain name to your hosting server. For those with separate domain and hosting accounts, you’ll need to follow similar steps as you did when setting up your primary domain.
However, if you opted for a combo domain-hosting package, your hosting provider already did it. In any case, you’ll need to configure your custom domain’s DNS records manually. The exact procedure depends on your domain registrar and hosting provider, so there is no one-size-fits-all procedure.
That’s why we recommend you contact your hosting provider or check out the configuration guides below for some of the most commonly used hosting services:
- Bluehost
- GoDaddy
- Namecheap
- com
- Google Domains
Once you’ve set up DNS to your custom domain, you can move on to the next step.
Step#3: Add Your Custom Domain to the Hosting Account
After setting up DNS records, go to your main network site’s hosting server and add the custom domain. The process varies based on your hosting environment. Here, we’ll do this using cPanel—the most common control panel for shared hosting. Follow the steps below:
1. Access your hosting account’s cPanel dashboard and find the “Alias” or “Parked Domains” option under the “Domains” section.
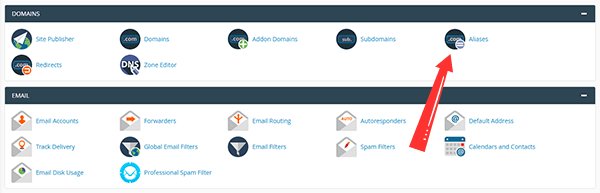
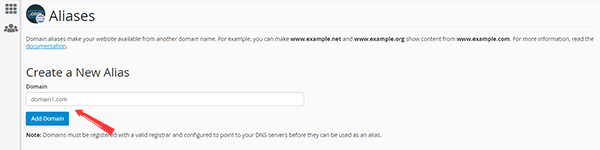
2. Click “Alias” or “Parked Domains” to proceed and create a new alias by entering your subsite’s custom domain name and clicking “Add Domain.”
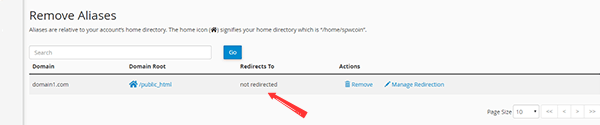
3. Mainly, hosting companies set up redirection automatically. If so, check the “Redirects To” column. If there’s redirection, click “Manage Redirection” on the right and select “Disable Redirection.” As shown in the following screenshot:
If you’ve followed the above steps correctly, now your custom domain has been added to your hosting account.
Step#4: Assign a Custom Domain to Your Network Subsite
Once you have added your custom domain to your hosting account, you can assign it to your network subsite. This step involves mapping the custom domain to a subsite in your WordPress Multisite network. You can do this by following the steps below
1. In your WordPress dashboard, navigate to the Sites panel in your Network Admin dashboard.
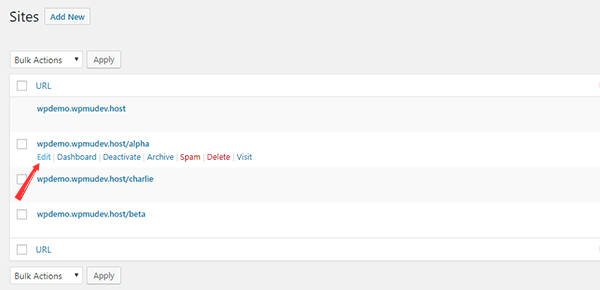
2. Look for the subsite whose domain you want to map and hover over it. Click on the Edit button.
3. In the Site Address (URL) field, enter the custom domain you want to map to the subsite.
4. Hit the blue Save Changes button to save the changes.
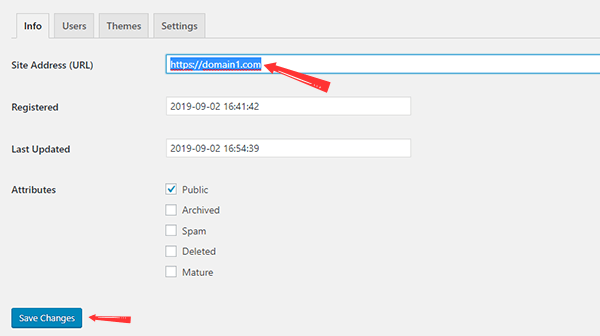
Once you have completed these steps, your custom domain will be mapped to the subsite, accessible via the custom domain.
IMPORTANT: Keep in mind that you cannot map the domain name of your main installation from here. You can, however, redirect it to another domain directly from its domain/hosting settings.
Step#5: Repeat the Same Procedure for Additional Subsites
In case you have multiple subsites in your WordPress Multisite network which you want to map to their custom domains, you can follow the same process outlined in steps 2, 3, and 4 for each subsite. It will ensure that all your subsites have their unique domain and provide a more personalized experience for your visitors.
Conclusion
There is no doubt that configuring domain mapping for a WordPress multisite network can be complex, but following this guide can simplify the process. Without third-party plugins, you can manage multiple sites on a single network with unique domain identities.
However, if you still find the process difficult, then you can contact our experienced WordPress developer for expert assistance.
Lastly, if you have a question, please feel free to ask in the comments below!


