User experience plays a crucial role in enhancing the potential of any WordPress website. Whether you are an experienced site admin or a beginner, the User Management plugin from WPExperts should be your preferred choice.
This impactful plugin lets you smartly manage your users’ data using numerous features, including a centralized dashboard, export or import capabilities, role-based filtering, etc.
This blog post will explain installing and setting up the WordPress user management plugin.
How Do You Install and Set Up the User Management Plugin?
You can install the user management plugin for WordPress, a brainchild of WPExperts, by following the below-mentioned steps:
- Click the Plugins tab through the WordPress dashboard and click the ‘Add New’ option.
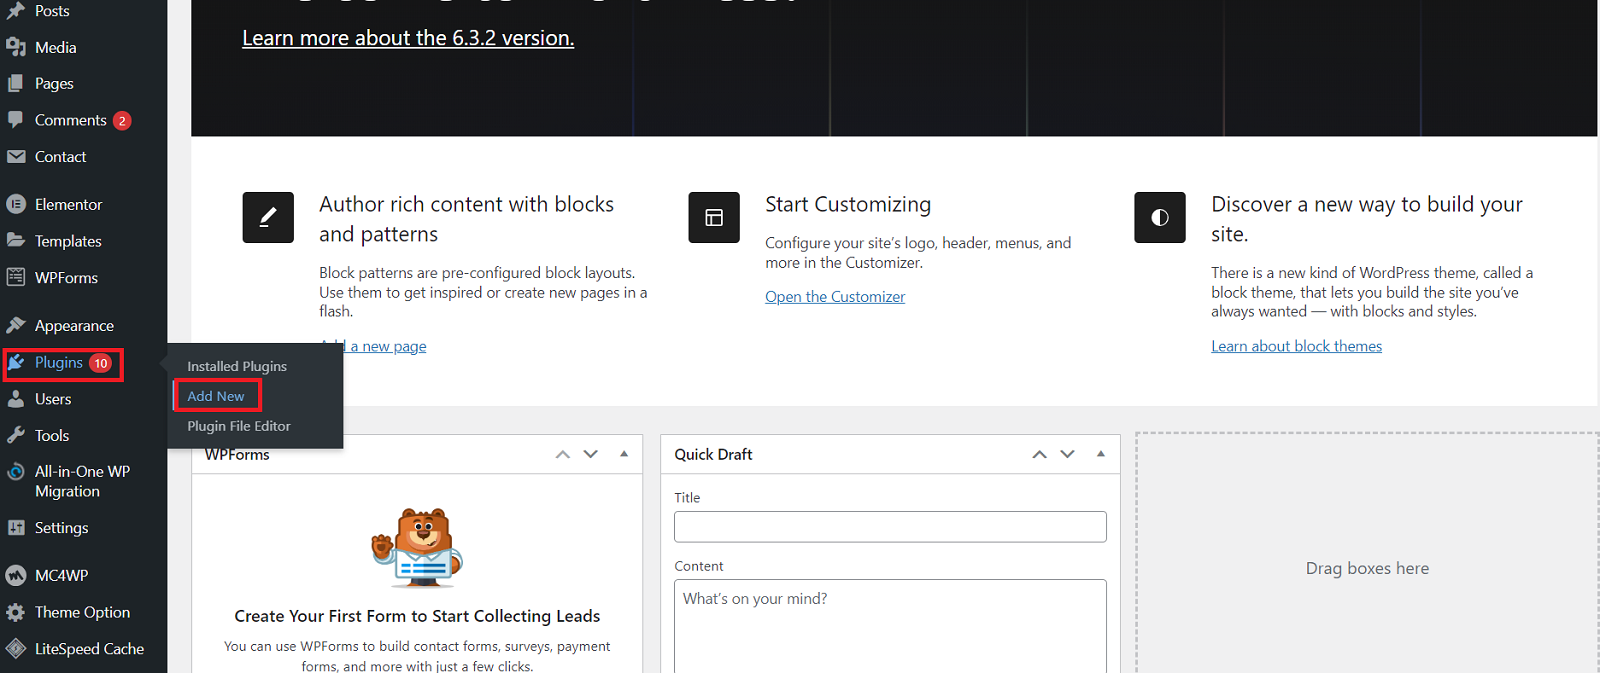
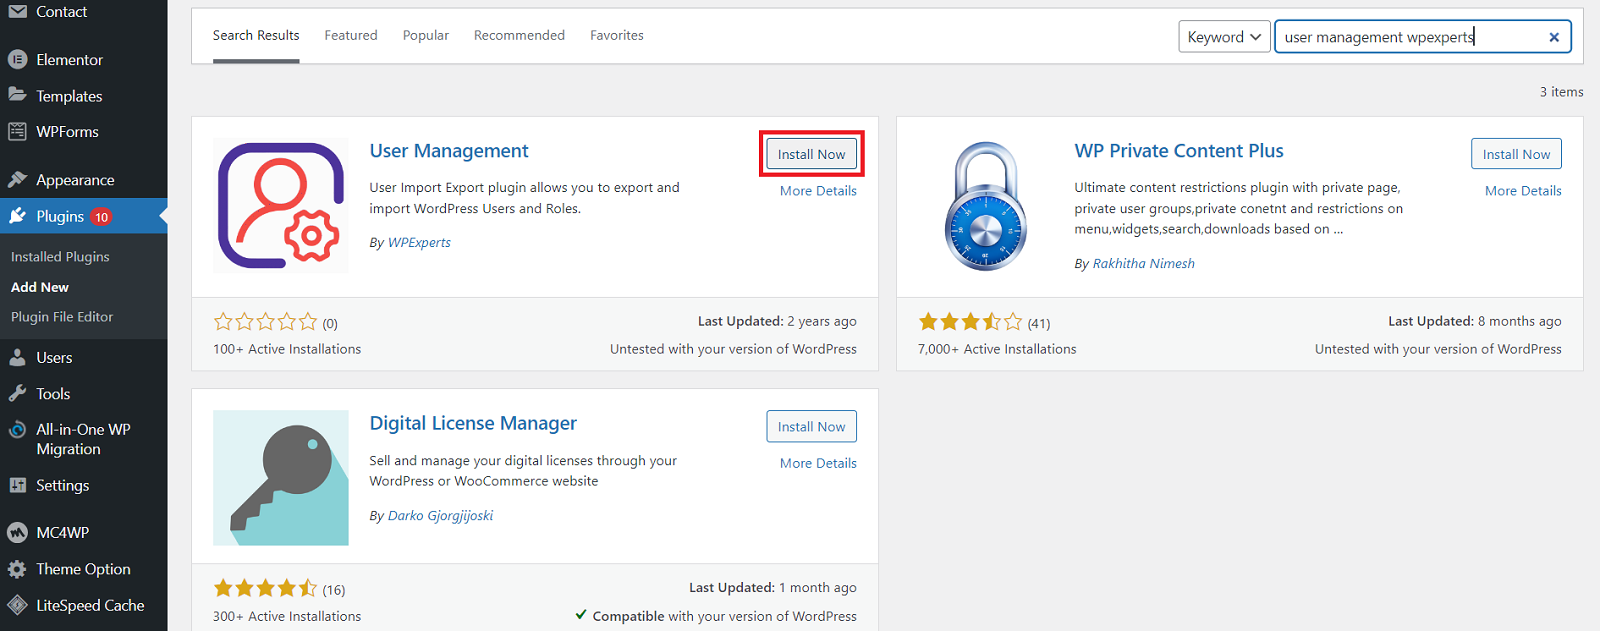
- Search for “User Management WPExperts.”
- Click the “Install Now” button to install the user management plugin.
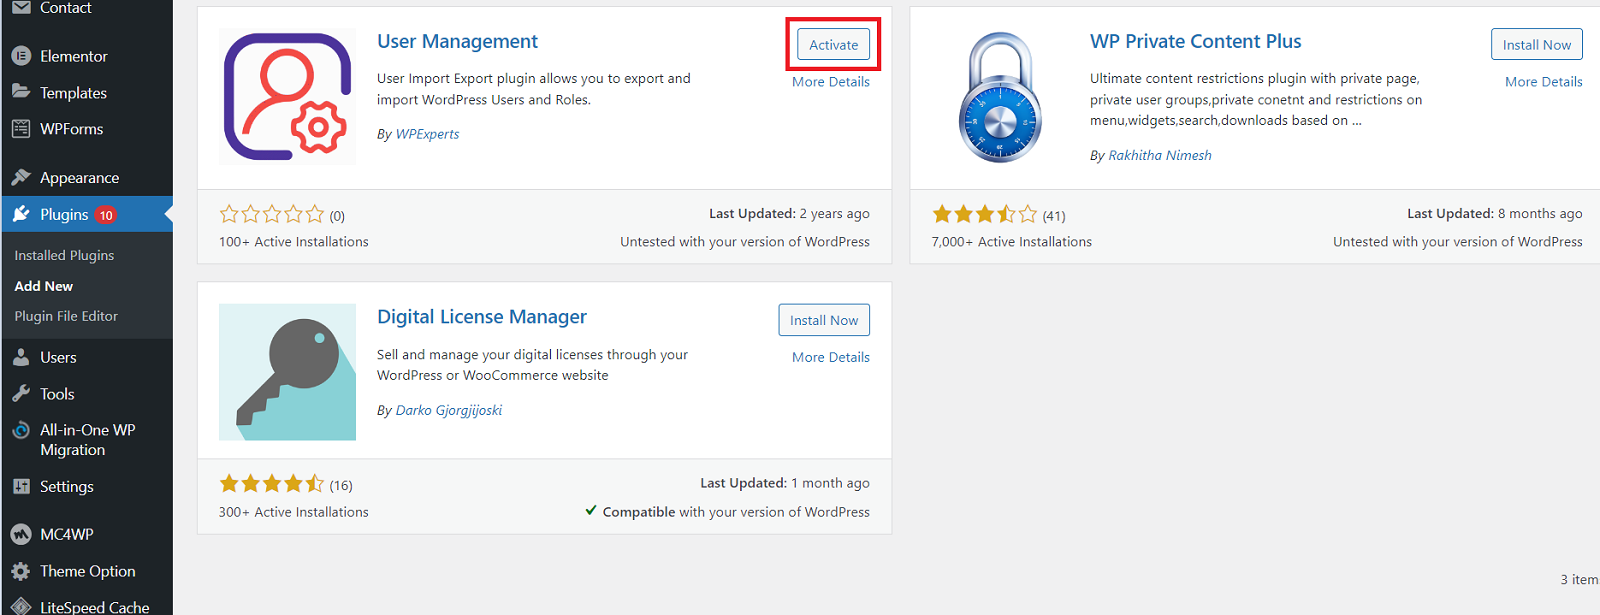
- Click the “Activate” button to enable the user management plugin.
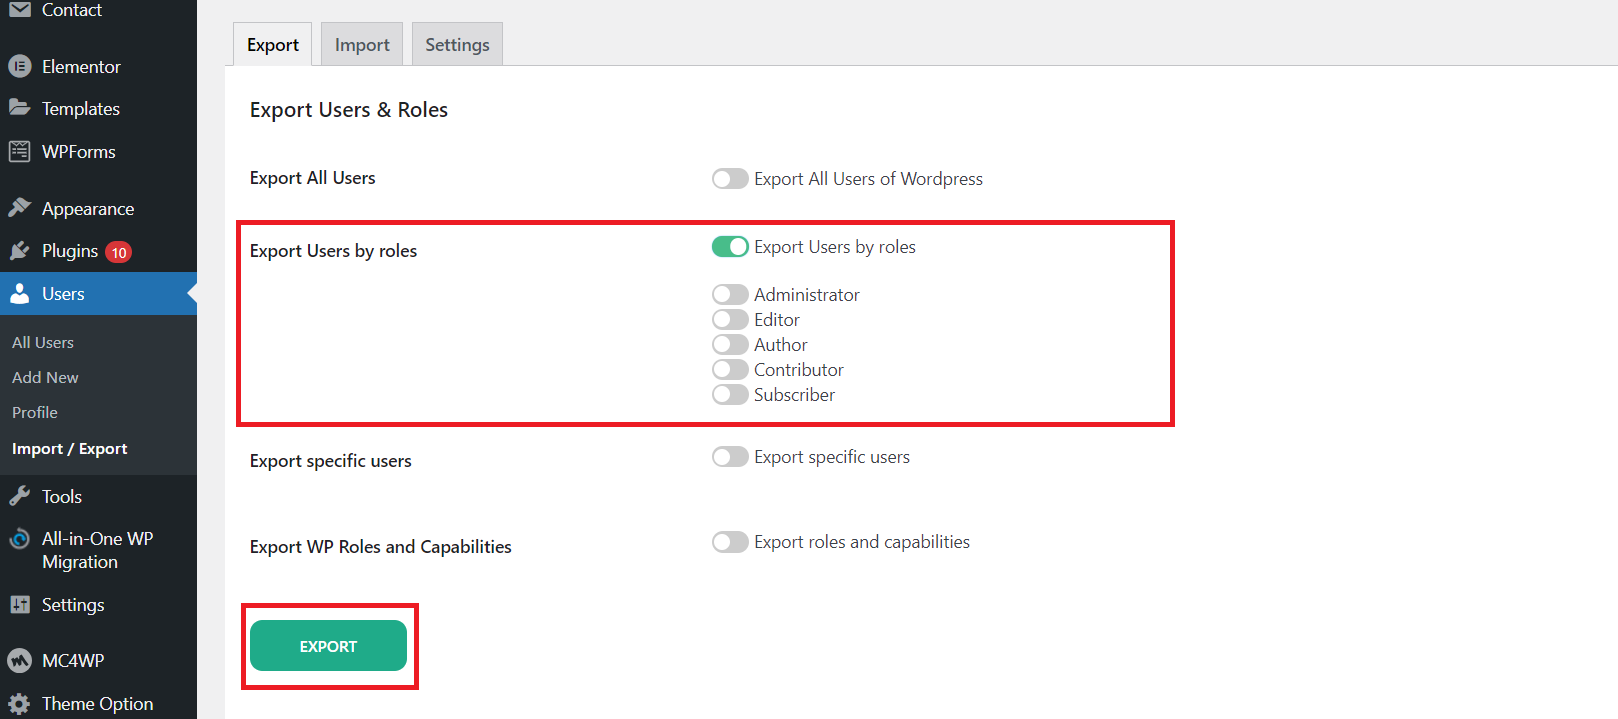
- Navigate to Users > Import / Export.

You will view different tabs, including Export, Import, and Settings. When clicking the export tab, you can view numerous options like Export All Users, Export Users by Roles, Export Specific Users, and Export WP Roles and Capabilities.

Export All Users
- Enable the “Export All Users of WordPress” option.

- Click the “Export” button to get a notification about the number of users exported successfully.

- A CSV file named export-all-users.csv will be downloaded to your system.

Export Users by Roles
- Activate the ‘Export Users by Roles’ option, and choose the user role you want to export. Click the Export button to get a notification about the number of users exported.
- A CSV file named export-by-roles.csv will be downloaded to your system.

Export Specific Users
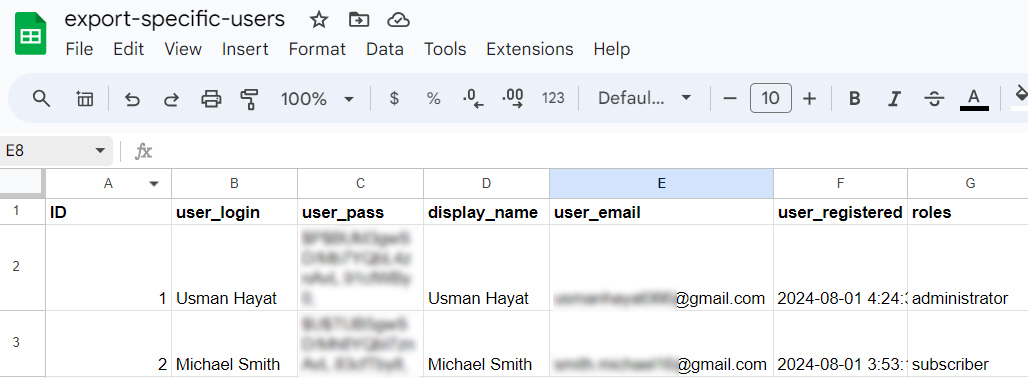
- Activate the ‘Export Specific Users’ option using the Export tab. Choose the users one by one that you want to export. You can choose multiple users at a time. Once you select the users, click the ‘Export’ button to get a notification about the number of users exported.
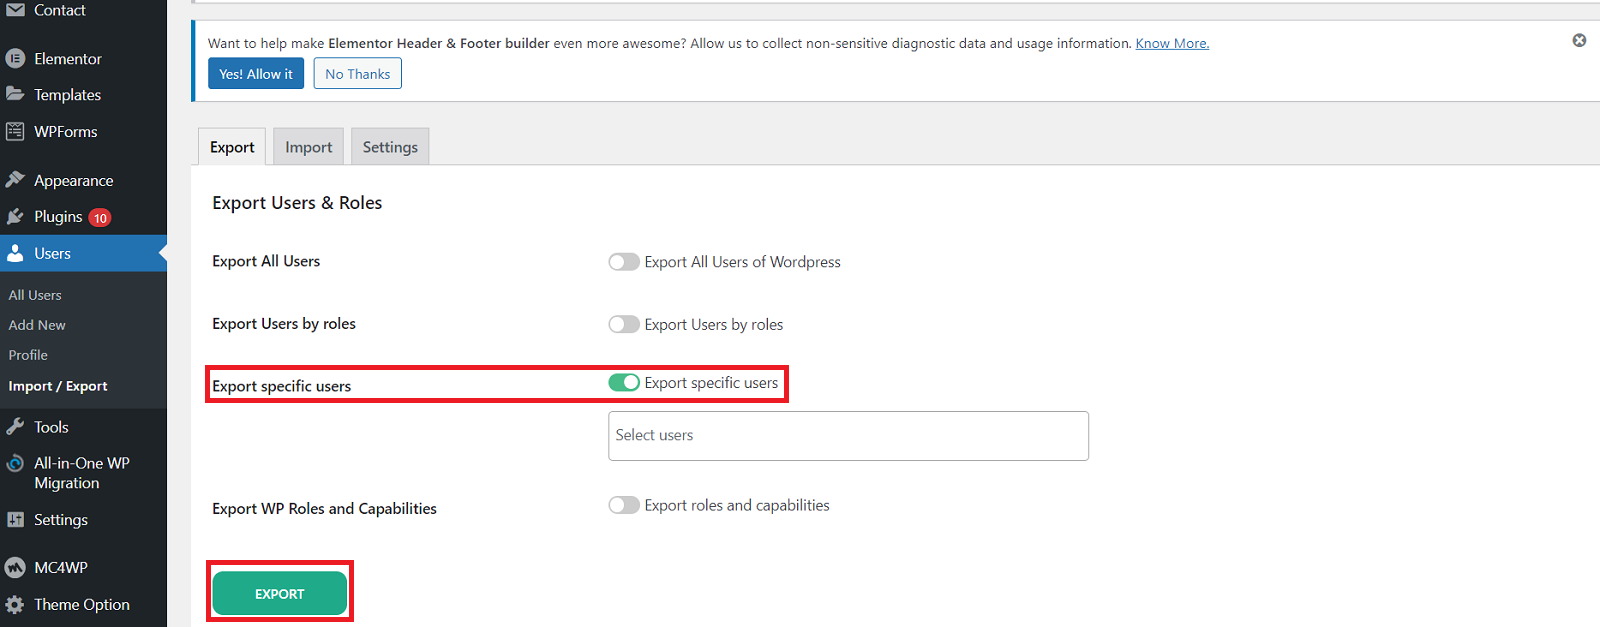
- A CSV file named export-specific-users.csv will be downloaded to your system.
Export WP Roles and Capabilities
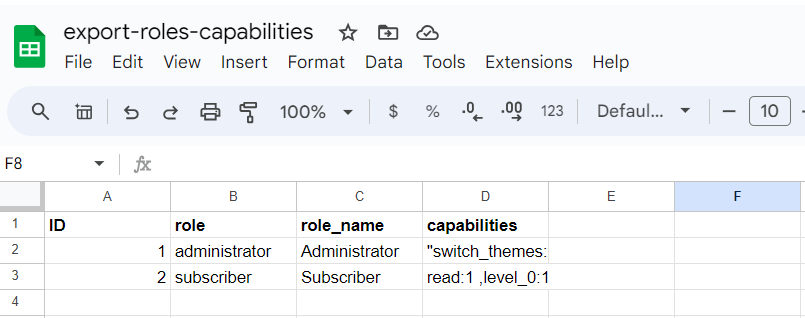
- Activate the ‘Export WP Roles and Capabilities’ option using the Export tab. Choose the users one by one that you want to export. You can choose multiple users at a time. Once you select the users, click the ‘Export’ button to get a notification about the number of roles and their capabilities exported.
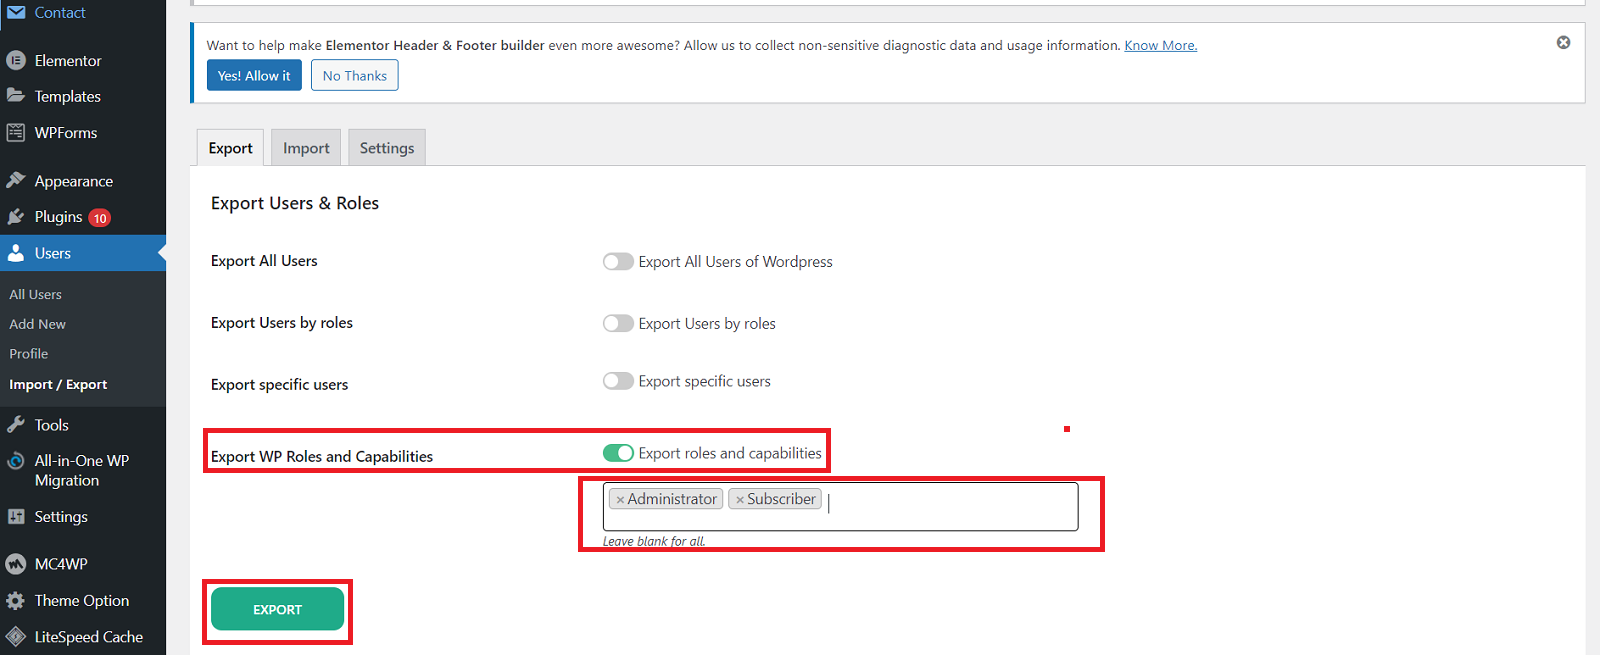
- A CSV file named export-roles-capabilities.csv will be downloaded to your system.
Import
- Different sub-options are available in the import tab, such as Import WP Users and Import WP Roles & Capabilities. Activate the Import Users option using the Import tab. You can also activate the Update Users option. Choose the file you want to import using the ‘Select a file’ button.
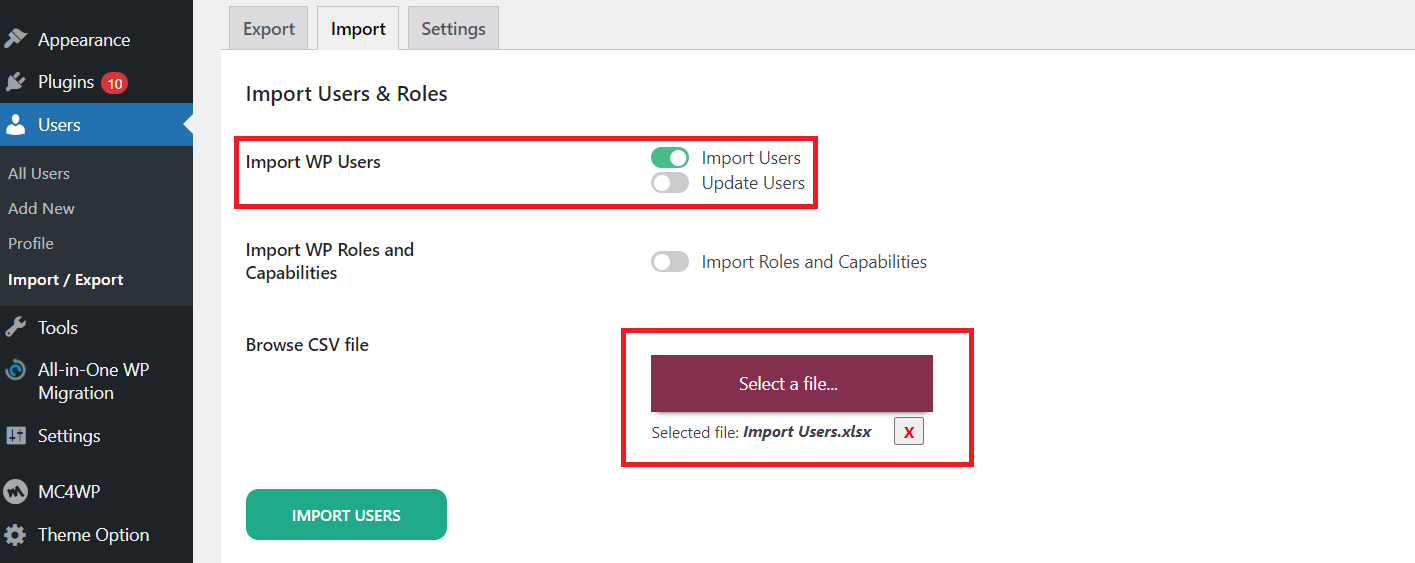
- Once you click the Import Users button, you can get a notification regarding your import status at the bottom of your page.

- After adding the credentials, we created the CSV file.

- Once you have imported the file, verify the imported user by going to the Admin dashboard > Users.

Update Users
- Navigate to the ‘Import WP Users’ option using the Import tab, and activate the ‘Update Users’ option. Export the file, change the users’ credentials you want to update, and save it. Choose the file you want to import using the ‘Select a file’ option.
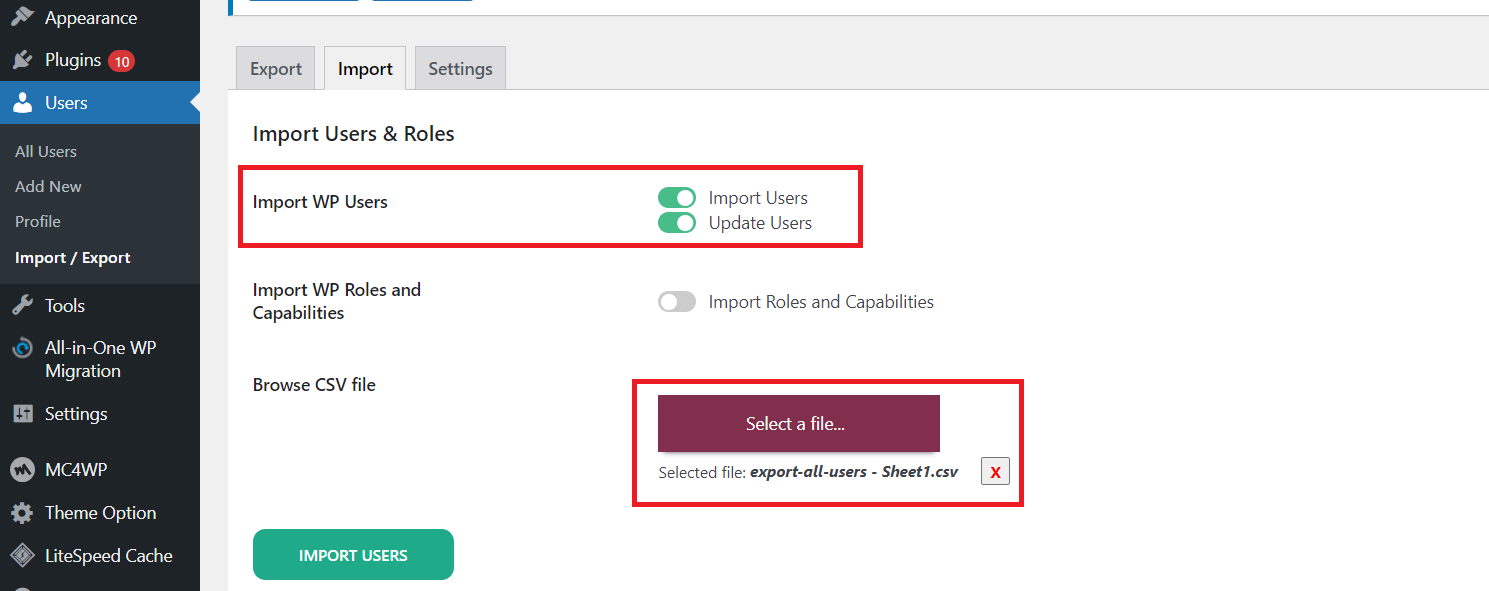
- Click the Import Users button and get the notification regarding your import status at the bottom of the page.

- We made the changes in the CSV file, such as users’ credentials, and saved the file.


- You should import the file and verify the user once you have imported the file. You can verify the user by going to Admin Dashboard > Users.
Import WP Roles and Capabilities
- Activate the Import WP Roles and Capabilities option using the Import tab. Choose the file you wish to import by clicking the “Select a file” button. Click the Import Users button to get a notification about your page status.

Settings
There are various fields available in the Settings tab, including:
- USER_ID (Mandatory Field)
- user_login
- user_registered
- user_nicename
- USER_Email
- user_url
- user_registered
- user_activation_key
- user_status
- display_name
- role (Meta)
- nickname (Meta)
- first_name (Meta)
- last_name (Meta)
- description (Meta)
- rich_editing (Meta)
- syntax_highlighting (Meta)
- comment_shortcuts (Meta)
- use_ssl (Meta)
- admin_color (Meta)
- show_admin_bar_front (Meta)
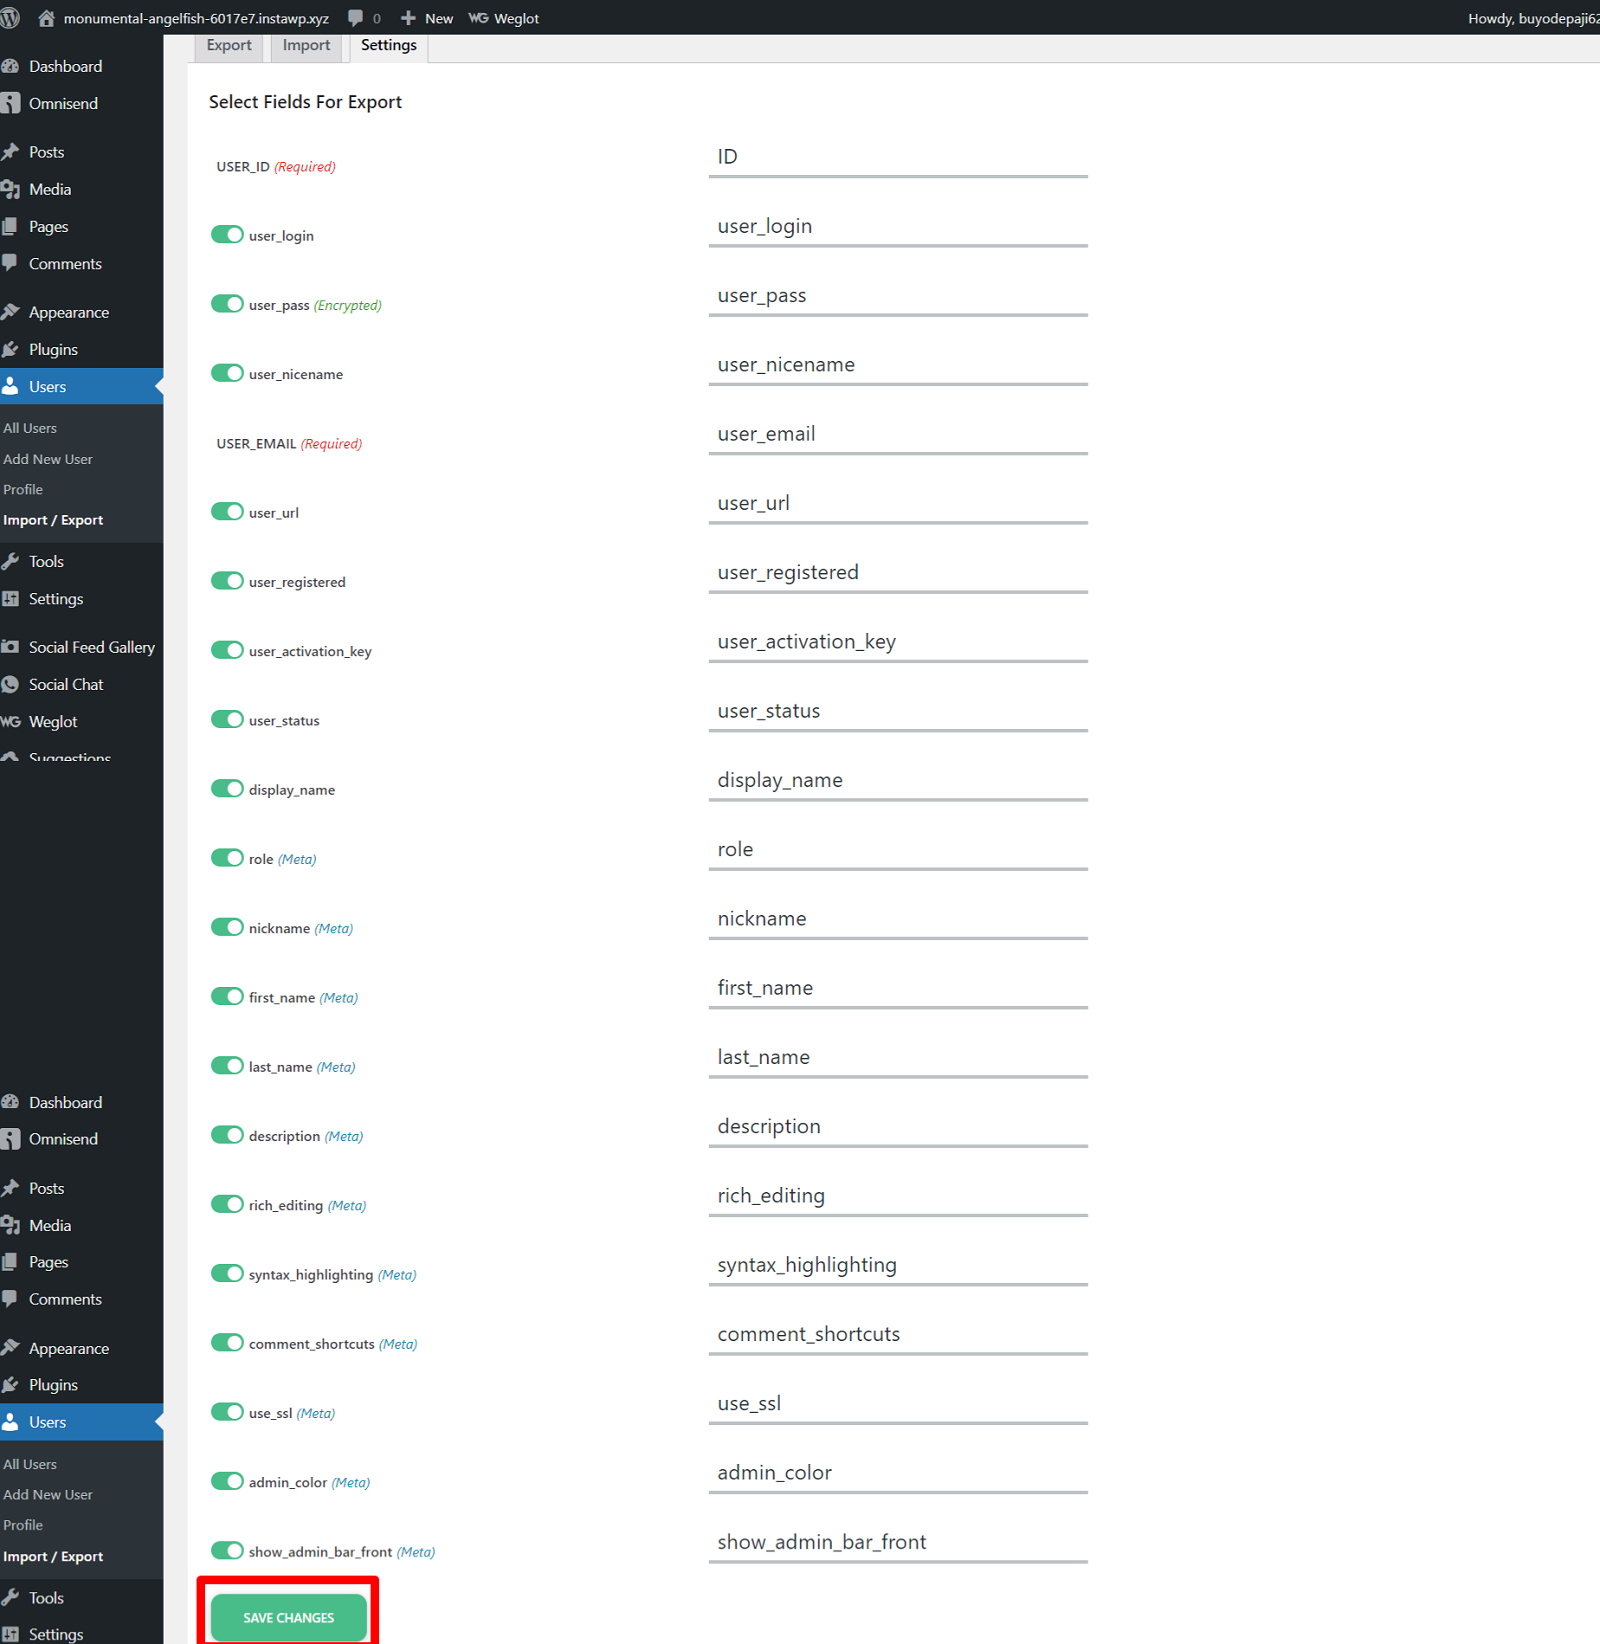
You can enable the fields mentioned above in the Settings tab by clicking the Save Changes button.
Prominent Features
- Users can easily upload the CSV file through a single click.
- Easily import WP users’ roles and capabilities through the CSV file.
- The plugin is available for free.
- Create or update existing and new users’ information hassle-free.
- Export all users of WP through a single click.
- It is compatible with the WooCommerce plugin.
What Should I Do to Import User Data?
To import user data, here is what you should do:
- From Users, click the Import/Export menu.
- Activate ‘Import WP Users.’
- Enable Import Users.
- Select the CSV File option.
- Click ‘Import Users’.
Wrapping Up
The WordPress user management plugin is crucial when website owners want to manage their users’ data through a centralized dashboard.
Furthermore, the plugin provides numerous compelling features like compatibility with the WooCommerce plugin, export roles and capabilities, export-specific users, export profile information via users’ metadata, etc.
You can access its documentation that helps you easily understand the ins and outs of this impactful plugin without issues.
Above all, this impressive plugin does not cost you a single penny.


