

You’ve decided to use Cloudflare CDN on your WordPress site. This tutorial will teach you how to install Cloudflare on your WordPress site. Let’s get started!

Cloudflare is a content delivery network (CDN) that can speed up your WordPress website by caching your content and delivering it from servers worldwide. It’s free for personal use, easy to install, and only takes a few minutes.
What is a CDN? Why Do You Need a CDN for Your Site?
A CDN is a content delivery network. It’s a network of servers that delivers your website’s content to users, no matter where they are in the world. This ensures that your website loads quickly for all users, regardless of location.
Why do you need a CDN for your WordPress site? Because a CDN can speed up your website’s loading time by up to 300%. That means faster page loads, higher visitor retention rates, and more sales conversions.
What is Cloudflare CDN?
Suppose you’re not familiar with Cloudflare CDN. In that case, it’s a content delivery network that speeds up your website’s loading by caching static content like images, CSS, and JavaScript files on servers around the world.
Cloudflare will also compress these files so that they take up less space, and they offer a number of other performance-related features like Railgun and Brotli compression. Basically, it’s everything you could want in a WordPress CDN.
For instance, a CDN server in the USA, not the core server in the UK, will handle a request to visit a website located in the UK. With a CDN, the closest CDN servers process all user requests. The visitors’ physical distance from the server hosting your website is reduced as a result.
This enhances the functionality and speed of your website for all visitors, regardless of where they are physically located. In addition to improving user experience, a quicker website slightly raises its SEO ranks.
For small businesses seeking a free CDN, Cloudflare is a great option. However, the $200/month Business plan is required if you want to make use of all of Cloudflare’s services.
Benefits Cloudflare CDN for WordPress
This content delivery network (CDN) improves your website’s performance by caching static files and delivering them from servers around the world. This reduces the loading time for your users and the stress on your own server, meaning your website is less likely to go down.
Cloudflare also offers a number of other features, such as security against DDoS attacks, performance enhancements, and options to minify and compress your files. And it’s all free to use.
Web Application Firewall (WAF)
By keeping track of the HTTP traffic between the internet and your WP site, the WAF capability aids in protecting your website. It defends against significant assaults like cross-site scripting (XSS), file inclusion, SQL injection, and others against your application.
DDoS Protection
Your websites, apps, and complete network are secured by the comprehensive DDoS protection offered by Cloudflare. Cloudflare makes sure that actual traffic performance is not jeopardized.
The 155 Tbps (terabit per second) Cloudflare network counters around 124 billion attacks daily. Some of the most significant DDoS assaults in history are also included.
Accelerated Mobile Pages (AMP)
Accelerated Mobile Pages (AMP) is a method for Google’s mobile search engine to pages more quickly on phones. Internet browsing on mobile devices is becoming popular.
Powered by AMP, Cloudflare CDN boosted URLs load pages with AMP capabilities inside the viewing window 3x quicker than regular mobile sites.
Caching
Cloudflare offers a sophisticated caching system that includes layered caching, cache cleaning, and automated saving of static material. By leveraging its servers for content, Cloudflare can help you conserve your web hosting’s CPU and bandwidth. The end-latency users may be decreased, and the overall user experience can be improved.
Pricing Plans
Cloudflare has four different pricing plans. You can choose the plan according to the features you require.

- Free – $0 per Month: The free plan is perfect for personal blogs, websites, and those who wish to test Cloudflare CDN.
- Pro – $20 per Month: This plan is for professional blogs, websites, and organizations that require a basic performance boost.
- Business – $200 per Month: The Business plan is excellent for small businesses and eCommerce websites that need advanced security, prioritized email support, PCI compliance, and massive performance enhancement.
- Enterprise: Companies looking for enterprise-level performance and security should go for this plan. You’ll also get guaranteed uptime and prioritized round-the-clock email, chat, and phone support.
How to Install Cloudflare CDN on WordPress?
To install Cloudflare CDN on WordPress, you must have a Cloudflare account. If you don’t, you can open the Cloudflare website and create a free account today.

1st Step – Add Site URL
After signing up on Cloudflare, your dashboard will open up.
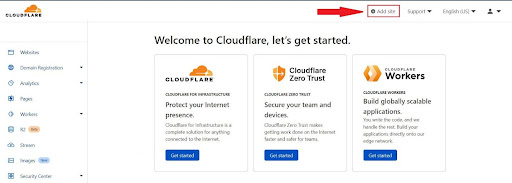
Click on “Add site.”
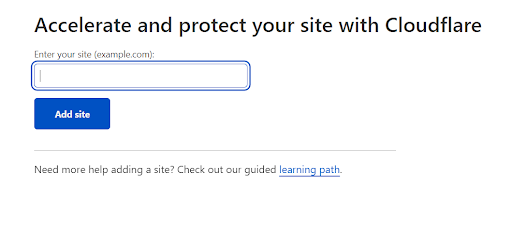
Now enter the URL of your website.
2nd Step – Choose a Cloudflare Plan
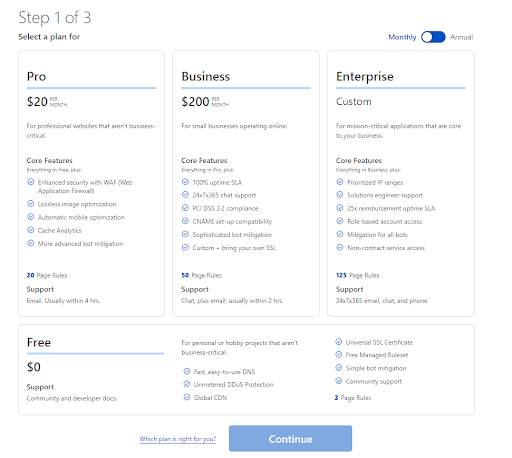
Once your URL is added, you’ll be asked to choose a plan. For now, we’ll stick with the free plan in this tutorial on how to install Cloudflare CDN on WordPress. Click “Continue” to move forward.
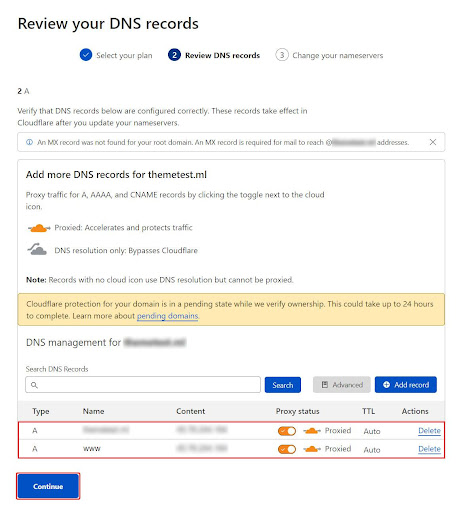
3rd Step – Review Your DNS Records
Next, you’ll have to review your DNS records to check whether they are configured accurately.
Review your records and click “Continue.”
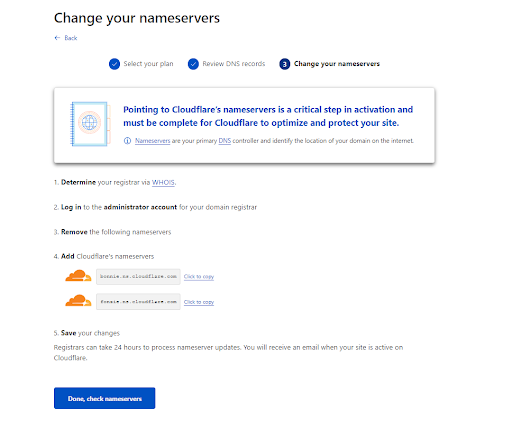
4th Step – Change the Nameserver
As you can see in the image pasted below, in order for this to work, you need to change the domain registrar’s nameservers. Use the ones Cloudflare has provided.
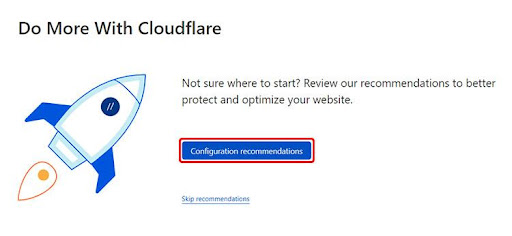
5th Step – Cloudflare Configuration
Once you have successfully updated the nameservers on the domain registrar, click “Done, check nameservers.”
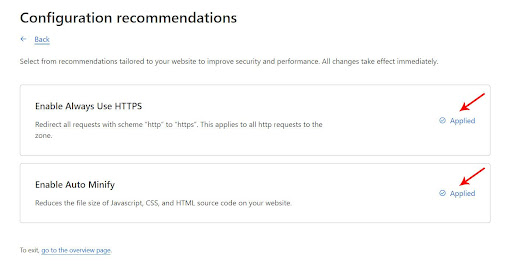
On the next screen, you’ll see a recommendation. Click on “Configuration recommendation.” Now we will configure settings to improve the performance and security of your domain.
Now you’ll see two options: “Enable Always Use HTTPS” & “Enable Auto Minify.” To activate both options, click on “Apply recommendation” for both.
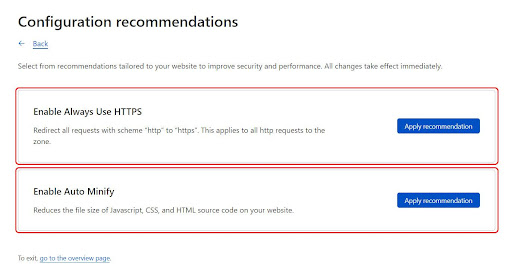
Once the settings are applied, your website’s security and performance will enhance immediately.
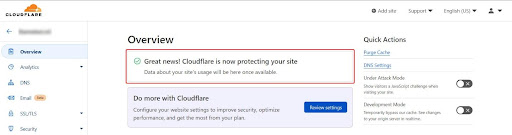
Now you can go back to the Cloudflare dashboard to view the notification confirming that Cloudflare is protecting your website. You will also get an email on your registered ID to notify you that Cloudflare is now active on your site.
A Cloudflare plugin is also available for installation on your WP site. That way, you can enjoy a better experience with this service.
6th Step – Check the Status of Cloudflare CDN
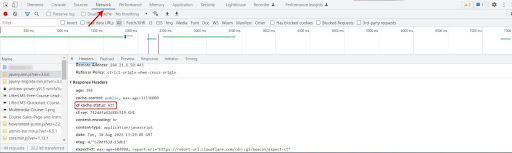
Now’s the time to test if Cloudflare CDN is active on the WP website you entered at the start.
- Open your website, Right-click anywhere, and click “Inspect.”
- Click the “Network” tab. Next, click “CSS” or “JS file” in the left corner.
- If you see “HIT” next to “cf-cache-status,” the CDN is up and running.
Wrap Up
Installing Cloudflare CDN on WordPress is a great way to improve your website’s speed and security. Cloudflare CDN is a free service that delivers your content from its global network of data centers. You can also go for the premium plans for more security and performance. If you are concerned about the safety and performance of your WordPress website, Cloudflare CDN is your solution.


