Do you want to migrate Webflow to WordPress? You are not alone. WordPress users can smartly optimize their sites since the famous platform offers many impactful features, plugins, and add-ons for the same reason.
Unfortunately, Webflow users do not have this luxury. They frequently deal with issues like limited customization and integration, high costs, etc.
Therefore, Webflow to WordPress migration is a viable option for users who want complete control over their websites.
This blog post discusses how to migrate Webflow to WordPress in detail. Read it until the end to move your existing Webflow site to WordPress.
What is Webflow?
Webflow is a user-friendly website builder like Wix that helps users create and launch responsive websites suitable for small and large businesses with varied target audiences.

What is WordPress?
WordPress is an impactful content management system worldwide. The leading platform has already reshaped small and large businesses in several global niches and industries. Launched initially as a blogging platform, WordPress has become a full-fledged web content management system in today’s era.

WordPress can benefit bloggers, publishers, artists, etc., when developing and maintaining websites, depending on their needs.
Interestingly, starting a business website on WordPress is not difficult because you will need a few simple steps to achieve your mission.
Why Should You Migrate From Webflow to WordPress?
Webflow offers users the luxury of simple and easy-to-use design tools, enabling them to create remarkable websites related to multiple niches.
However, there is a catch that lies in the form of limited customization and integration. Besides, a few users may find its pricing packages higher.
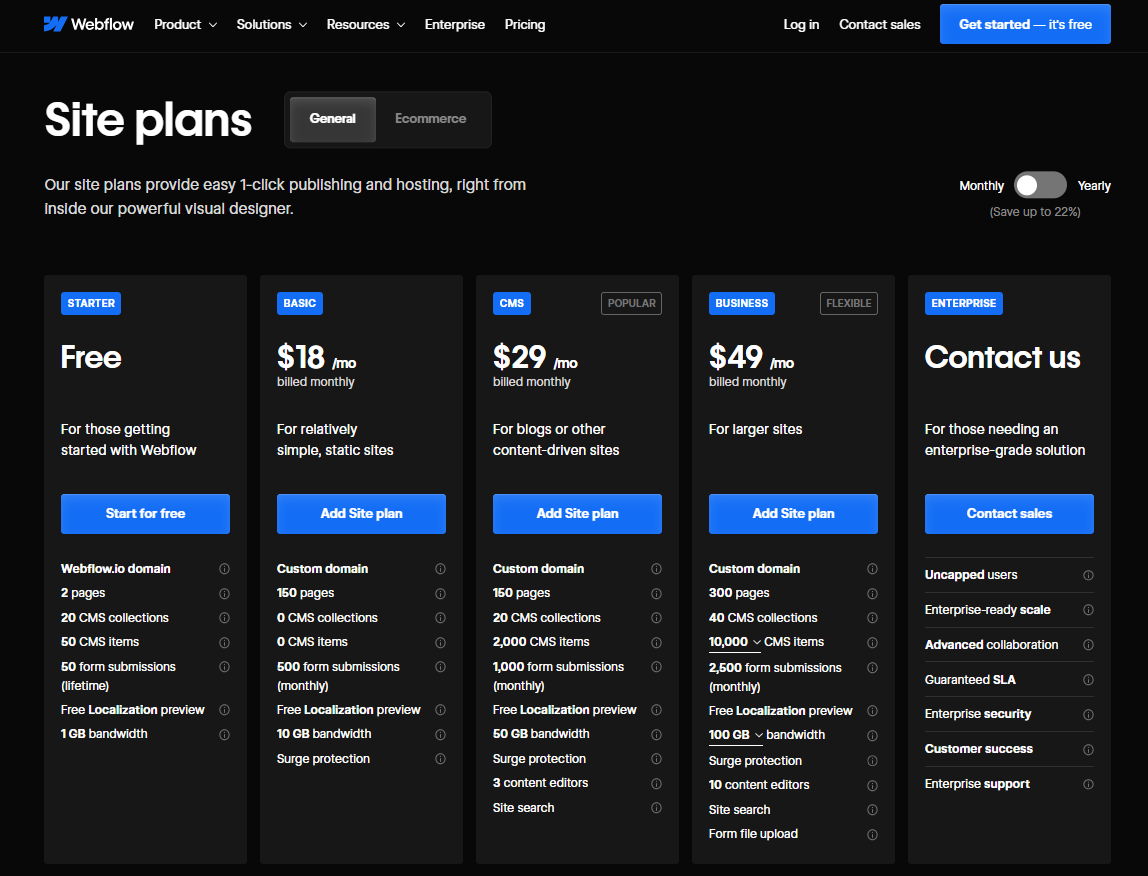
Therefore, they can choose WordPress over Webflow. On the pricing front, the former is a better choice. Due to its free and open-source nature, WordPress lets users efficiently control their miscellaneous costs.
Similarly, you can install various plugins and extensions to convert your WordPress sites into results-driven e-commerce stores. You can customize your e-commerce stores using several free and paid WordPress themes.
WordPress lets you integrate third-party tools, such as marketing and e-commerce, to improve the functionality and capability of your WooCommerce store.
How to Migrate Webflow to WordPress in 2024?
Webflow to WordPress migration is easier than you think. Switching from Webflow to WordPress allows users to access various incredible features under one roof.
In addition, managing a WordPress site is not complicated, as you can easily scale it and save money in the future.
To migrate from Webflow to WordPress, follow the steps given below:
Step 1: Subscribe to the WordPress Hosting Service Provider
You must sign up for your preferred WordPress hosting service provider when starting the Webflow to WordPress migration process.
Our preferred choice is Bluehost, but you can also choose other WordPress hosting services, such as Hostinger, Go Daddy, DreamHost, HostGator, SiteGround, and more.
To begin the signup process, here is what you should do:
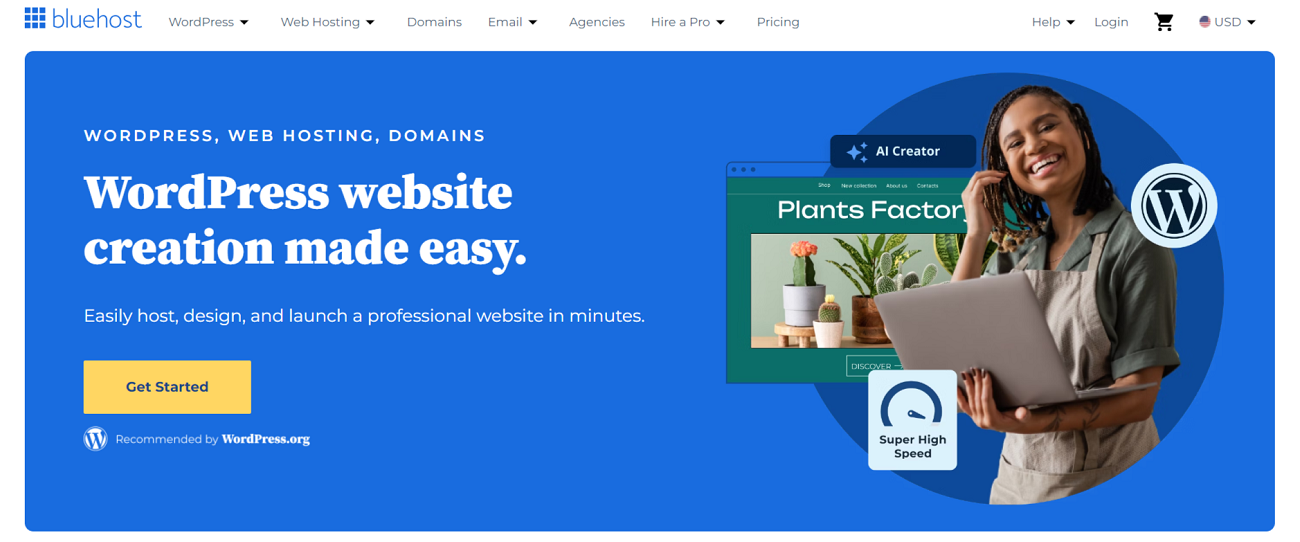
- Click the ‘Get Started Now’ button after visiting the official Bluehost website.
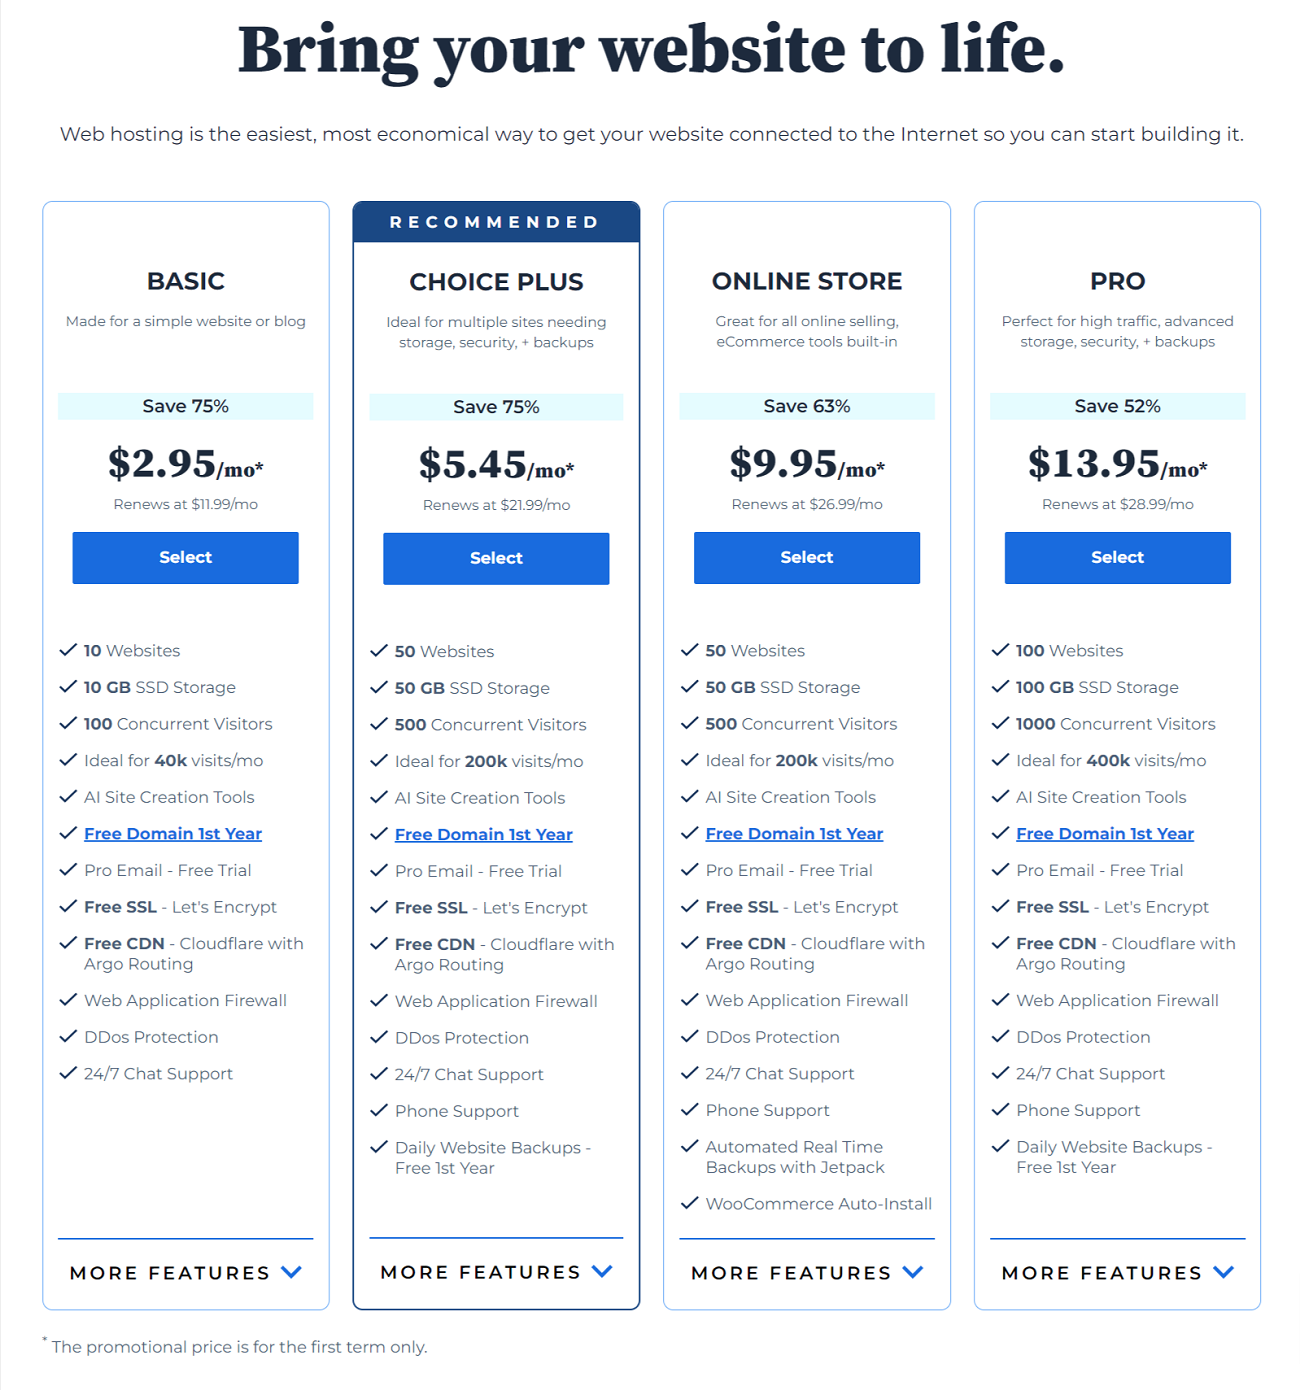
- You will see a pricing page on your page. Click the’ Select’ button to select your desired pricing plan according to your budget.
- Provide a custom domain you used for the Webflow website earlier. Check the ‘I want to use a domain I already own’ option and enter the domain name.
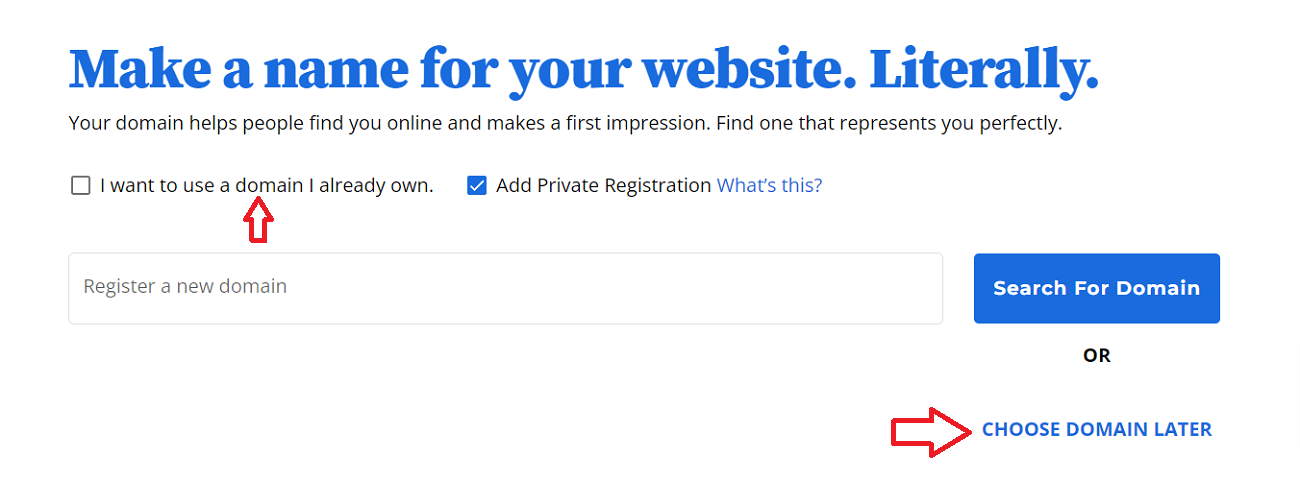
- If you want to skip this step, click the ‘Choose Domain Later’ option.
- Click the ‘Continue to Checkout’ button to complete the checkout process.
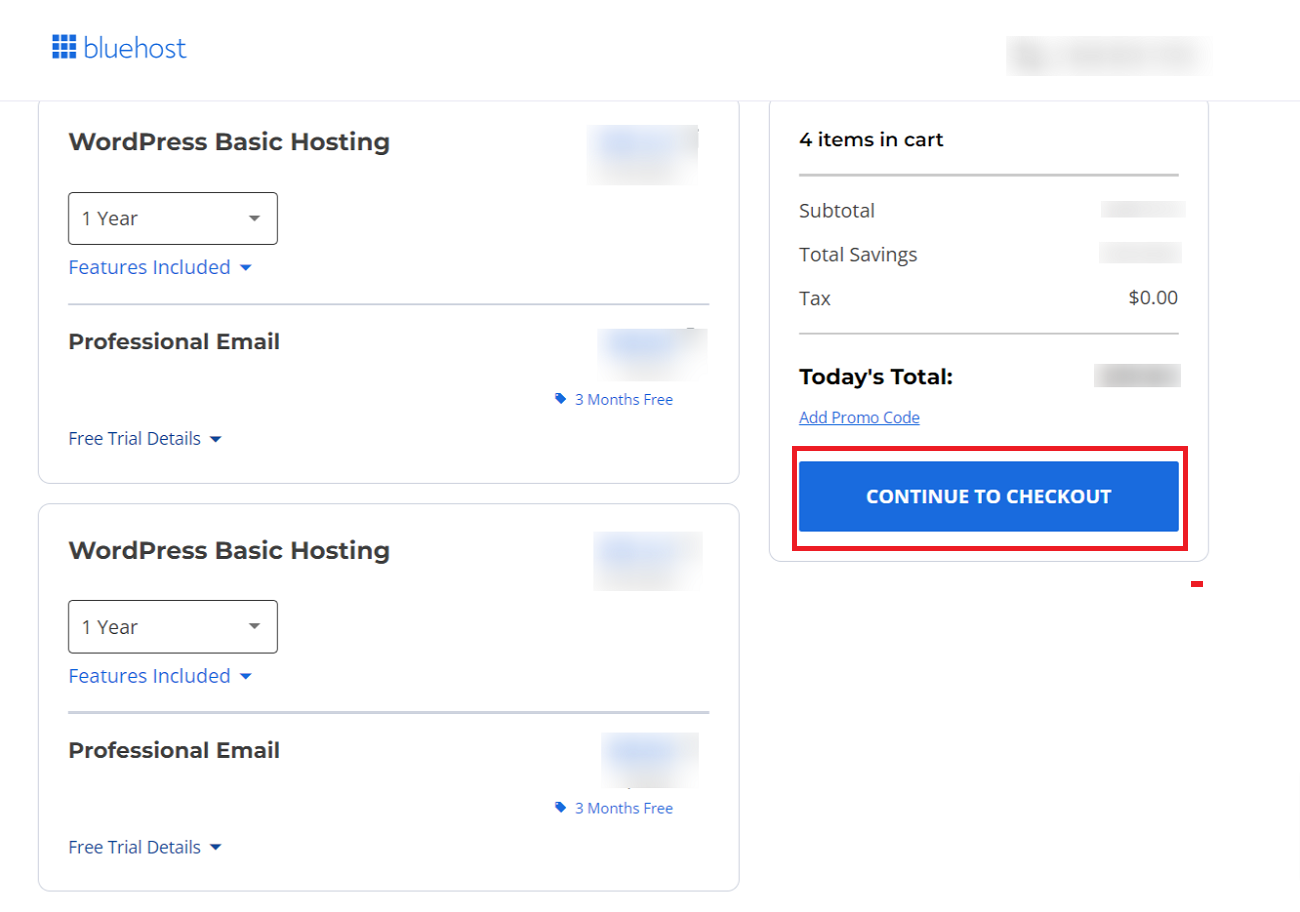
- Provide all the necessary information, including Billing information, to complete the purchase.
- You will receive an official email from Bluehost. You will sign into your account using the credentials provided in the email.
- Once you have logged into your account, Bluehost will start installing WordPress. To launch the WordPress dashboard, click the ‘Edit Site’ button.
After installing WordPress, it is time to select the design template (theme) for your site.
NOTE: Users who do not want to perform the WordPress hosting service registration process themselves can benefit from our premium WordPress hosting services.
This way, they can fulfill all the WordPress hosting requirements for their websites under budget.
Step 2: Select a WordPress Theme
Selecting a WordPress theme for a website is straightforward. Whether you are a newbie or a seasoned entrepreneur, a simple yet impactful WordPress theme is the new black.
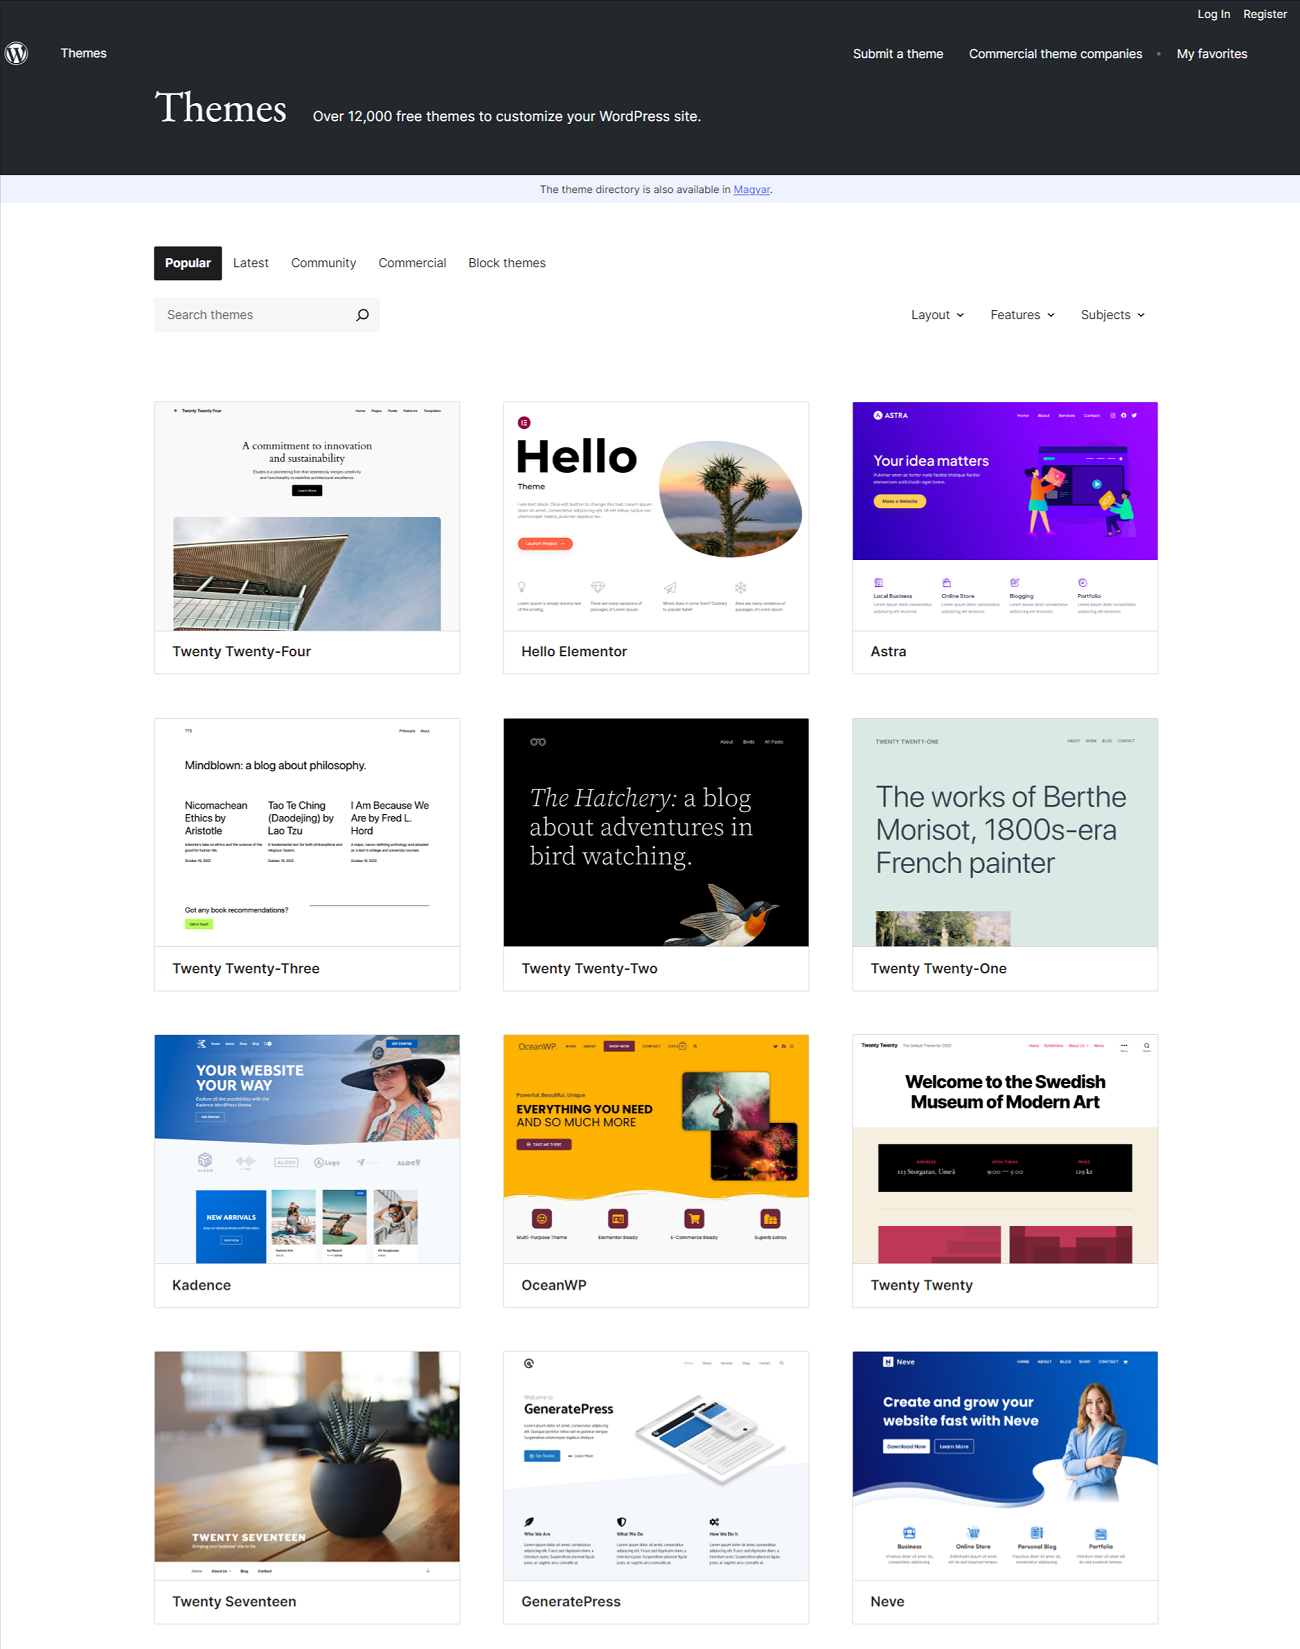
The best thing about these themes is their flexibility, which means you can easily change them anytime. Clean, user-friendly, and minimal layouts should also be your top priority to inspire current and potential website visitors.
Step 3: Export Your Webflow Website
Webflow enables users to export limited content from their websites. This means they can only export some website content depending on their needs.
They can export various site export files, such as HTML, CSS, JS, and media/images, and export CMS components like blog posts.
If you subscribe to a Webflow Workspace plan, the Code Export feature allows you to export your site and save it to your computer.
NOTE: Users cannot import Webflow pages directly into their WordPress sites. Therefore, they will use the Code Export feature when exporting Webflow sites to WordPress.
To export the Webflow site, here is what you should do:
- Launch the Designer tool by logging into your Webflow account.

- After entering the Webflow Designer UI, click the ‘Export Code’ button at the top-right corner of the screen, which will open the Export Code popup.

- Click the Prepare Zip button to continue. You can find the Prepare Zip button at the bottom of the popup.
- Webflow will begin preparing your files. Hence, you can easily download these files to your computer.
If you do not subscribe to the Webflow Workspace package, you can manually save your web pages to your device. When downloading web pages to your computer, you can benefit from the HTTrack Website Copier.
Step 4: Export Blog Posts
Webflow lets you export CMS components like blog posts in WordPress. To do so, enter the Webflow Designer UI and click the CMS tab, which is located in the left toolbar. After clicking the CMS tab, click the Blog Posts option.

Click the Export button to download blog posts in CSV format. You can locate the Export button at the top.
Step 5: Import Blog Posts into WordPress
Importing blog posts from Webflow to WordPress is straightforward. The WP All Import plugin makes it easy to import blog posts. Follow the below steps to import blog posts:
- Once you activate the plugin, navigate to the All Import > New Import using the WordPress admin.

- Click the Upload a file option and choose the CSV file.

- The plugin will detect the content type automatically. Click the Continue to Step 2 button.
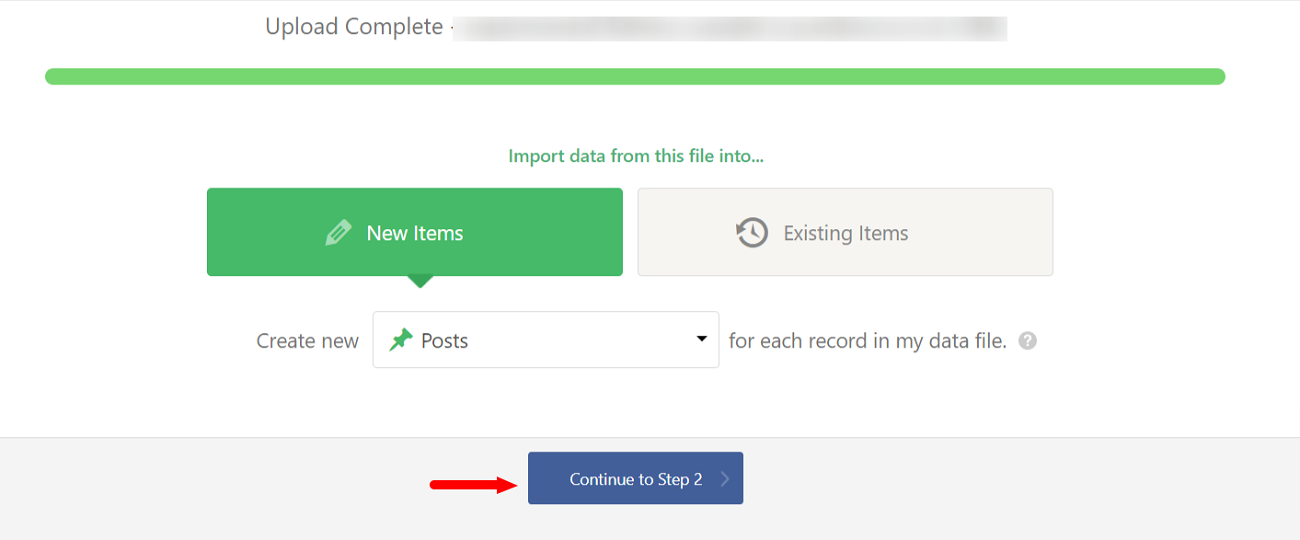
- The plugin helps you access the data preview in the file. To proceed to the next step, click Continue.
- You should map fields to WordPress post fields. For example, drag the type field to the WordPress post title area.
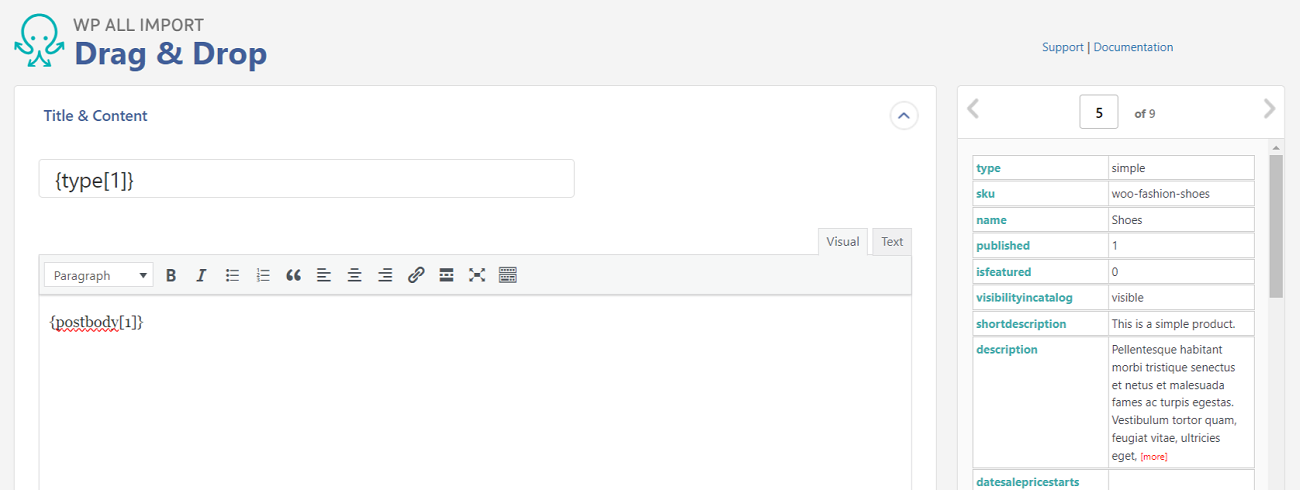
- Once you match fields to related areas in WordPress, click the Continue to Step 4 button.
- Elaborate the unique identifier for the posts. You can use the Auto-detect button to generate an ID. WordPress uses the ID internally, but it does not show on your site.

- Click Confirm & Run Import to finish the import process. The plugin will notify you once it is completed.
Step 6: Import Images
Unfortunately, WP All Import does not automatically upload images from Webflow to WordPress. You will need to install and activate another plugin, Auto Upload Images.
To start importing external images from Webflow to WordPress, here is what you should do:
- Once you have activated the plugin, navigate to Posts > All Posts. Choose your blog posts and click Edit. The Edit tab is easily located under the Bulk Actions dropdown menu.

- You should click the Apply option to proceed further.
You will see a Quick Update option for all posts on your screen. By clicking the Update option, WordPress will update your blog posts.

As a result, the plugin will begin uploading the external images from Webflow to the WordPress media library.
By the way, the Auto Upload Images plugin will explore blog posts to import external images.
Step 7: Change Domain Name Settings
In this step, you will need to point the custom domain name of your Webflow site to the new WordPress website. For this purpose, you should change your domain’s nameserver settings.
Domain nameserver settings or DNS point the domain name to the website hosting service company.
You should use your web hosting account to get the desired nameserver information in this situation. You will likely find the information below from your web hosting service provider:
- ns1.yourwebhost.com
- ns2.yourwebhost.com
- ns3.yourwebhost.com
When migrating Webflow to WordPress, you should not overlook the significance of an impactful domain name extension. Domain name extensions can take your WordPress sites to the next level.
So, you must understand the critical differences among .com, .net, and .org extensions and select the right domain extension for your site.
Step 8: Set Up Permalinks
In this step, match your old Webflow website URL structure with the WordPress permalinks. Follow the steps provided below to set up permalinks:
- Using the WordPress admin dashboard, go to Settings > Permalinks.
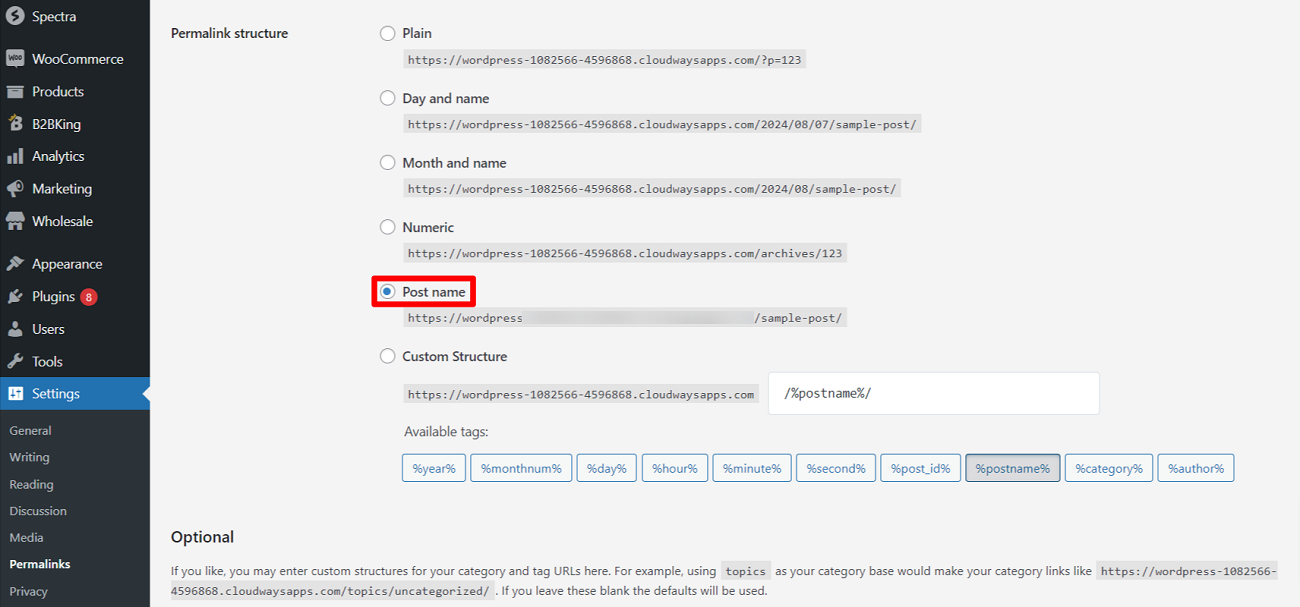
- Select the Post name option to match your Webflow URL structure with WordPress URLs.
You should press the ‘Save Changes’ button to enable the new permalink settings successfully.
However, after migrating from Webflow, you may experience the annoying index.php issue on your newly created WordPress site. In this scenario, you must know how to remove index.php from WordPress URLs in advance.
Step 9: Configure Useful WordPress Plugins
You need a few helpful WordPress plugins to make your new WordPress site results-driven regarding conversions, sales, and revenue.
Utilize a powerful plugin like Wholesale for WooCommerce, to convert your WordPress site into an engaging yet result-oriented WooCommerce wholesale store.
This plugin helps B2B and B2C businesses manage various attributes, including wholesale products, user roles, and pricing.
Apart from this, businesses of all sizes can benefit from License Manager for WooCommerce, an impactful plugin that helps them manage and sell all their license keys in one place.
Crucial Differences Between Webflow and WordPress
Webflow is an impressive visual website builder that lets users develop stunning websites without coding. On the other hand, WordPress is a comprehensive CMS (Content Management System) that started its journey in 2003.
When comparing Webflow with WordPress, you will realize that the latter has a decisive edge due to its impactful plugins and add-ons. Thousands of plugins are available that can enhance the productivity of WordPress websites.
Do You Need Professional Help?
WPExperts is a seasoned WordPress development and marketing agency that helps small, medium-sized, and large businesses streamline their daily operations to the next level.
Through WordPress Migration services, businesses of various sizes can effortlessly migrate to WordPress from other Content Management Systems (CMS) according to their specific needs or demands.
Wrapping Up – Migrate Webflow to WordPress
We hope you liked our detailed blog post describing how to migrate Webflow to WordPress. Webflow is a website builder like Wix that helps users build visually appealing sites without coding.
WordPress is a popular platform that offers users thousands of impactful plugins, add-ons, and themes. With these plugins, add-ons, and other helpful tools, users can quickly develop impressive websites tailored to their preferences or demands.
Moving from Webflow to WordPress can initially be challenging for both newbies and experienced users. Additionally, these platforms differ significantly in approach and functionality.
Correct execution can make the migration from Webflow to WordPress successful. All the above steps allow you to transfer your old Webflow site to WordPress, eliminating guesswork and mistakes comprehensively.
Moreover, consider using the WordPress plugins above to succeed in this migration process. They help you launch your newly developed WordPress site and successfully manage it afterward.


