Description #
The Custom Checkout Fields Editor plugin allows users to fully customize their checkout page. They can add, edit, delete, and rearrange fields, including default billing and shipping fields, and create new sections with custom fields. The plugin also supports conditional logic for displaying or hiding fields based on other inputs and allows for additional pricing options, like fixed or percentage-based charges, to be added to the subtotal. This enhances the checkout process by gathering more customer information and offering more choices to customers.
Features #
- Add custom fields.
- Add custom sections.
- Add and customize default billing fields.
- Add and customize default shipping fields.
- Display conditions.
- Style settings.
- Add Pricing.
Installation #
- Download the .zip file from your WooCommerce account.
- Go to WordPress Admin Dashboard > Plugins > Upload Plugin > Choose File.
- Install Now and Activate Plugin.
Getting Started #
All Checkout Fields #
- Go to WordPress Admin Dashboard > WooCommerce > Custom Checkout.
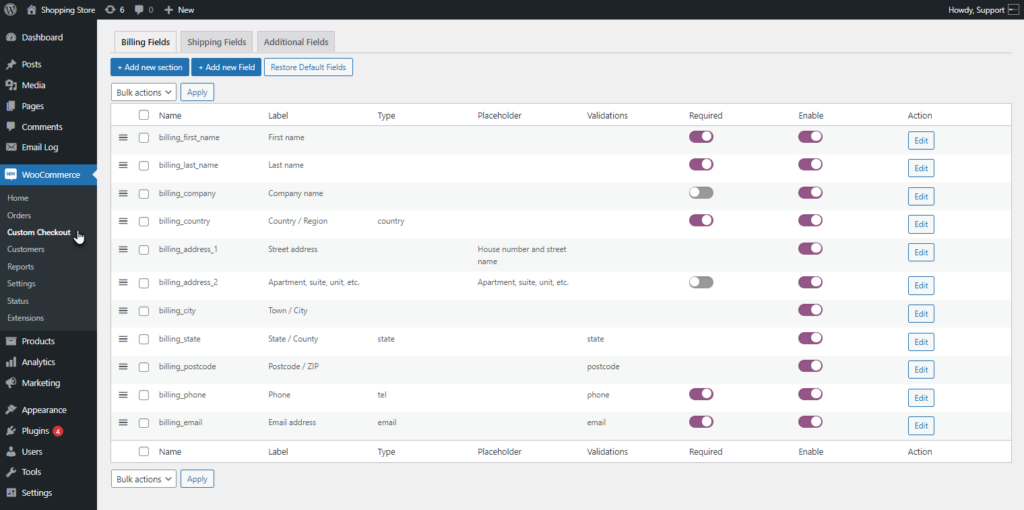
- The All Checkout Fields screen will appear. By default, three sections are present.
- Billing Fields
- Shipping Fields
- Additional Fields

- There are three more options available for the admin.
- Add new Section – this will add a new section.
- Add new Field – this will add a new field in the section.
- Restore Default Fields – this will restore all the field settings of a section to their default settings.

- The admin can Add a new section.
Adding a New Section #
- Go to WordPress Admin Dashboard > WooCommerce > Custom Checkout.
- Click on the Add New Section button.

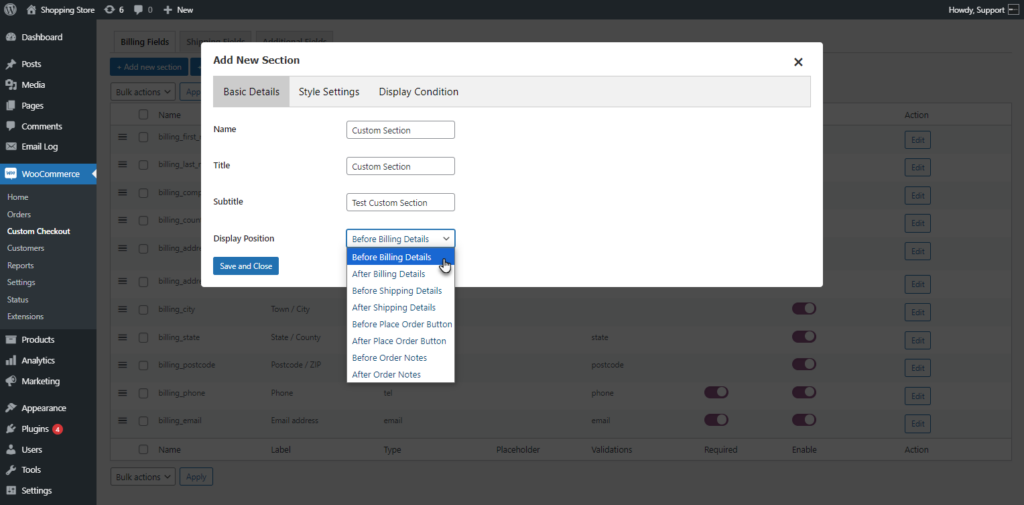
- Add New Section popup will appear. There are three tabs to configure the New Section.
- Basic Details
- Style Settings
- Display Condition

Basic Details #
- The admin needs to complete the Basic Details tab by filling out the Name, Title, Subtitle, and Display Position fields for the section.
Style Settings #
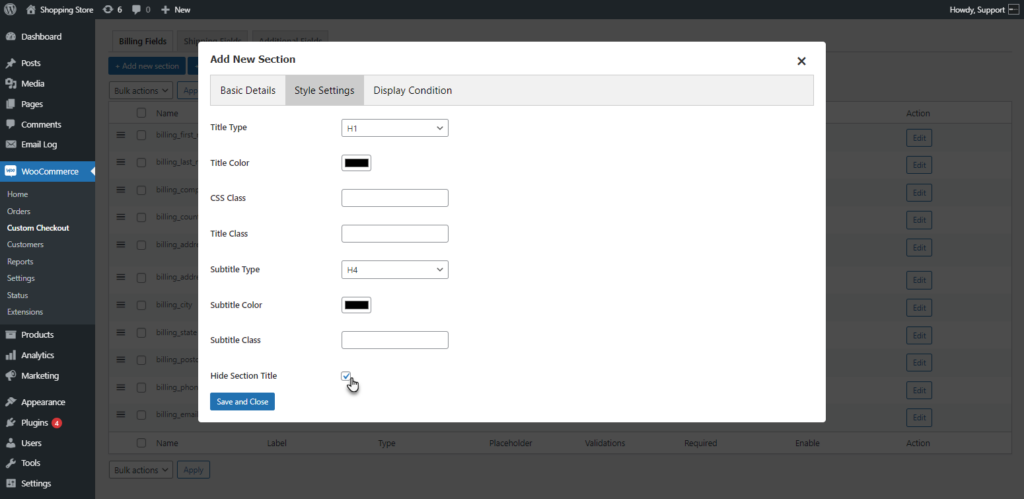
- Now move to the Style Settings of the Section. In this tab, the admin can style the Title Type, Title Color, and CSS Class and add the Title Class for the section.

- The admin can also style the Subtitle Type, Subtitle Color, and Subtitle Class.

- The admin can hide the section title on the front end by checking the Hide Section Title checkbox.
Display Condition #
- Once done with the Style settings, navigate to the Display Condition tab. The admin can Hide/Show the section from the Display Type option.

- The Display Condition section contains conditions on which the section will be shown or hidden.
- The admin can select the Match All or Match Any Condition option from the Match Condition option.

- The admin can set the condition on Cart, Cart Subtotal, and User Role.

- The admin can select the condition which includes Contains, Not Contains, and Only Contains options.

- The admin can set the conditions for a Product, Category, and Tag.

- The Product, Category, and Tag can be searched from the search field.

- The admin can add multiple conditions by clicking on the add button.

- The condition can be deleted by clicking on the delete button.

- Click on the Save and Close button to create a new section.

- A new Section will be added.

- Click on the newly created section.

- There are four options present on the new section screen: Add New Section, Edit Section, Delete, and Add New Field.

- A new field is added to show the New Section on the front end.

PLEASE NOTE: The custom-created section will only appear on the front end if it contains a field.
Front End Impact #
- Login to your account.
- Go to the Shop page and Add a product to the cart.
- Move to the Checkout Page.
- A new section will appear on the Checkout Page.

PLEASE NOTE: This plugin currently works only on the legacy Checkout page.
Adding a New Field #
- In order to add a new field to the section, click on the Add New Field button.

- An Add New Field pop will appear. This popup contains four tabs to configure your field.
- Field Info
- Style Settings
- Pricing
- Display Condition

PLEASE NOTE: Field types such as Password, Text Area, Heading, Paragraph, Label, Phone, Email, Date, Month, Week, Time Pickers, State, Country, and File Upload do not affect the price. Therefore, when any of these field types are selected, the Pricing tab will not be displayed.
Field Info #
The admin can add the Name, Title, Field Type, Description, Placeholder, Min Length, Max Length, and Default Value for the Field.
- Name: this is the unique identifier for the field that will be used in the backend. This property can not be duplicated.
- Title: this is the label for the field that will be displayed on the front end checkout page for the field.
- Description: This will show a short description of the field on the front end. This will be shown when the cursor will be on the field.
- Placeholder: Field placeholder text will be added here and shown on the front end.
- Default Value: This value will already be added in the field on the checkout page. The customer can remove this value and add another on the front end.
- Min Length: This is the min length of the value that can be added in the field.
- Max Length: This is the maximum length of the value that can be added to the field.
- Validation: This dropdown will contain a few validation fields on which the field will be validated on the front end.
- Phone
- Number
- Postal Code

PLEASE NOTE: Min, Max Length, and Validation will only be for text field and will not be included in Checkbox, Radio, Select, Heading, Paragraph, Label, Date, Month, Week, Time pickers, state (drop down), country (dropdown) and file upload.
- In the Field Type, multiple field types are provided for the users.
- TextField: A text field will appear for the user on the checkout page.
- Password: A password field will appear for the user on the checkout page.
- Phone: A phone number field will appear for the user on the checkout page.
- Email: An email field will appear for the user on the checkout page.
- Textarea: A larger text area will appear for the user on the checkout page.
- Number: A number field will appear for the user on the checkout page.
- Select: A dropdown selector will appear, enabling the user to choose from options.
- Multiselect: A multi-select field will appear, allowing the user to select multiple options from a list.
- Checkbox group: A group of checkboxes will appear, allowing the user to check multiple options.
- Radio: A radio button will appear, enabling users to select from different options.
- Datetime picker: A datetime picker will appear on the checkout page for the user to select a date and time. The admin can set the default value for the field.
- Date picker: A date picker will appear for the user to select a date. The admin can set the default value for the field.
- Time picker: A time picker will appear for the user to select a time. The admin can set the default value for the field.
- Month: A month picker will appear for the user to select a month. The admin can set the default value for the field.
- Week: A week picker will appear for the user to select a week. The admin can set the default value for the field.
- Country: A country selector dropdown will appear for the user to select a country. The admin can set the default value for the field.
- State: A state selector dropdown will appear for the user to select a state. The admin can set the default value for the field.
- File Upload: A file upload option will appear for the user to upload a file. The admin can set the maximum upload size of the file.
- Heading: The title of the field will appear on the checkout page, with the admin able to set the heading type (H1, H2, etc.).
- Paragraph: The content placed in the paragraph field will appear on the checkout page.
- Label: The title of the field will appear on the checkout page.

- The admin can enable the field by checking the Enable option.

- The admin can set this field as required. The user needs to fill this need to proceed further on the front end.

- Click on the Save and Close button to add the field.

Front End Impact #
- Login to your account.
- Go to the Shop page and Add a product to the cart.
- Move to the Checkout Page.
- A new field will appear on the Checkout Page.

Style Settings #
- The admin can style the field in the Style Settings tab. In this section, the admin can change the appearance of the field.
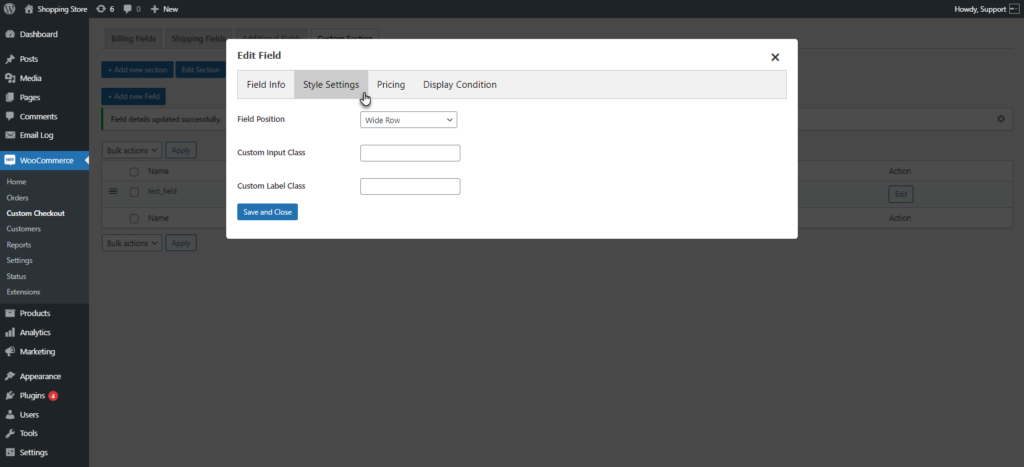
- The admin can set the field position from the Field Position drop-down list.
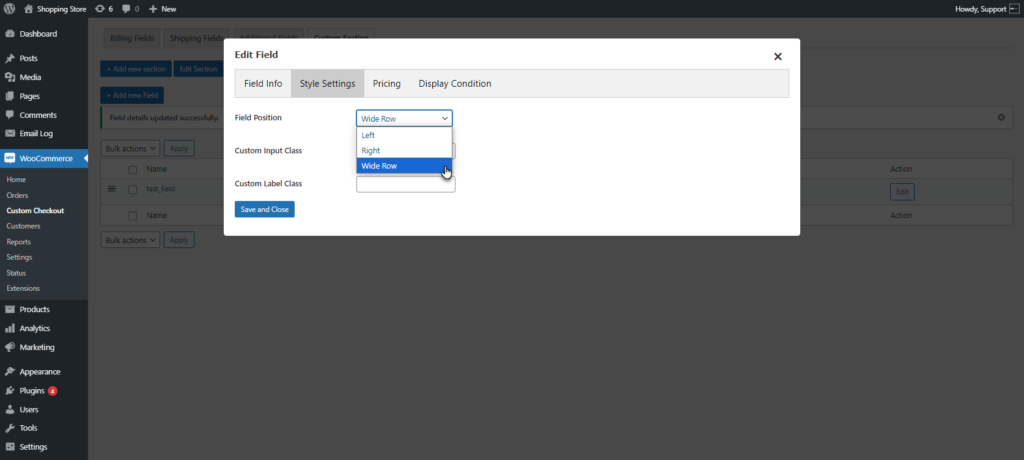
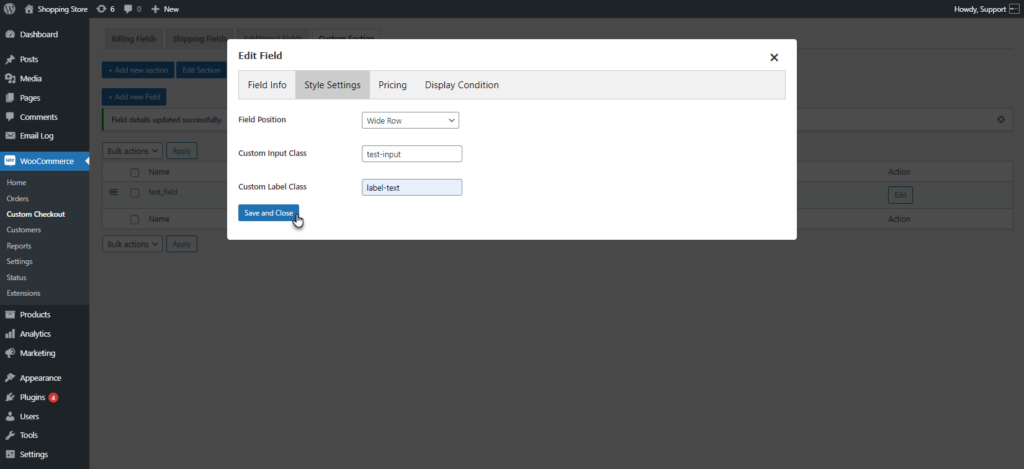
- The admin can add the Custom Input Class to the field.

- The admin can add Additional CSS to the input Class by customizing the theme options.

- The admin can add Custom Label class to the field.

- The admin can add Additional CSS to the Label Class by customizing the theme options.

- Click on the Save and Close button to save the changes.
Front End Impact #
- Login to your account.
- Go to the Shop page and Add a product to the cart.
- Move to the Checkout Page.
- The changes will appear in the field on the Checkout Page.

Pricing #
- In the pricing tab, the admin can add extra pricing based on the input field value, which will be included in the final subtotal on the checkout page.

- Enable the Pricing option.

- Select the Pricing Type from the Price Type drop-down. Price type includes three options
- Fixed – When this option is selected, the exact price entered in the amount field will be added to the total.
- Percentage of Cart Subtotal – When this option is selected, the percentage entered in the amount field will be calculated based on the cart subtotal and added to the total amount.
- Custom – This option allows the customer to add a custom price on the checkout page.

- Enter the amount on the Amount tab.

- The admin can enable the Tax by enabling the Taxable option. This will add tax to the price.

PLEASE NOTE: The Tax Option will only be effective if tax is enabled in WooCommerce settings and tax classes and rates are configured.
- The admin can set the Tax Class from the Tax Class drop-down.

PLEASE NOTE: This Option will only work when the Taxable Option is enabled.
Front End Impact #
- Login to your account.
- Go to the Shop page and add a product to the cart.
- Move to the Checkout Page. There is no extra pricing on the checkout as the custom field is empty.

- Add a value to the field and the additional pricing will appear.

- The Tax will be applicable as set in the settings.

Display Condition #
- The Display Condition tab enables the admin to set conditions on whether to show the field on the checkout page or not. There are two types of conditions admin can set.
- On Cart Condition
- On Checkout Condition

On Cart Condition #
- When the On Cart Condition is applied, it functions by displaying the field only if the cart contains a specified product, like a Beanie. For instance, if the condition is set for a Belt, the field will appear on the checkout page when the cart includes a Beanie. If the cart does not contain a Beanie, the field will stay hidden.
- The admin can Hide/Show the field from the Display Type option.

- The admin can select the Match All or Match Any Condition option from the Match Condition option.
- Match All: The section will be shown when all of the added conditions are matched.
- Match Any: The section will be shown or hidden when any of the added conditions matches.

- The admin can set the condition on Cart, Cart Subtotal, and User Role.

- The admin can select the condition which includes Contains, Not Contains, and Only Contains options.

- The admin can set the conditions for a Product, Category, and Tag.

- The Product, Category, and Tag can be searched from the search field.

- The admin can add multiple conditions by clicking on the add button.

- The condition can be deleted by clicking on the delete button.

Front End Impact #
- Login to your account.
- Go to the Shop page and Add a Product to the cart. Ensure that the product added is the same one specified when the condition was set.

- Go to the Cart page. The Cart Condition is met.

- Move to the Checkout Page. The Field will be visible on the Checkout page.

On Checkout Condition #
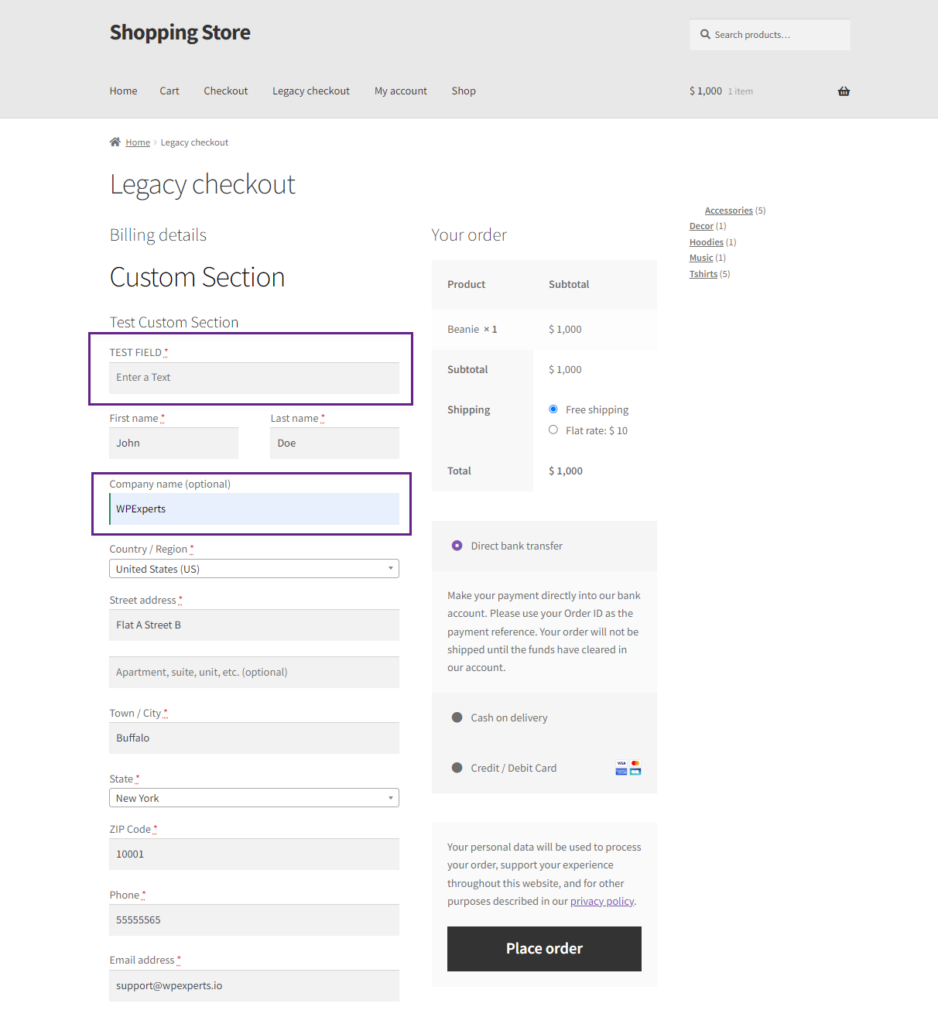
- When the On Checkout condition is applied, it functions as follows: If a display condition is set to show the field only when the Billing Company name is WPExperts, then the additional custom field will appear on the checkout page under that condition.
- In the Display Condition tab, Set the Condition as needed.

Front End Impact #
- Login to your account.
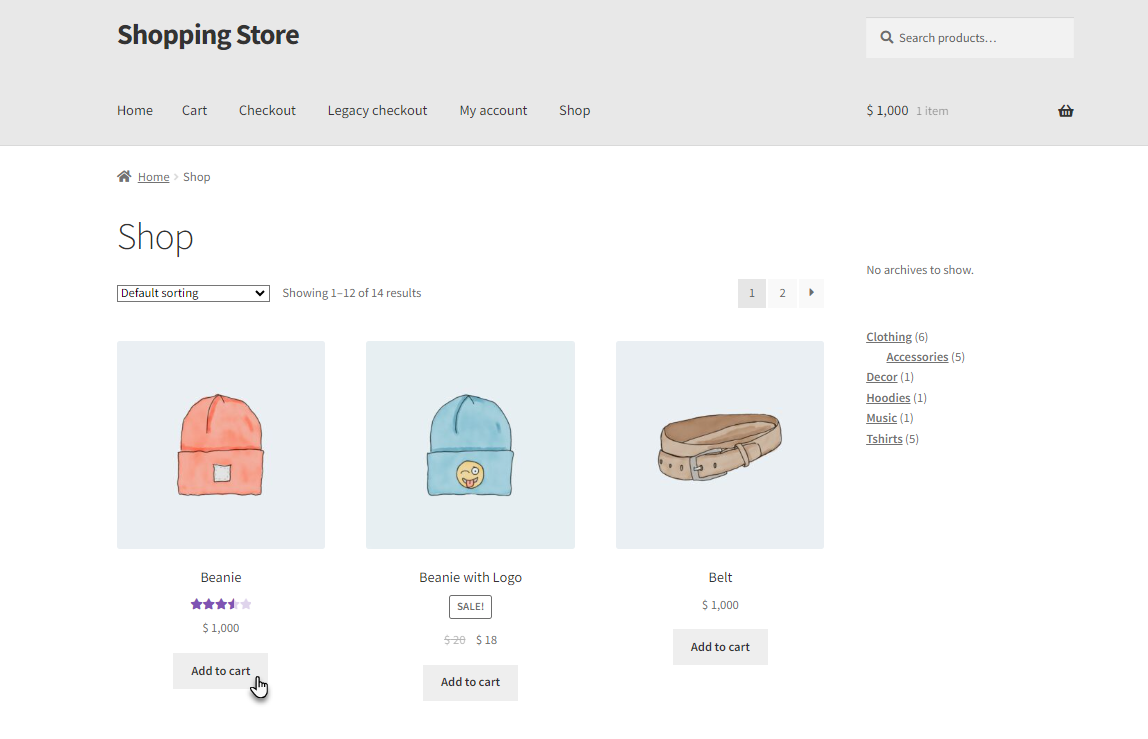
- Go to the Shop page and Add a Product to the cart.
- Move to the Checkout Page. The Field will not be visible until the condition is met.

- Enter the Company name as specified when the condition was set. The custom field will appear.
Custom Field Display in Admin Emails #
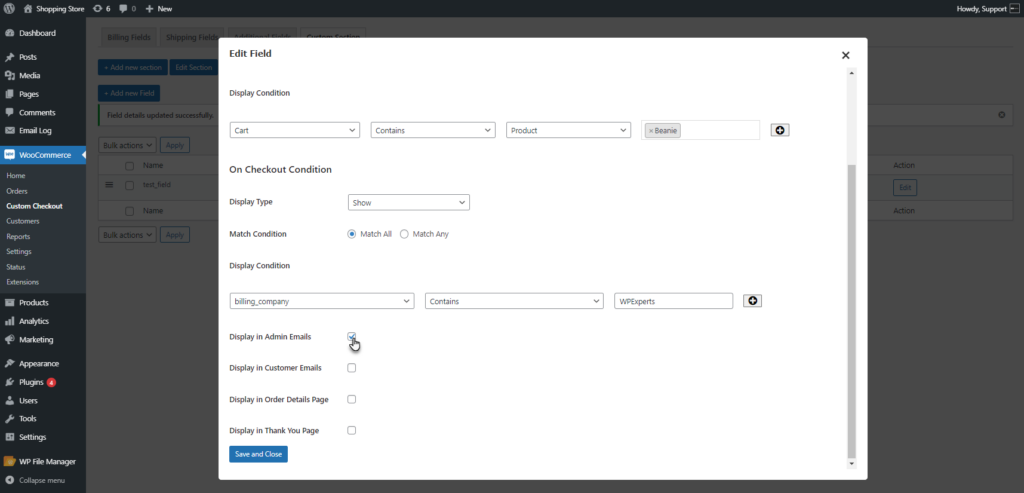
- Enable this option. When this option is enabled, the custom fields and their values will be added in the order Emails sent to admin.
Front End Impact #
- Login to your account.
- Go to the Shop page and Add a Product to the cart.
- Move to the Checkout Page. Add the value in the Custom Field and Place Order.
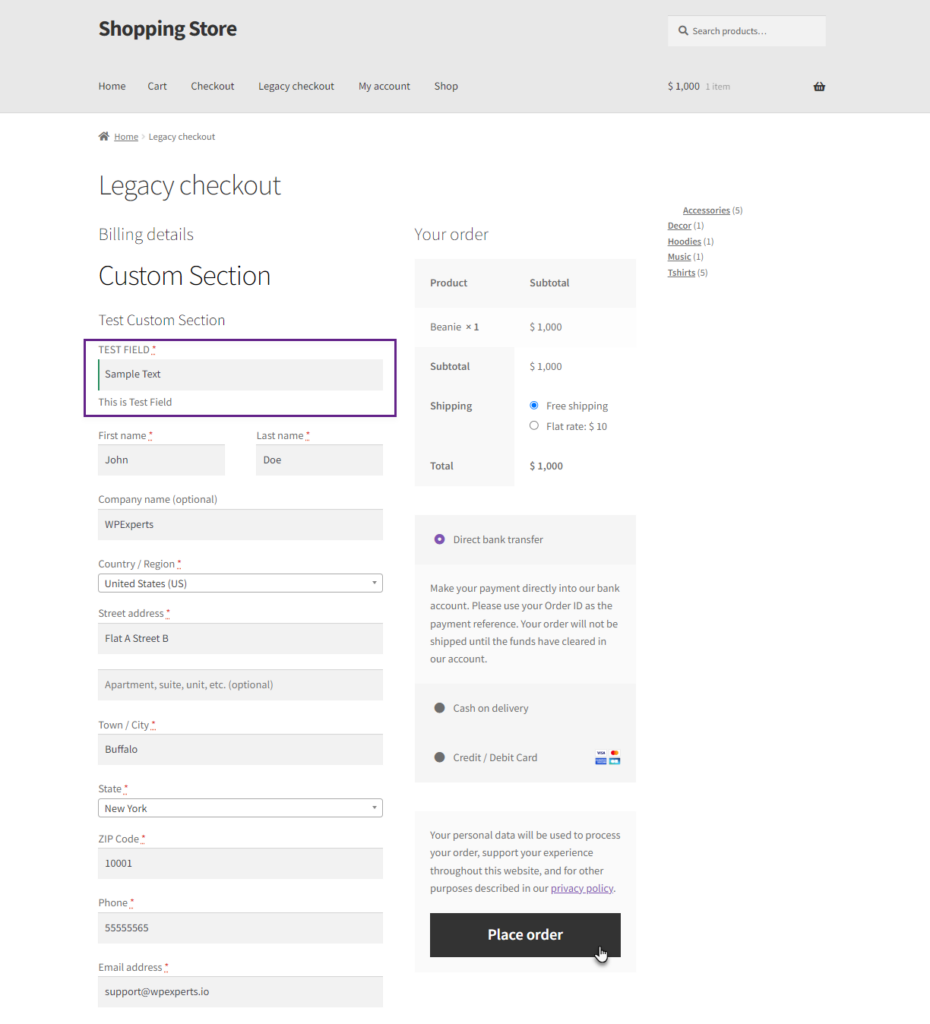
- As the Order is Placed, an Email will be sent to the Admin displaying the Custom Field.

Custom Field Display in Customer Emails #
- Enable this option. When this option is enabled, the custom fields and their values will be added in the order Emails sent to the customer.

Front End Impact #
- As the order is placed an Email sent to the customer will have details of Custom Field.

Custom Field Display in Order Details Page #
- Enable this option. When this option is enabled, the custom fields and their values will be shown on the order details page in WooCommerce.

- Once the order is placed, the Custom fields will be displayed on the order details page. Navigate to the WordPress Admin Dashboard > WooCommerce > Orders.

Custom Field Display on the Thank You Page #
- Enable this option. When this option is enabled, the custom fields and their values will be shown in the order details on the Thank You Page when the order is placed.

Front End Impact #
- As the order is placed, the custom Field will be displayed on the Thank You page.

All Custom Fields #
- The admin can add multiple custom fields to the checkout page. The following section contains all the custom fields that are available.

Front End Impact #
- All the created Custom Fields will appear on the Checkout Page.

Billing Fields Section #
- The admin can also add Custom Fields in the Billing section of the Checkout page.
- Go to WordPress Admin Dashboard > Custom Checkout > Billing Fields.
- Click on Add New Field to add a new field to the section.

- The Add New Field popup will appear. Fill out the Name, Title, and Field Type.

- As the field type Select is chosen, the admin can add different options to be displayed at the front end. Add options as needed.

- The admin can set any option as default. The chosen option will be selected by default.

- Enable the field. The admin can make the field required if needed.

- Click on the Save and Close button to add a new field.

- A new field will be added to the section.

- The admin can Restore Default Fields. The custom field will be discarded when the admin clicks the Restore Default Fields button.

Front End Impact #
- Login to your account.
- Go to the Shop page and Add a product to the cart.
- Move to the Checkout Page. A custom field will appear in the Billing Section.

Shipping Fields Section #
- The admin can also add Custom Fields in the Shipping section of the Checkout page.
- Go to WordPress Admin Dashboard > Custom Checkout > Shipping Fields.

- Click on Add New Field to add a new field to the section.

- The Add New Field popup will appear. Fill out the Name, Title, and Field Type.

- As the field type Checkbox Group is chosen, the admin can add different options to be displayed at the front end. Add options as needed.

- Enable the field. The admin can set the field as required if needed.

- Click on the Save and Close button to add a new field.

Front End Impact #
- Login to your account.
- Go to the Shop page and Add a product to the cart.
- Move to the Checkout Page. A custom field will appear in the Shipping Section.

Additional Fields Section #
- The admin can also add Custom Fields in the Additional section of the Checkout page.
- Go to WordPress Admin Dashboard > Custom Checkout > Additional Fields.

- Click on Add New Field to add a new field to the section.

- The Add New Field popup will appear. Fill out the Name, Title, and Field Type.

- As the field type Date Picker is chosen, the admin can set the default value for the field.

- Enable the field. The admin can set the field as required if needed.

- Click on the Save and Close button to add a new field.

Front End Impact #
- Login to your account.
- Go to the Shop page and Add a product to the cart.
- Move to the Checkout Page. A custom field will appear in the Additional Section.


