- Installation
- Features
- Wholesale User Roles
- Wholesale Role
- Wholesale Products
- Wholesale Variations
- Wholesale Category Discounts
- Wholesale General Discounts
- Bundle and Composite Products
- Wholesale Pricing
- Global Wholesale Pricing
- Category-based Wholesale Pricing
- Product-based Wholesale Pricing
- How-to-steps – Configure pricing options for a simple product
- How-to-steps – Configure pricing options for a variable product
- How-to-steps – Configure multiple pricing settings for simple products
- How-to-steps – Configure multiple pricing settings for variable products
- How-to-steps – Configure minimum quantity restrictions for variable products
- Variation Table
- Bulk Wholesale Pricing
- Step Quantity
- Step quantity – Simple product
- How-to-steps – Configure step quantity settings for simple products
- Step quantity – Variable product
- How-to-steps – Configure step quantity settings for variable products
- Step quantity – Tiered pricing product
- How-to-steps – Configure step quantity settings for tiered pricing product
- Enable/disable coupon codes
- Cart Total Discount
- Coupons
- Wholesale Order Total
- Wholesale Tier Pricing
- Wholesale Product & Price Visibility
- Product Visibility – General Settings
- Individual Product Visibility
- Enable/Disable product visibility for a product category
- Hide Wholesale Products from non-wholesale/retail users & visitors
- Hide Wholesale or Retail products from customers
- Hide Price Labels (Retail and Save price) from wholesale customers
- Hide Wholesale or Retail products from visitors
- Product Attachments
- Wholesale pricing column on products
- CSV Import/Export Wholesale Prices
- Wholesale Manual Orders
- Request Sample
- Non-logged-in Users
- Strike-Through Price
- Wholesale Registration Form
- Default & Custom Fields
- Advanced Form Builder
- Form Builder on the Checkout page
- Form Builder on the My-Account page
- Approve/deny user requests
- Email notifications
- Page redirection on specific products/pages
- Overriding WooCommerce’s default registration page on my-account page
- Wholesale new order email notification
- Confirm Password Field
- Sales Dashboard and Reports
- Private Store for WooCommerce
- Requisition List
- Tax Management
- Shipping and Payment Gateway Management
- Wholesale order filters
- Customization options
- Compatibility and integrations
- Bulk Order Form for WooCommerce
- WooCommerce Subscriptions (with Limitations)
- Bulk Shop for WooCommerce (with Limitations)
- Bulk Variation Forms (with Limitations)
- WooCommerce Pre-Orders
- Compatible with Currency Switcher For WooCommerce
- Compatible with Quote For WooCommerce
- Compatible with Invoice Payment Gateway for WooCommerce
- Compatible with Product Bundles
- Compatible with Product Add-Ons
- Compatible with Product Vendors
- Compatible with reCaptcha for WooCommerce
- REST API
Installation #
- Go to your WordPress Dashboard to Install;
- Click Upload Plugin at the top;
- Click on the “Choose File” button and select Wholesale-For-WooCommerce-Plugin.zip;
- Click Install Now and Activate the extension.
Features #
- Wholesale Role
- Products
- Variations
- Category Discounts
- General Discounts
- Bundle and Composite Products
Wholesale User Roles #
Single Wholesale Role #
The single wholesale user role option allows you to create wholesale prices based on products so every user is offered the same level of discount.
Multiple Wholesale Role #
Multiple wholesale role is an advanced wholesale pricing option that allows you to create wholesale prices based on multiple user roles.
You can create pricing strategies based on different price levels and wholesale user roles, for instance, 20% discount for User A and 30% discount for User B on the same product.
Create different levels of wholesale allows users to level up to get better pricing options and benefits. This option also helps define different minimum quantity requirements for each role.
Default Multi-Wholesale Role #
You can create a default role (multi-role option) so when a new user requests to register as a wholesaler, they will be registered at the default wholesale level.
For example, There are three wholesale user role levels (Level A, Level B & Level C) and the default option is set to Level A. All users registering as a wholesaler will be assigned to Level A. You can manually change the role levels when approving requests from the back-end.
How to add new wholesale user roles #
You can add multiple wholesale user roles each with its own individual settings. By adding multiple wholesaler roles, you can offer different levels of discounts to different roles.
For example, 20% discount for Role A and 25% discount for Role B. This will make your process easier and smoother if you are selling in multiple places.
How-to-steps – Creating a new user role #
- Navigate to Wholesale dropdown 🡪 Click on User Roles.
- Enter Name for your Wholesaler Role (Example: Standard, Premium & Platinum.)
- Enter a slug. (the “slug” refers to the part of a web page’s address that appears after the domain name.)
- Enter the description for that particular role. (Example: standard is basic and will provide a 20% discount to the user)
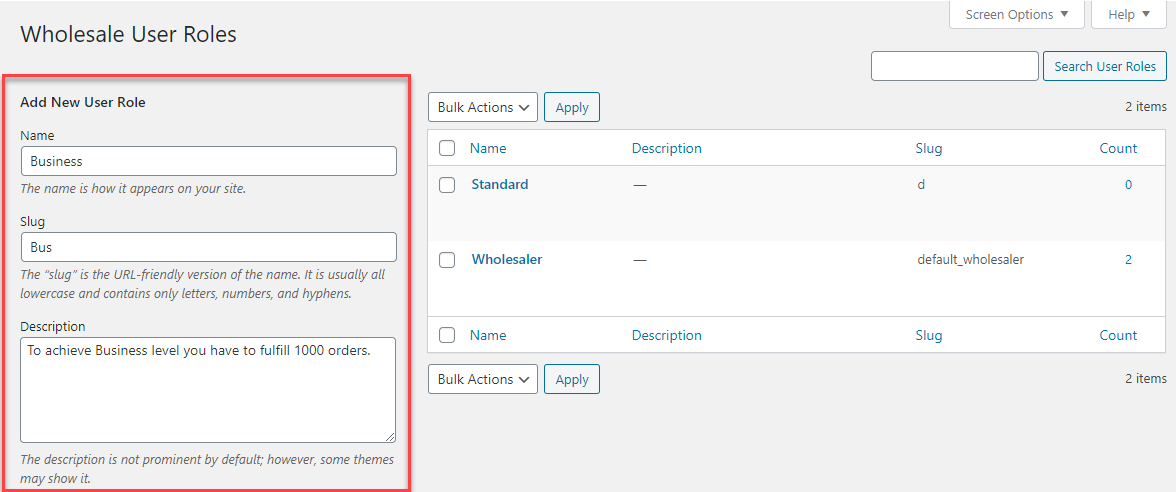
Note: Do not use special characters in the Wholesale Name field. (example: Wholesale 20 %, Wholesale @ B).
How to add a customer upgrade request option #
You can add the option for retail users to become a wholesaler by requesting the admin. You can write a custom text that is displayed on the upgrade tab. You can enable the following options for this tab:
- Upgrade Tab: This tab will be visible to non-wholesale users on their WooCommerce My Account Page. Users can fill out the form to submit the request for the wholesaler role. The request will be approved by the admin.
- Resubmit Request: This option allows the user to re-submit their request for the wholesaler role when their application is rejected the first time.

Front-end screenshot

Wholesale Role #
- The Wholesale Products API provides functionality for Generating, Displaying, Modifying, and Removing wholesale products.
- Available Routes are mentioned below:
- GET: wholesale/v1/roles
- GET: wholesale/v1/roles/{role_key}
- POST: wholesale/v1/roles/{role_key}
- PUT: wholesale/v1/products/{product_id}
- DELETE: wholesale/v1/products/{product_id}
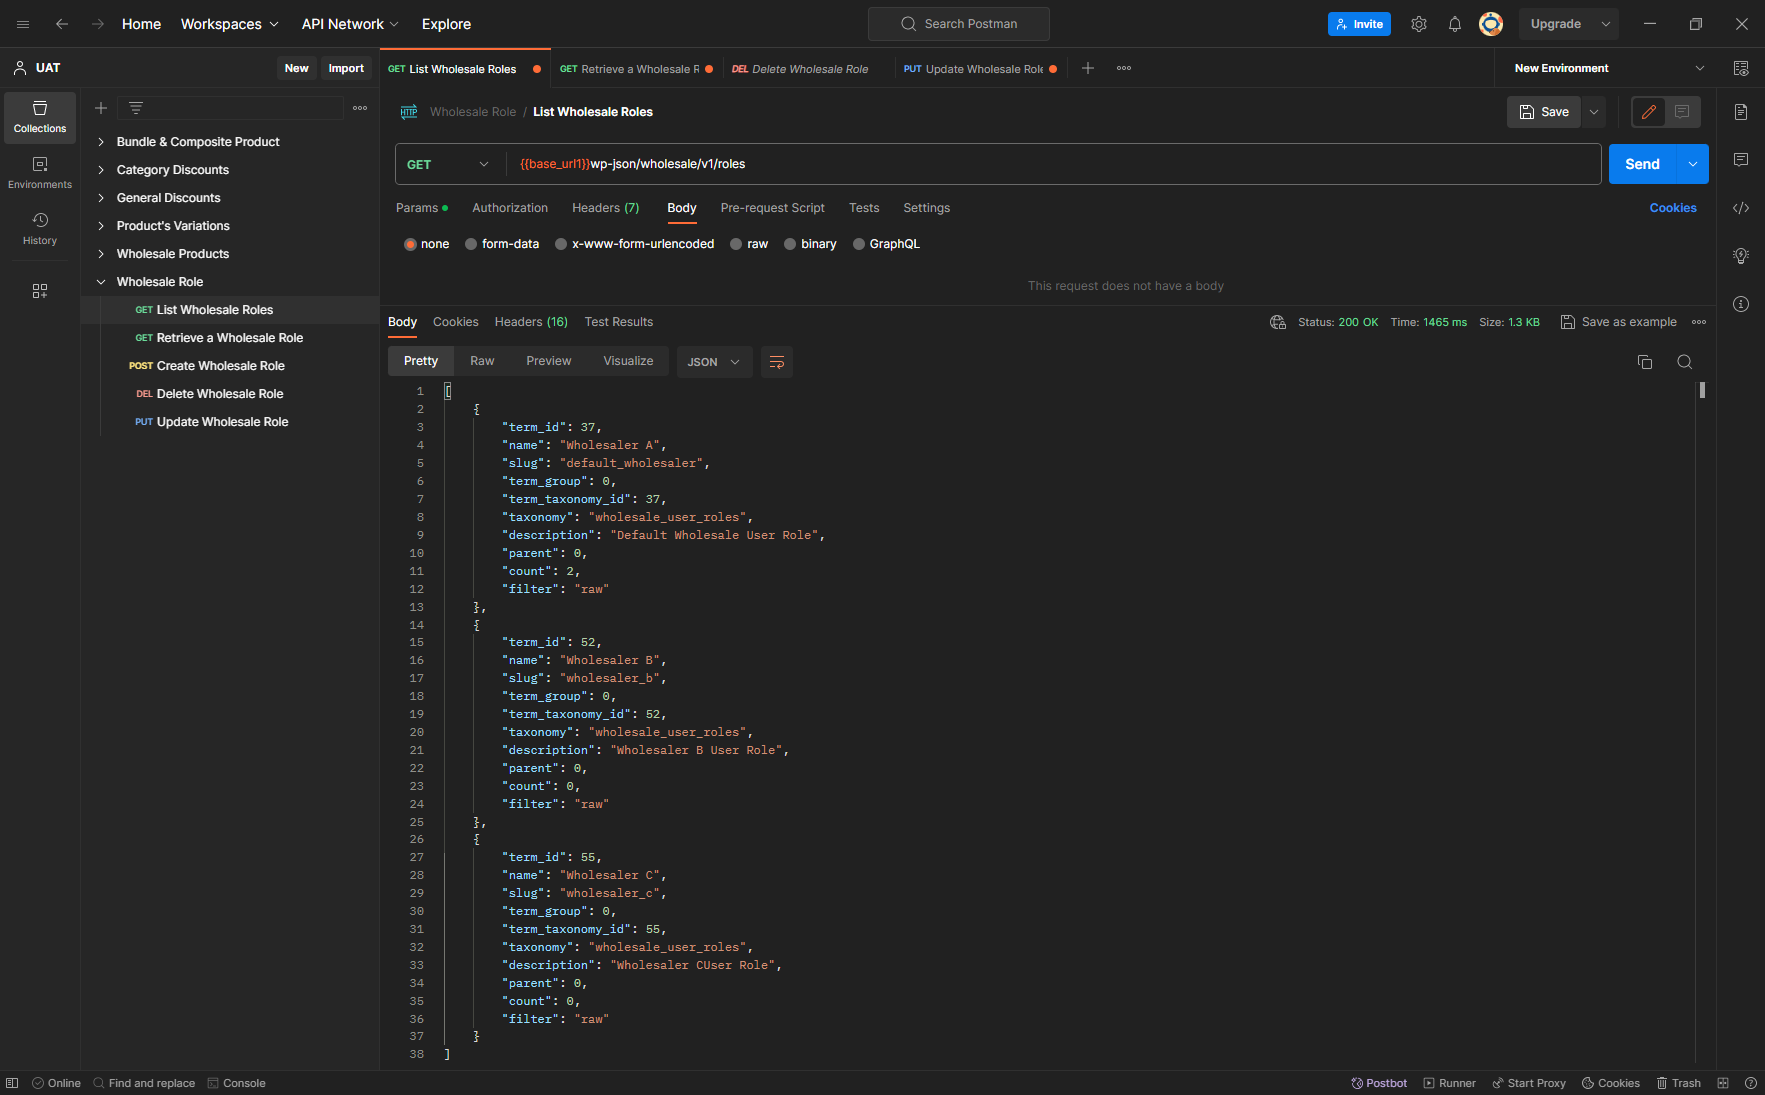
List Wholesale Roles (GET) #
Request Example
- METHOD: GET
- ENDPOINT: /wp-json/wholesale/v1/roles
- POSTMAN: Fetch all Wholesale User Roles
GET: wholesale/v1/roles
Response Example
- STATUS: 200 OK (Fetch all Wholesale Roles)
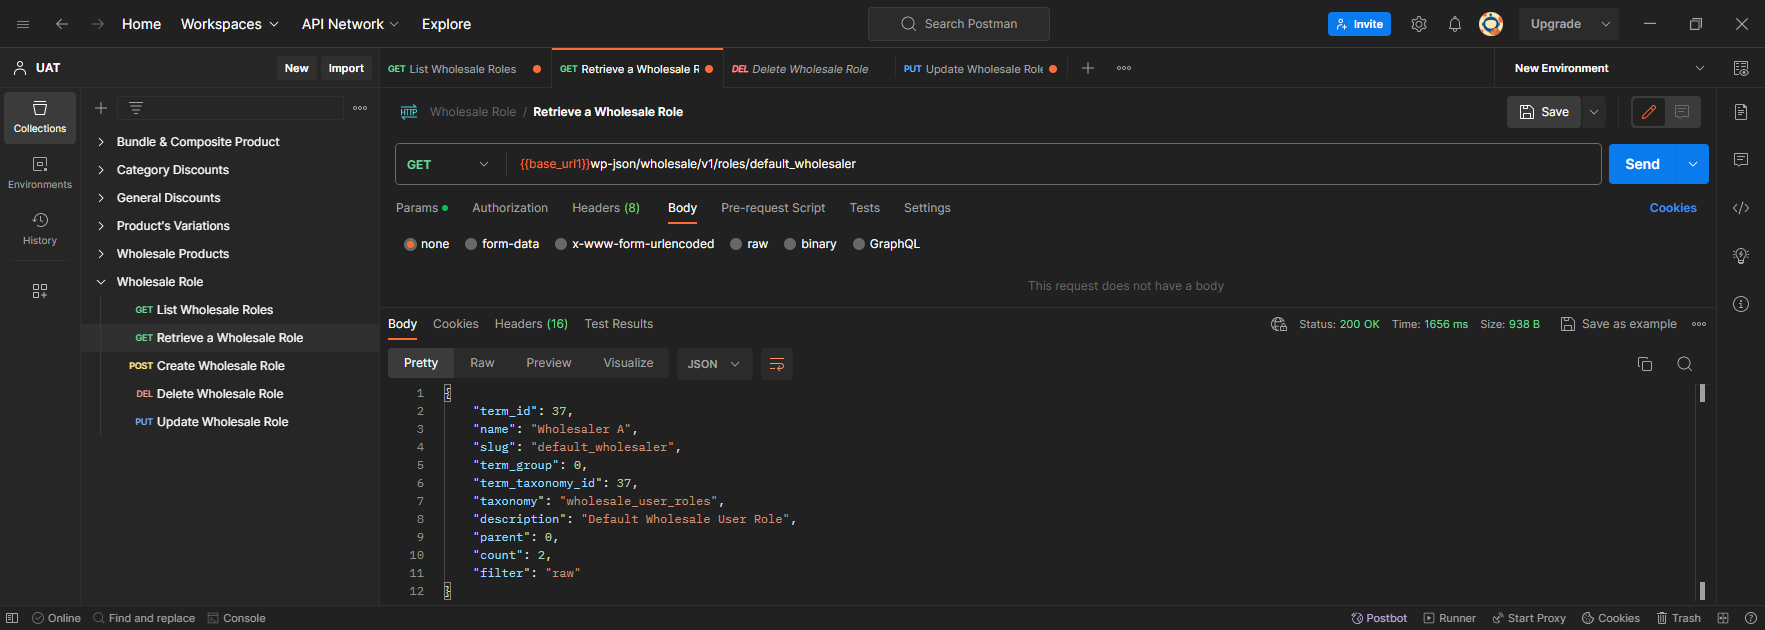
Retrieve a Wholesale Role (GET) #
Request Example
- METHOD: GET
- ENDPOINT: /wp-json/wholesale/v1/roles/default_wholesaler
- POSTMAN: Fetch a specific Wholesale User Role
GET: wholesale/v1/roles/default_wholesaler
Response Example
- STATUS: 200 OK (Fetch specific Wholesale Role)
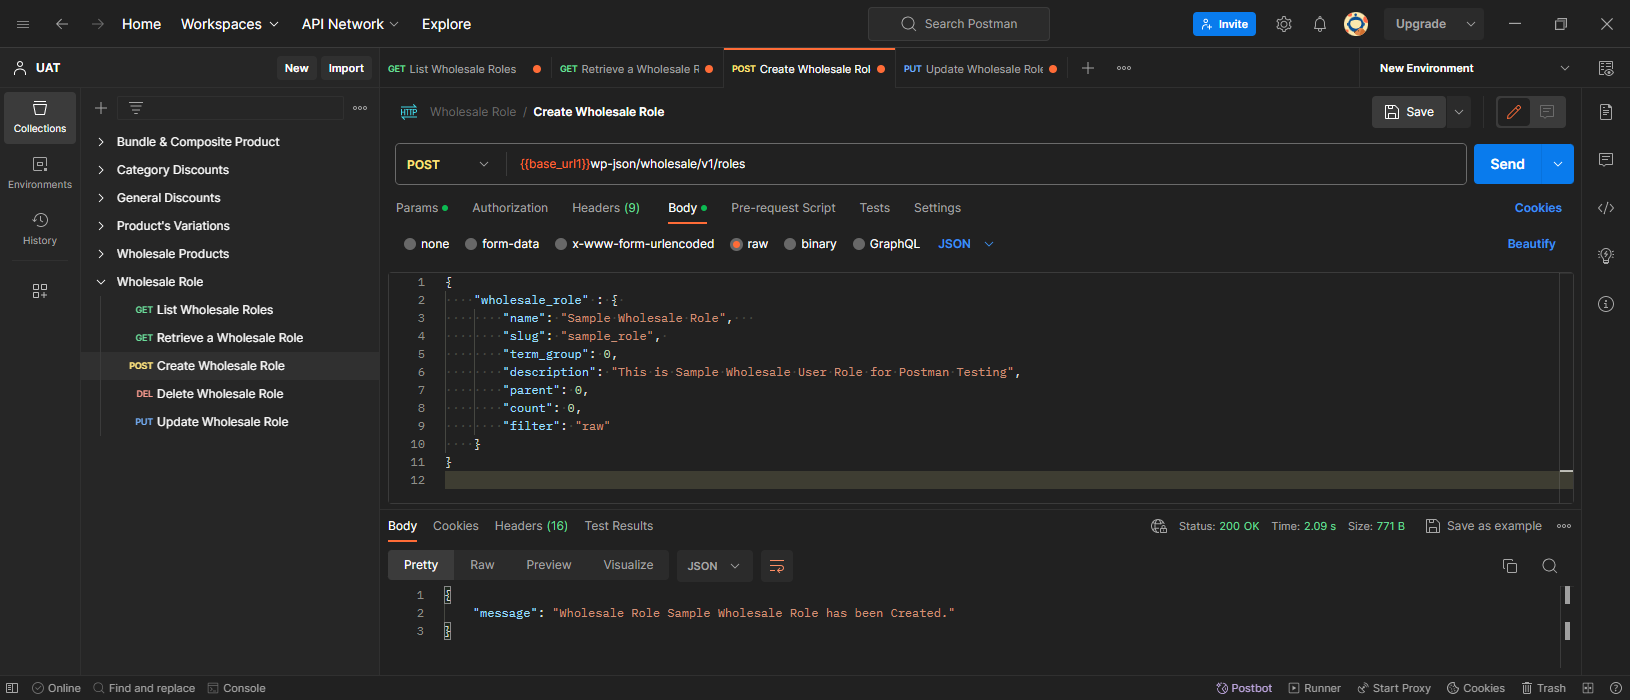
Create a Wholesale Role (POST) #
Request Example
- METHOD: POST
- ENDPOINT: /wp-json/wholesale/v1/roles/
- POSTMAN: Create a Wholesale User Role
POST: wholesale/v1/roles/
JSON Body:
{
    "wholesale_role" : {
        "name": "Sample Wholesale Role",
        "slug": "sample_role",
        "term_group": 0,
        "description": "This is Sample Wholesale User Role for Postman Testing",
        "parent": 0,
        "count": 0,
        "filter": "raw"
    }
}
Response Example
- STATUS: 200 OK (Wholesale Role created successfully)
- STATUS: 400 Bad Request (In case of Duplication)
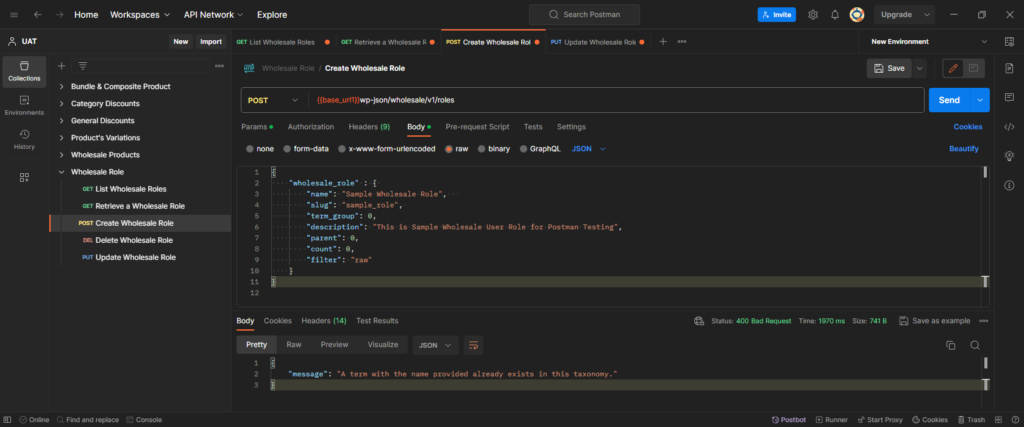
- STATUS: 400 Bad Request (In case of Missing Required Fields)

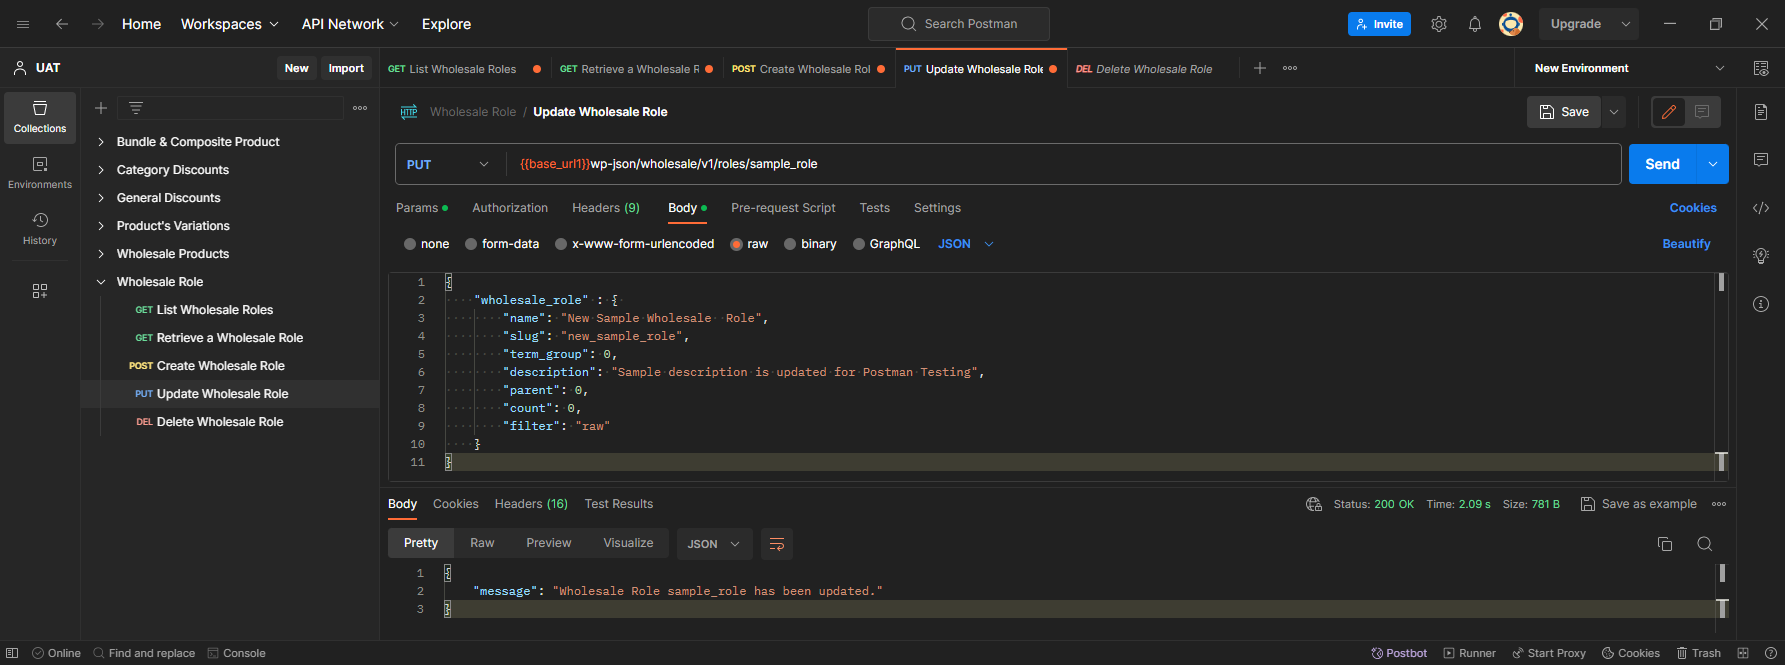
Update a Wholesale Role (POST) #
- Request Example
- METHOD: PUT
- ENDPOINT: /wp-json/wholesale/v1/roles/sample_role
- POSTMAN: Create a Wholesale User Role
PUT: wholesale/v1/roles/sample_role
JSON Body:
{

    "wholesale_role" : {

        "name": "New Sample Wholesale Role",

        "slug": "new_sample_role",

        "term_group": 0,

        "description": "Sample description is updated for Postman Testing",

        "parent": 0,

        "count": 0,

        "filter": "raw"

    }

}- Response Example
- STATUS: 200 OK (Wholesale Role updated successfully)
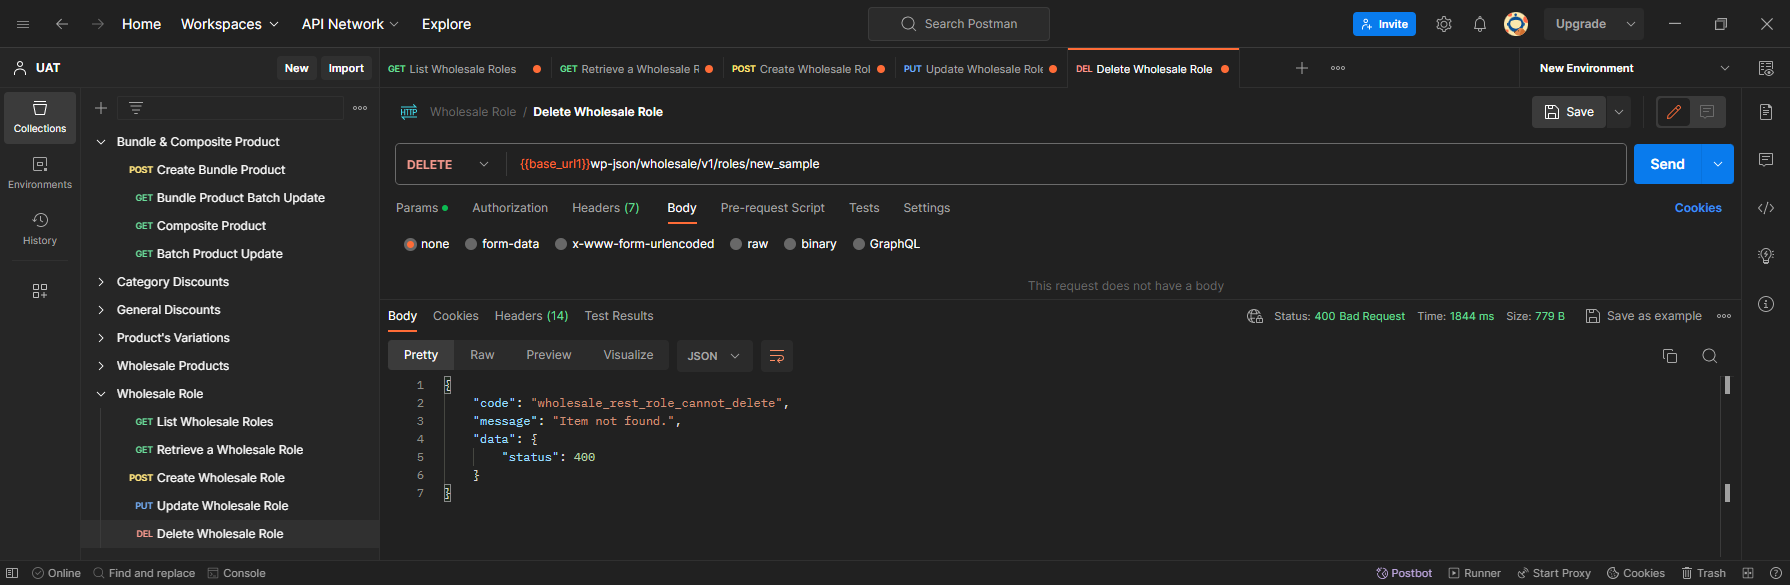
Delete a Wholesale Role (DELETE) #
Request Example
- METHOD: DELETE
- ENDPOINT: /wp-json/wholesale/v1/roles/new_sample_role
- POSTMAN: Delete a Wholesale Product
DELETE: wholesale/v1/roles/new_sample_role
- Response Example
- STATUS: 200 OK (Delete a Wholesale Role)
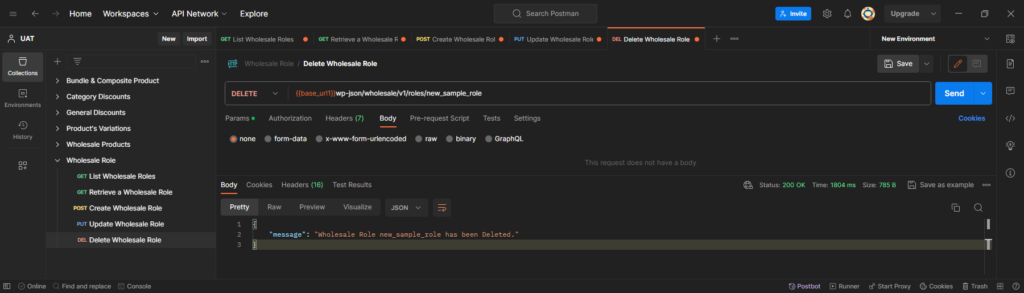
- STATUS: 400 Bad Request (In case of Invalid Role Name)
Wholesale Products #
- The Wholesale Role API provides functionality for Generating, Displaying, Modifying, and Removing wholesale user roles.
- Available Routes are mentioned below:
- GET: wholesale/v1/products/
- GET: wholesale/v1/products/{product_id}
- POST: wholesale/v1/products
- PUT: wholesale/v1/products/{product_id}
- DELETE: wholesale/v1/products/{product_id}
- POST: wholesale/v1/products/batch?wholesale_role=default_wholesaler
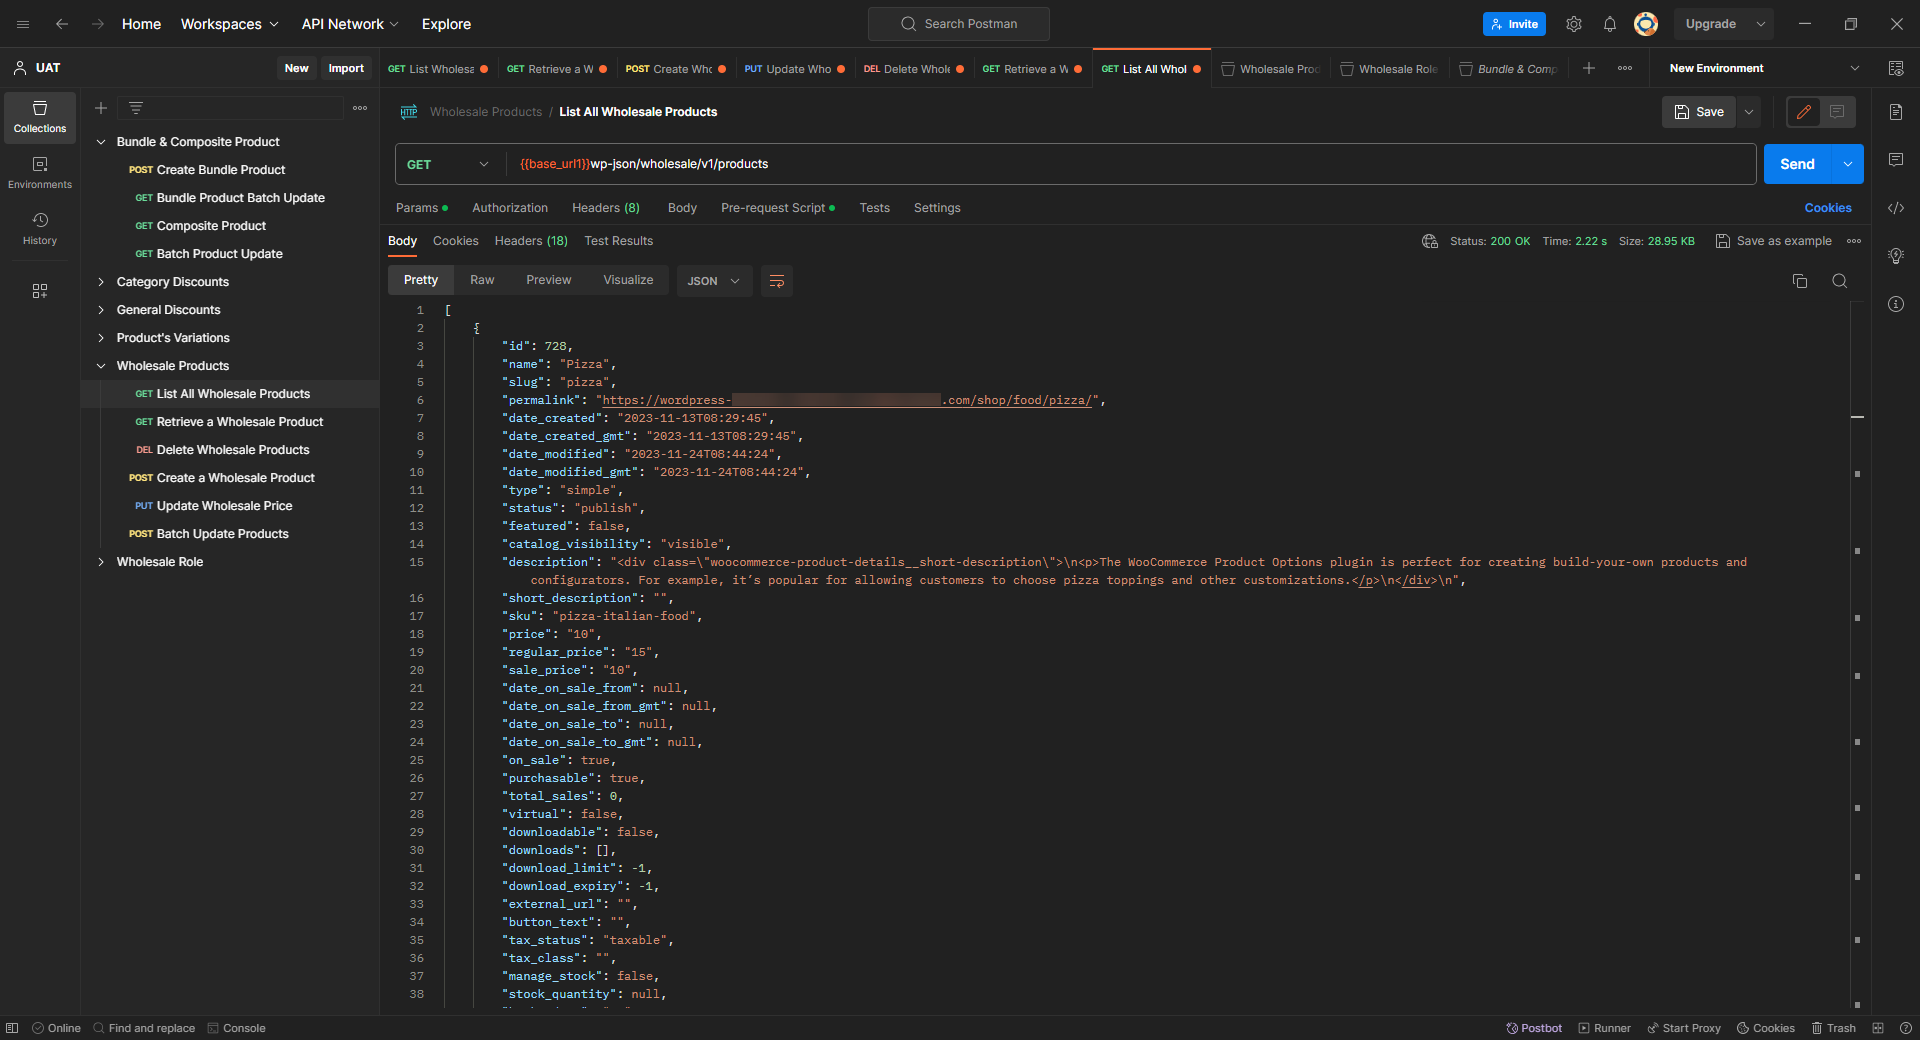
List All Wholesale Products (GET) #
- Request Example
- METHOD: GET
- ENDPOINT: /wp-json/wholesale/v1/products
- POSTMAN:
- Fetch all Wholesale Products
GET: /wp-json/wholesale/v1/products
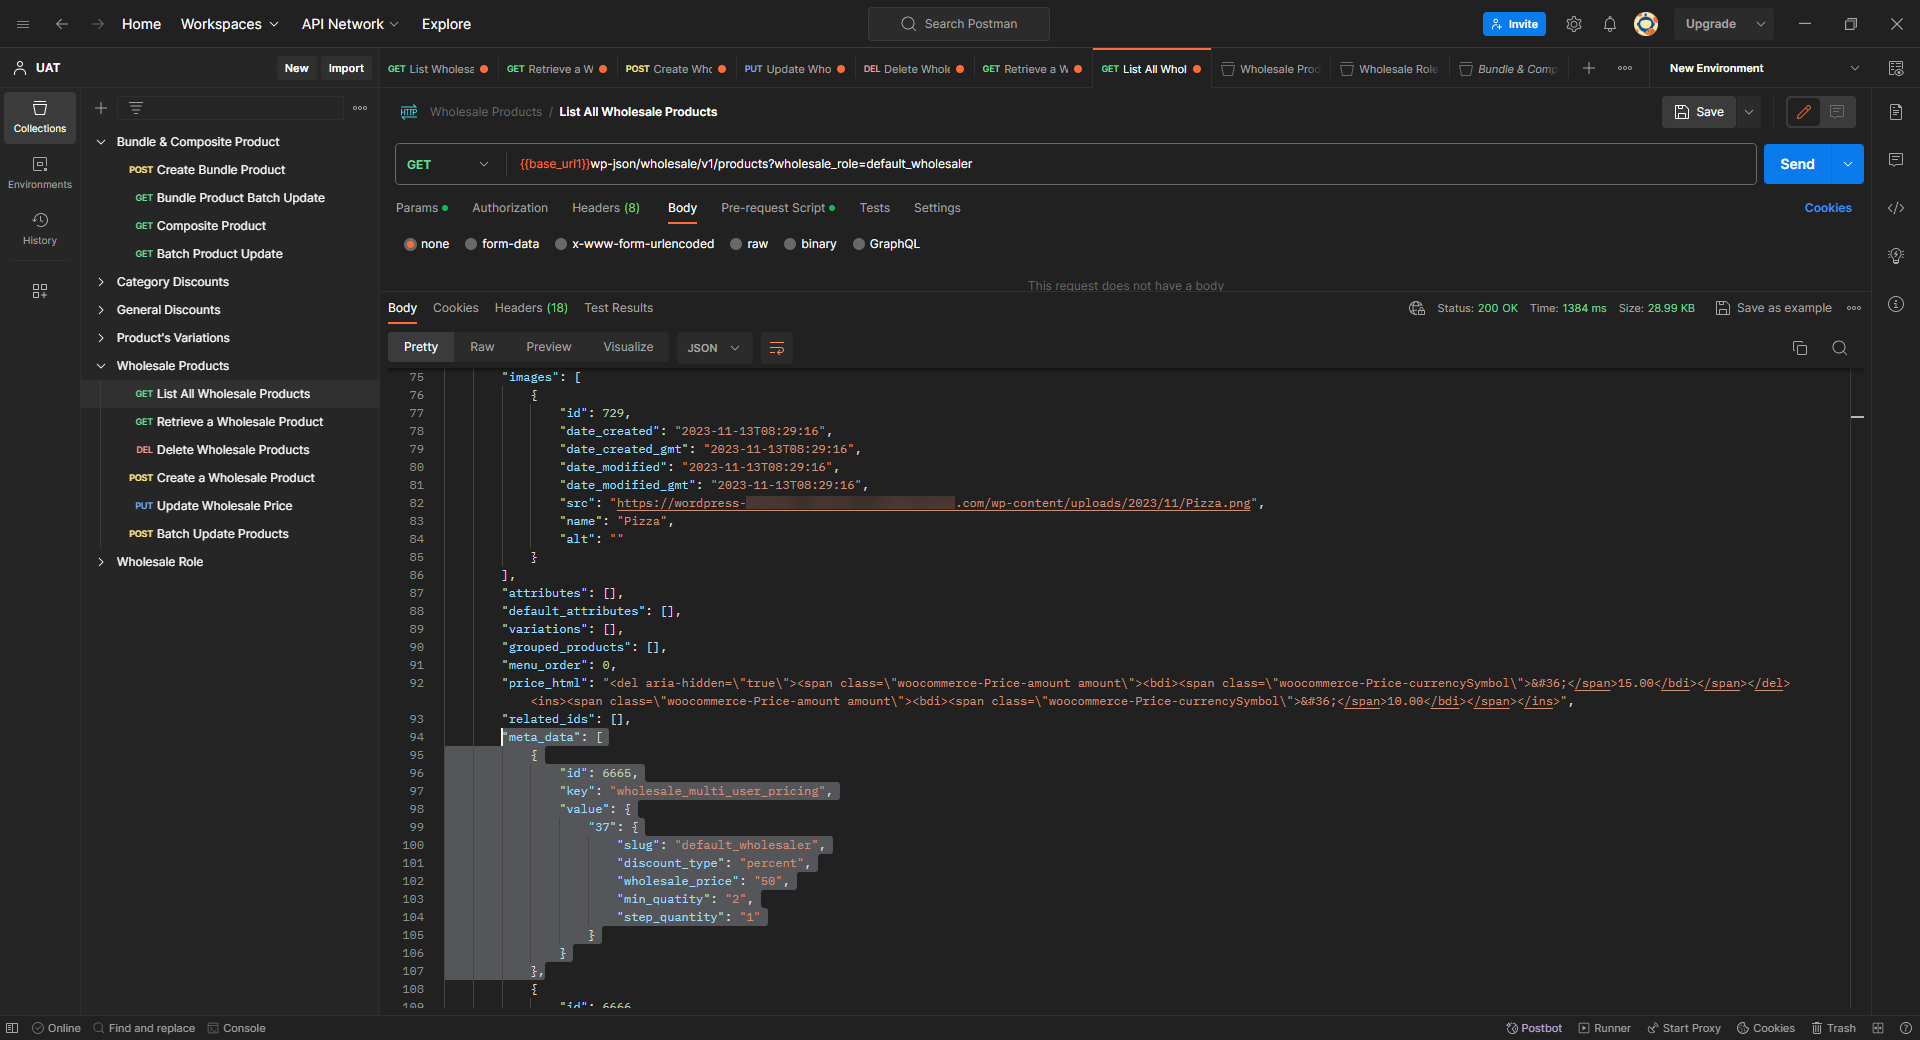
- Fetch Wholesale Products with Wholesale Role
GET: /wp-json/wholesale/v1/products?wholesale_role=default_wholesaler
- Response Example
- STATUS: 200 OK (Fetch all Wholesale Products)
- STATUS: 200 OK (Fetch Wholesale Products with Wholesale Role)

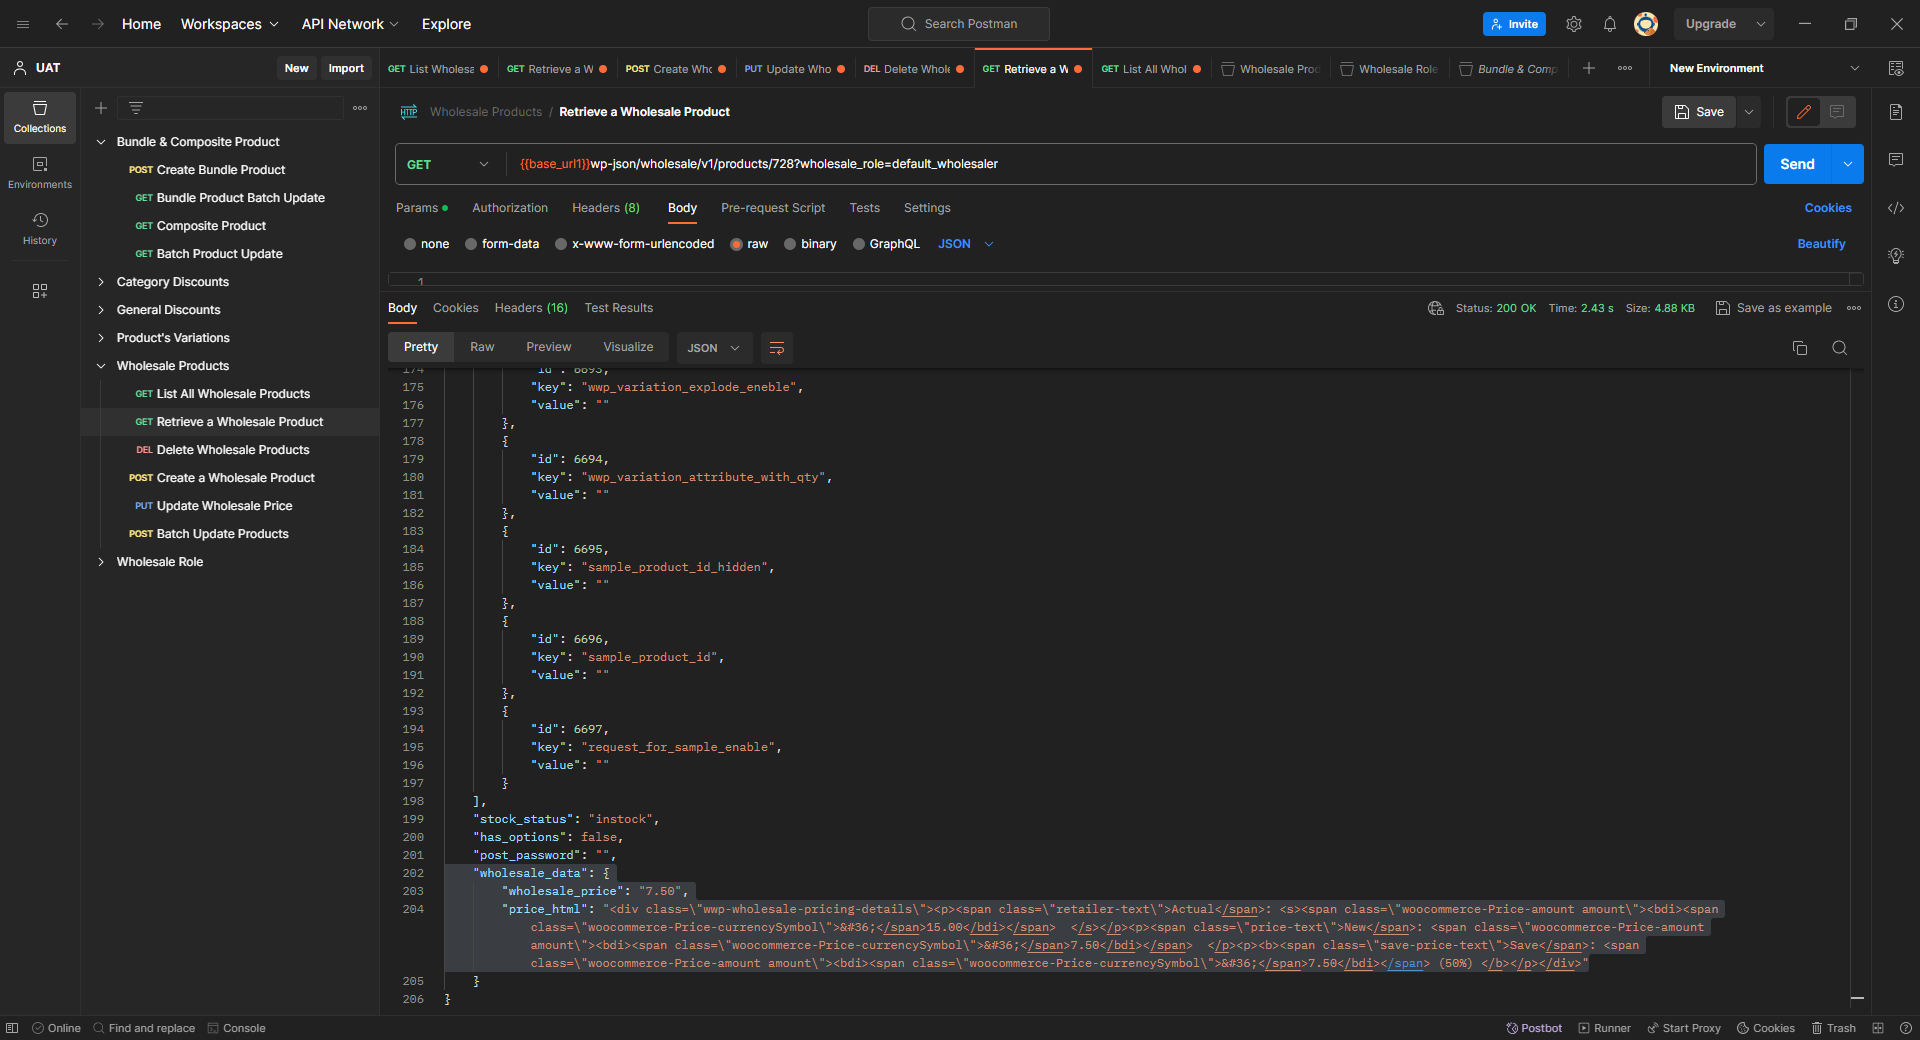
Retrieve a Wholesale Product (GET) #
- Request Example
- METHOD: GET
- ENDPOINT: /wp-json/wholesale/v1/products/{product_id}?wholesale_role=default_wholesaler
- POSTMAN:
- Fetch the Product
GET: wholesale/v1/products/{product_id}
- Fetch the Product with Wholesale Role
GET: wholesale/v1/products/{product_id}?wholesale_role=default_wholesaler
- Response Example
- STATUS: 200 OK (Fetch a specific Product)
- STATUS: 200 OK (Fetch the Product with Wholesale Role)
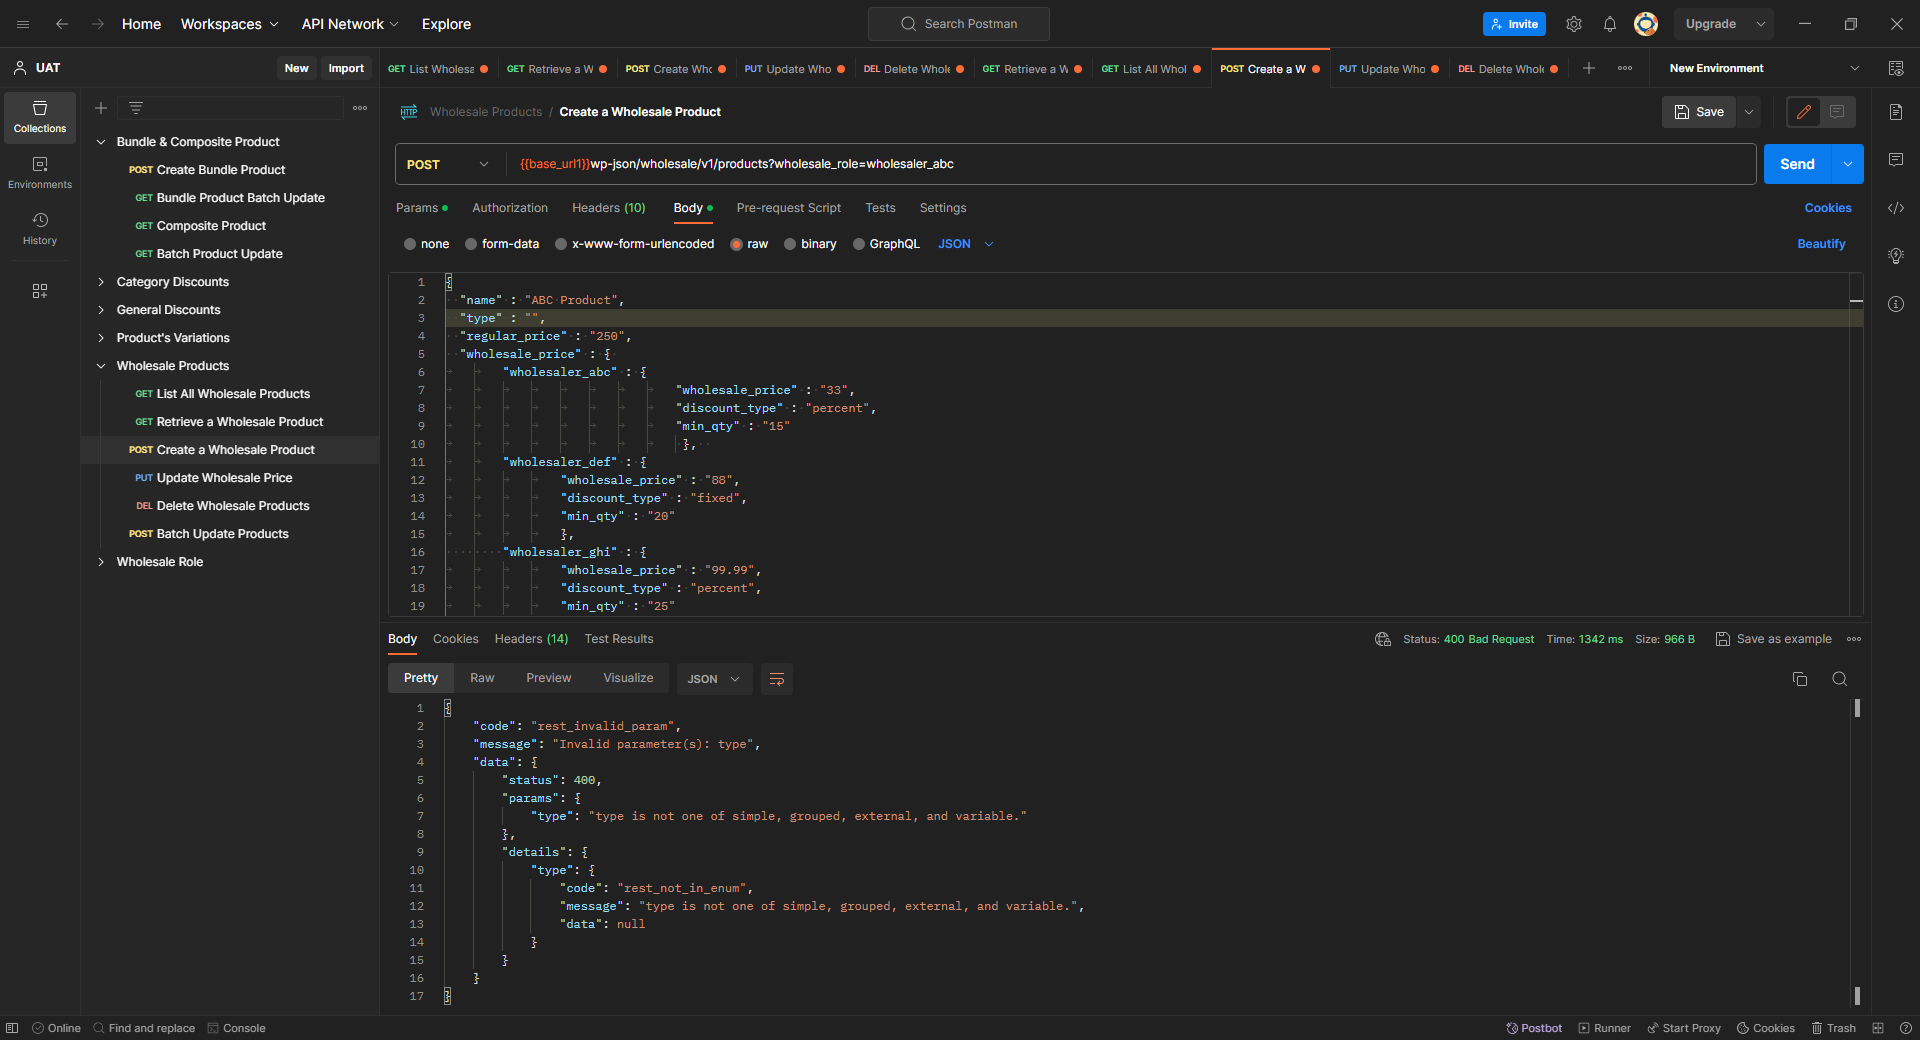
Create a Wholesale Product (POST) #
- Request Example
- METHOD: POST
- ENDPOINT: /wp-json/wholesale/v1/products?wholesale_role=default_wholesaler
- POSTMAN: Create a Wholesale Product
POST: wholesale/v1/products?wholesale_role=default_wholesaler
JSON Body:
{

  “name” : “Sample Product”,

  “type” : “simple”,

  “regular_price” : “250”,

  “wholesale_price” : {

“default_wholesaler” : {

“wholesale_price” : “33”, “discount_type” : “percent”, “min_qty” : “15”

}

“wholesale_price” : “88”,

“discount_type” : “fixed”,

“wholesale_price” : “99.99”,

“discount_type” : “percent”,

“min_qty” : “25”

        }

  }

}- Response Example
- STATUS: 200 OK (Creating a Wholesale product)

- STATUS: 400 Bad Request (In case of Invalid Product Type)
Update a Wholesale Product (POST) #
- Request Example
- METHOD: PUT
- ENDPOINT: /wp-json/wholesale/v1/products/{product_id}?wholesale_role=default_wholesaler
- POSTMAN: Update a Wholesale Product
PUT: wholesale/v1/products/{product_id}?wholesale_role=default_wholesaler
JSON Body:
{

“name” : “Sample Product”,

“type” : “simple”,

“regular_price” : “250”,

“wholesale_price” : {

“default_wholesaler” : {

“wholesale_price” : “33”, “discount_type” : “percent”, “min_qty” : “15”

},

“wholesaler_b” : {

“wholesale_price” : “88”,

“discount_type” : “fixed”,

“min_qty” : “20”

},

“wholesaler_c” : {

“wholesale_price” : “99.99”,

“discount_type” : “percent”,

“min_qty” : “25”

}

}

}- Response Example
- STATUS: 200 OK (Updating a Wholesale product)
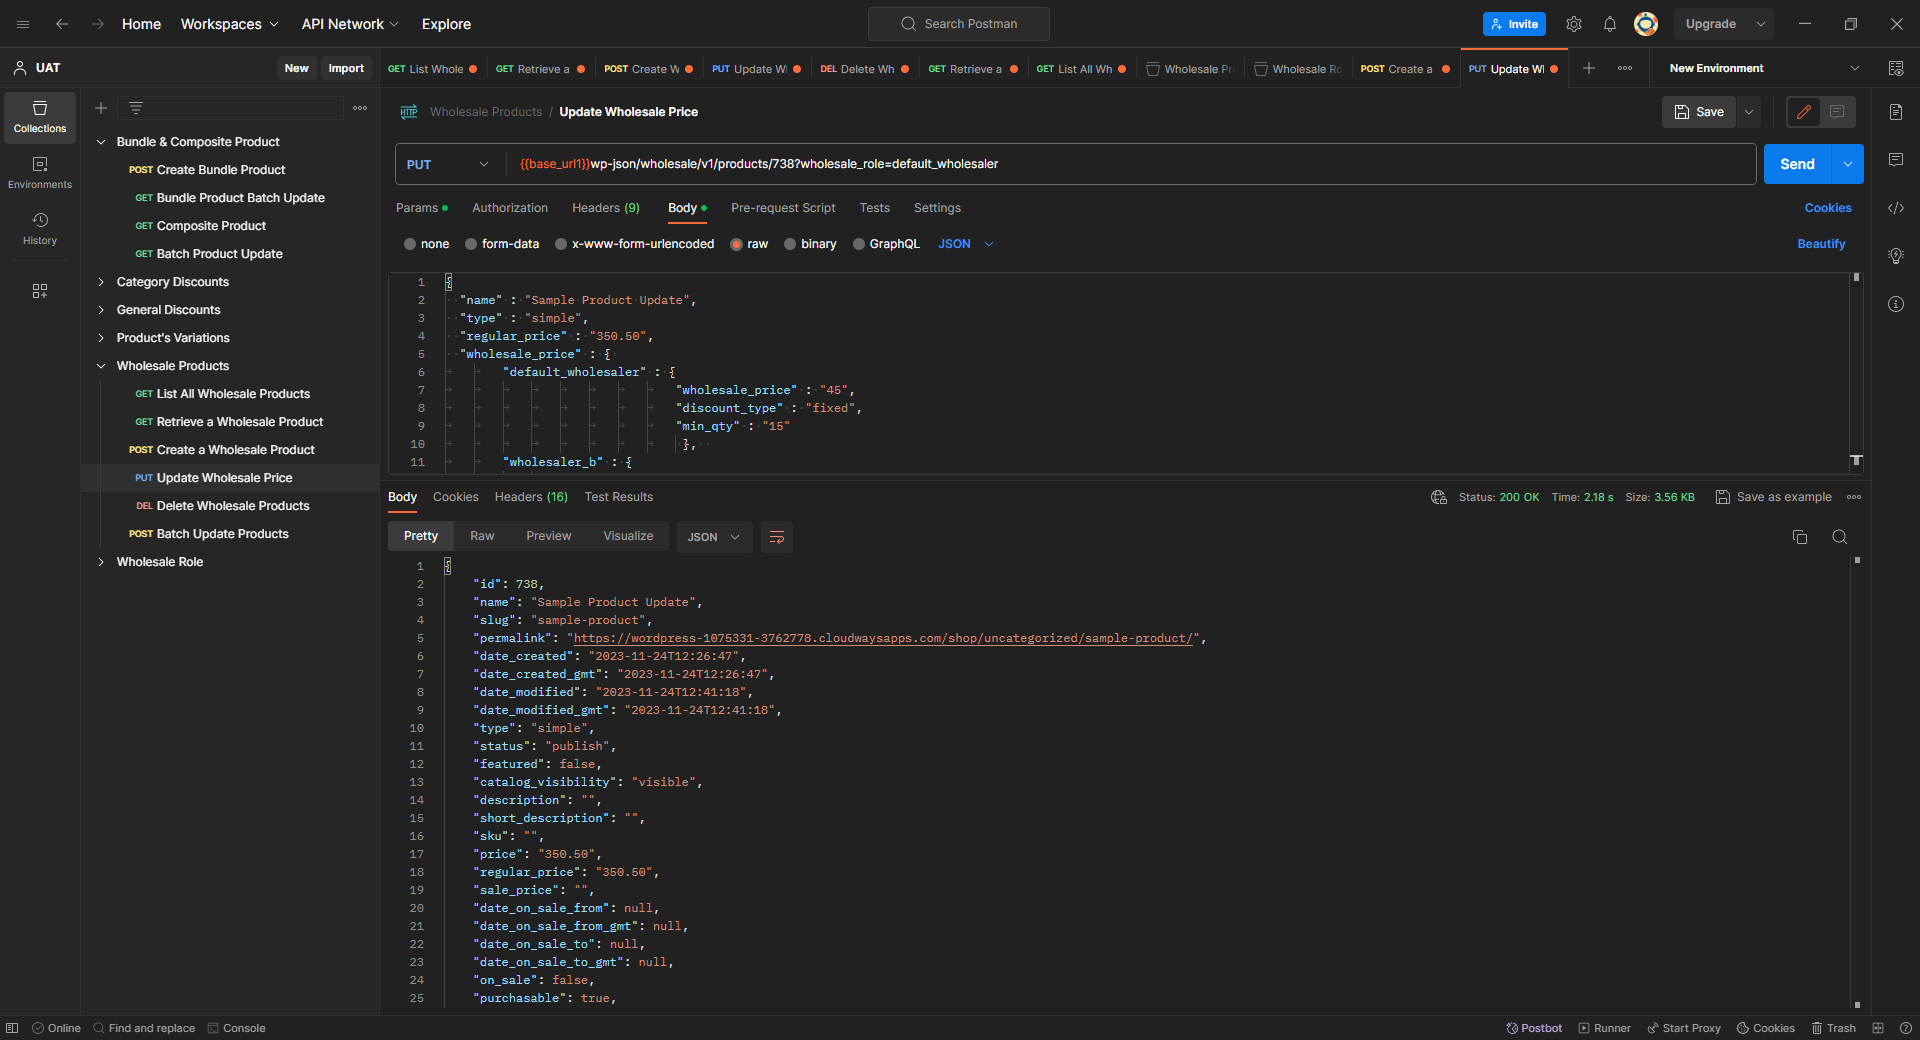
- STATUS: 400 Bad Request (In case of Invalid Product ID)

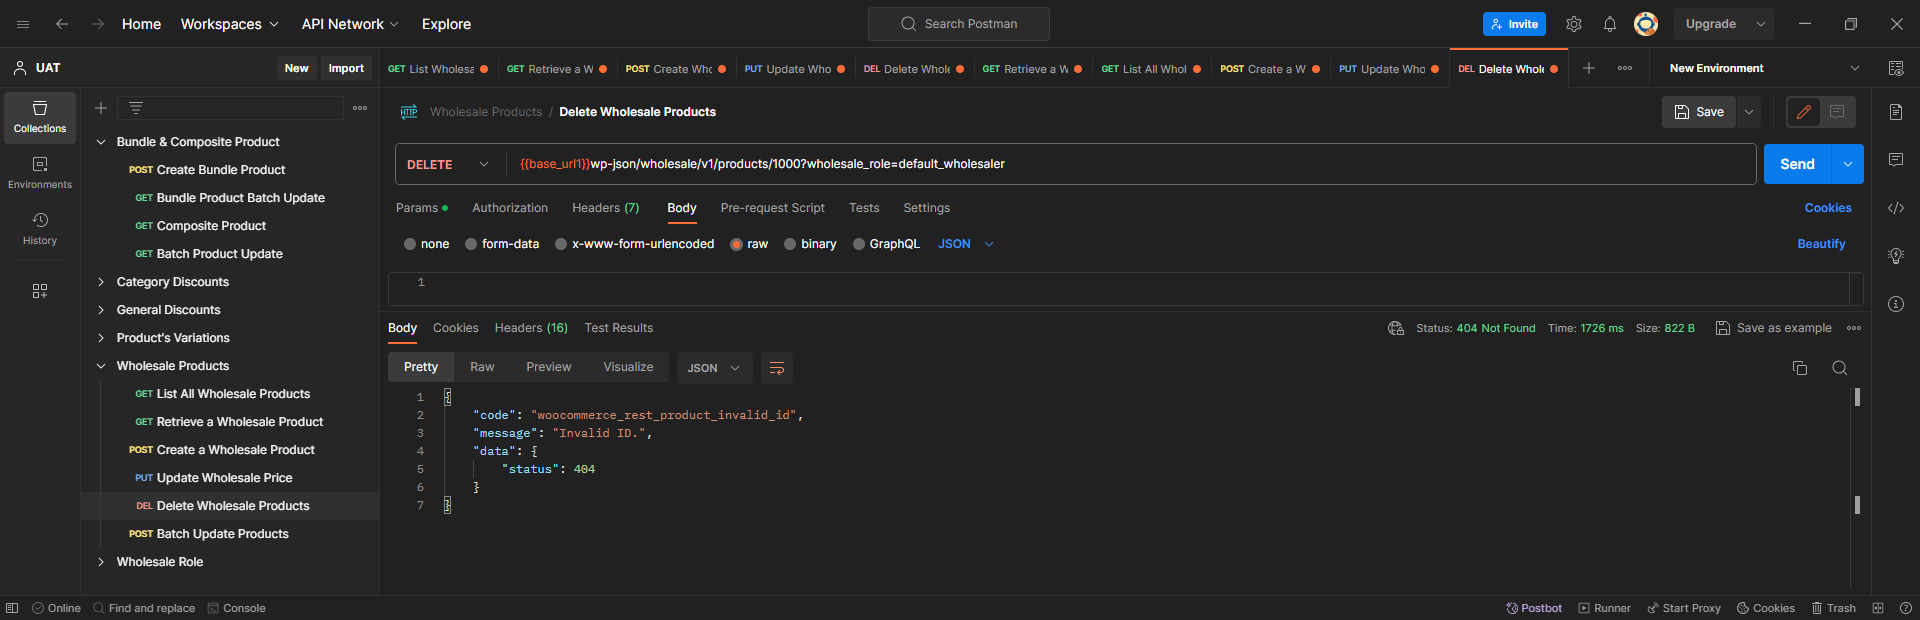
Delete a Wholesale Product (DELETE) #
- Request Example
- METHOD: DELETE
- ENDPOINT: /wp-json/wholesale/v1/products/{product_id}?wholesale_role=default_wholesaler
- POSTMAN: Delete a Wholesale Product
DELETE: wholesale/v1/products/{product_id}?wholesale_role=default_wholesaler
- Response Example
- STATUS: 200 OK (Deleting a Wholesale product)
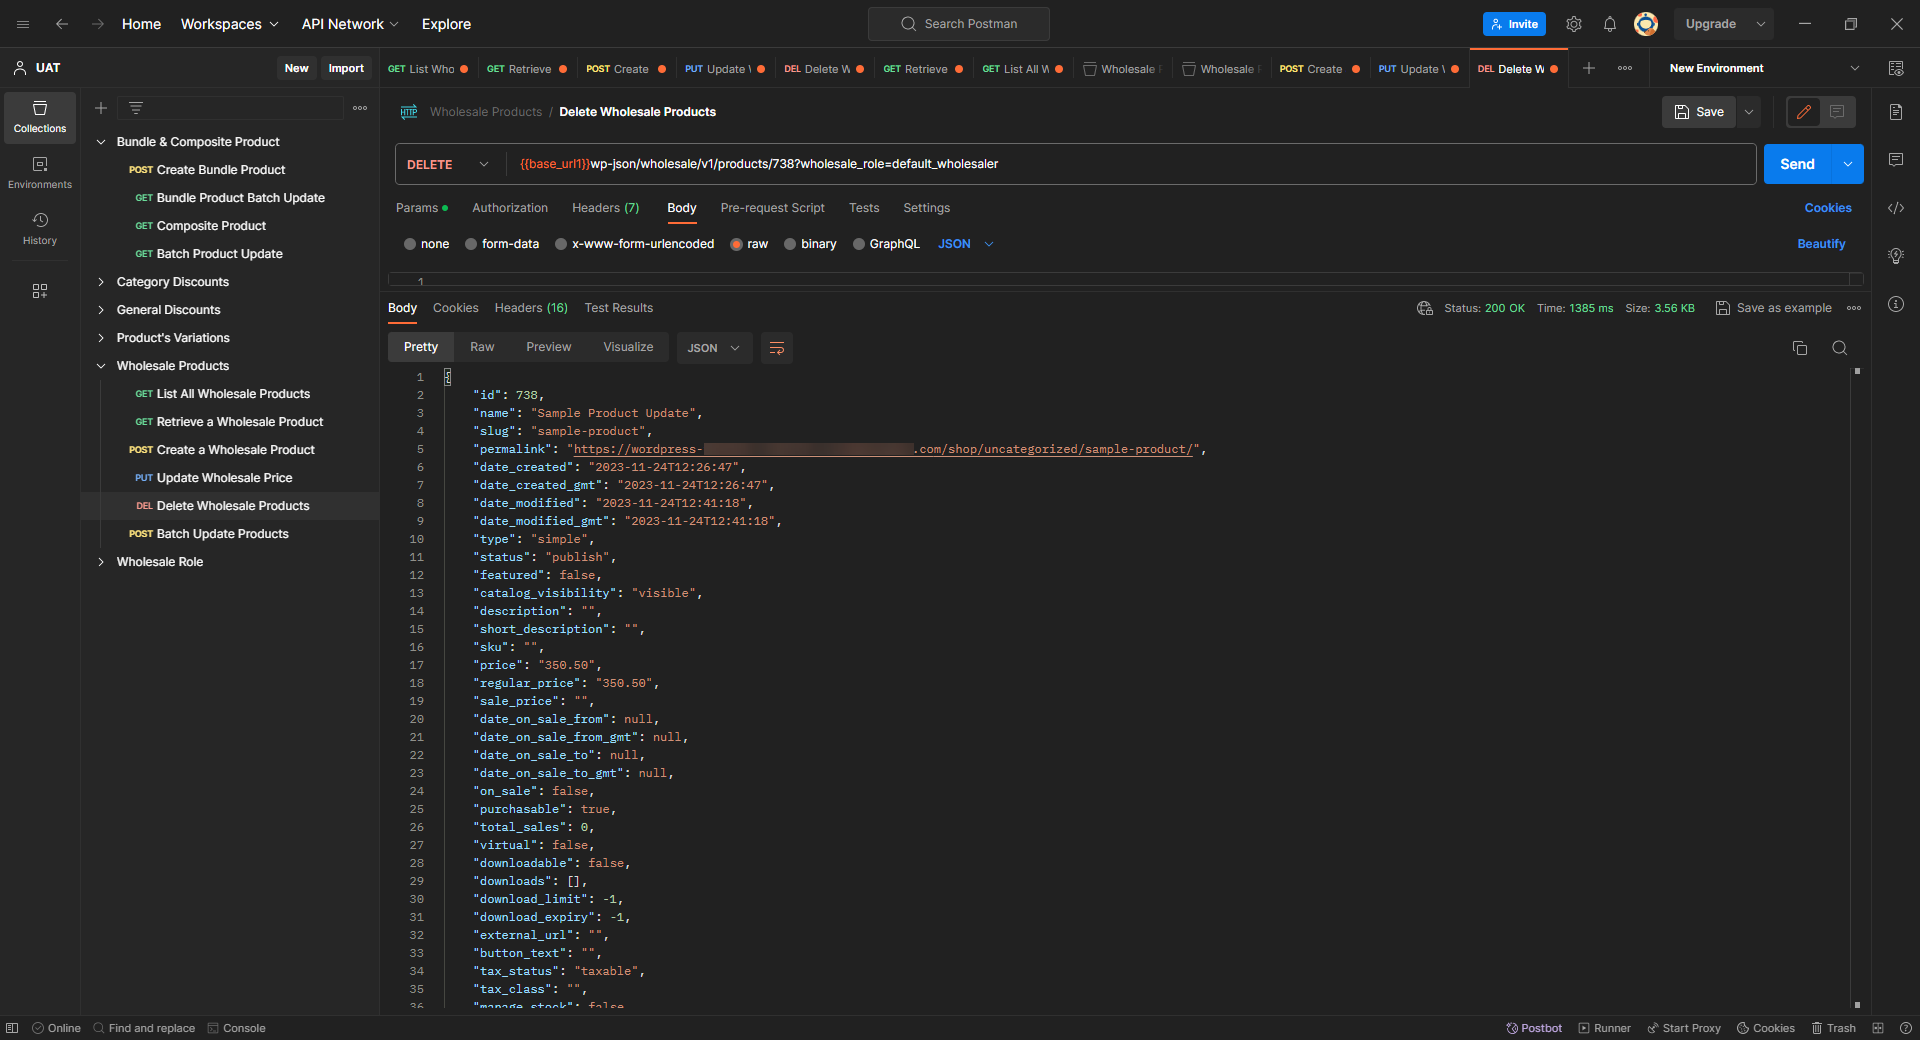
- STATUS: 404 Not Found (In case of Invalid Product ID)
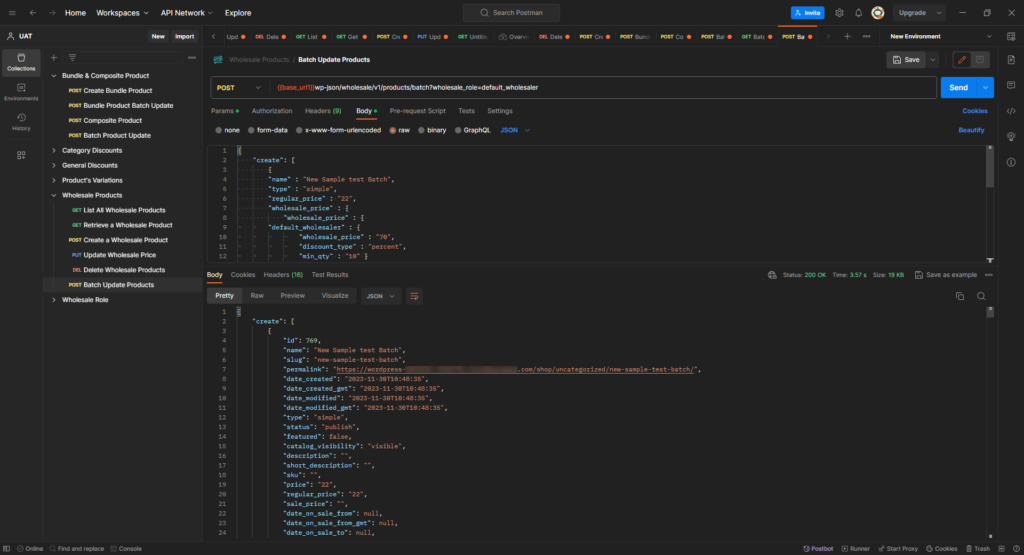
Batch Update a Wholesale Product (POST) #
- Request Example
- METHOD: POST
- ENDPOINT: /wp-json/wholesale/v1/products/batch?wholesale_role=default_wholesaler
- POSTMAN: Batch Update a Wholesale Product
POST: wholesale/v1/products/batch?wholesale_role=default_wholesaler
JSON Body:
{

    “create”: [

        {

        “name” : “New Sample test Batch”,

        “type” : “simple”,

        “regular_price” : “22”,

        “wholesale_price” : {

            “wholesale_price” : {

                “default_wholesaler” : {

                                “wholesale_price” : “70”,

                                “discount_type” : “percent”,

                                “min_qty” : “10” }

        }

    }

        }

    ],

    “update”: [

        {

            “id”: 728,

            “name” : “Test Data Update”,

            “type” : “simple”,

            “regular_price” : “500”,

            “wholesale_price” : {

                “wholesale_price” : “75”,

                “role” : “default_wholesaler”,

                “discount_type” : “percent”,

                “min_qty” : “1”

     }

        }

    ],

    “delete”: [

        761,762,763

    ]

}- Response Example
- STATUS: 200 OK (Batch Update a Wholesale Product)
Wholesale Variations #
- The Wholesale Role API provides functionality for Generating, Displaying, Modifying, and Removing wholesale variations.
- Available Routes are mentioned below:
- GET: wholesale/v1/products/{product_id}/variations?wholesale_role=default_wholesaler
- GET: wholesale/v1/products/{product_id}?wholesale_role=default_wholesaler
- POST: wholesale/v1/products/{product_id}/variations?wholesale_role=default_wholesaler
- PUT: wholesale/v1/products/{product_id/variations/{variation_id?wholesale_role=default_wholesaler
- DELETE: wholesale/v1/products/{product_id}/variations/{variation_id}?wholesale_role=default_wholesaler
- POST: wholesale/v1/products/{product_id}/variations/batch
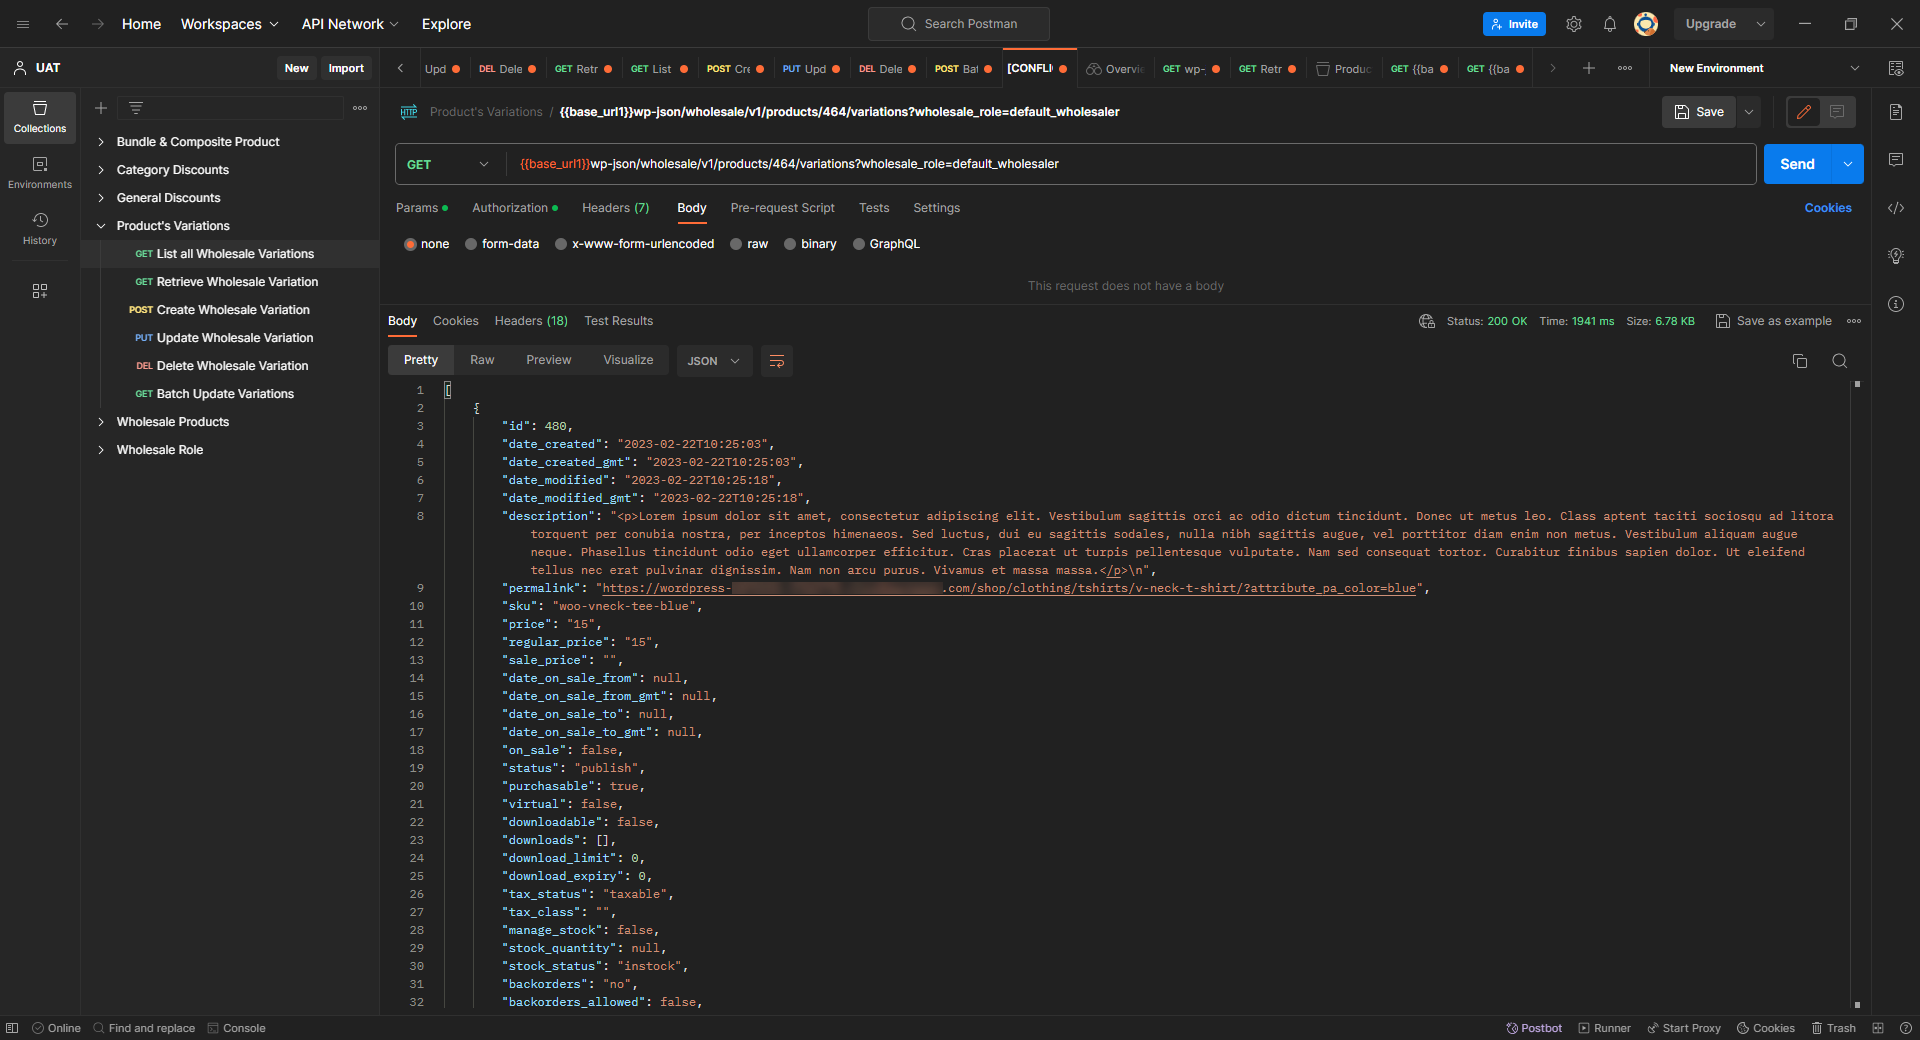
List All Wholesale Variations (GET) #
- Request Example
- METHOD: GET
- ENDPOINT: /wp-json/wholesale/v1/products/{product_id}/variations?wholesale_role=default_wholesaler
- POSTMAN: Fetch Wholesale product variations with Wholesale Role
GET: wholesale/v1/products/{product_id}/variations?wholesale_role=default_wholesaler
- Response Example
- STATUS: 200 OK (Fetch Wholesale product variations with Wholesale Role)
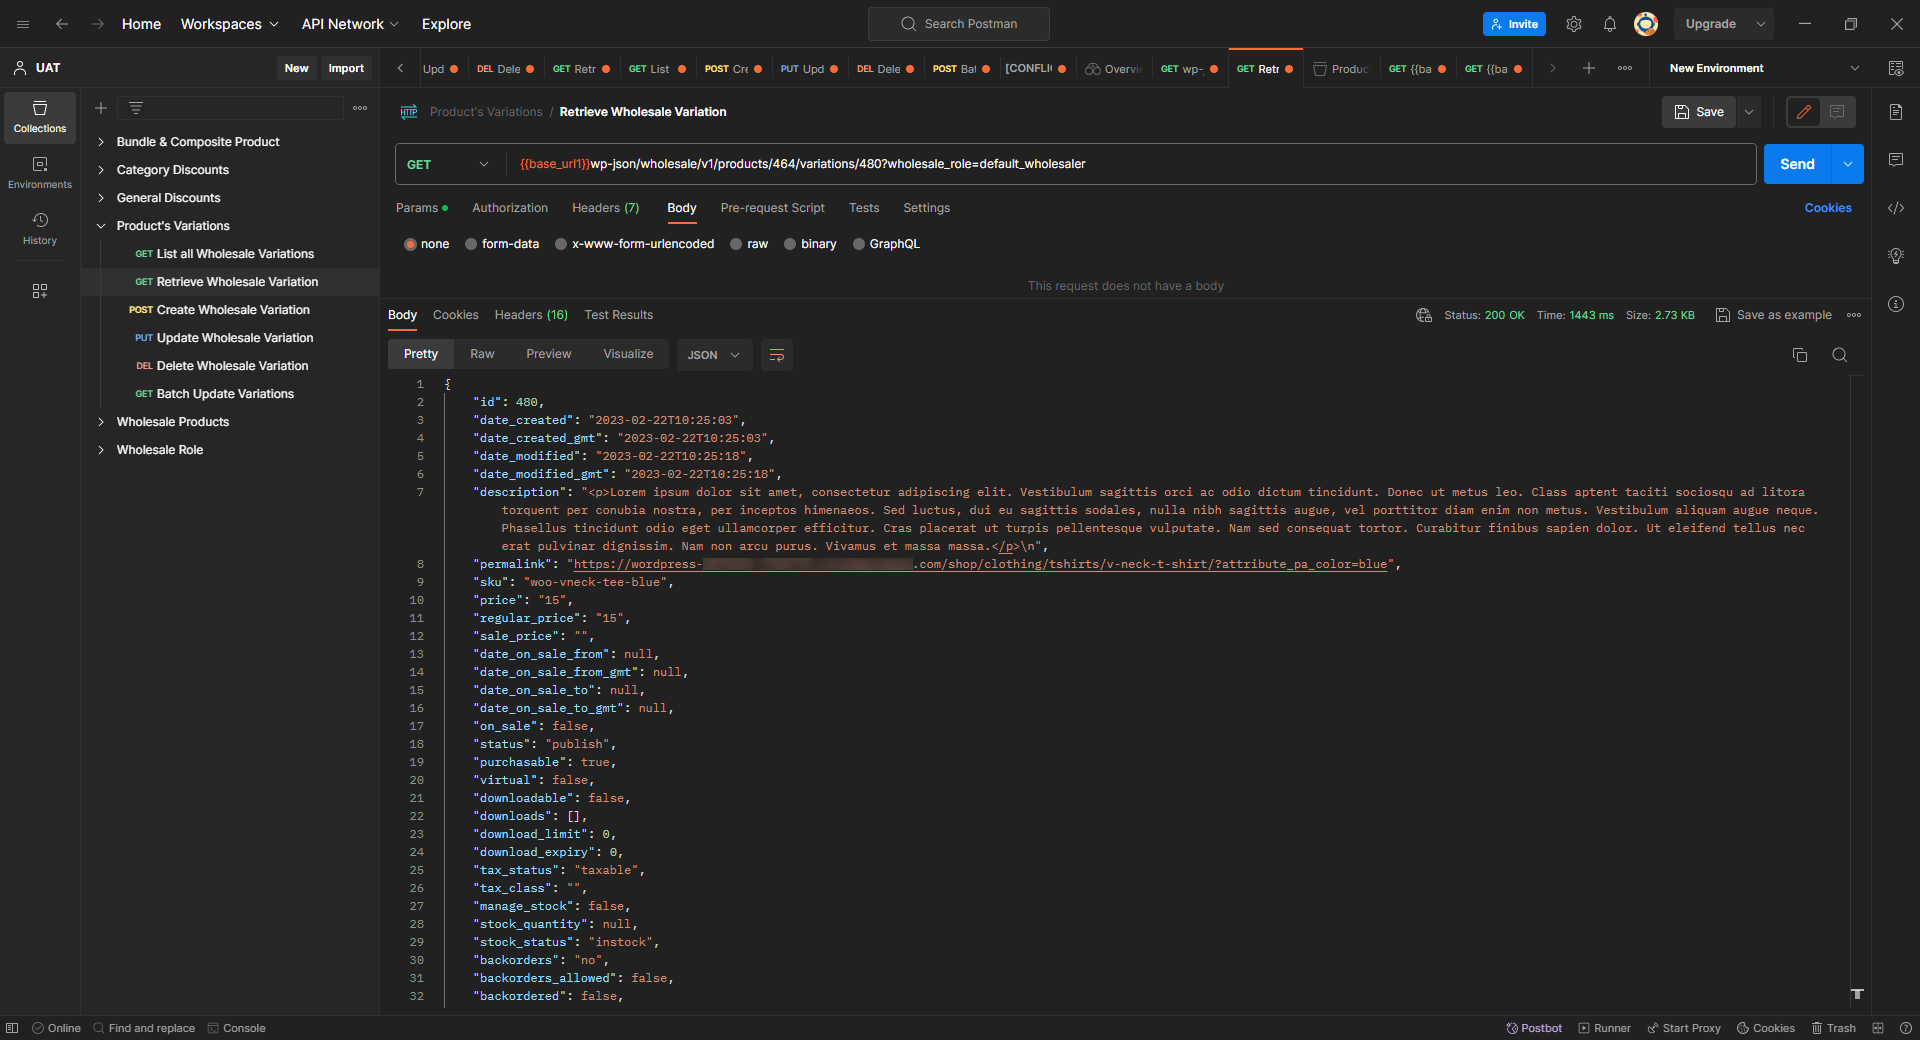
Retrieve a Wholesale Variation (GET) #
- Request Example
- METHOD: GET
- ENDPOINT: /wp-json/wholesale/v1/products/{product_id}?wholesale_role=default_wholesaler
- POSTMAN: Fetch the Product with Wholesale Role
GET: wholesale/v1/products/{product_id}/variations/{variation_id}?wholesale_role=default_wholesaler
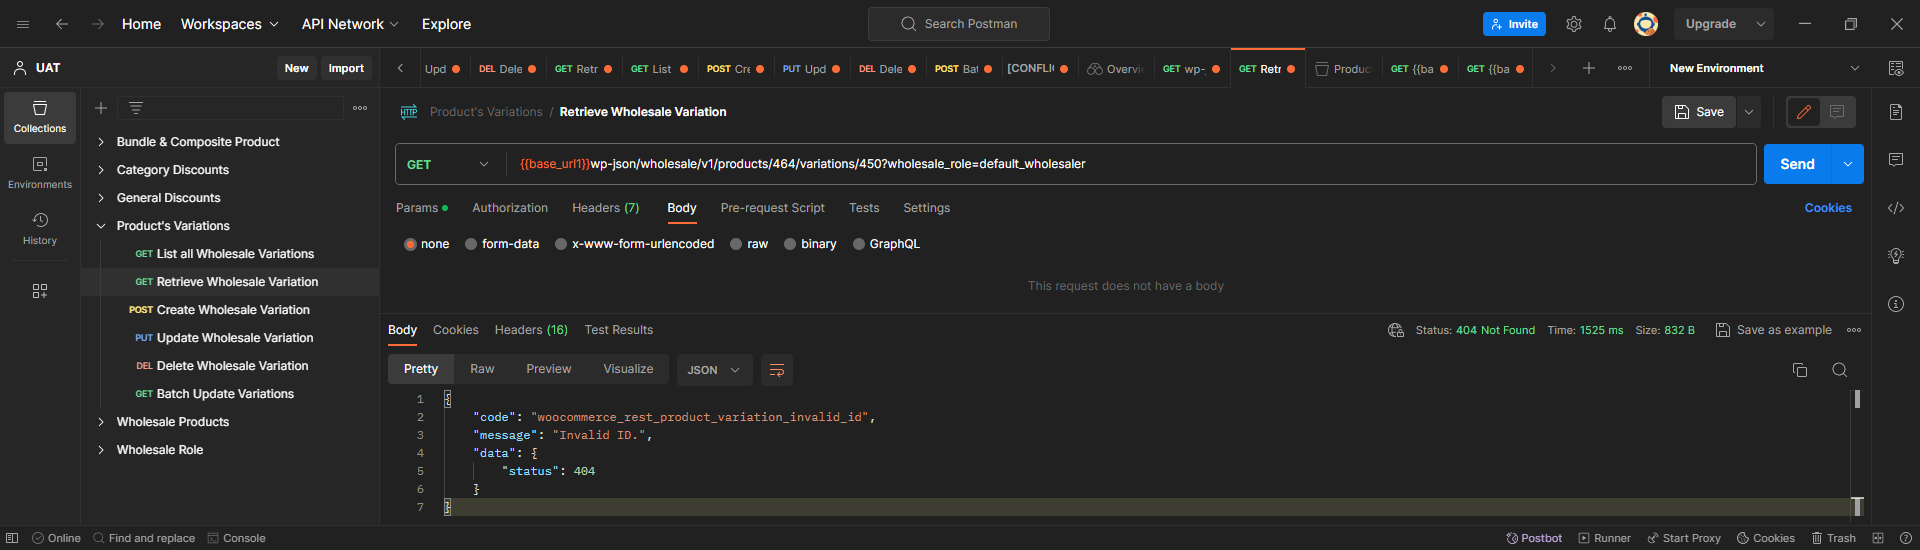
- Response Example
- STATUS: 200 OK (Fetch a specific Wholesale Product Variation)
- STATUS: 404 Not Found (In case of Invalid Variation ID)
Create a Wholesale Variation (POST) #
- Request Example
- METHOD: POST
- ENDPOINT: /wp-json/wholesale/v1/products/{product_id}/variations?wholesale_role=default_wholesaler
- POSTMAN: Create a Wholesale Variation
POST: wholesale/v1/products/{product_id}/variations?wholesale_role=default_wholesaler
JSON Body:
{

    “regular_price”: “12.00”,

    “attributes”: [

            {

                “id”: 1,

                “name”: “Color”,

                “option”: “Red”

            }

    ],

      “wholesale_price” : {

“default_wholesaler” : { “wholesale_price” : “33”,

“discount_type” : “percent”, “min_qty” : “15”

}

   }

}- Response Example
- STATUS: 201 Created (Creating a Wholesale Variation)
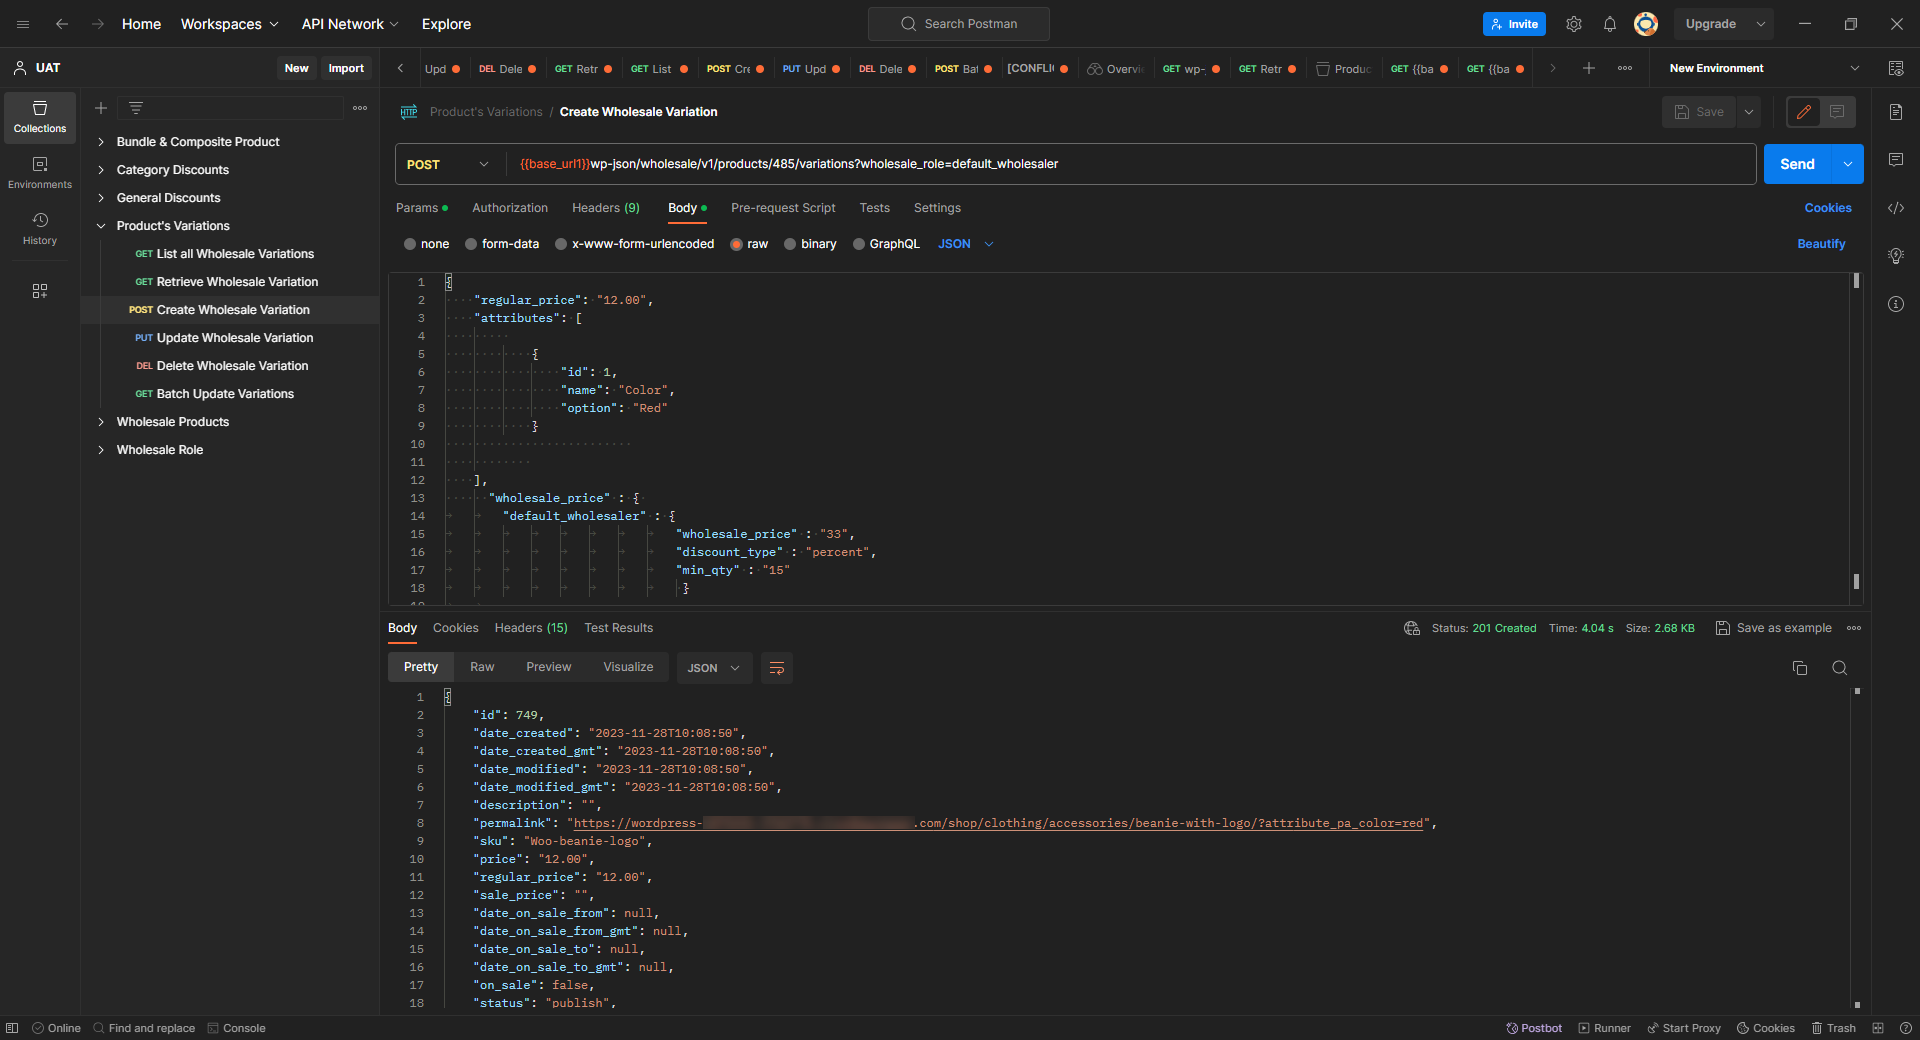
- STATUS: 403 Forbidden (In case of Invalid Product ID or Variation ID)
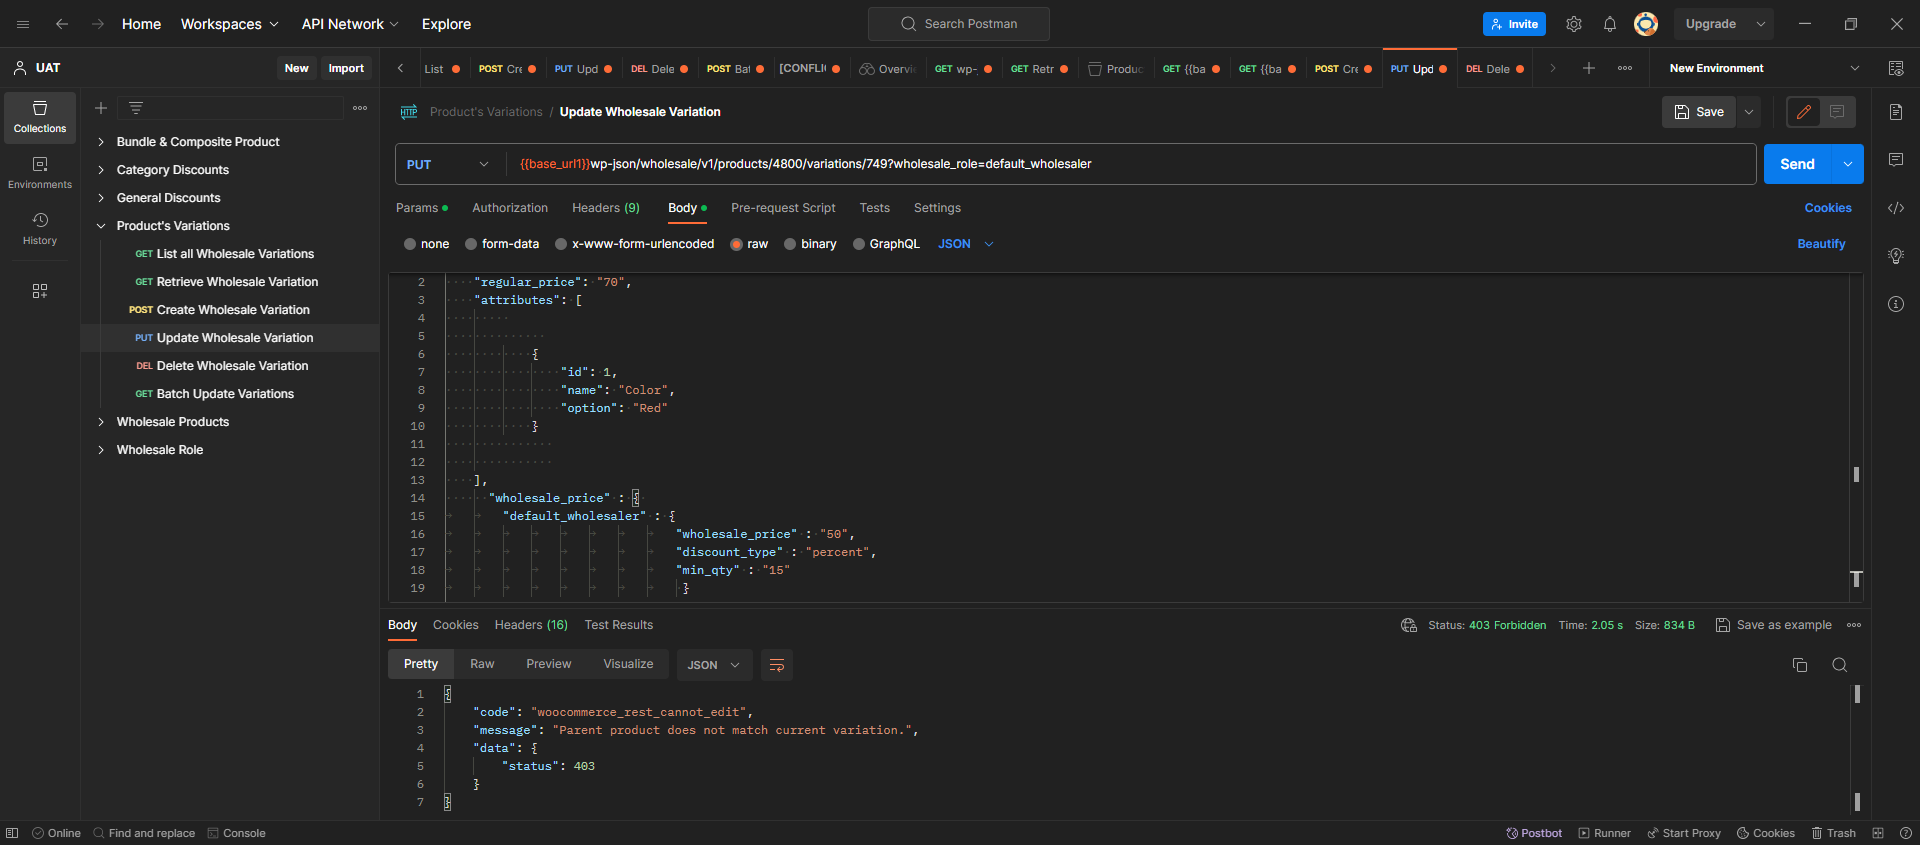
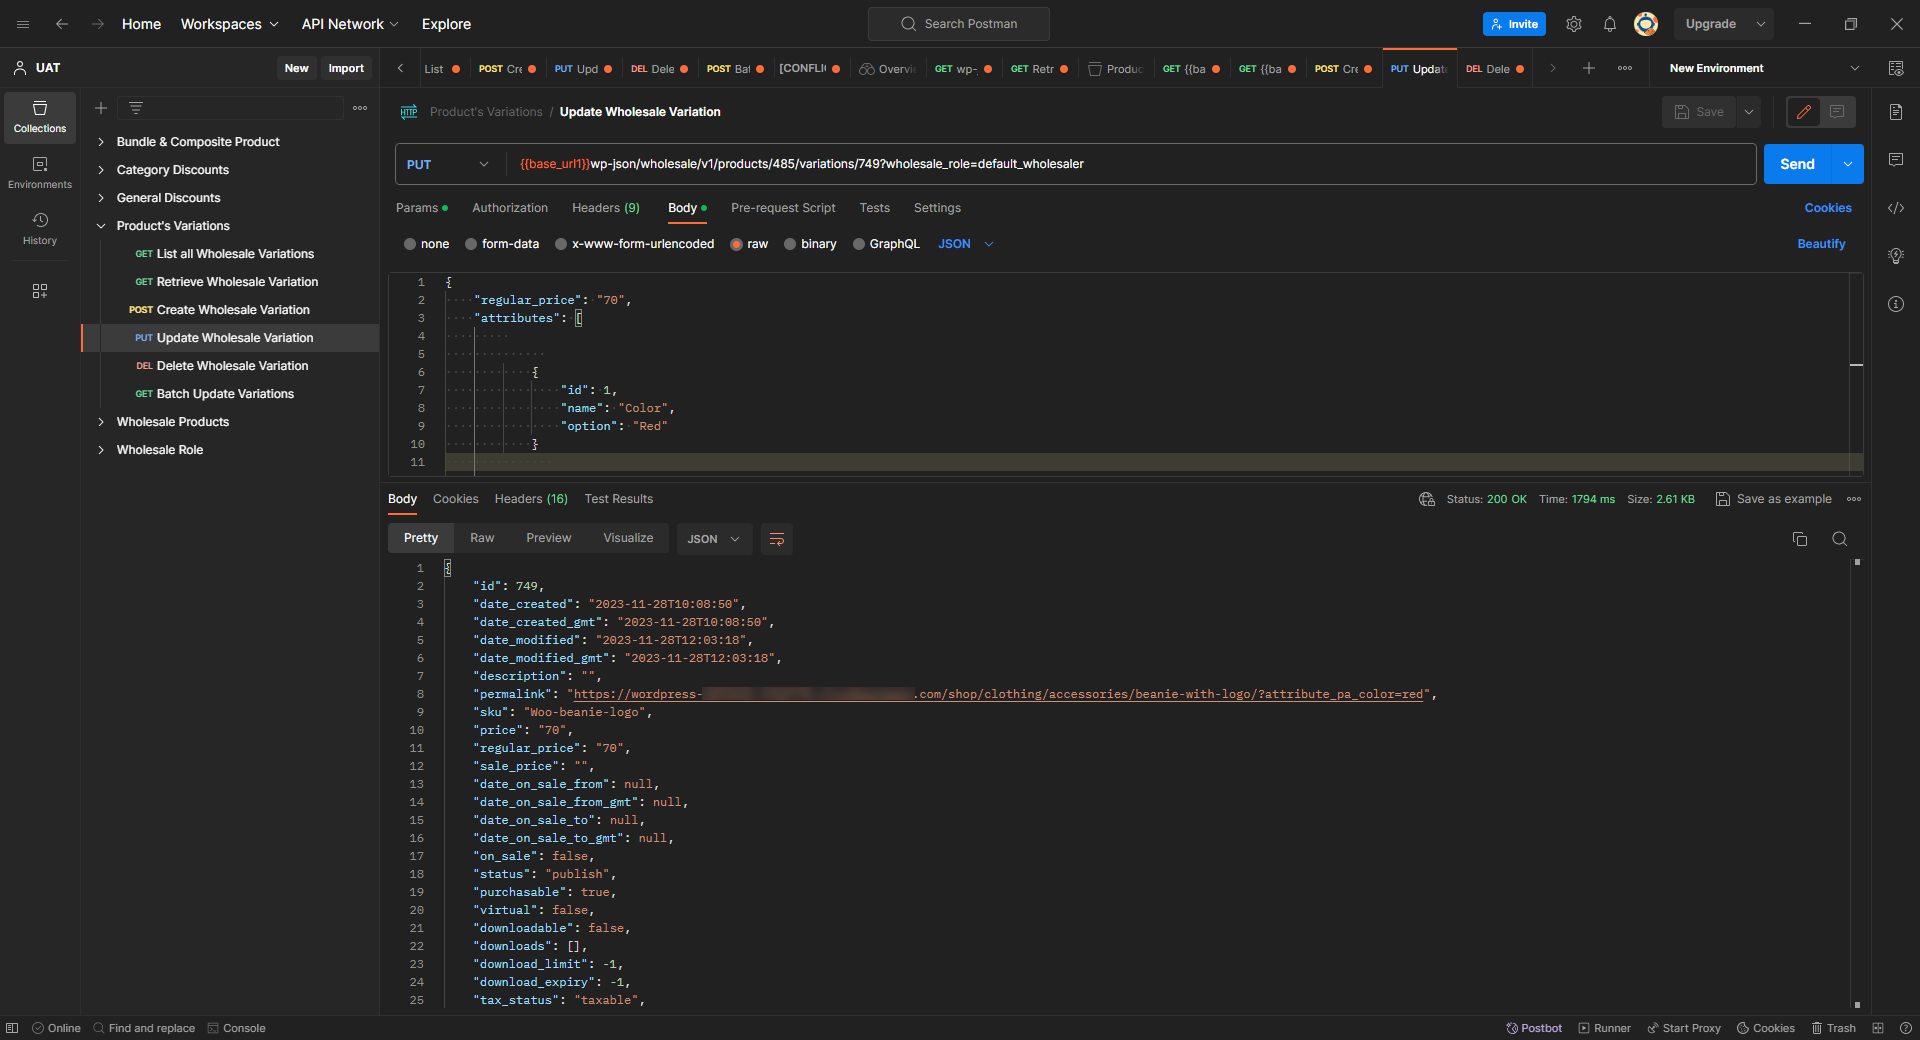
Update a Wholesale Variation (PUT) #
- Request Example
- METHOD: PUT
- ENDPOINT: /wp-json/wholesale/v1/products/{product_id/variations/{variation_id?wholesale_role=default_wholesaler
- POSTMAN: Update a Wholesale Variation
PUT: wholesale/v1/products/{product_id}?wholesale_role=default_wholesaler
JSON Body:
{

    “regular_price”: “70”,

    “attributes”: [

            {

                “id”: 1,

                “name”: “Color”,

                “option”: “Red”

            }

    ],

      “wholesale_price” : {

                “default_wholesaler” : {

                                “wholesale_price” : “50”,

                                “discount_type” : “percent”,

                                “min_qty” : “15”

                                 }

  }

}- Response Example
- STATUS: 200 OK (Updating a Wholesale Variation)
- STATUS: 403 Forbidden (In case of Invalid Product ID or Variation ID)

Delete a Wholesale Variation (DELETE) #
- Request Example
- METHOD: DELETE
- ENDPOINT: /wp-json/wholesale/v1/products/{product_id}/variations/{variation_id}?wholesale_role=default_wholesaler
- POSTMAN: Delete a Wholesale Variation
DELETE: wholesale/v1/products/{product_id}/variations/{variation_id}?wholesale_role=default_wholesaler
- Response Example
- STATUS: 200 OK (Deleting a Wholesale product)

Batch Wholesale Variation (POST) #
- Request Example
- METHOD: POST
- ENDPOINT: /wp-json/wholesale/v1/products/batch?wholesale_role=default_wholesaler
- POSTMAN: Batch Update Wholesale Product
POST: wholesale/v1/products/batch?wholesale_role=default_wholesaler
JSON Body:
{

    “create”: [

        {

        “name” : “New Sample test Batch”,

        “type” : “simple”,

        “regular_price” : “22”,

        “wholesale_price” : {

            “wholesale_price” : {

                “default_wholesaler” : {

                                “wholesale_price” : “70”,

                                “discount_type” : “percent”,

                                “min_qty” : “10” }

        }

    }

        }

    ],

    “update”: [

        {

            “id”: 728,

            “name” : “Test Data Update”,

            “type” : “simple”,

            “regular_price” : “500”,

            “wholesale_price” : {

                “wholesale_price” : “75”,

                “role” : “default_wholesaler”,

                “discount_type” : “percent”,

                “min_qty” : “1”

     }

        }

    ],

    “delete”: [

        761,762,763

    ]

}- Response Example
- STATUS: 200 OK (Batch Update Wholesale Product)

Wholesale Category Discounts #
- The Wholesale Category Discounts API provides functionality for Generating, Displaying, Modifying, and Removing wholesale variations.
- Available Routes are mentioned below:
- GET: wholesale/v1/category-discount
- GET: wholesale/v1/category-discount/{category-discount_id}
- POST: wholesale/v1/category-discount
- PUT: wholesale/v1/category-discount/{category-discount_id}
- DELETE: wholesale/v1/category-discount/{category-discount_id}
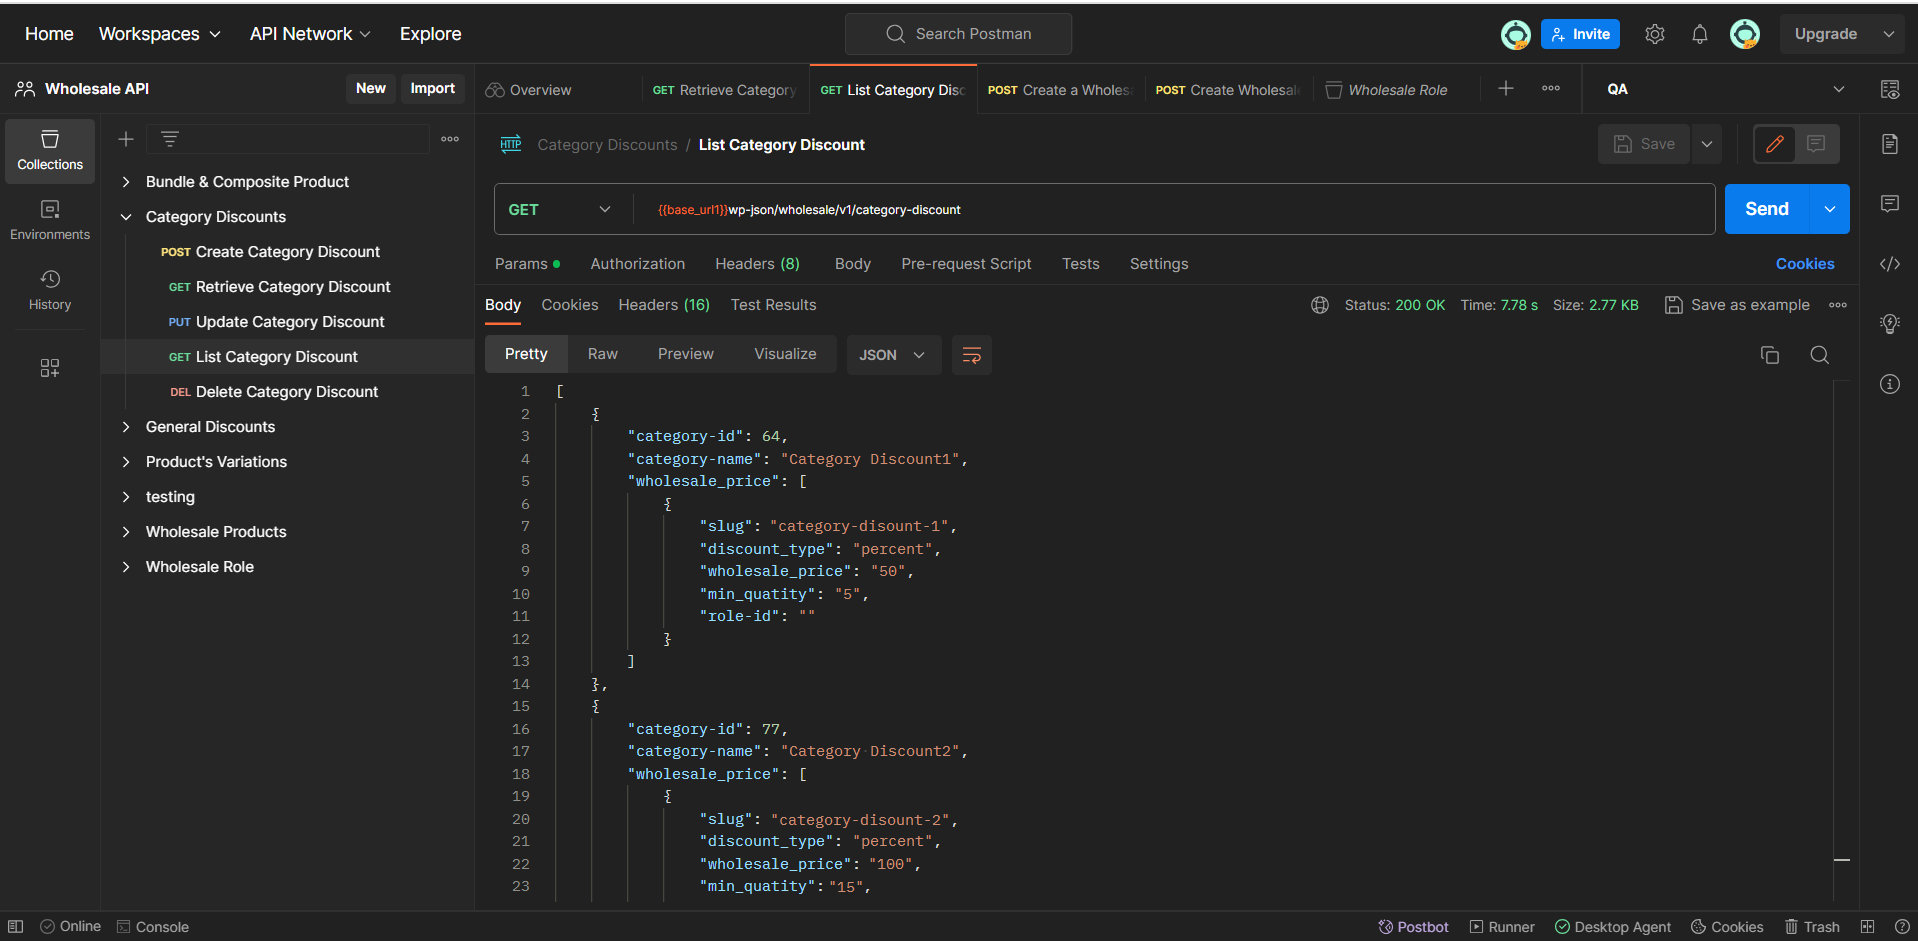
List All Category Discounts (GET) #
- Request Example
- METHOD: GET
- ENDPOINT: /wp-json/wholesale/v1/category-discount
- POSTMAN: Fetch all Categories Discounts with Wholesale Discounts
GET: wholesale/v1/category-discount
- Response Example
- STATUS: 200 OK (Fetch all Category Discount with Wholesale Discounts)
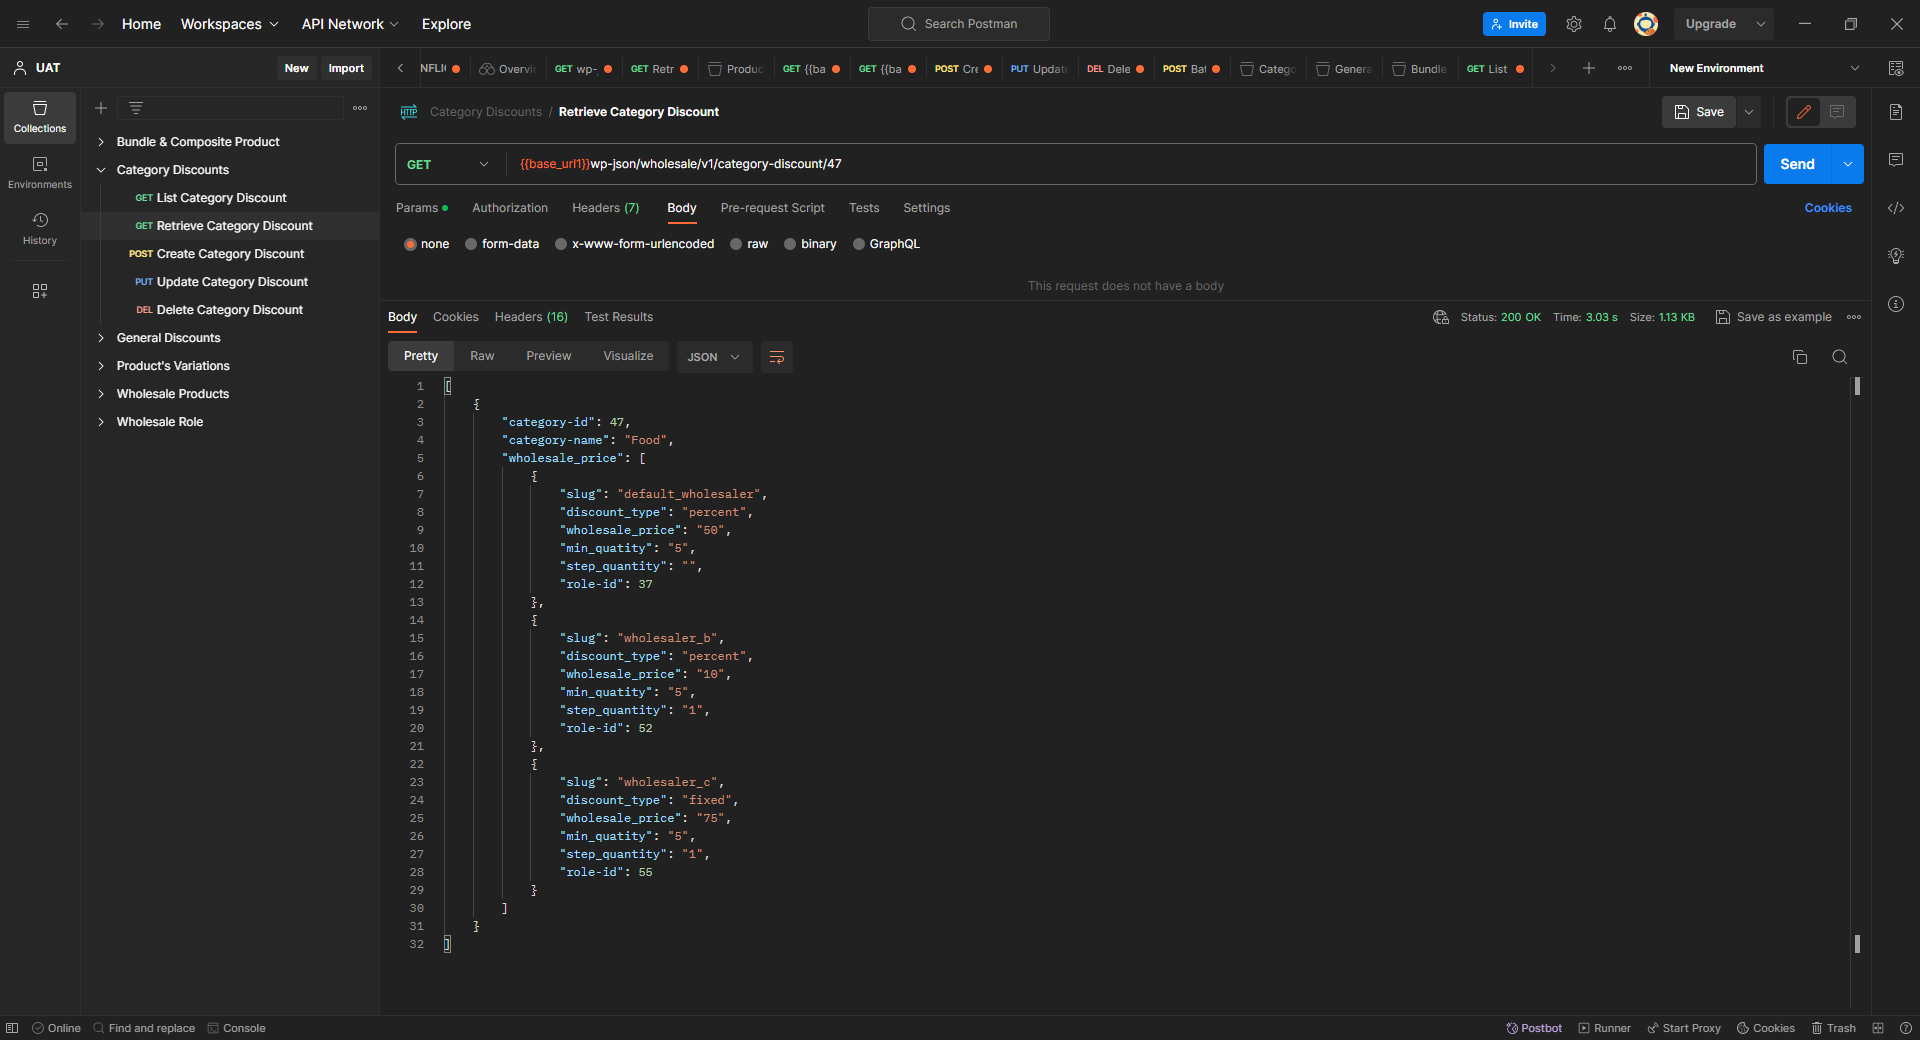
Retrieve a Category Discount (GET) #
- Request Example
- METHOD: GET
- ENDPOINT: /wp-json/wholesale/v1/category-discount/{category-discount_id}
- POSTMAN: Fetch a Category Discount with Wholesale Discounts
GET: wholesale/v1/category-discount/{category-discount_id}
- Response Example
- STATUS: 200 OK (Fetch a specific Category Discount with Wholesale Discounts)
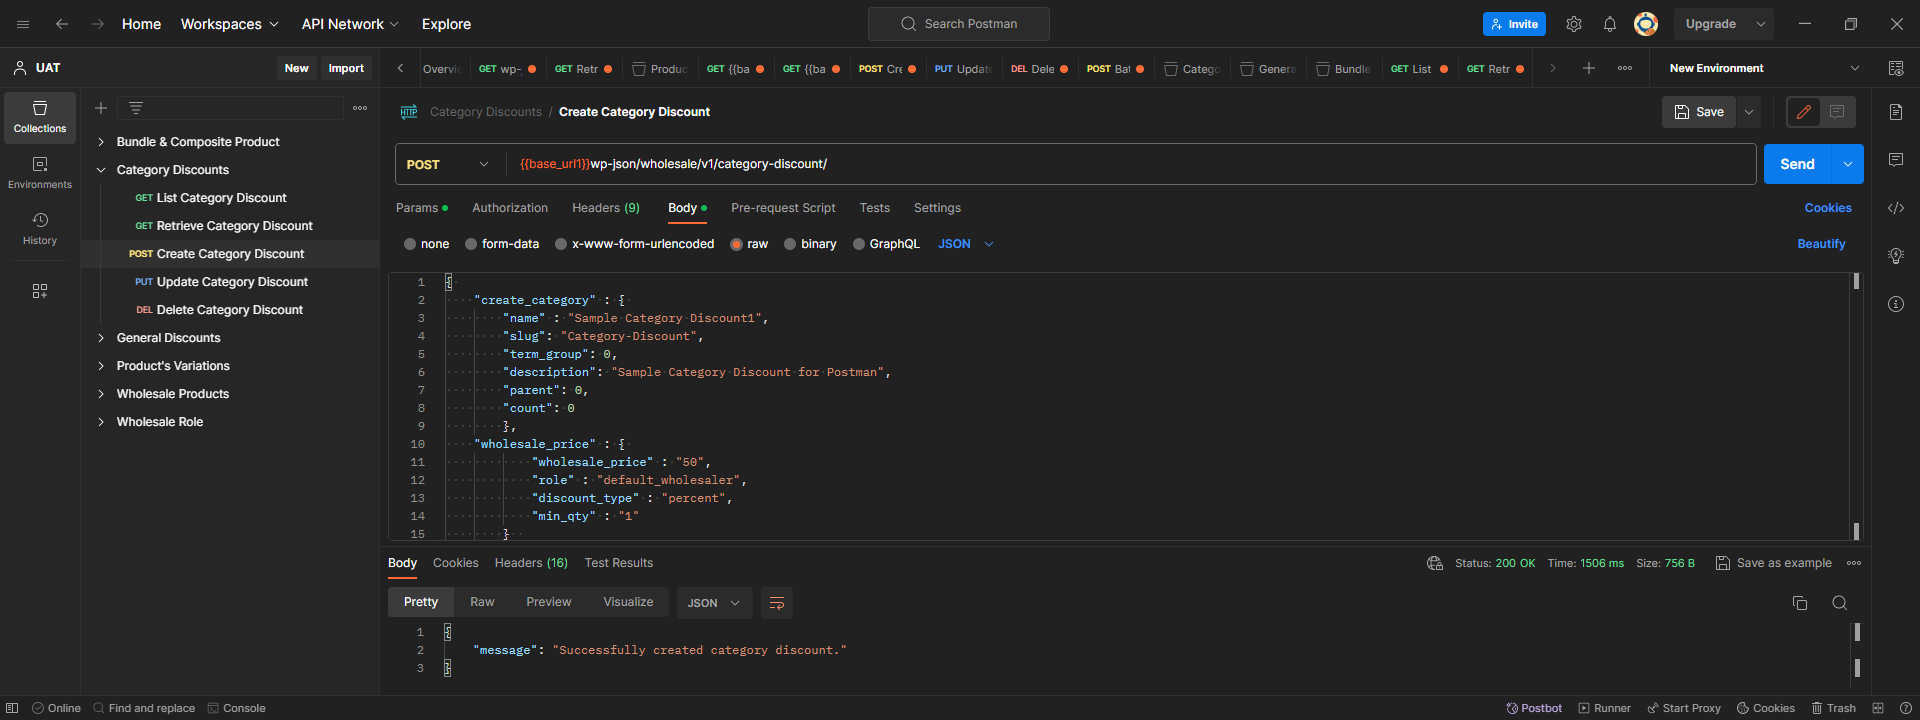
Create a Category Discount (POST) #
- Request Example
- METHOD: POST
- ENDPOINT: /wp-json/wholesale/v1/category-discount
- POSTMAN: Create a Category Discount with Wholesale Discounts
POST: wholesale/v1/category-discount
JSON Body:
{

    “update_category” : {

        “name” : “Update Sample Category”,

        “slug”: “update-category-discount”,

        “term_group”: 0,

        “description”: “Updated Sample Category Discount for Postman”,

        “parent”: 0,

        “count”: 0

        },

     “wholesale_price” : {

            “wholesale_price” : “100”,

            “role” : “wholesaler_b”,

            “discount_type” : “fixed”,

            “min_qty” : “5”

        }

}- Response Example
- STATUS: 200 OK (Creating a Category Discount with Wholesale Discounts)
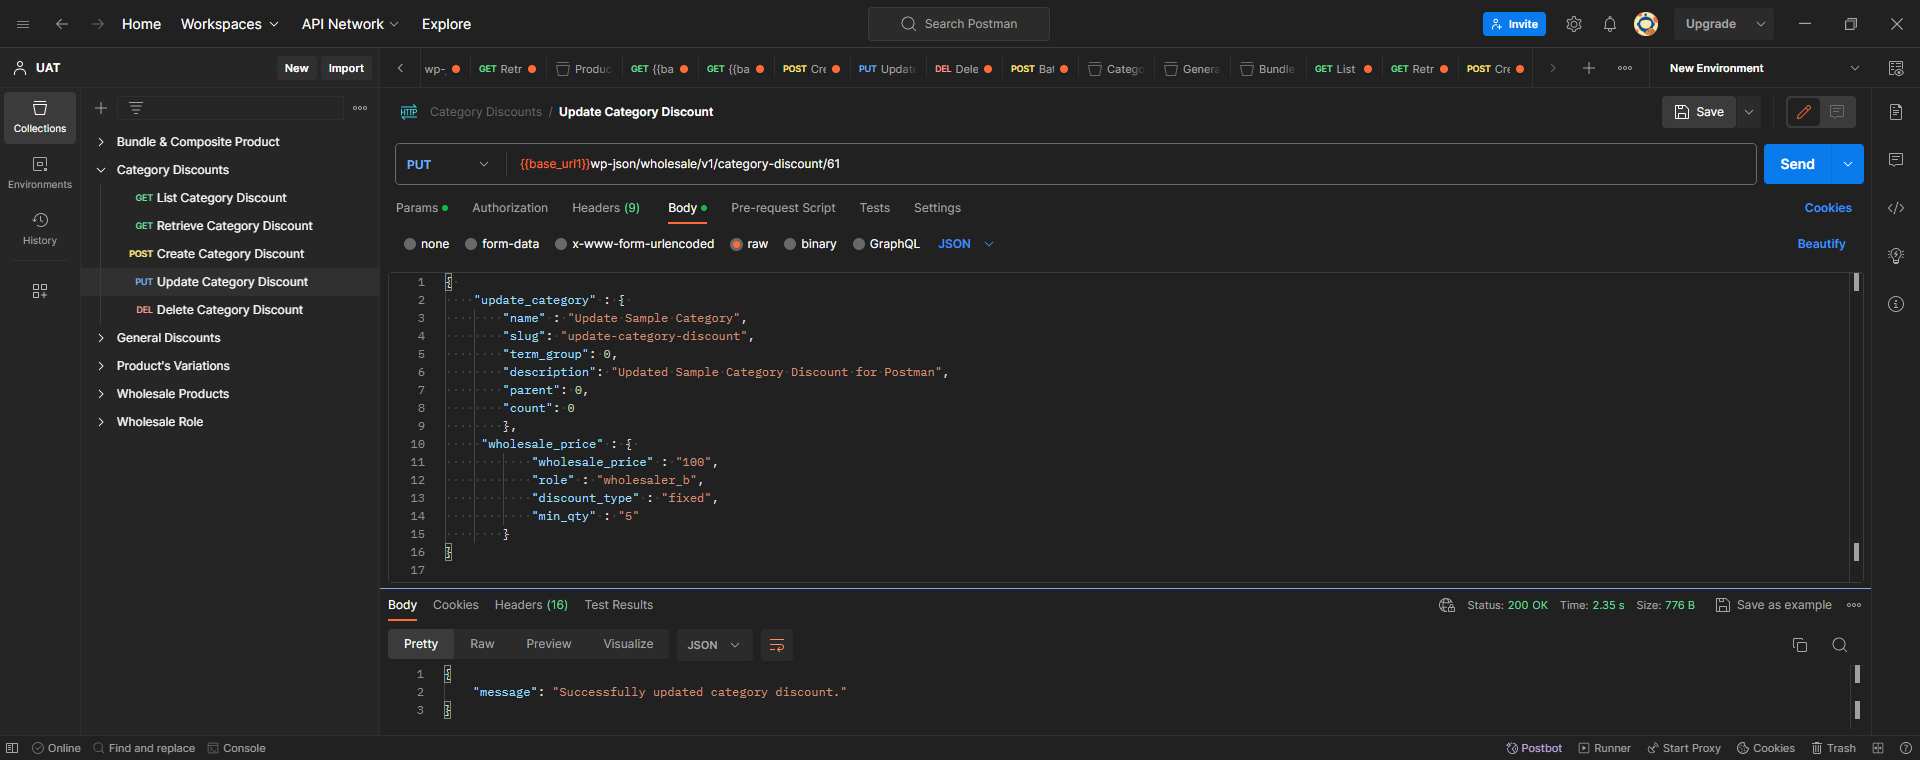
Update a Category Discount (POST) #
- Request Example
- METHOD: PUT
- ENDPOINT: /wp-json/wholesale/v1/category-discount/{category-discount_id}
- POSTMAN: Update a Category Discount with Wholesale Discounts
PUT: wholesale/v1/category-discount/{category-discount_id}
JSON Body:
{

    “update_category” : {

        “name” : “Update Sample Category”,

        “slug”: “update-category-discount”,

        “term_group”: 0,

        “description”: “Updated Sample Category Discount for Postman”,

        “parent”: 0,

        “count”: 0

        },

     “wholesale_price” : {

            “wholesale_price” : “100”,

            “role” : “wholesaler_b”,

            “discount_type” : “fixed”,

            “min_qty” : “5”

        }

}- Response Example
- STATUS: 200 OK (Updating a Category Discount with Wholesale Discounts)
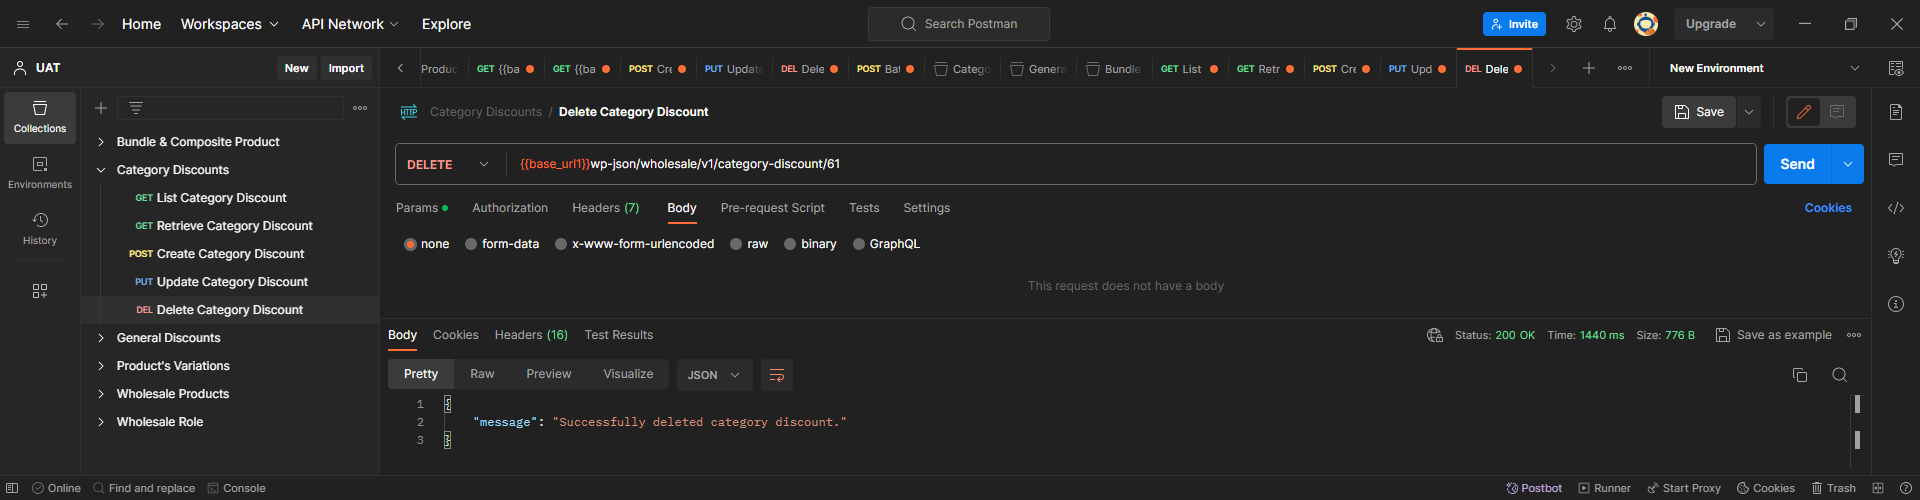
Delete a Category Discount (DELETE) #
- Request Example
- METHOD: DELETE
- ENDPOINT: /wp-json/wholesale/v1/category-discount/{category-discount_id}
- POSTMAN: Delete a Category Discount with Wholesale Discounts
DELETE: wholesale/v1/category-discount/{category-discount_id}
- Response Example
- STATUS: 200 OK (Deleting a Category Discount with Wholesale Discounts)
Wholesale General Discounts #
- The Wholesale General Discounts API provides functionality for Generating, Displaying, Modifying, and Removing wholesale variations.
- Available Routes are mentioned below:
- GET: wholesale/v1/general-discount
- GET: wholesale/v1/general-discount/{general-discount_id}
- POST: wholesale/v1/general-discount
- PUT: wholesale/v1/general-discount/{general-discount_id}
- DELETE: wholesale/v1/general-discount/{general-discount_id}
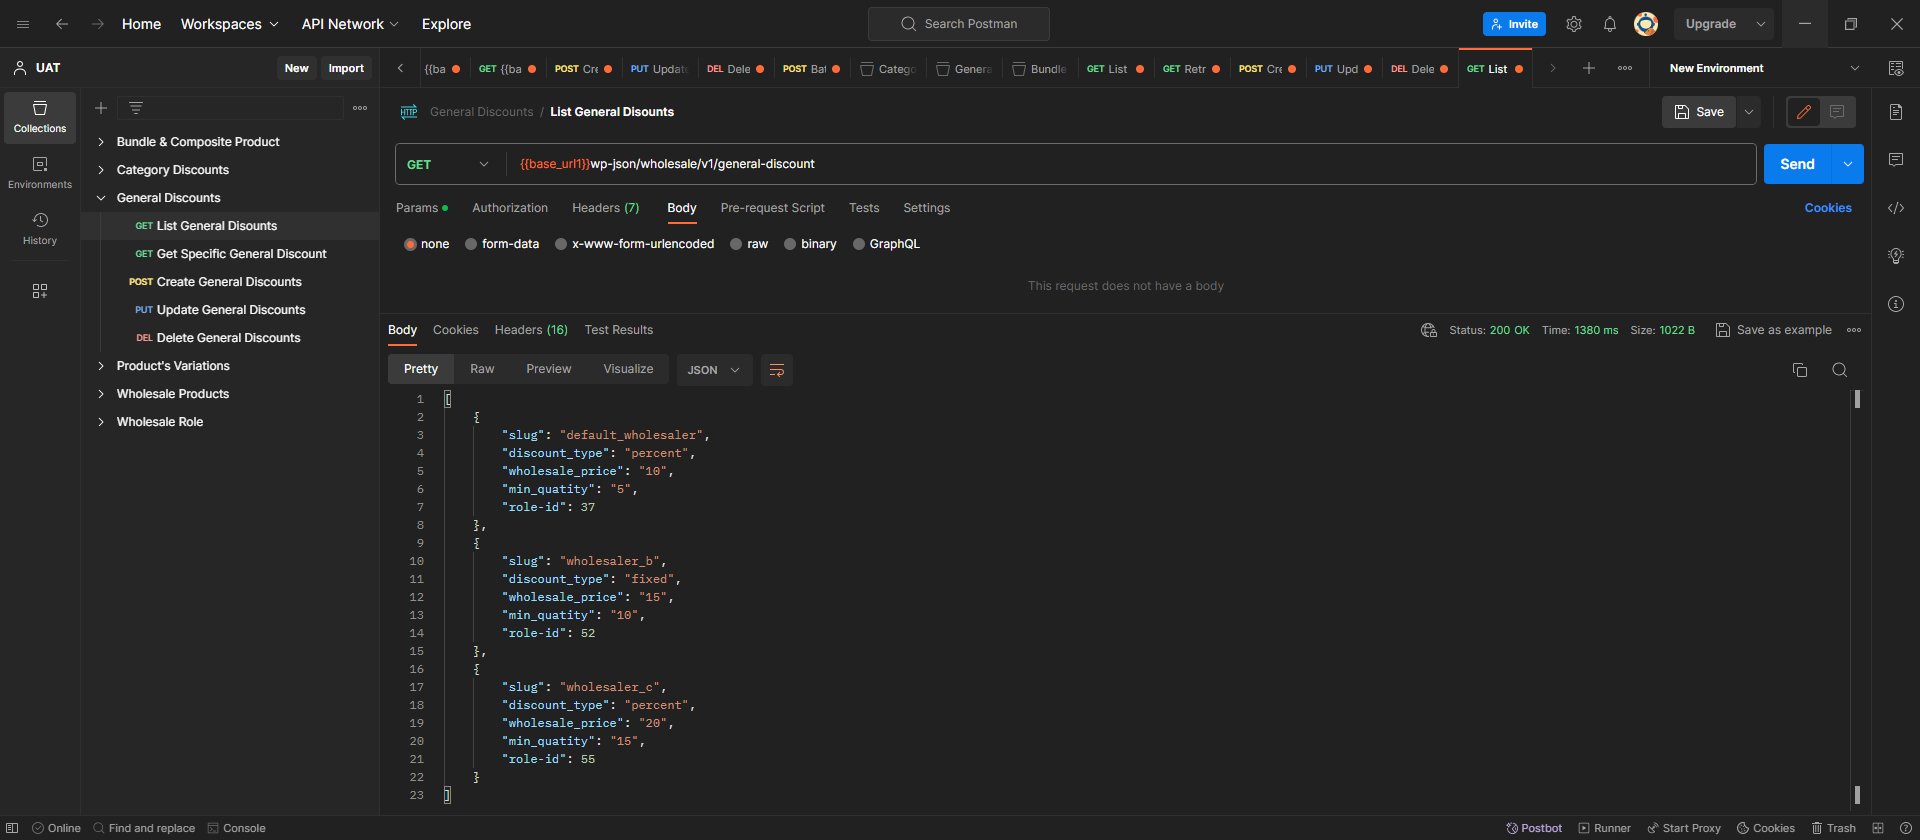
List All General Discounts (GET) #
- Request Example
- METHOD: GET
- ENDPOINT: /wp-json/wholesale/v1/general-discount
- POSTMAN: Fetch General Discounts of all Wholesale Roles
GET: wholesale/v1/general-discount
- Response Example
- STATUS: 200 OK (Fetch all General Discount for all Wholesale Roles)
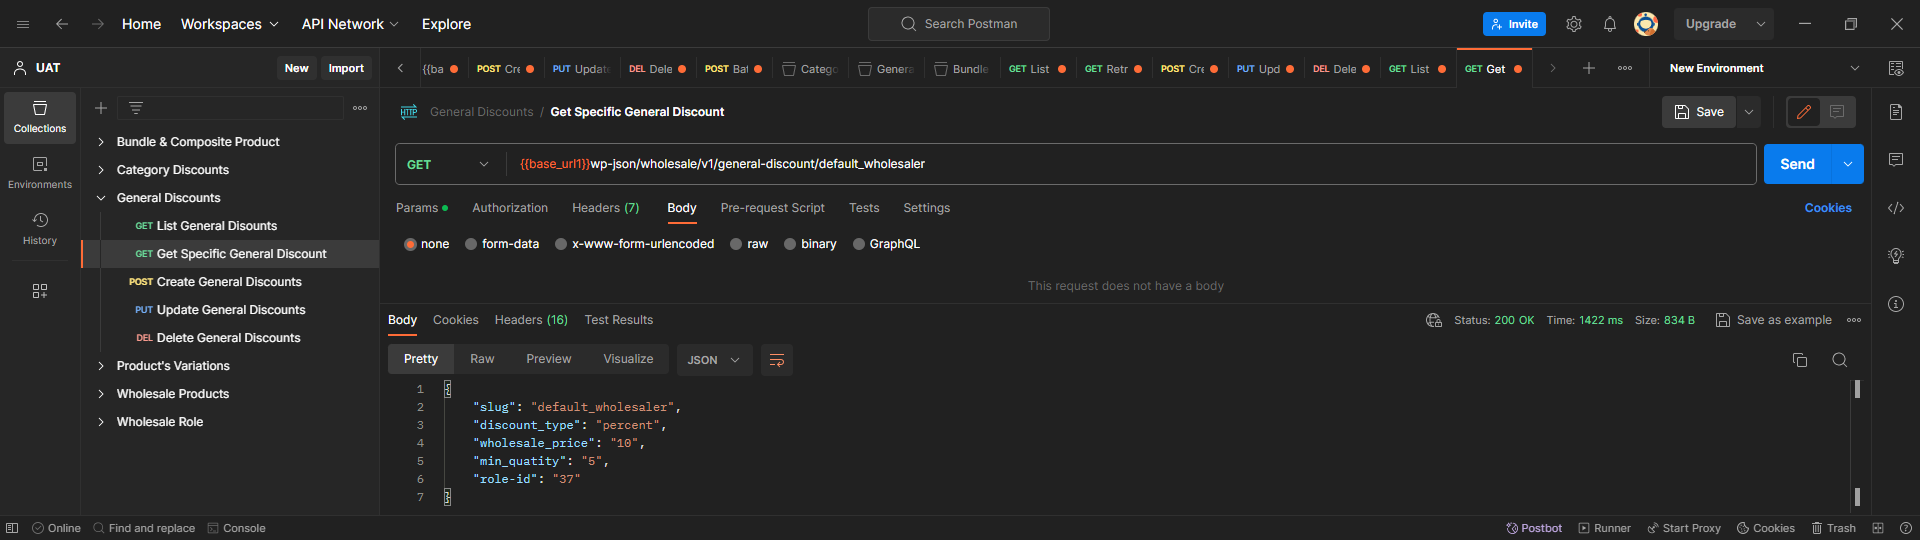
Retrieve a General Discount (GET) #
- Request Example
- METHOD: GET
- ENDPOINT: /wp-json/wholesale/v1/general-discount/{general-discount_id}
- POSTMAN: Fetch a General Discount of a specific Wholesale Role
GET: wholesale/v1/general-discount/{general-discount_id}
- Response Example
- STATUS: 200 OK (Fetch a General Discount for a specific Wholesale Role)
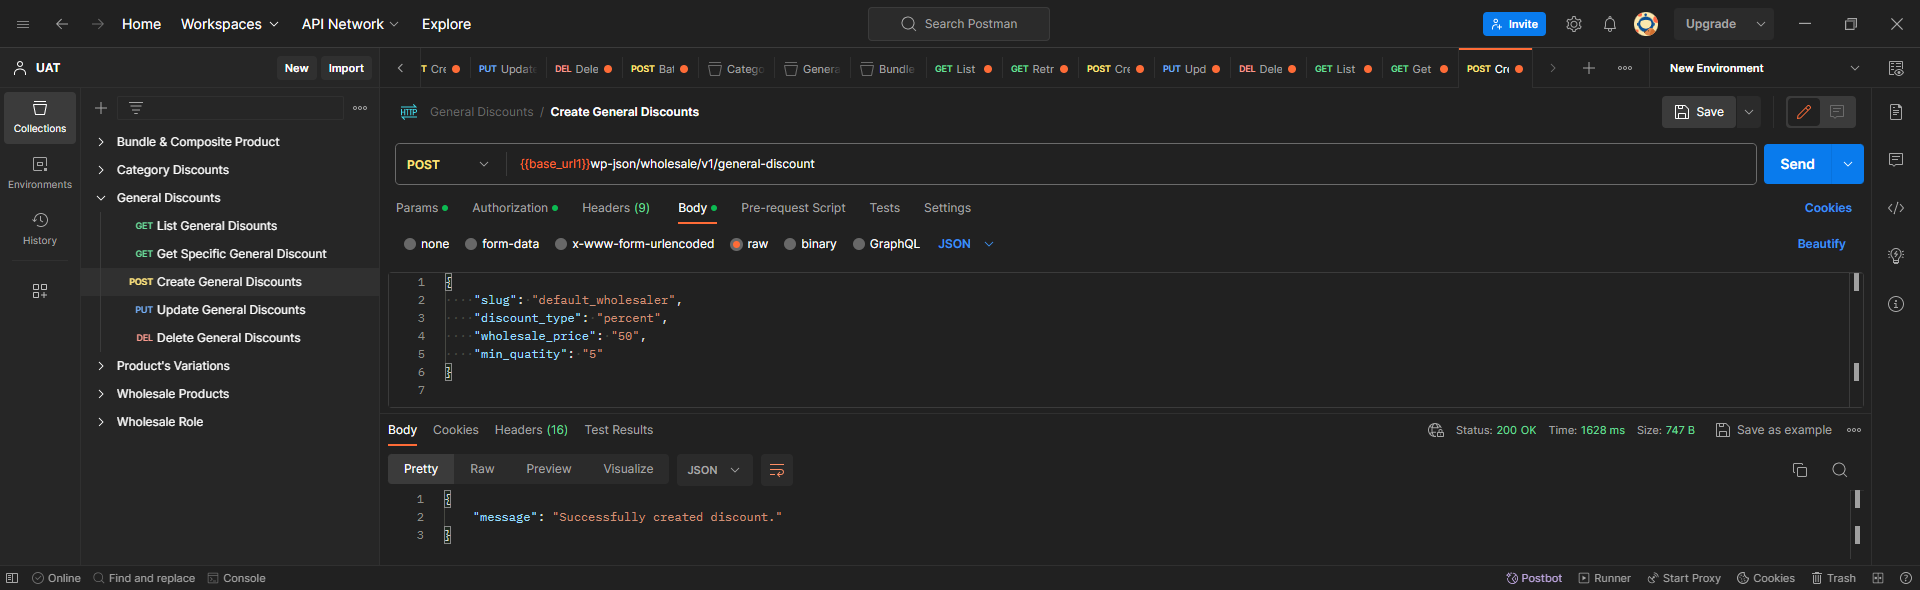
Create a General Discount (POST) #
- Request Example
- METHOD: POST
- ENDPOINT: /wp-json/wholesale/v1/general-discount
- POSTMAN: Create a General Discount for a specific Wholesale Role
POST: wholesale/v1/general-discount
JSON Body:
{

    “update_category” : {

        “name” : “Update Sample Category”,

        “slug”: “update-category-discount”,

        “term_group”: 0,

        “description”: “Updated Sample Category Discount for Postman”,

        “parent”: 0,

        “count”: 0

        },

     “wholesale_price” : {

            “wholesale_price” : “100”,

            “role” : “wholesaler_b”,

            “discount_type” : “fixed”,

            “min_qty” : “5”

        }

}- Response Example
- STATUS: 200 OK (Creating a General Discount for specific Wholesale Role)
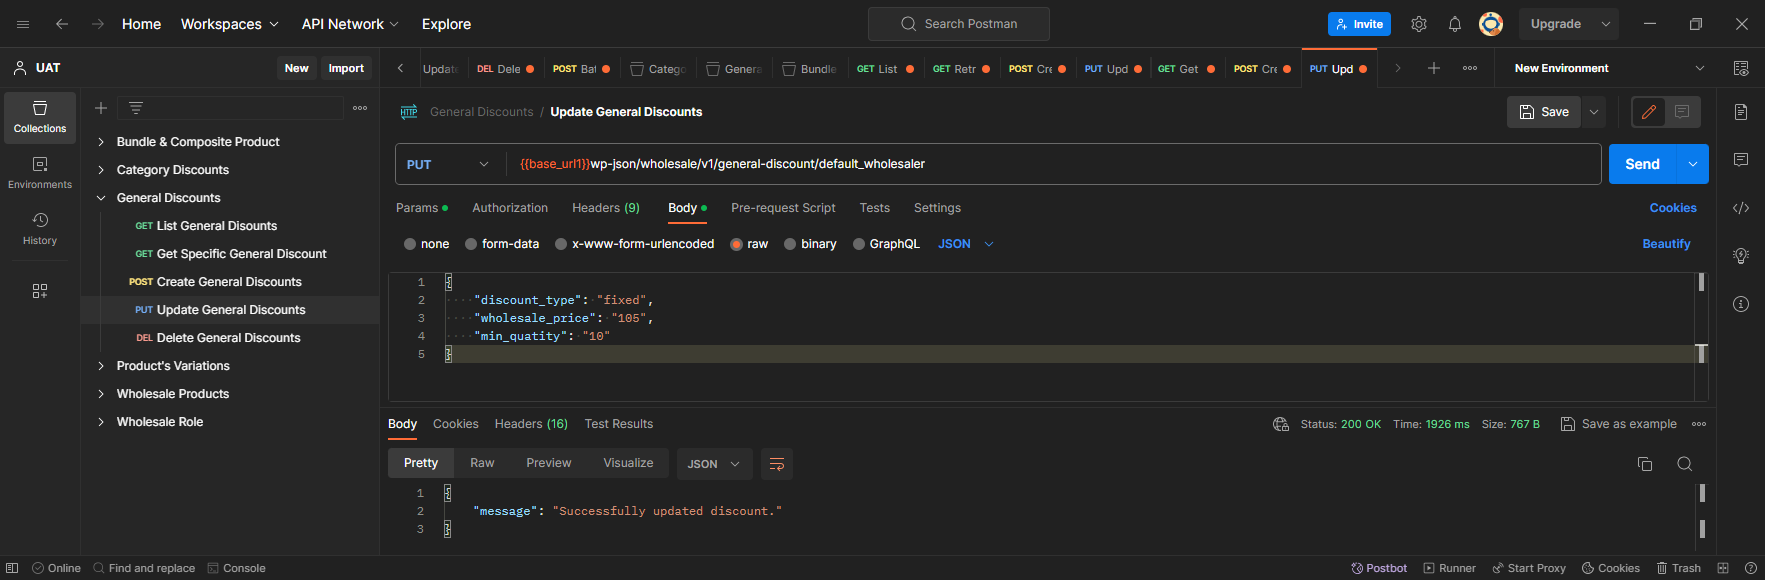
Update a General Discount (POST) #
- Request Example
- METHOD: PUT
- ENDPOINT: /wp-json/wholesale/v1/general-discount/{general-discount_id}
- POSTMAN: Update a General Discount of a specific Wholesale Role
PUT: wholesale/v1/general-discount/{general-discount_id}
JSON Body:
{

    “update_general” : {

        “name” : “Update Sample General”,

        “slug”: “update-general-discount”,

        “term_group”: 0,

        “description”: “Updated Sample General Discount for Postman”,

        “parent”: 0,

        “count”: 0

        },

     “wholesale_price” : {

            “wholesale_price” : “100”,

            “role” : “wholesaler_b”,

            “discount_type” : “fixed”,

            “min_qty” : “5”

        }

}- Response Example
- STATUS: 200 OK (Updating a General Discount for a specific Wholesale Role)
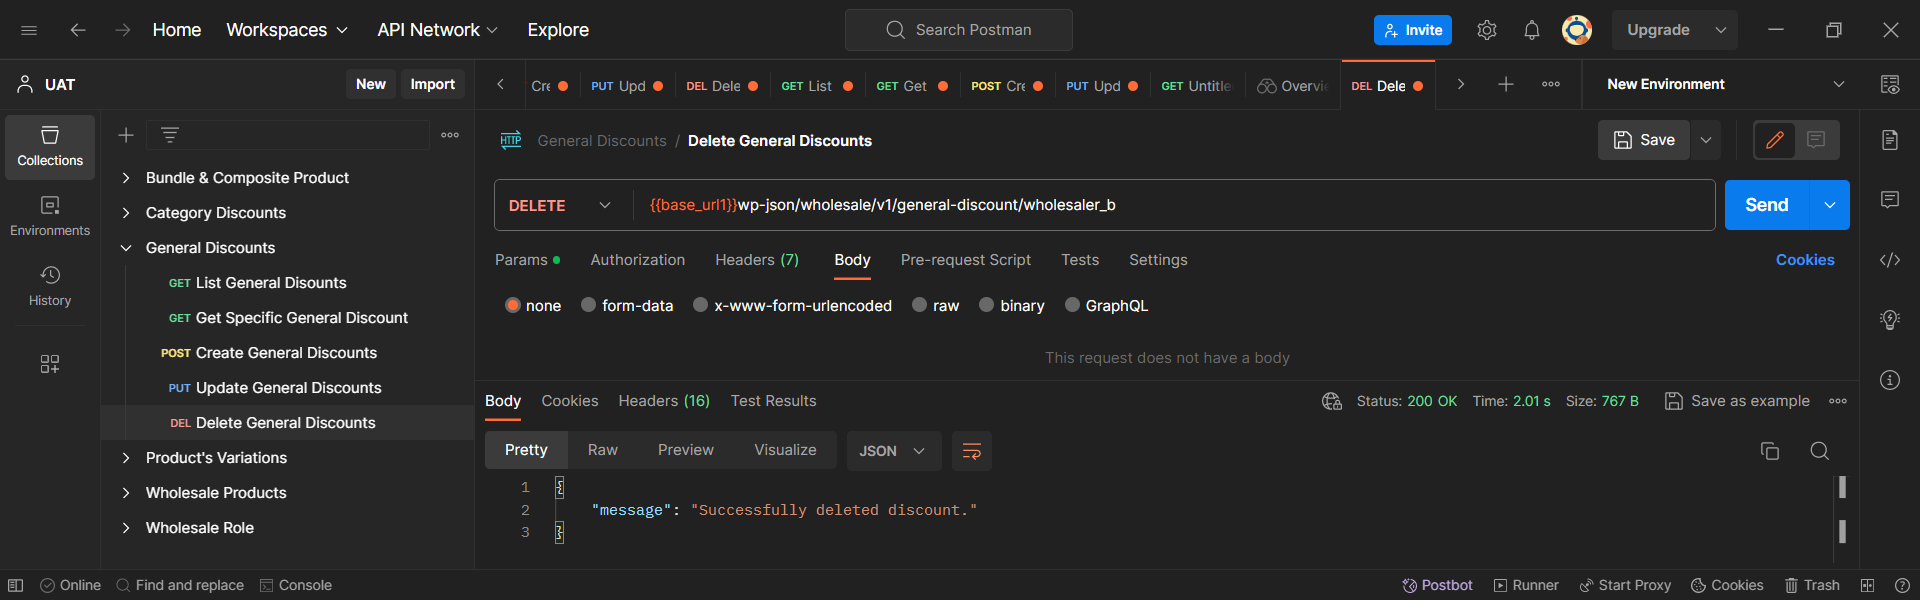
Delete a General Discount (DELETE) #
- Request Example
- METHOD: DELETE
- ENDPOINT: /wp-json/wholesale/v1/general-discount/{general-discount_id}
- POSTMAN: Delete the General Discount of a specific Wholesale Role
DELETE: wholesale/v1/general-discount/{general-discount_id}
- Response Example
- STATUS: 200 OK (Deleting a General Discount for a specific Wholesale Role)
Bundle and Composite Products #
- The Wholesale Bundle and Composite Products API provides functionality for Generating, Displaying, Modifying, and Removing wholesale bundle and composite products.
- Available Routes are mentioned below:
- POST: wholesale/v1/products?wholesale_role=default_wholesaler
- POST: wholesale/v1/products/batch?wholesale_role=default_wholesaler
- POST: wholesale/v1/products?wholesale_role=default_wholesaler
- POST: wholesale/v1/products/batch?wholesale_role=default_wholesaler
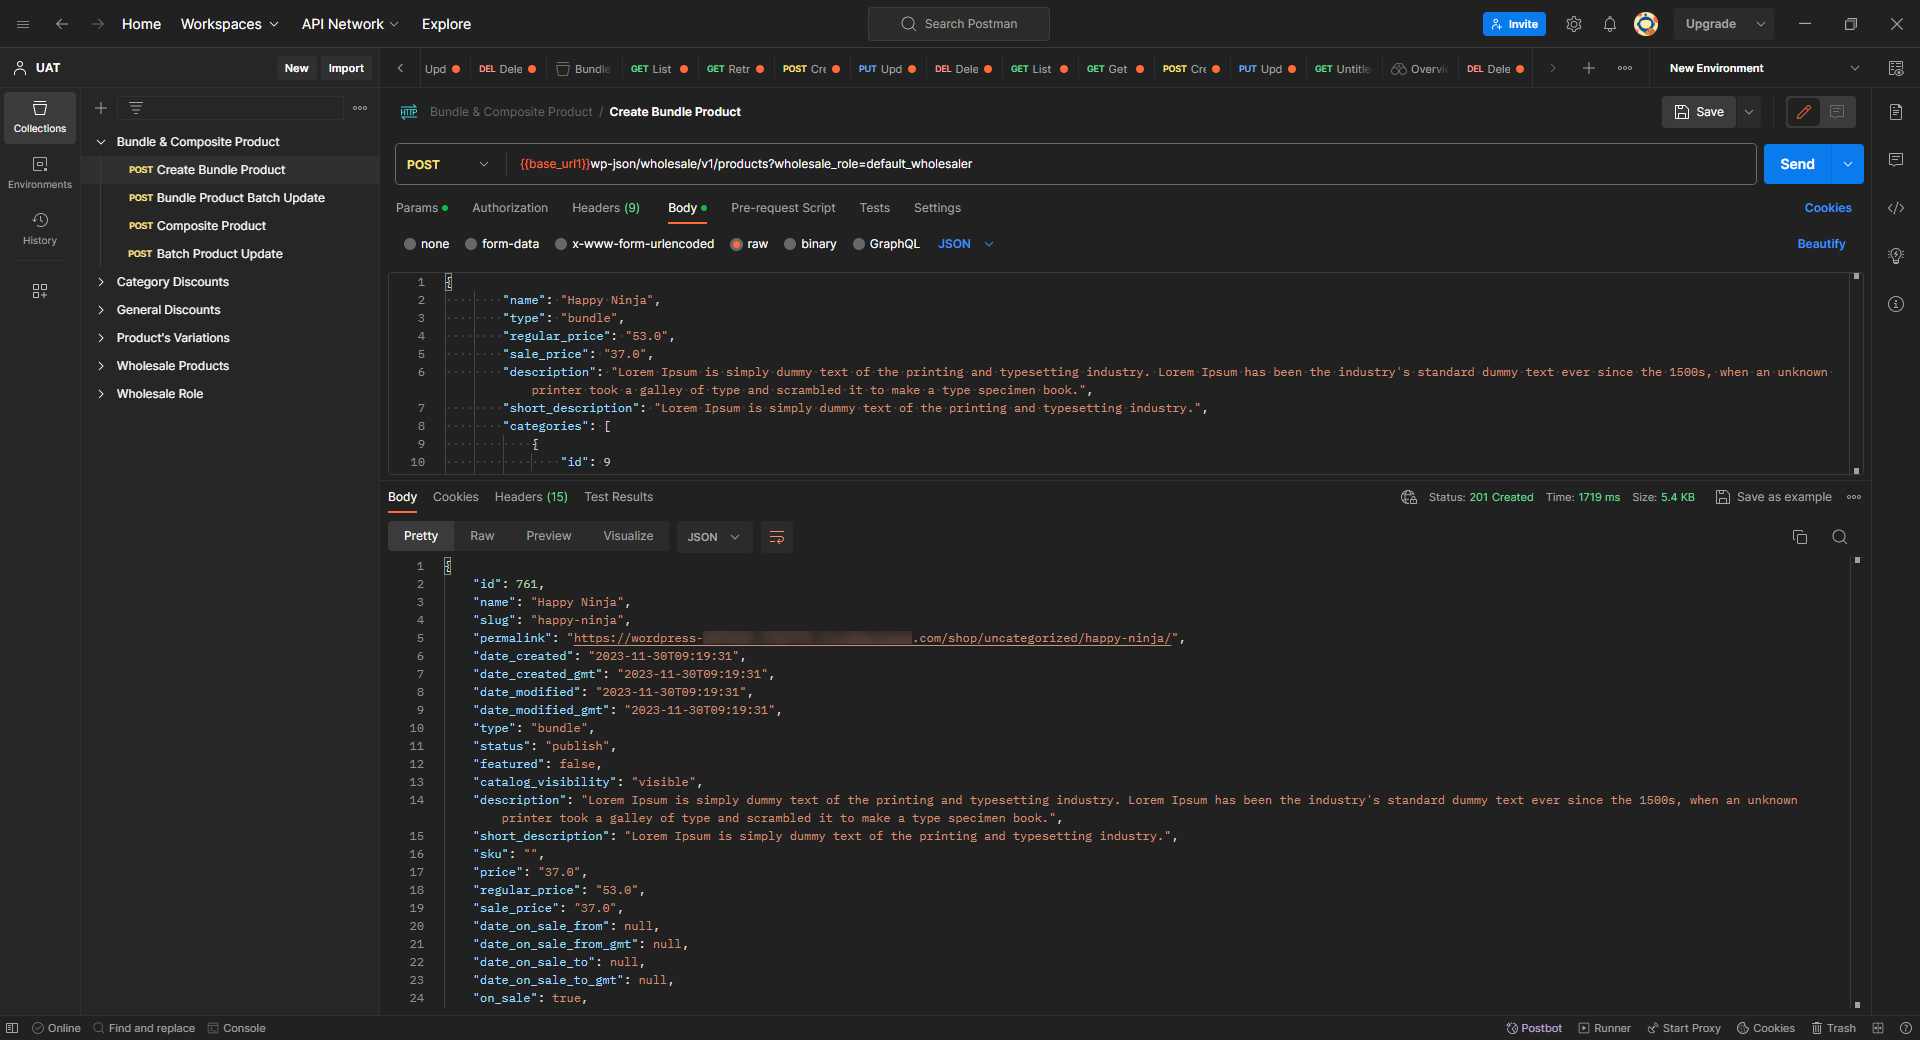
Create a Bundle Product (POST) #
- Request Example
- METHOD: POST
- ENDPOINT: /wp-json/wholesale/v1/products?wholesale_role=default_wholesaler
- POSTMAN: Create a Wholesale Bundle product
POST: wholesale/v1/products?wholesale_role=default_wholesaler
JSON Body:
{

        “name”: “Happy Ninja”,

        “type”: “bundle”,

        “regular_price”: “53.0”,

        “sale_price”: “37.0”,

        “description”: “Lorem Ipsum is simply dummy text of the printing and typesetting industry. Lorem Ipsum has been the industry’s standard dummy text ever since the 1500s, when an unknown printer took a galley of type and scrambled it to make a type specimen book.”,

        “short_description”: “Lorem Ipsum is simply dummy text of the printing and typesetting industry.”,

        “categories”: [

            {

                “id”: 9

            }

        ],

        “images”: [

        ],

        “bundled_items”: [

            {

                “product_id”: 470,

                “quantity_min”: 1,

                “quantity_max”: 1,

                “priced_individually”: false,

                “shipped_individually”: false,

                “optional”: false,

                “override_title”: true,

                “title”: “Happy Ninja T-Shirt”

            },

            {

                “product_id”: 469,

                “quantity_min”: 1,

                “quantity_max”: 1,

                “priced_individually”: false,

                “shipped_individually”: false,

                “optional”: false,

                “override_title”: true,

                “title”: “Happy Ninja Hoodie”

            }

        ],

        “bundle_layout”: “default”,

        “wholesale_price” : {

            “wholesale_price” : “50”,

            “role” : “default_wholesaler”,

            “discount_type” : “percent”,

            “min_qty” : “1”

        }

}- Response Example
- STATUS: 201 Created (Creating a Wholesale Bundle product)
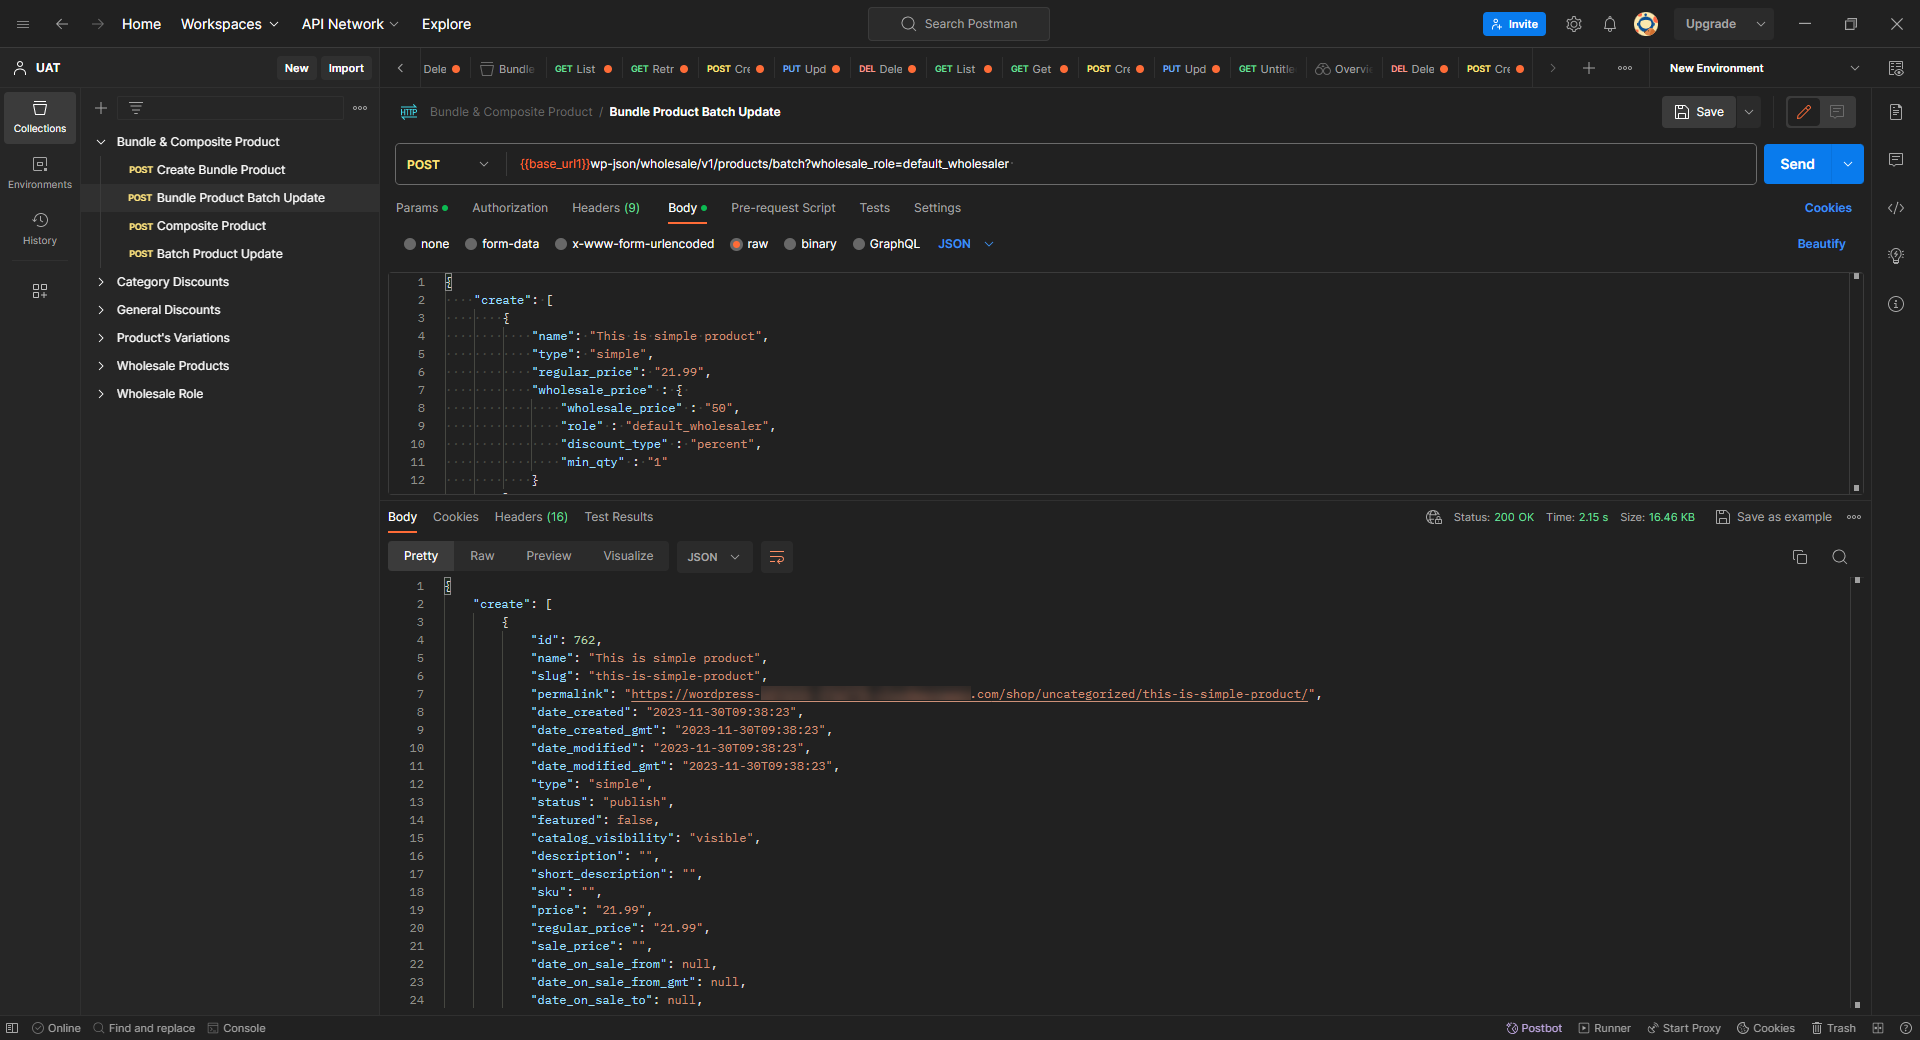
Batch Update a Bundle Product (POST) #
- Request Example
- METHOD: POST
- ENDPOINT: /wp-json/wholesale/v1/products/batch?wholesale_role=default_wholesaler
- POSTMAN: Create a Wholesale Bundle product using Batch Update
POST: wholesale/v1/products/batch?wholesale_role=default_wholesaler
JSON Body:
{

    “create”: [

        {

            “name”: “This is simple product”,

            “type”: “simple”,

            “regular_price”: “21.99”,

            “wholesale_price” : {

                “wholesale_price” : “50”,

                “role” : “default_wholesaler”,

                “discount_type” : “percent”,

                “min_qty” : “1”

            }

        },

        {

            “name”: “This is Bundle product”,

            “type”: “bundle”,

            “regular_price”: “53.0”,

            “sale_price”: “37.0”,

            “description”: “ABC.123”,

            “short_description”: “ABCD.”,

            “bundle_layout”: “default”,

            “bundled_items”: [

                {

                    “product_id”: 486,

                    “quantity_min”: 1,

                    “quantity_max”: 1,

                    “priced_individually”: true,

                    “shipped_individually”: false,

                    “optional”: false,

                    “override_title”: true,

                    “title”: “Happy Ninja T-Shirt”

                }

            ],

            “wholesale_price” : {

                “wholesale_price” : “50”,

                “role” : “default_wholesaler”,

                “discount_type” : “percent”,

                “min_qty” : “1”

            }

        }

    ],

    “update”: [

        {

            “id”: 761,

            “name”: “batch Title Updated again”,

            “wholesale_price” : {

                “wholesale_price” : “88”,

                “role” : “default_wholesaler”,

                “discount_type” : “percent”,

                “min_qty” : “1”

            }

        }

    ],

    “delete”: [

        743

    ]

}- Response Example
- STATUS: 200 OK (Creating a Wholesale Bundle product using Batch Update)
Create a Composite Product (POST) #
- Request Example
- METHOD: POST
- ENDPOINT: /wp-json/wholesale/v1/products?wholesale_role=default_wholesaler
- POSTMAN: Create a Wholesale Composite product
POST: wholesale/v1/products?wholesale_role=default_wholesaler
JSON Body:
{

    “name”: “Sample Composite Product”,

    “type”: “composite”,

    “description”: “Lorem Ipsum is simply dummy text of the printing and typesetting industry. Lorem Ipsum has been the industry’s standard dummy text ever since the 1500s, when an unknown printer took a galley of type and scrambled it to make a type specimen book.”,

    “short_description”: “Lorem Ipsum is simply dummy text of the printing and typesetting industry.”,

    “composite_layout”: “single”,

    “regular_price”: “50”,

    “wholesale_price” : {

        “wholesale_price” : “50”,

        “role” : “default_wholesaler”,

        “discount_type” : “percent”,

        “min_qty” : “1”

    }

}- Response Example
- STATUS: 201 Created (Creating a Wholesale Composite product)

Batch Update a Composite Product (POST) #
- Request Example
- METHOD: POST
- ENDPOINT: /wp-json/wholesale/v1/products/batch?wholesale_role=default_wholesaler
- POSTMAN: Create a Wholesale Composite product using Batch Update
POST: wholesale/v1/products/batch?wholesale_role=default_wholesaler
JSON Body:
{

    “create”: [

        {

            “name”: “NEW Composite Sample”,

            “type”: “simple”,

            “regular_price”: “21.99”,

            “wholesale_price” : {

                “wholesale_price” : “88”,

                “role” : “default_wholesaler”,

                “discount_type” : “percent”,

                “min_qty” : “1”

            }

        },

        {

            “name”: “Sample 1”,

            “type”: “composite”,

            “description”: “ABC.123.”,

            “short_description”: “ABC.”,

            “composite_layout”: “single”,

            “wholesale_price” : {

                “wholesale_price” : “88”,

                “role” : “default_wholesaler”,

                “discount_type” : “percent”,

                “min_qty” : “1”

            }

        }

    ],

    “update”: [

        {

            “id”: 2318 ,

            “name”: “Sample Title Updated Composite “,

            “regular_price”: “22”,

            “wholesale_price” : {

                “wholesale_price” : “82”,

                “role” : “default_wholesaler”,

                “discount_type” : “percent”,

                “min_qty” : “1”

            }

        }

    ],

    “delete”: [

        765

    ]

}- Response Example
- STATUS: 200 OK (Creating a Wholesale Composite product using Batch Update)

Wholesale Pricing #
Global Wholesale Pricing #
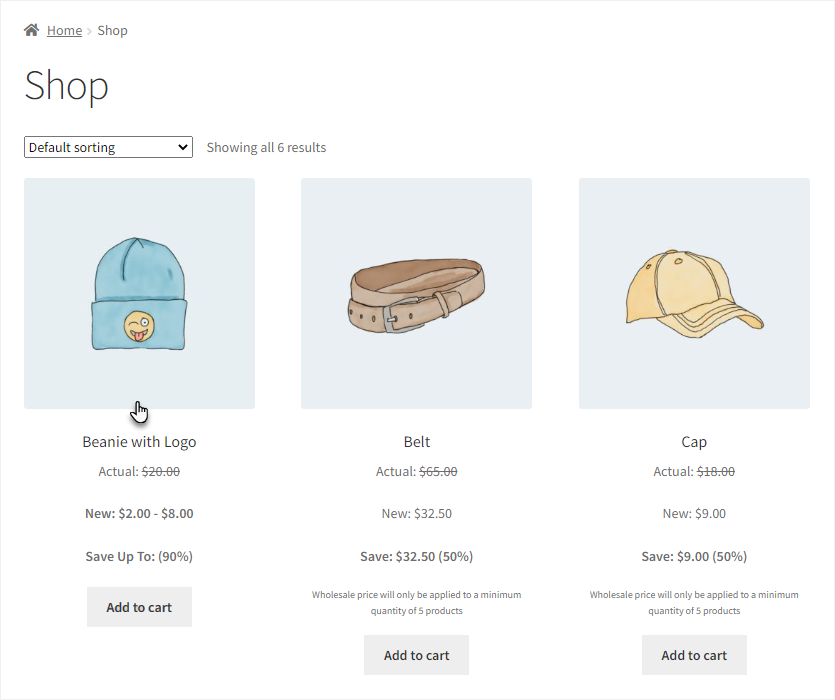
This option allows you to apply wholesale prices to all products that have a regular price. There are THREE types of pricing options: Global Pricing, Product-Category Pricing, and Individual Product Pricing.
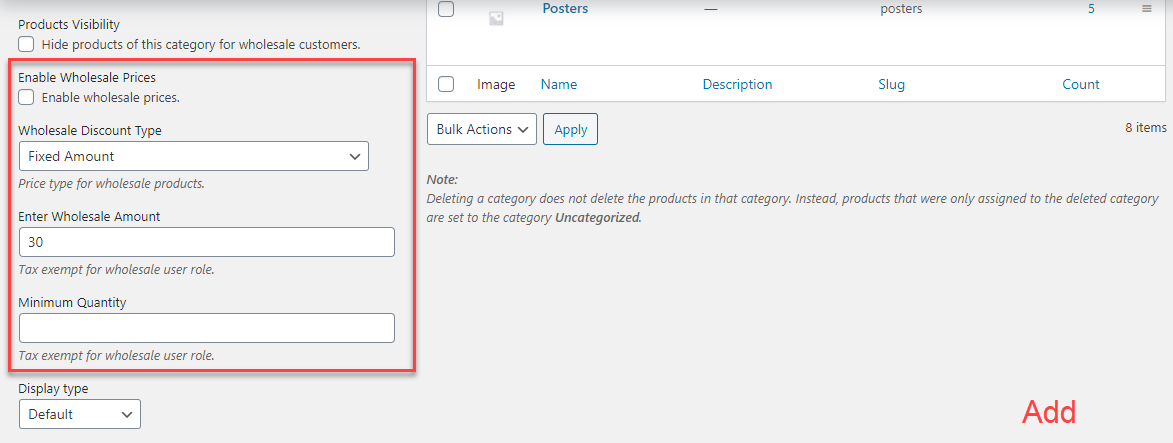
You can configure the following options inside the Global Pricing tab:
- Discount Types: There are two types of discounts available Fixed and Percentage. This is a general setting that will apply to all products when enabled.
- Fixed Amount: Set a fixed wholesale amount for your users either for a single wholesale role or multiple. For example: if the wholesale price is set to $25, so it will be applied to all products and the prices of the products for the wholesale customer will be $25.
- Percentage Amount: You can set the wholesale amount on a percentage basis, is the most suitable way to offer discounts to your wholesale users when you have a lot of products in your store. For example: if the wholesale percentage amount is set to 80, then the wholesale customer will get a 20% discount from the retail price. So if a product costs $50 in retail then the price for wholesalers will be $40 after a 20% discount.
- Enter Wholesale Amount: This is the wholesale price you want to offer to your customers. This is not a discount amount so enter the wholesale selling price here. This is a general option and will apply to all products.
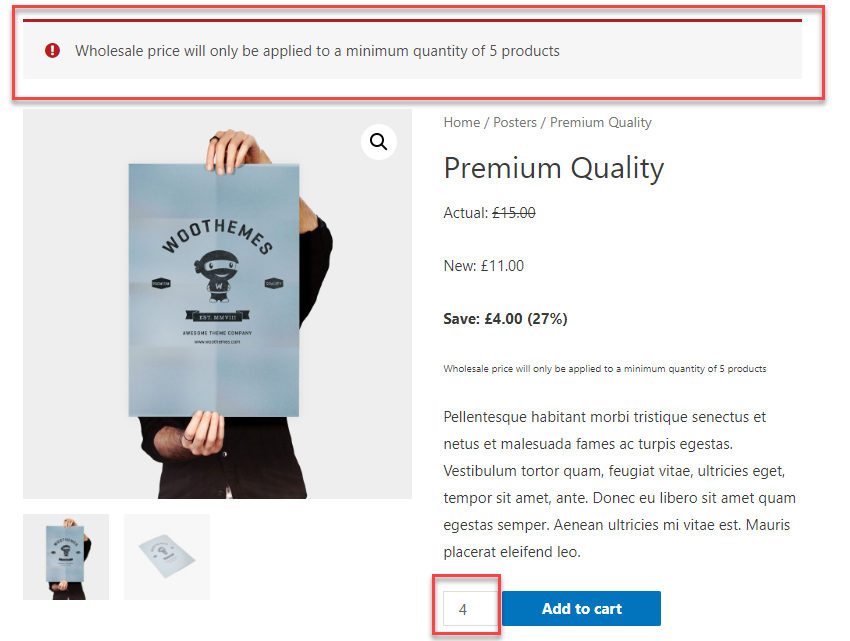
- Minimum Quantity: Enter the product minimum quantity for wholesalers to get a discount on products, otherwise they have to purchase at a regular price.
Front-end screenshot – Minimum quantity restrictions

Category-based Wholesale Pricing #
You can create wholesale prices for product categories so that a particular category’s product prices are adjusted instantly.
You can set different prices for different wholesale roles only if the multi-pricing role option is enabled.
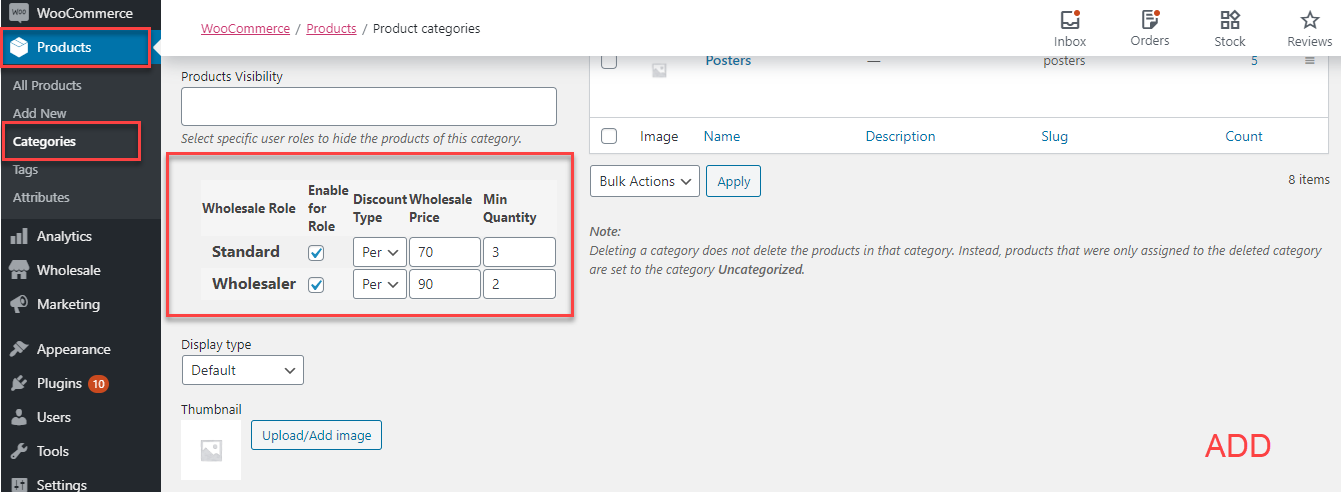
How-to-steps – Configure category-based price options #
- Go to WooCommerce Products 🡪 Categories.
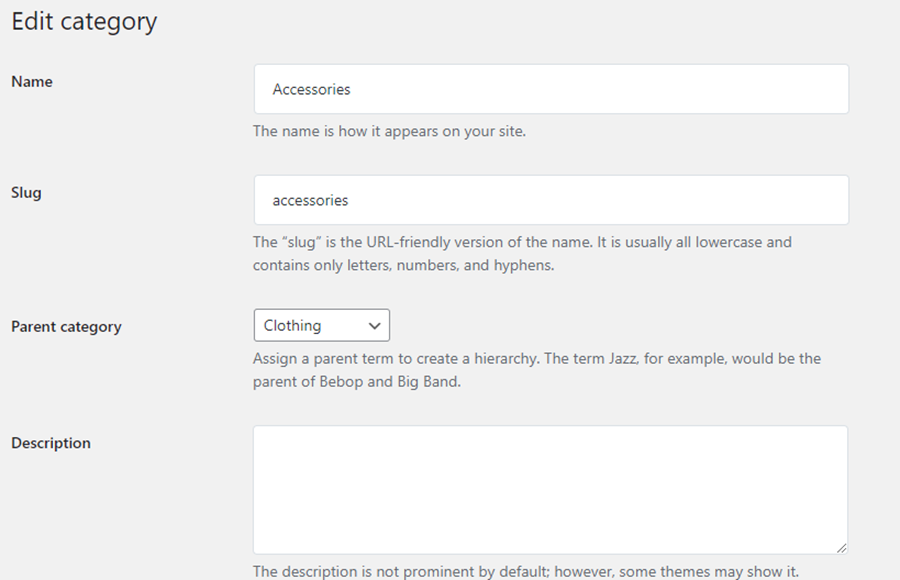
- Add or Edit a product category.
- Choose the discount type option: Fixed or Percentage.
- Enter the price in the wholesale price field.
- Apply Minimum quantity restrictions.
- Update the Category.

Multi-wholesale role pricing option
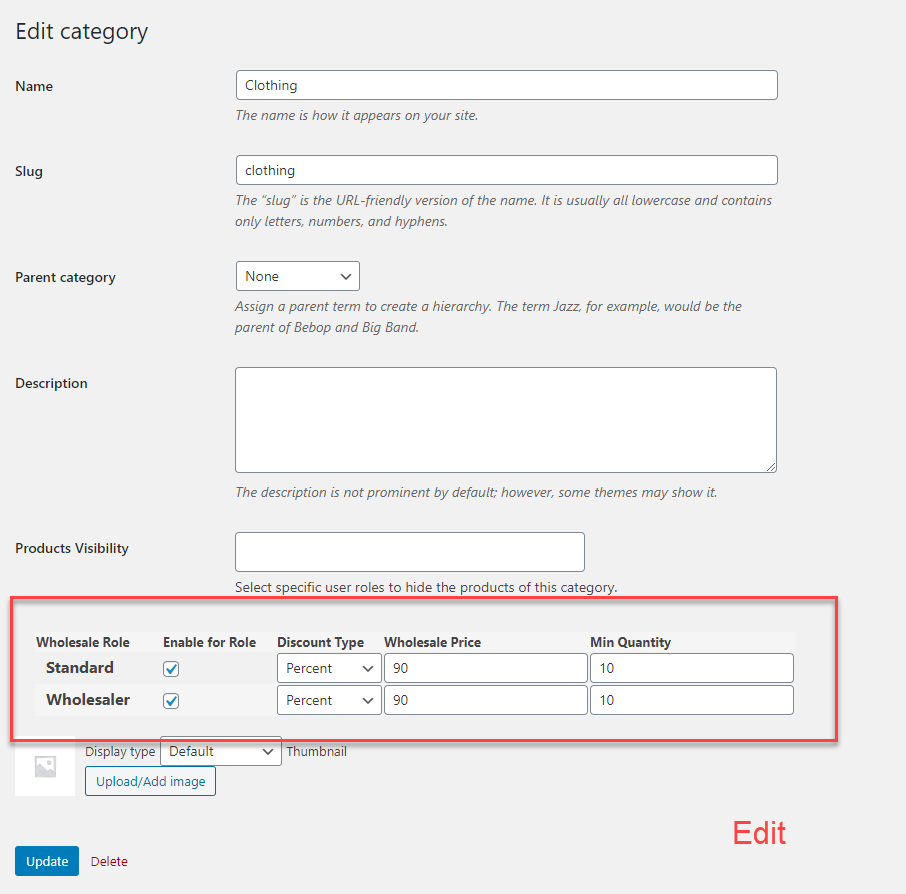
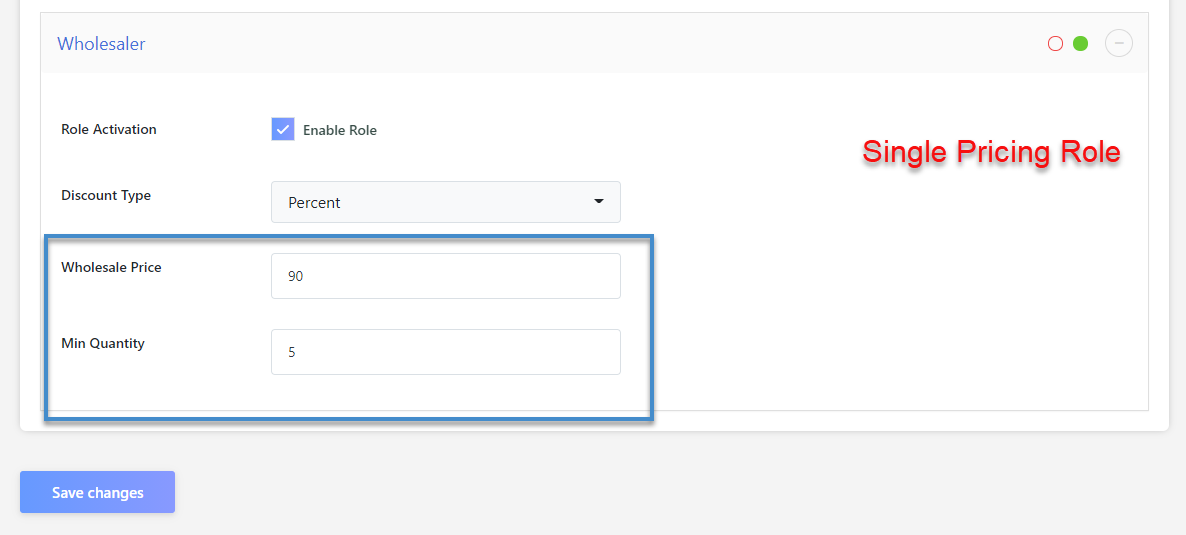
Single-role Pricing option

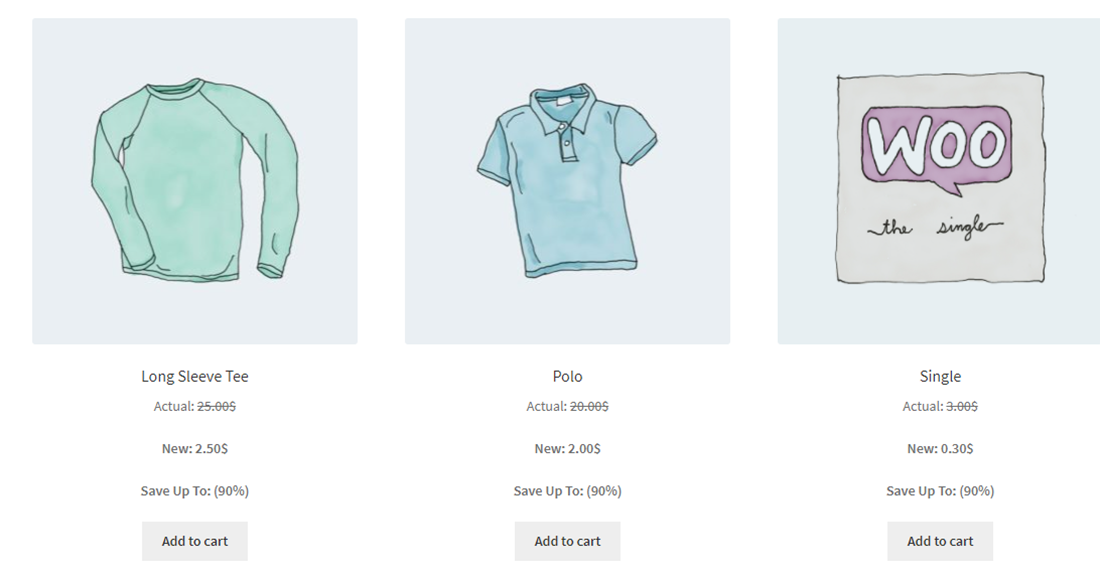
Now, all products linked with that category will show the wholesale amount you entered.
For example, if the discount type is a percentage and 90% is entered into the wholesale amount then a 10% discount will be offered on all products linked with the clothing category.
Product-based Wholesale Pricing #
Set wholesale prices for individual products on single and multiple wholesale role levels. You can also set wholesale prices on simple and variable products.
How-to-steps – Configure pricing options for a simple product #
- Click on the wholesale tab.
- Go to Simple product settings
- Mark the “Enable Wholesale item” checkbox
- Select the wholesale discount type of your choosing.
- Enter Wholesale Price.
- Apply Minimum quantity restrictions.
- Update or Publish the product.

How-to-steps – Configure pricing options for a variable product #
- Click on the wholesale tab.
- Go to variable product settings
- Mark the “Enable Wholesale item” checkbox
- Select the wholesale discount type of your choosing.

How-to-steps – Configure multiple pricing settings for simple products #
To configure multiple pricing settings, click on the wholesale multiple user pricing checkbox that will enable product pricing for that particular role and also allow you to set the pricing on each role level.
You can enable and set wholesale prices from the Wholesale Multi-User pricing meta box.
- Enable Wholesale prices for each role.
- Select a wholesale discount type for each role.
- Enter Wholesale Prices for each role.
- Apply minimum quantity restrictions for each role.
- Update the product.

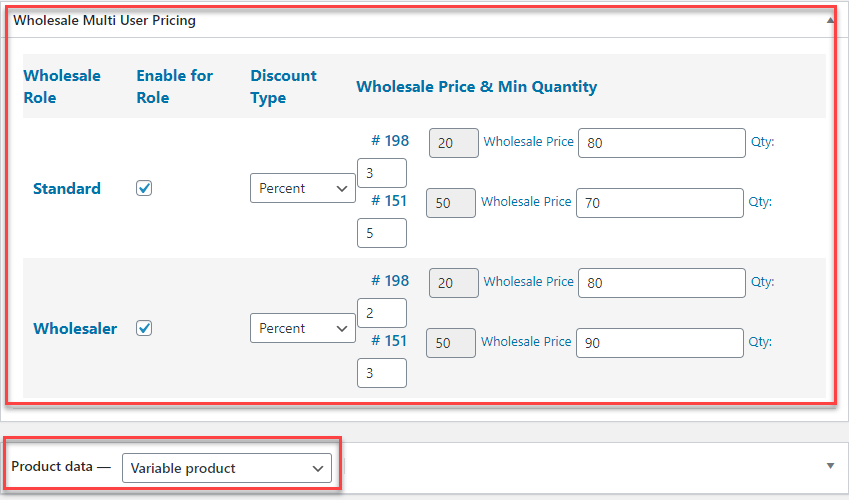
How-to-steps – Configure multiple pricing settings for variable products #
It is a tiered level pricing system that allows you to offer different types of discounts and prices to different wholesale user roles. You can enable and set wholesale prices from the Wholesale Multi-User pricing meta box.
- Enable Wholesale prices for each role.
- Select a wholesale discount type for each variation and role.
- Enter Wholesale Prices for of each variation and individual role.
- Apply minimum quantity restrictions.
- Update the product.
How-to-steps – Configure minimum quantity restrictions for variable products #
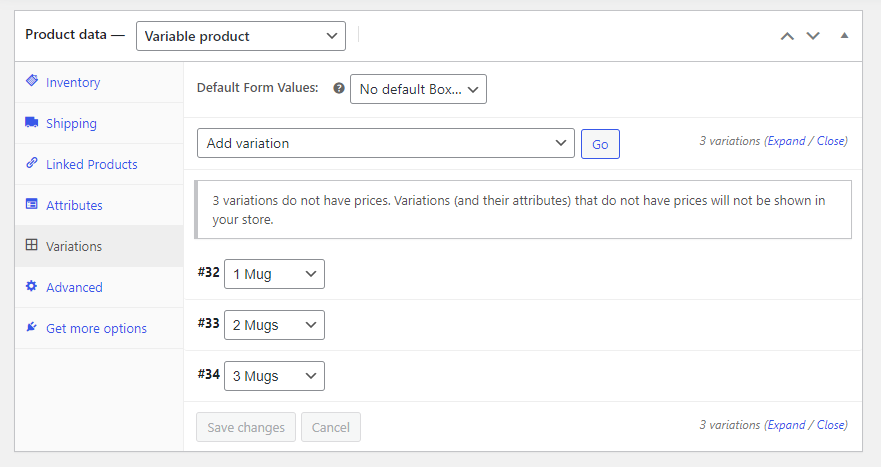
- Go to the variations tab.
- You can set wholesale price and minimum quantity for each variation.
- Publish/Update product.

Variation Table #
- Navigate to WordPress Admin Dashboard → Wholesale→Settings.

- Select the General Tab on the right panel.
- Under the General Tab on the right panel, enable the Variation Table checkbox.

- Once enabled, navigate to the Product under the WooCommerce tab.
- Select the desired Variable Product and click edit.
Note: The Product must be a variable product
- Select and set the desired Attributes of the Product.
- Specify the desired attributes under the attributes tab.

- Similarly, specify the desired Variation under the Variations tab.
- Now navigate to Wholesale.
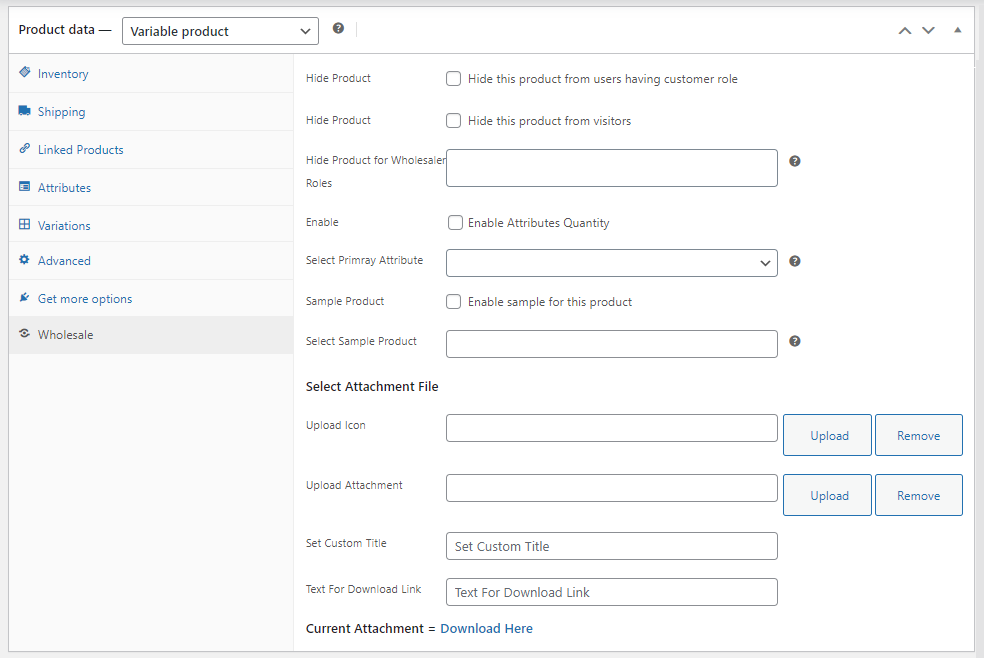
- Now under the wholesale tab, select Enable Attribute Quantity checkbox.
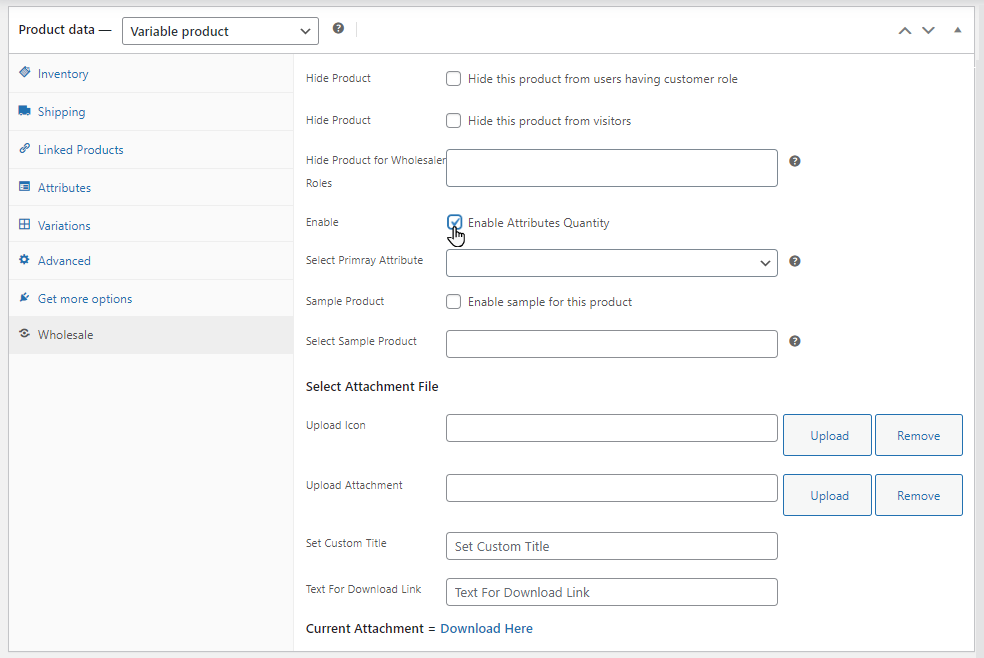
- After that, Select Primary Attribute from the dropdown.

Note: The selected Primary attribute will be available as a List with Quantity on the frontend.
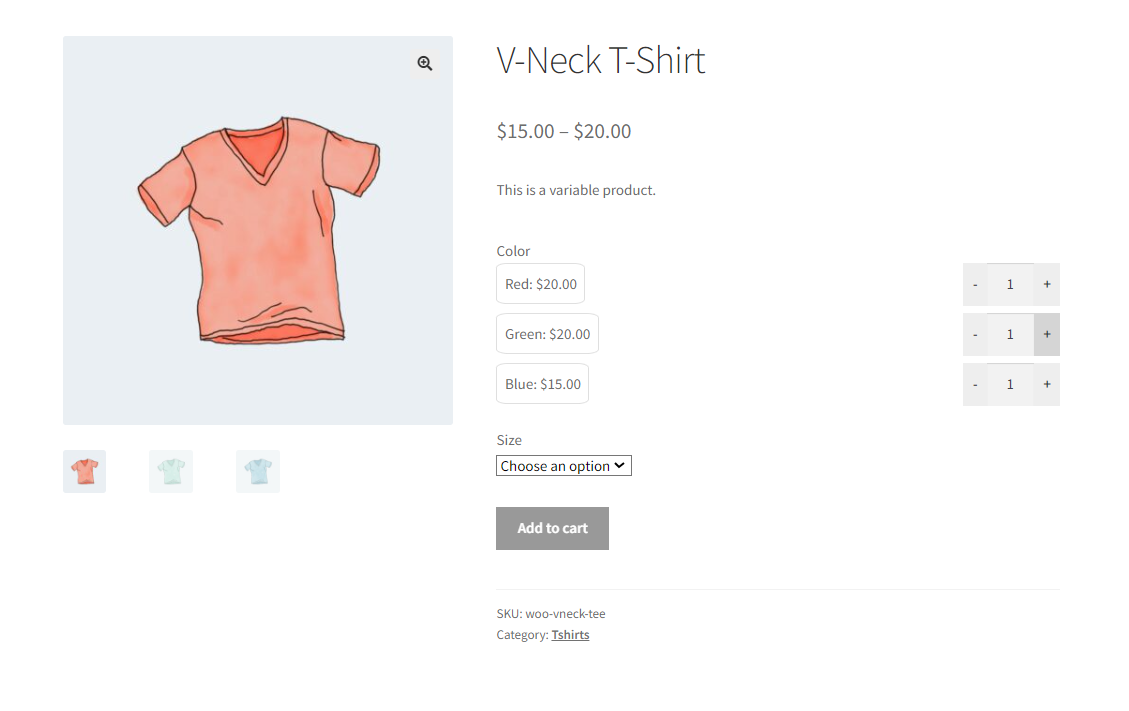
Frontend Impact #
- After logging in as a Wholesaler role on the front end, the user can view the variation list by which the user can add multiple variations to the cart.
- Users can apply wholesale pricing on the variation list as well.
- Click Add to cart button to buy the product as wholesale.
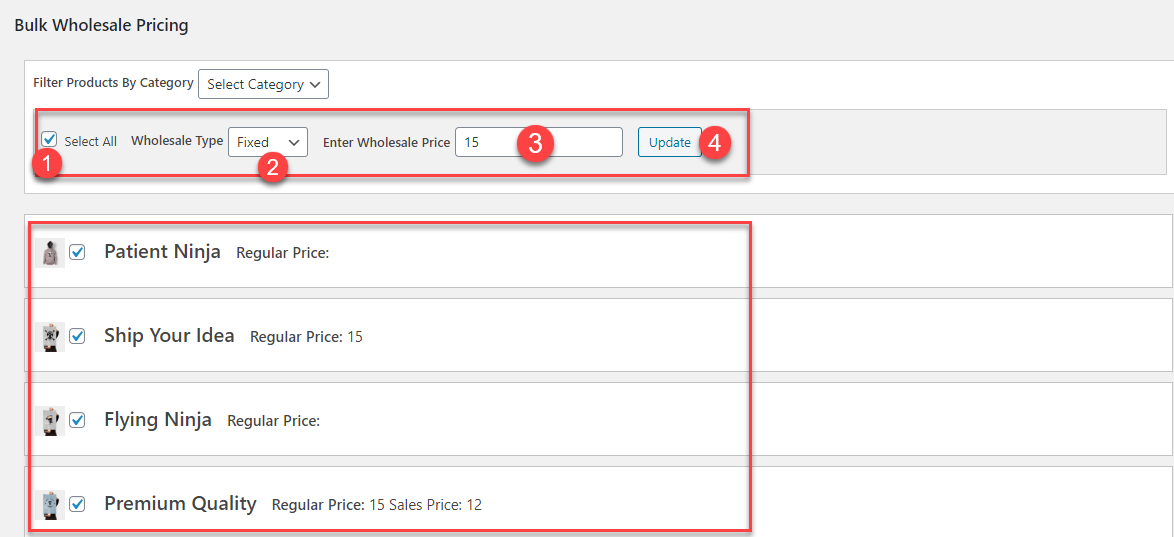
Bulk Wholesale Pricing #
If you want to offer bulk quantities of your product to wholesale customers then use the bulk assigning option.
You can select the number of products and assign the wholesale price either fixed or percentage in single wholesale pricing option.
For multiple wholesale pricing option, you can perform bulk action by enabling the role for each product and assigning the wholesale prices. You can assign different level of pricing discounts to different wholesale role easily with bulk pricing.
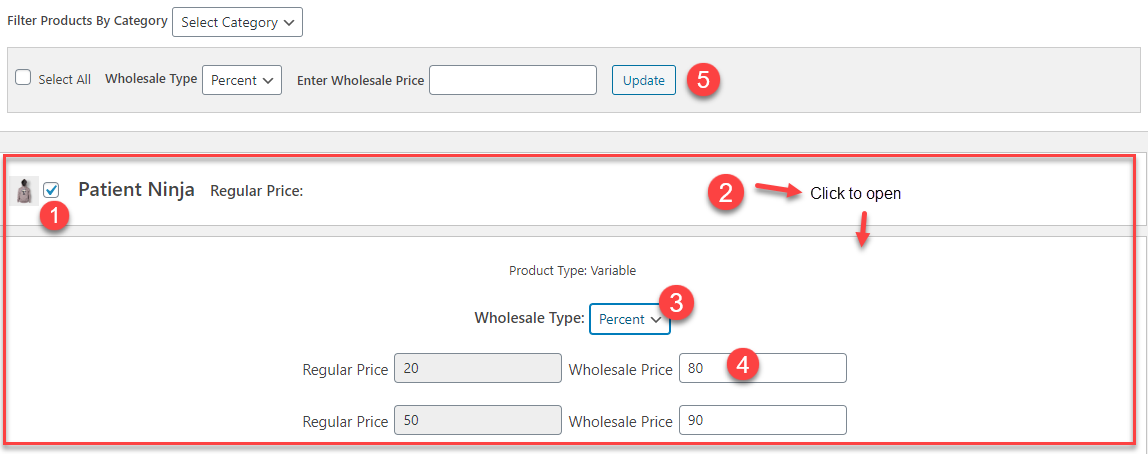
Option 1
- Go to Wholesale 🡪 Bulk Wholesale Pricing.
- Select products 🡪 Select Wholesale Type (percentage of fixed) 🡪 Enter Wholesale Price.
- Update to apply wholesale prices.

Option 2
- You can also Check and select Individual Products.
- Click on Individual Products to select discount type and assign wholesale prices.
- Update to apply.
Option 3
- Check the “Select all” option to select all products on a single page
- Select discount type and assign wholesale prices.
- Update to apply.
Step Quantity #
- The Step Quantity feature allows you to sell products according to the number of quantity steps assigned in the back-end configuration on the Edit Product page. The step quantity option will correspond with the minimum quantity option on the Product and Cart pages.
- The Step quantity option will be displayed in Individual Product wholesale pricing and product category wholesale pricing. To make the step quantity option work, the admin must define the minimum quantity first. If the user manually inputs the quantity figure in the field, clicks on Add to Cart button, and does not match the Step Quantity and number, it will display the error message to enter the correct step quantity.
Step quantity – Simple product #
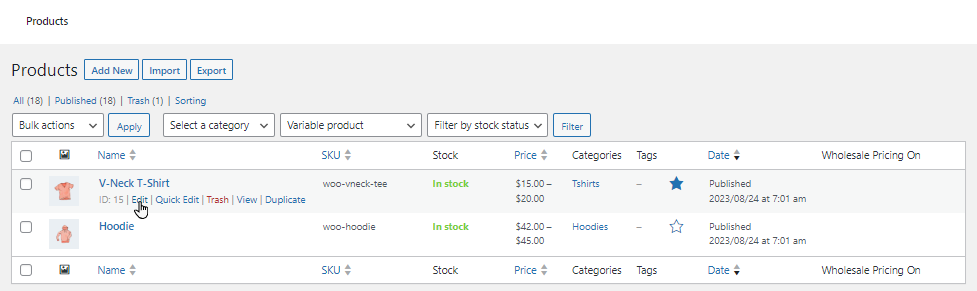
How-to-steps – Configure step quantity settings for simple products #
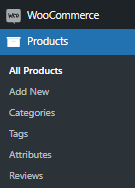
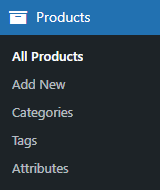
- Navigate to the WordPress Admin Dashboard → Products → All Products.

- On the Products page, hover on any existing Simple Product to view the suboptions.
- Click on the Edit suboption.
- On the Products page, hover on any existing Simple Product to view the suboptions.
- Click on the Edit suboption.
- Checkmark the Enable Role checkbox in the Role Activation option.
- Set the Discount Type.
- Set the Wholesale Price.
- Set the Min Quantity.
- Set the Min Quantity.
- Set the Step Quantity.
- Set the Product Tier Pricing. (Optional)
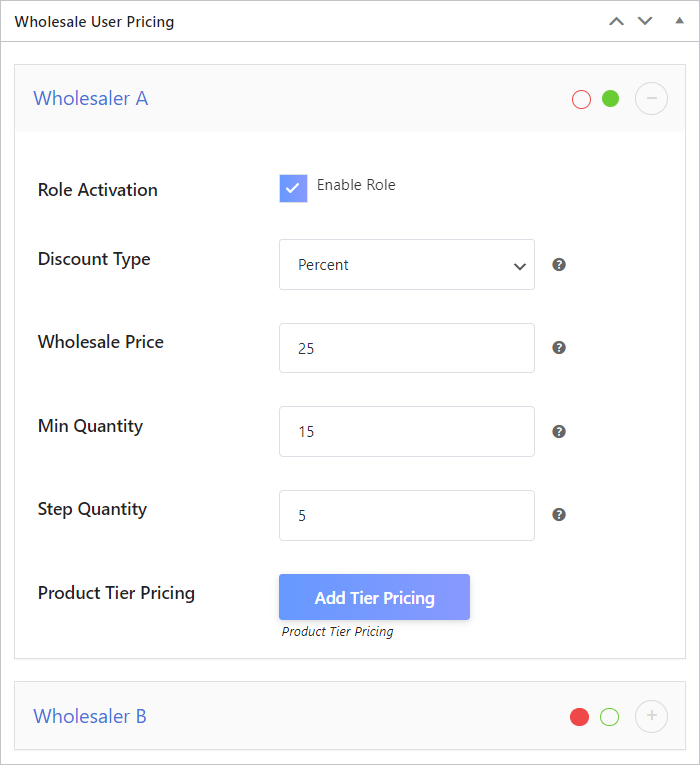
- Once done, click on the Update button.
- Now navigate to the WordPress Admin Dashboard → Products → All Products.
- We can see the Wholesaler A Product tag in the Wholesale Pricing On column on the configured product.
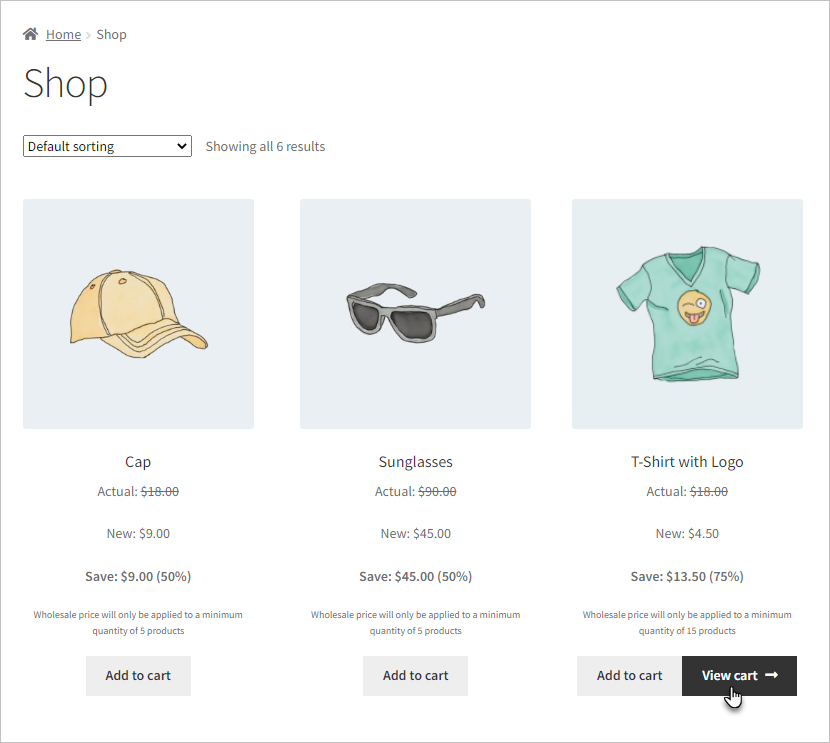
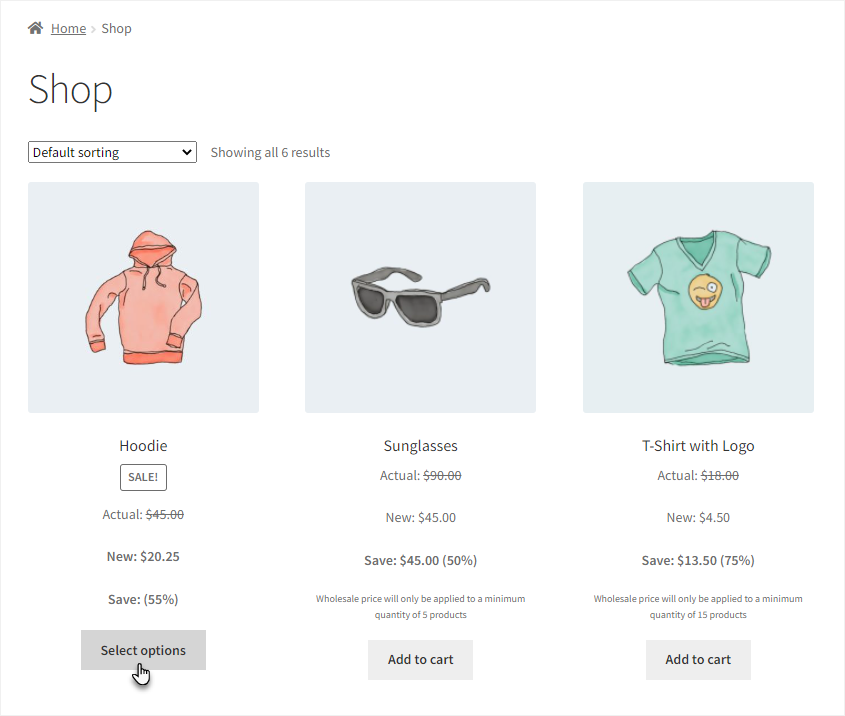
Frontend screenshots #
- A user with the user role Wholesaler A (because the configuration was done for user role Wholesaler A) will log in to the website.
- The user will visit the shop page.
- The user will click on the T-Shirt with Logo product and click on the Add to Cart button.

- Now the user will click on the View Cart button.
- On the Cart page, go to the Quantity section and click on the arrow keys to increase and decrease the quantity.
- We can see that the quantity will increase/decrease with the specific number configured in the Step Quantity tab in the Wholesale User Pricing section.
Step quantity – Variable product #
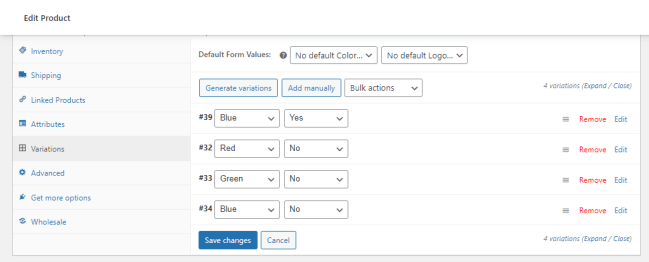
How-to-steps – Configure step quantity settings for variable products #
- Navigate to the WordPress Admin Dashboard → Products → All Products.

- On the Products page, hover on any existing Variable Product to view the suboptions.
- Click on the Edit suboption.
- On the Edit Product page, navigate to the Product Data section and go to the Variations tab.
- We can see that there are 4 Variations in this product so each variation will have its different Wholesale rule configuration in the Wholesale User Pricing section.
Frontend screenshots #
- A user with the user role Wholesaler A (because the configuration was done for user role Wholesaler A) will log in to the website.
- The user will visit the shop page.
- The user will click on the Hoodie product and then click on the Add to Cart button.
- Select the variation first once you’re on the Single Product Page page. Now go to the Quantity section and click on the arrow keys to increase and decrease the quantity.
- We can see that the quantity will increase/decrease with the specific number configured in the Step Quantity tab of each variation in the Wholesale User Pricing section.
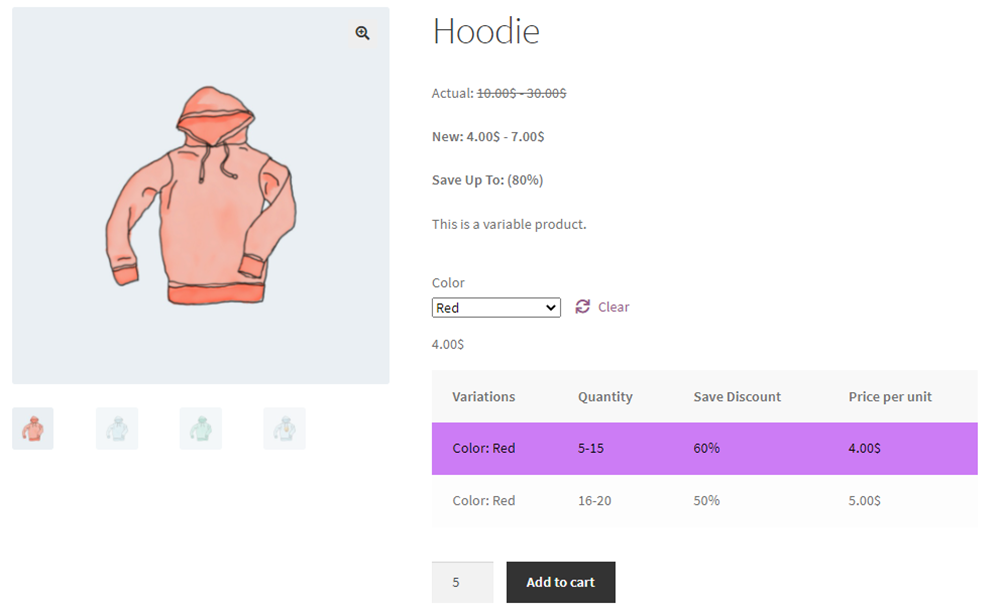
Step quantity – Tiered pricing product #
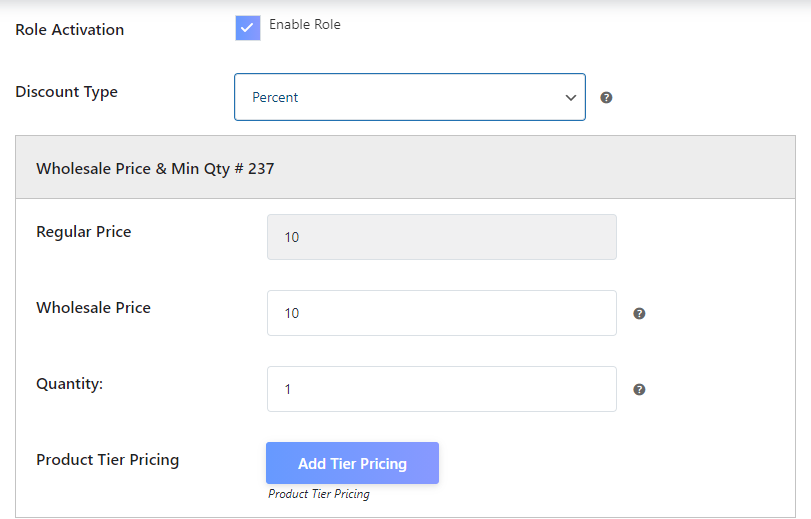
How-to-steps – Configure step quantity settings for tiered pricing product #
- Navigate to the WordPress Admin Dashboard → Products → All Products.

- On the Products page, hover on any existing Variable Product to view the suboptions.
- Click on the Edit suboption.

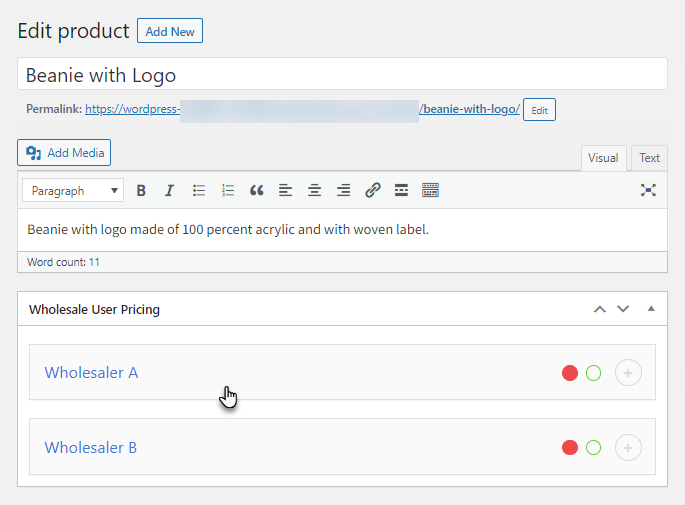
- Go to the Wholesale User Pricing section on the Edit Product page.
- Click on the wholesale user role on which you want to configure the rule.
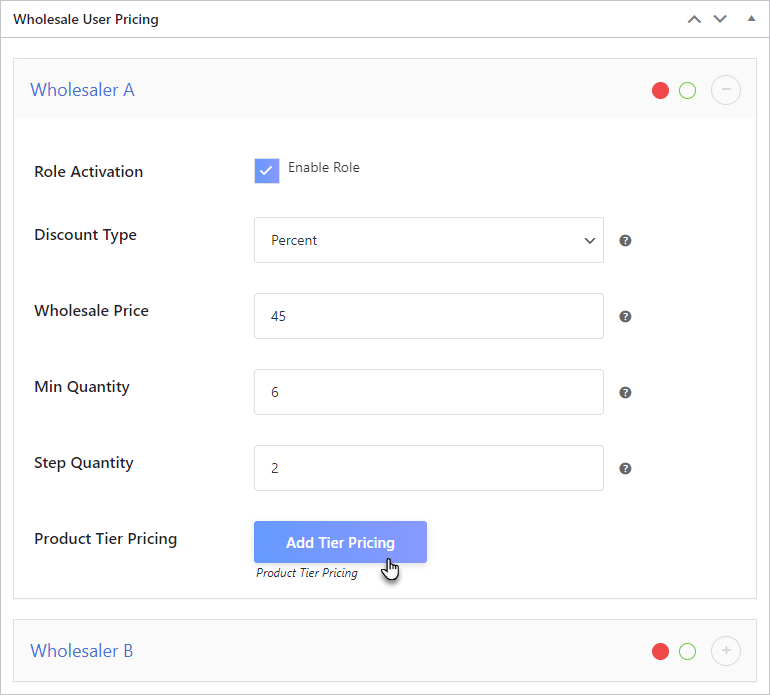
- Checkmark the Enable Role checkbox in the Role Activation option.
- Set the Discount Type.
- Set the Wholesale Price.
- Set the Min Quantity.
- Set the Min Quantity.
- Set the Step Quantity.
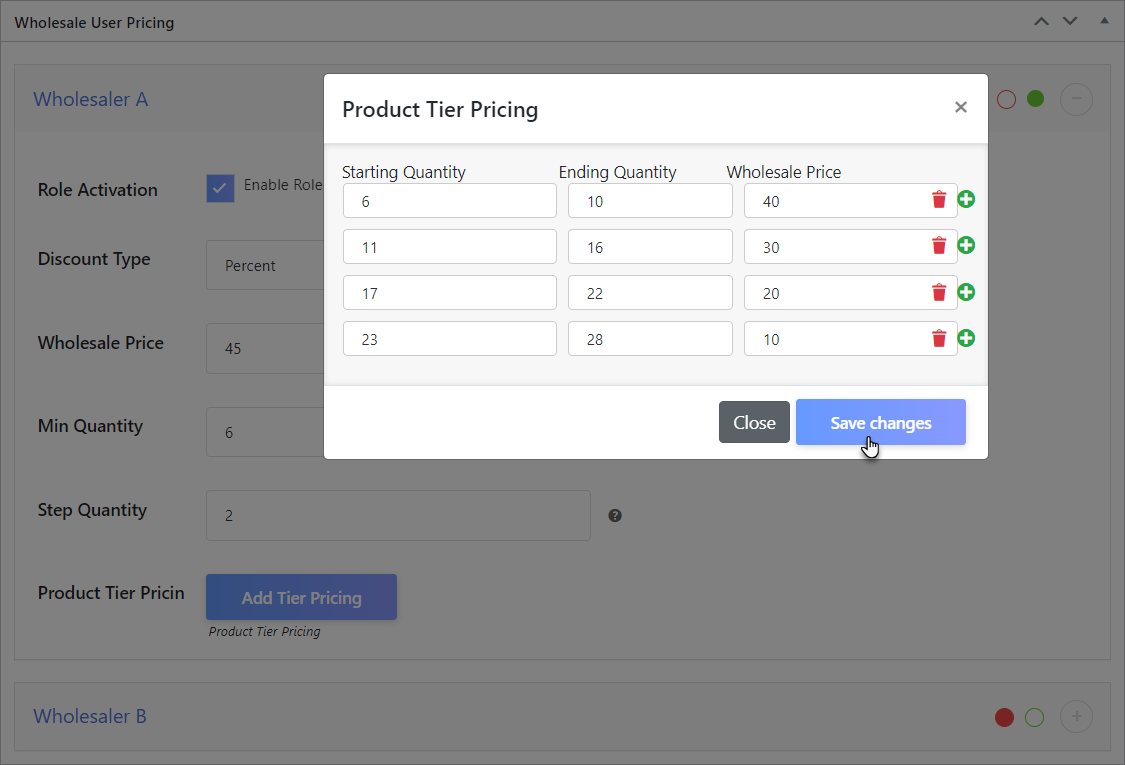
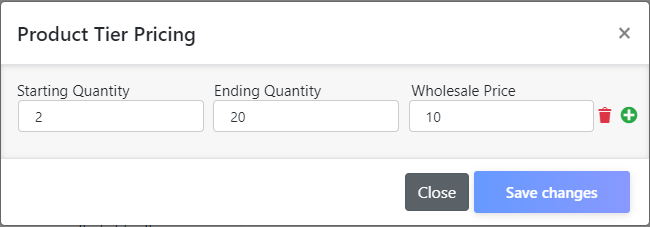
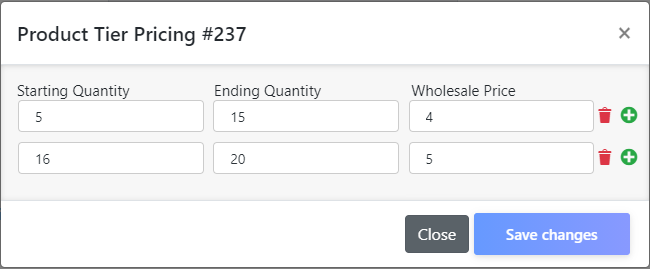
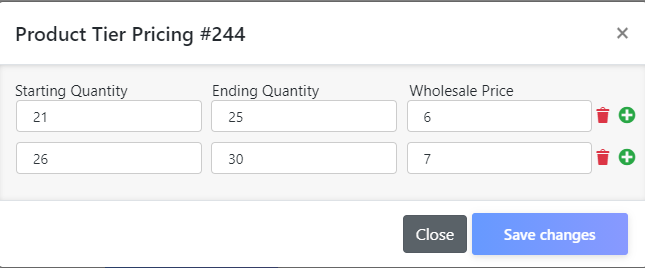
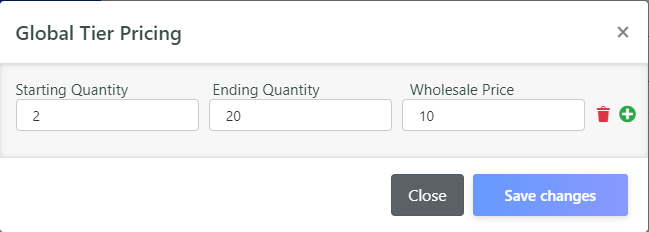
- Click on the Add Tier Pricing button to set up Product Tier Pricing.
- Setup the Product Tier Pricing and click on the Save changes button.
- Once done, click on the Update button.
- Now navigate to the WordPress Admin Dashboard → Products → All Products.
- We can see the Wholesaler A Product tag in the Wholesale Pricing On column on the configured product.

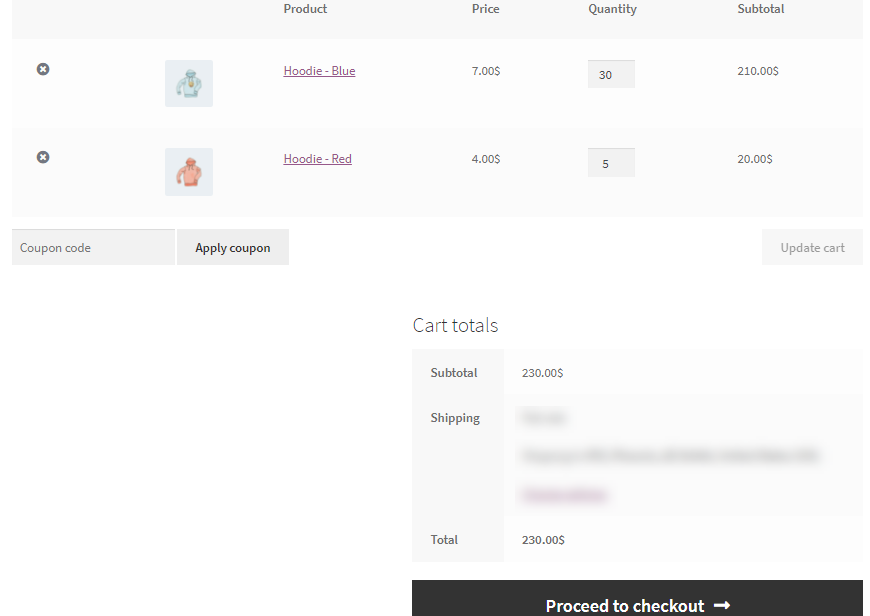
Frontend screenshots #
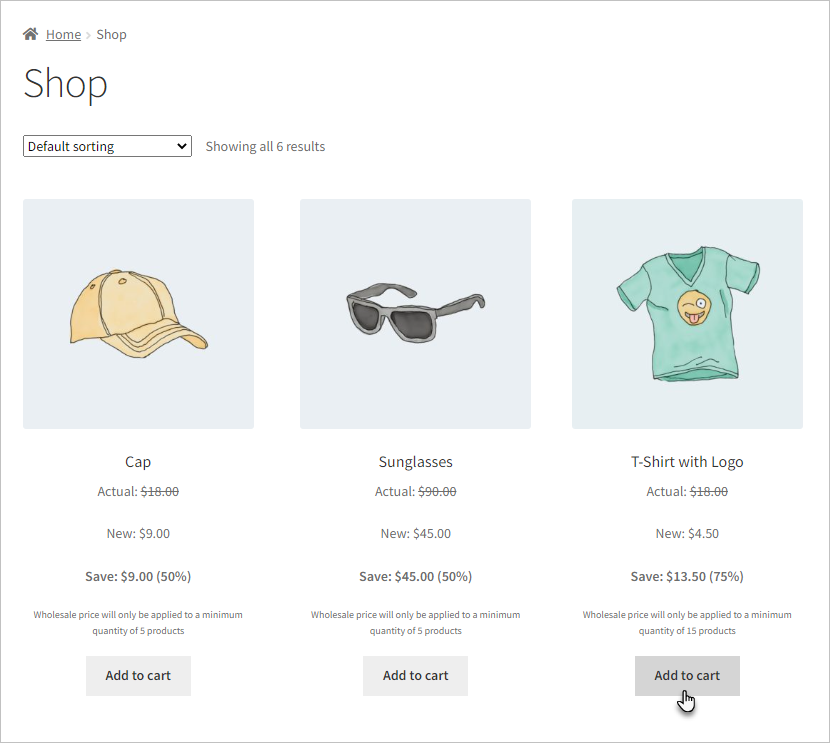
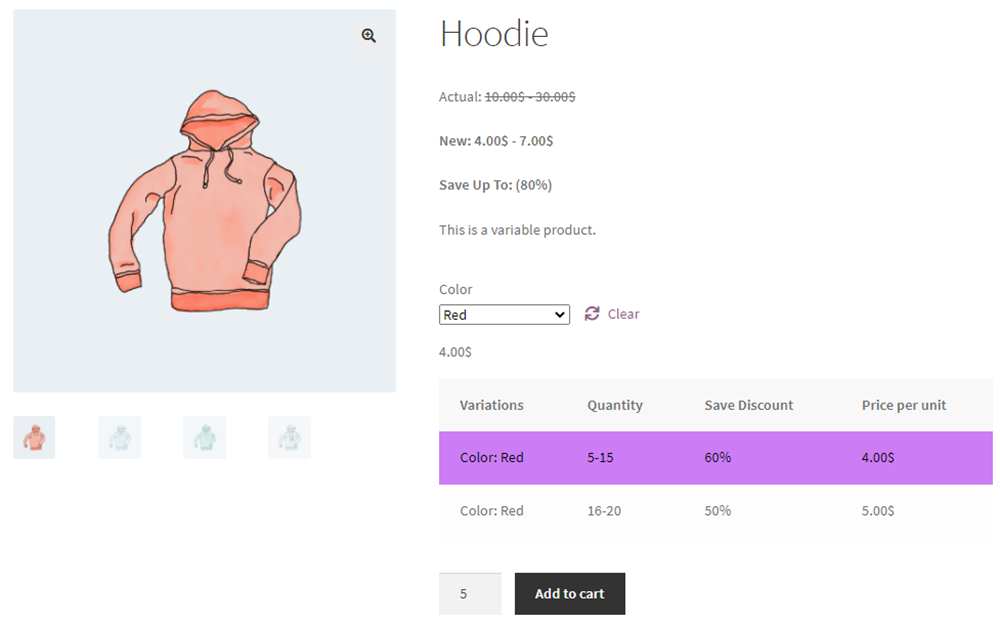
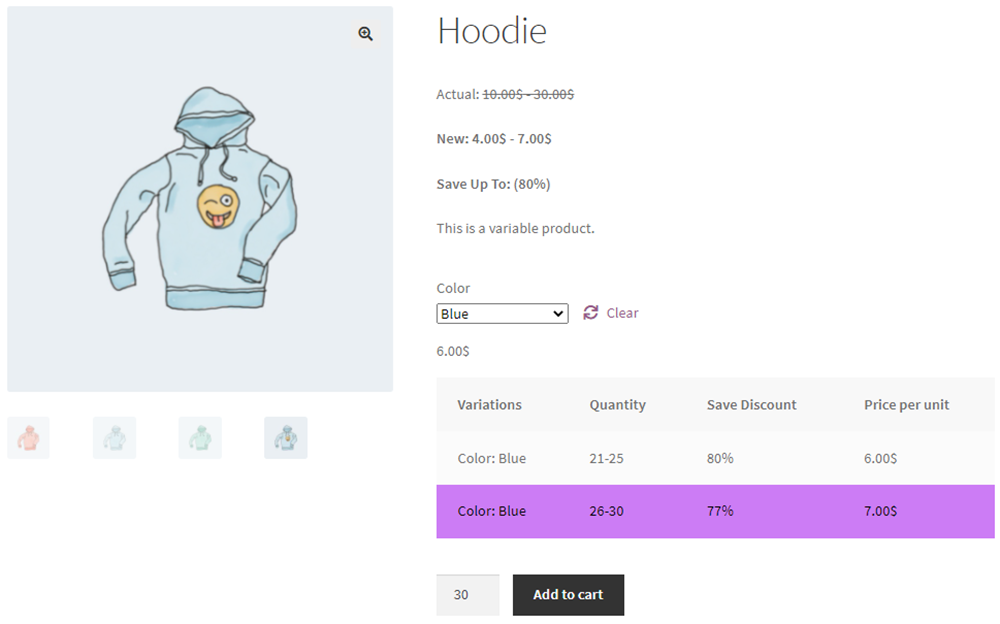
- A user with the user role Wholesaler A (because the configuration was done for user role Wholesaler A) will log in to the website.
- The user will visit the shop page.
- The user will click on the T-Shirt with Logo product and click on the Add to Cart button.
NOTE: If you enter any number manually in the Quantity section, which is not relevant according to the configured Step Quantity so it will consider invalid. Also, do not input characters or decimals in the Quantity section.

NOTE: If the Step Quantity field is empty from the back-end, then the default functionality will work, but the Product Quantity will begin from the Minimum Quantity number that has been configured.
Enable/disable coupon codes #
You can enable/disable Coupon Codes for Wholesale customers by clicking on the checkbox (as shown in the screenshot below). When coupon codes are disabled for any specific or all wholesale roles, the customers cannot utilize their coupons on cart and checkout page.
How-to-steps – Configure coupon code settings #
- Go to Wholesale 🡪 User Roles.
- Add a new Role or Edit Existing Role.
- Disable Coupon for selected roles.


Cart Total Discount #
Cart Total Discount can be applied on Cart total by setting minimum cart amount and cart discount value. This discount will be applicable on product total in the cart regardless of any other discount applied or not, in cart total discount there is also two types of discounts
(Fixed and Percentage)
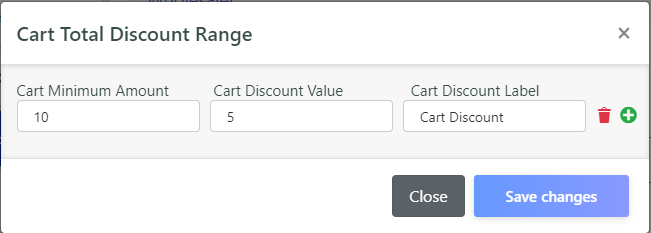
Backend: #
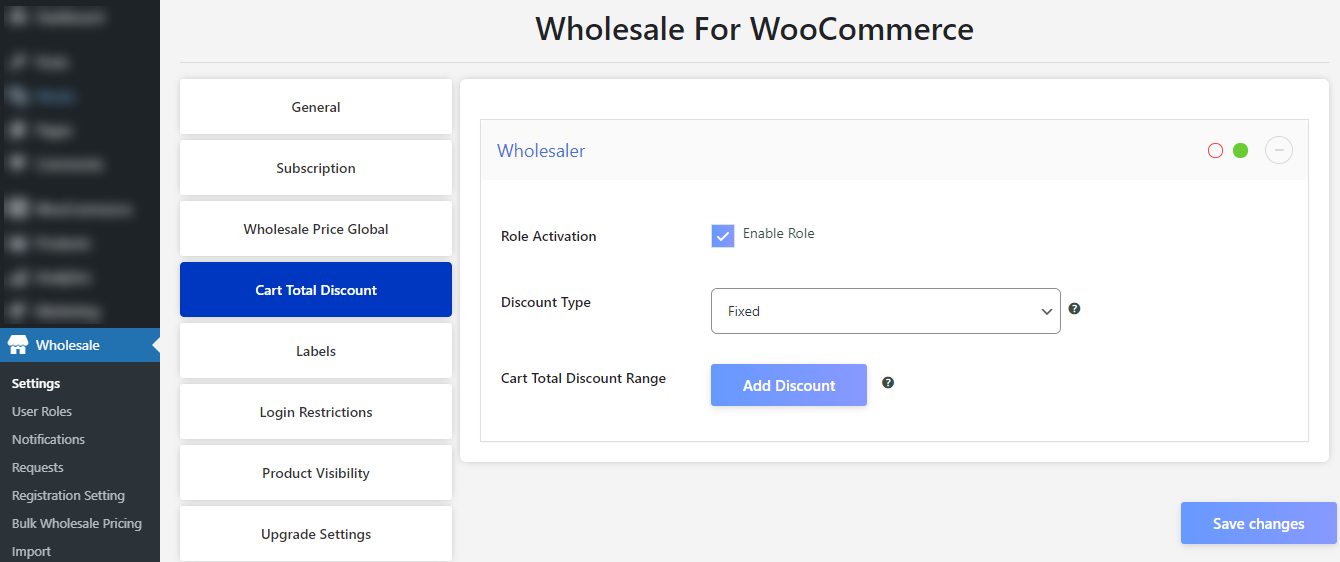
- Go to Wholesale > Settings > Cart Total Discount
- Select any Role > Enable Role by checkbox
- Select Discount Type (Fixed/Percentage)
- Click on Add Discount
- Enter Cart min Amount, Cart Discount Value and Cart Discount Label
- Click on Save changes
Fixed Cart Total Discount #

Frontend: #
- As Defined above, for a minimum cart total of 10, Fixed discount of 5 will be applied. For any cart total less than 10, no cart discount will be applicable

- As Highlighted above a discount of 5 will be applied. (Total 50-5=45)
Percentage Cart Total Discount #
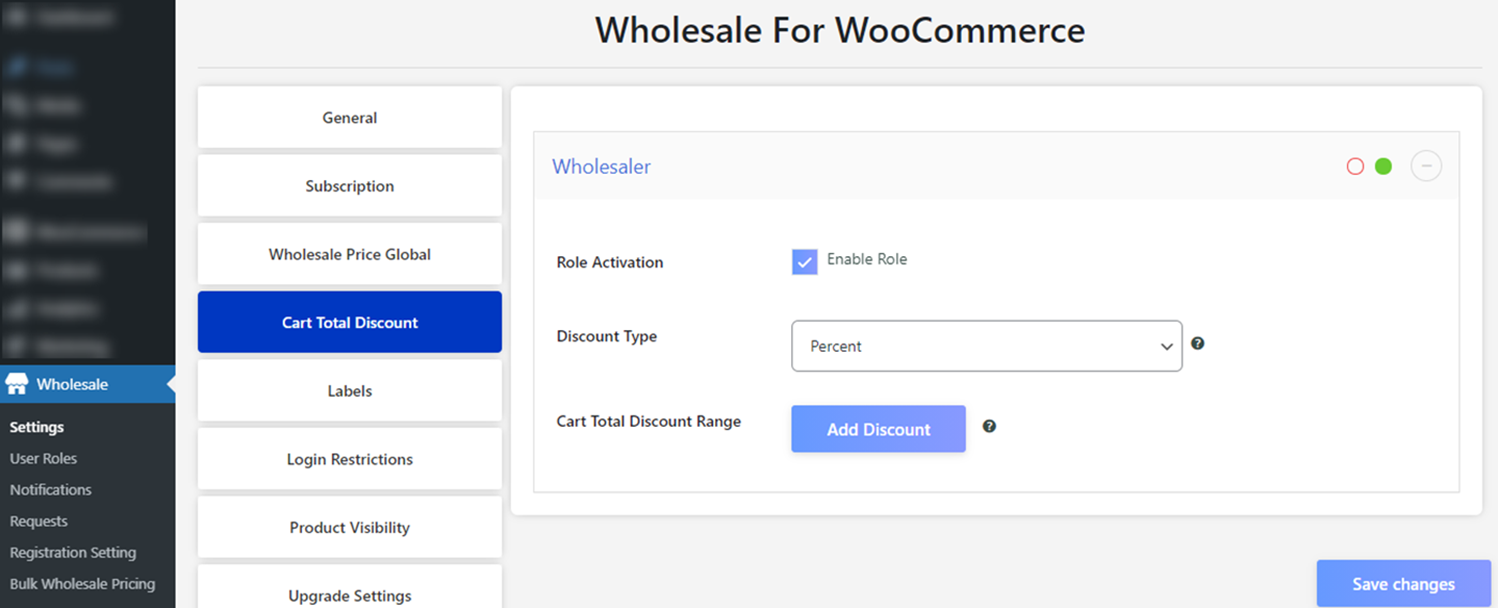
Frontend: #
- As Defined above, for a minimum cart total of 10, Percentage discount of 5% will be applied. For any cart total less than 10, no cart discount will be applicable.
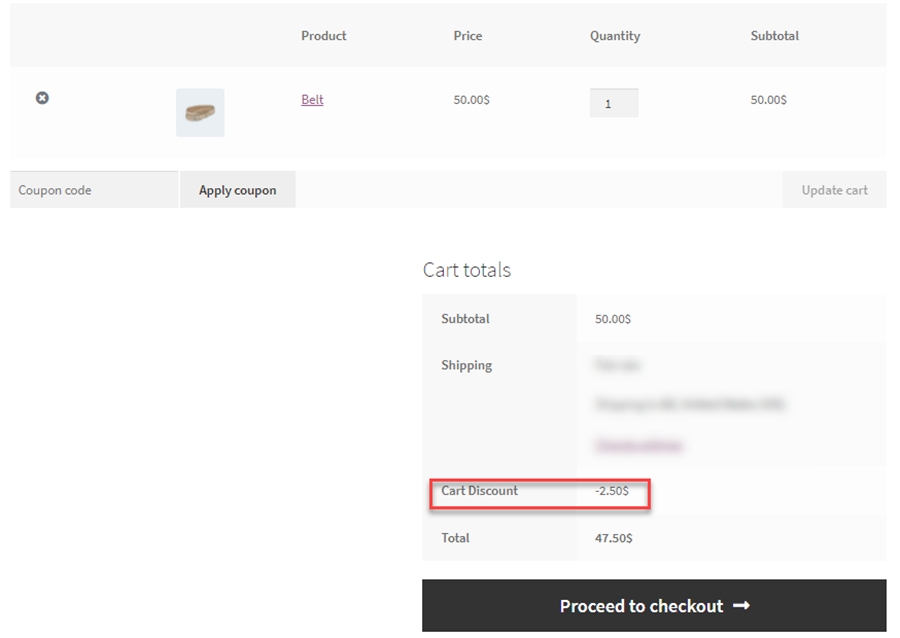
- As Highlighted above a discount of 2.50 will be applied. (5% of 50 is 2.50). (Total 50-2.50 = 47.50)
Coupons #
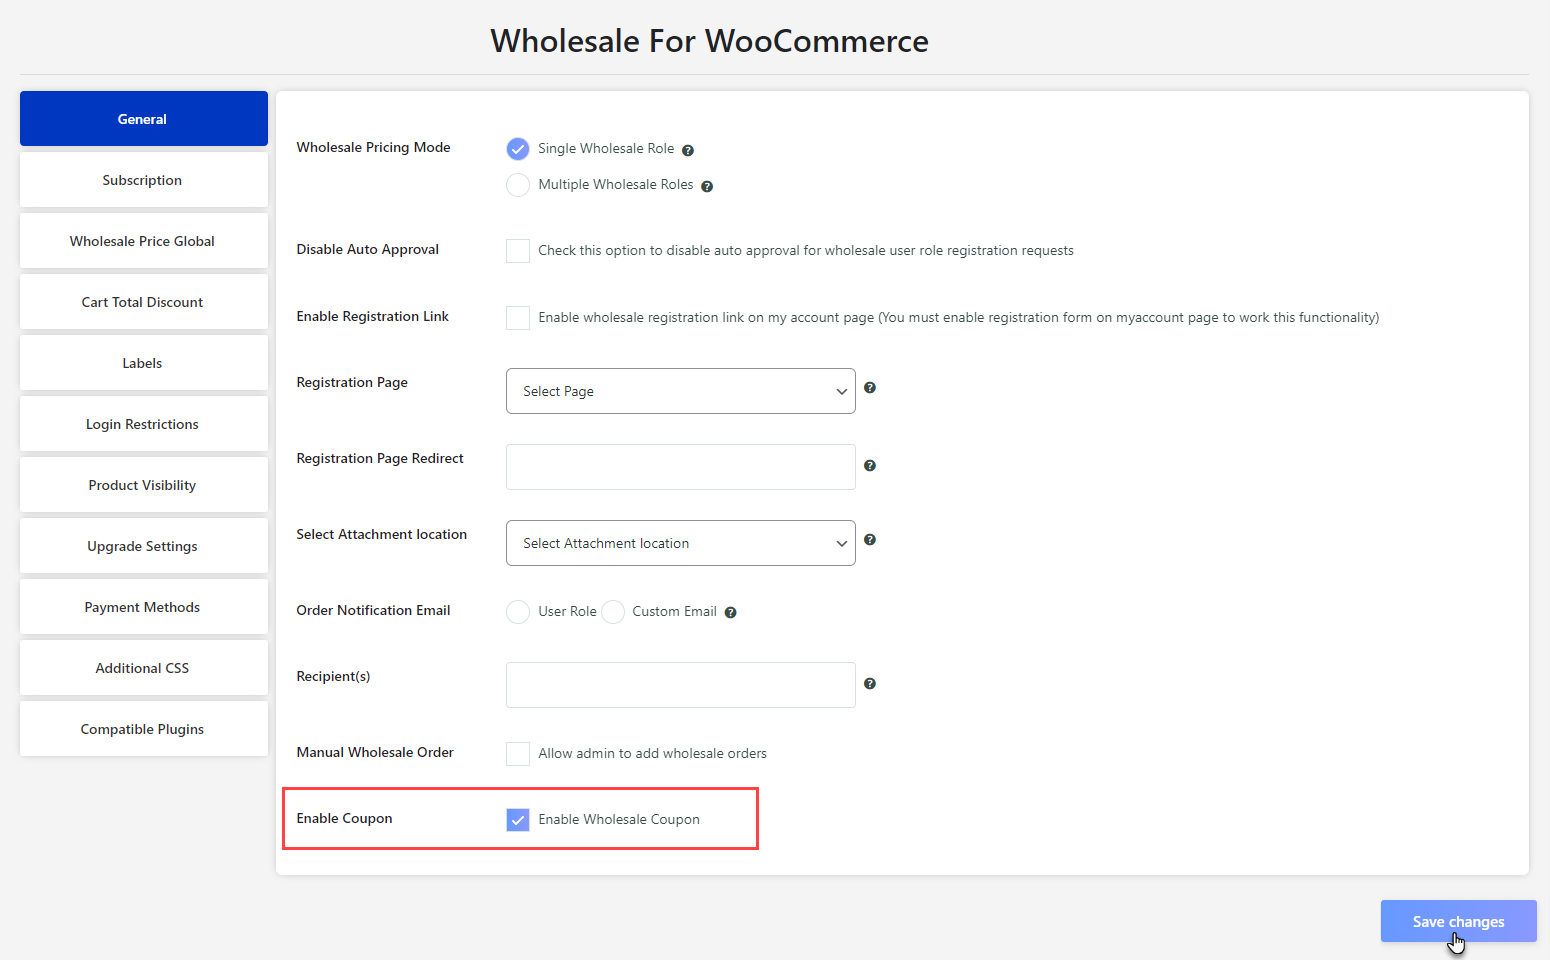
- Navigate to WordPress Admin Dashboard → Wholesale → Dashboard.

- Now you’re on the Wholesale For WooCommerce Settings page.
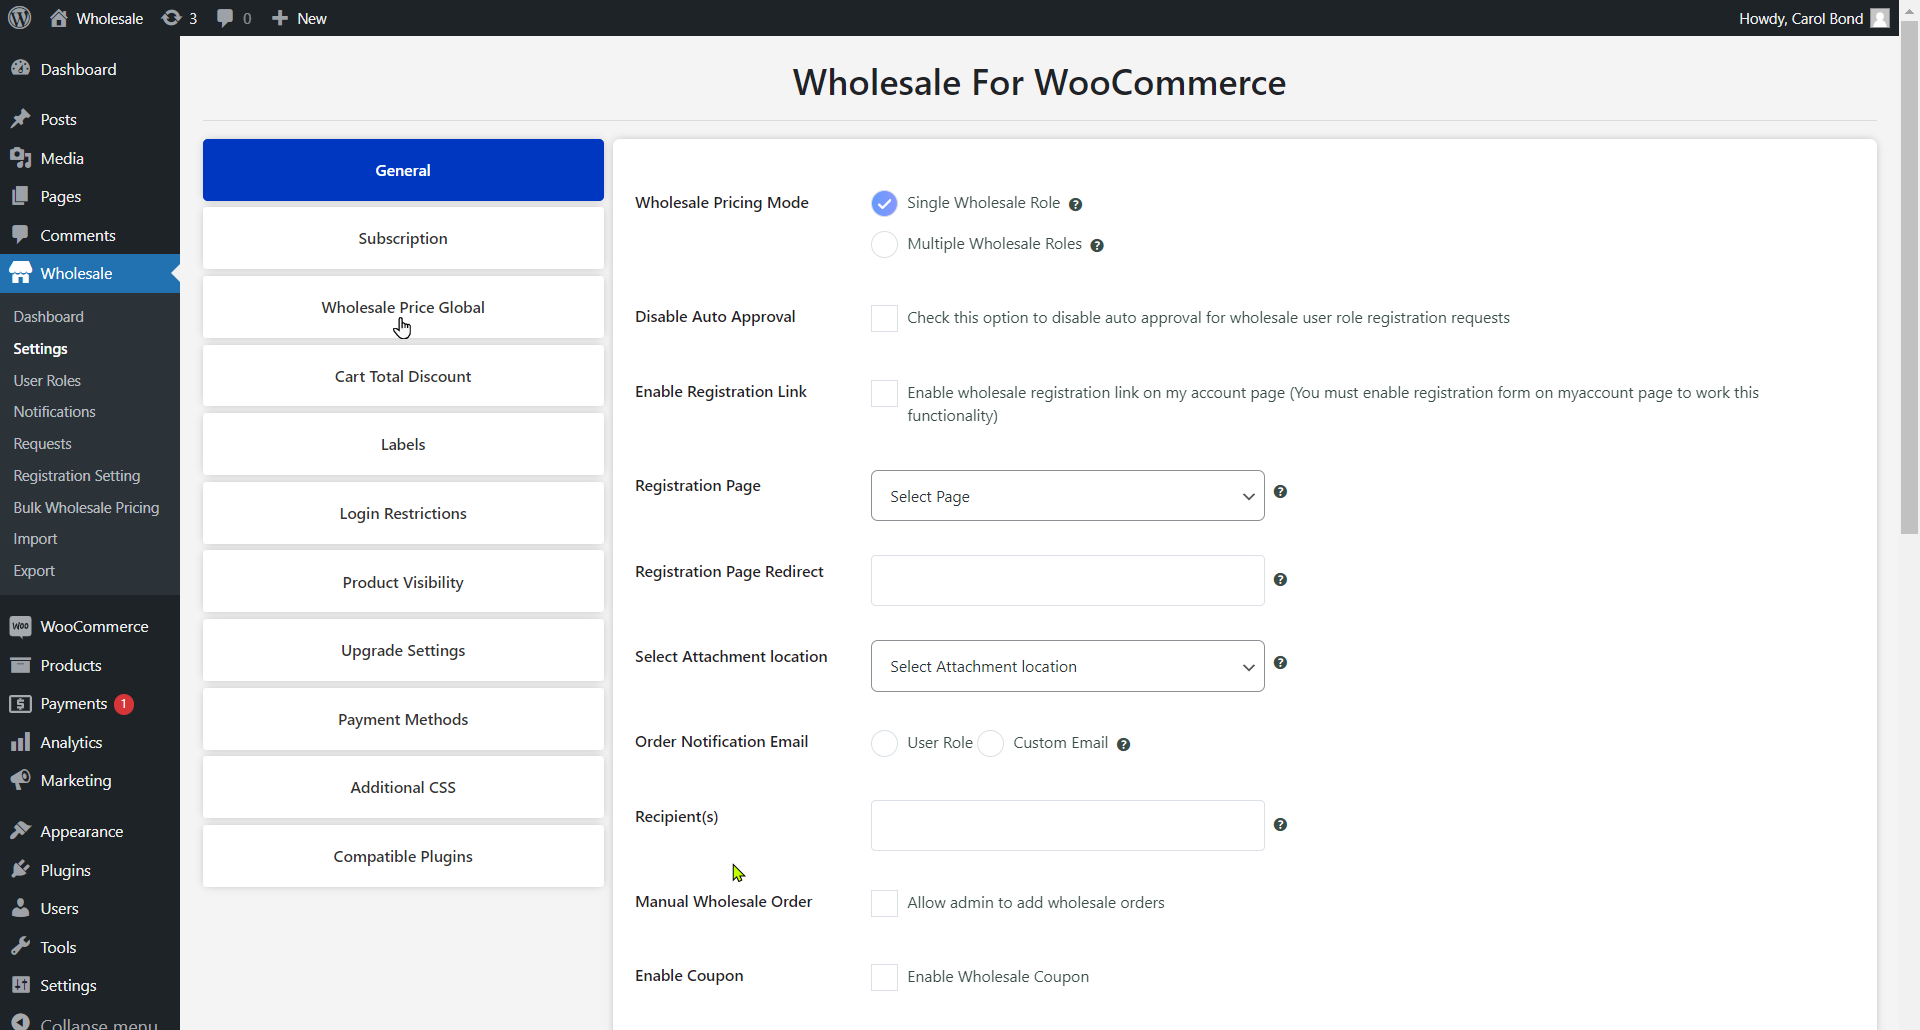
- Go to the General tab.
- Navigate to the Enable Coupon option and checkmark the checkbox to Enable Wholesale Coupon.
- Navigate to WordPress Admin Dashboard → WooCommerce → Dashboard, Or you can also navigate to WordPress Admin Dashboard → Marketing → Coupons.
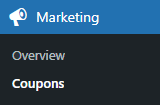
- Now you’re on the Coupons page.
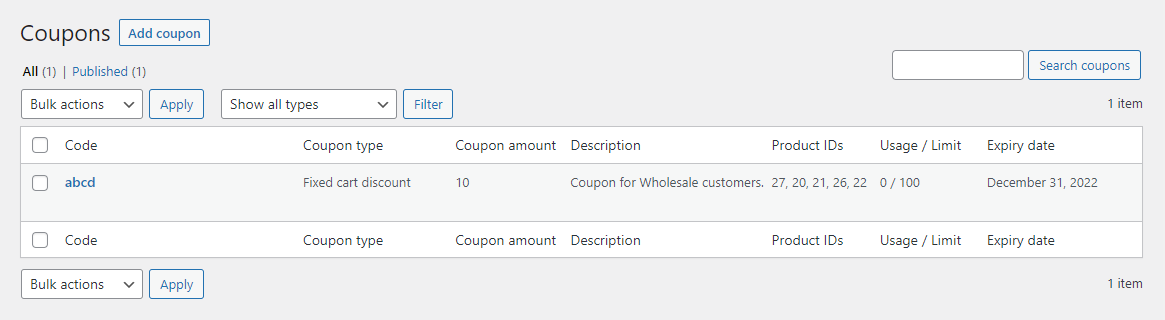
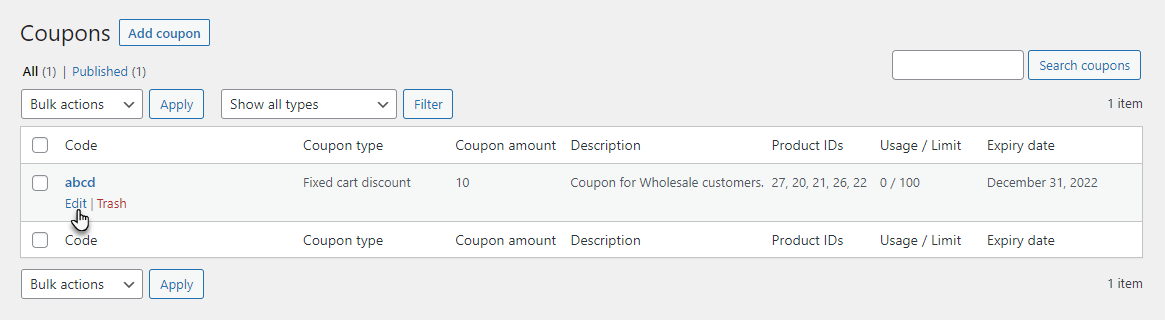
- Hover over the existing coupon to view the suboptions.
- Once done, click on the Edit button.
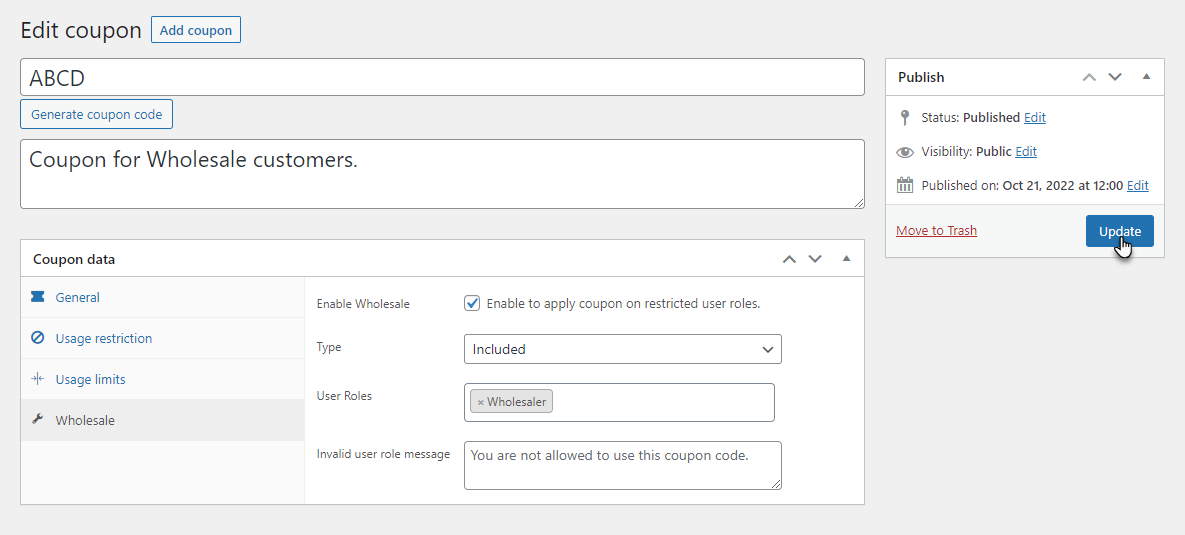
- Navigate to the Wholesale tab.
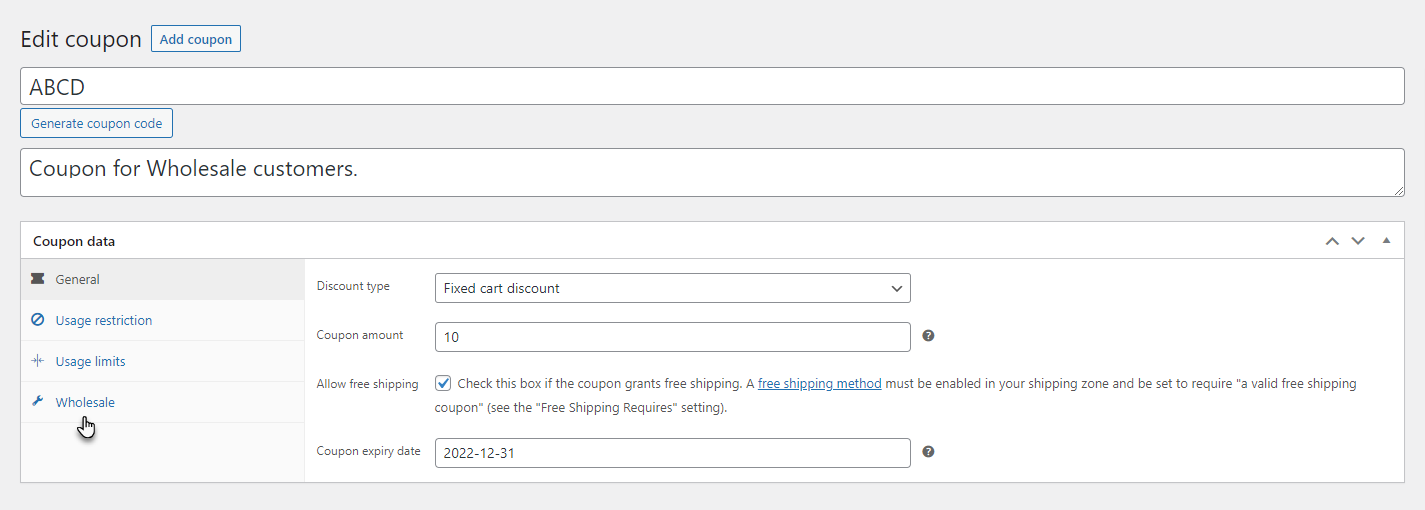
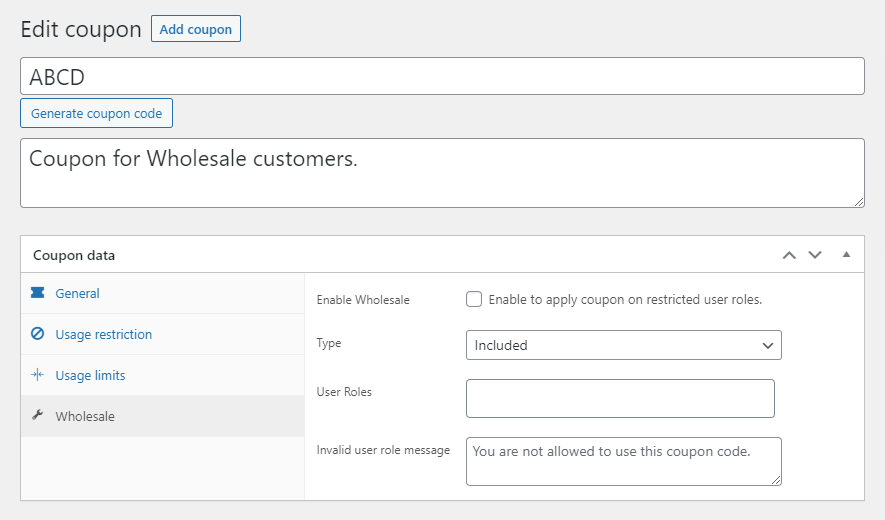
- In the Wholesale tab, there are four options available.
- Enable Wholesale
- Checkmark the Enable Wholesale to apply coupons on wholesale user roles.
- Type
- There are two types available:
- Included
- Exclude
- User Roles
- User Role box field to add or delete user roles.
- Invalid user role message
- Display the custom message to wholesale customers if the coupon is not applicable.
- When the Wholesale Type is Included
- Select Included in the Type option.
- Click on the Update button.
Front-End Impact #
- Go to the website.
- The wholesale customer will log in and navigate to the Shop page.
- Select the items from the Shop page according to your requirements.
- Once done, navigate to the Cart page.

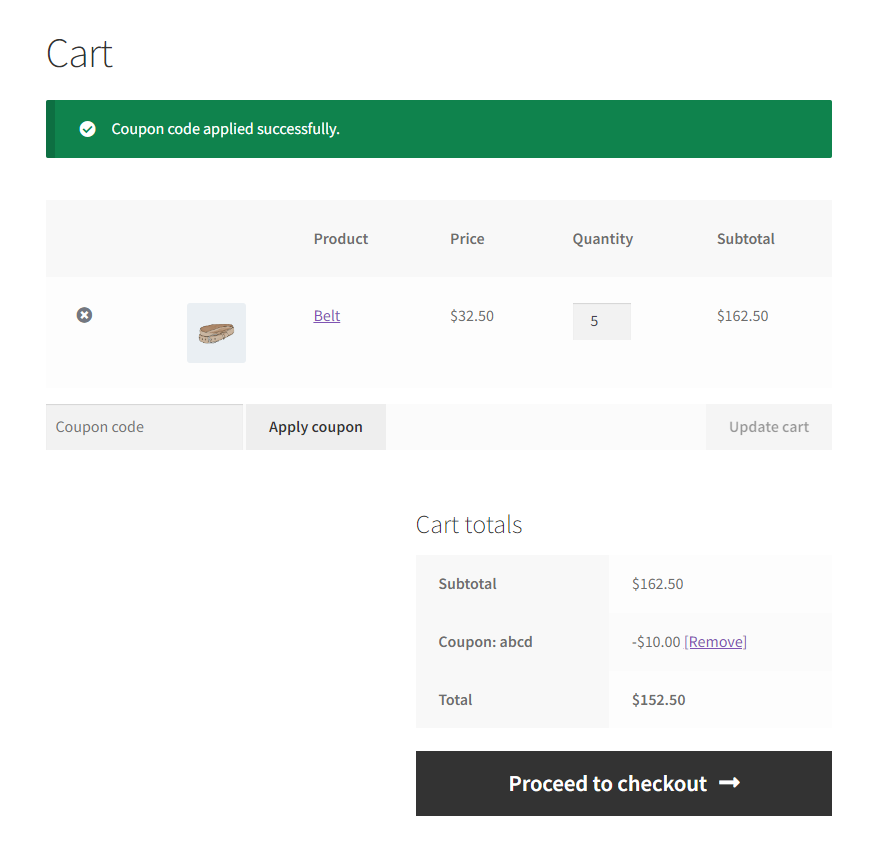
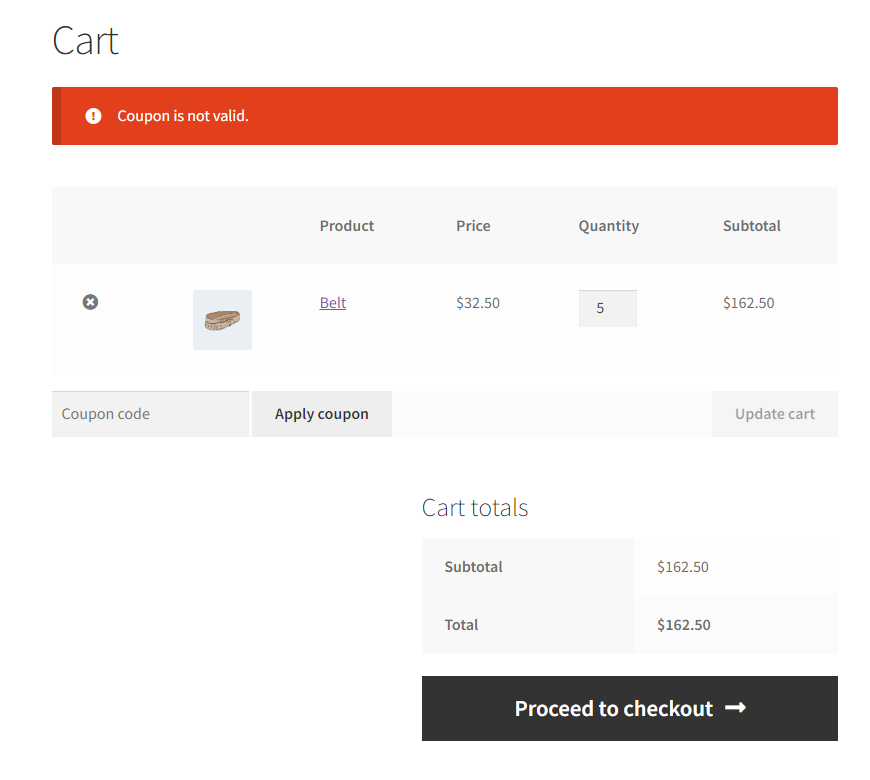
- On the Cart page, add the coupon and then click on the Apply Coupon button.
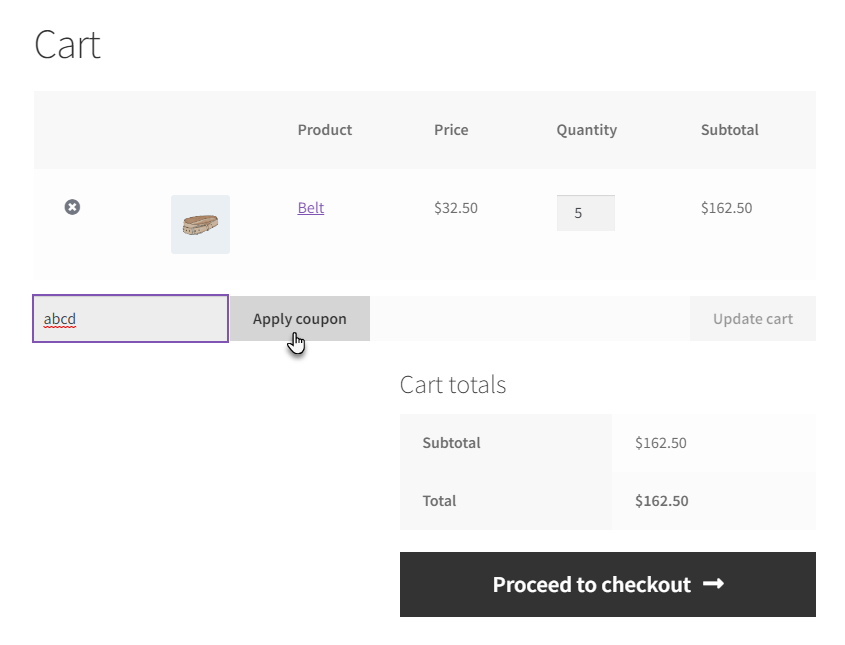
- The coupon is applied when the Type is set to Included.
- When the Wholesale Type is Excluded
- Select Excluded in the Type option.
- Click on the Update button.

Front-End Impact #
- Go to the website.
- The wholesale customer will log in and navigate to the Shop page.
- Select the items from the Shop page according to your requirements.
- Once done, navigate to the Cart page.
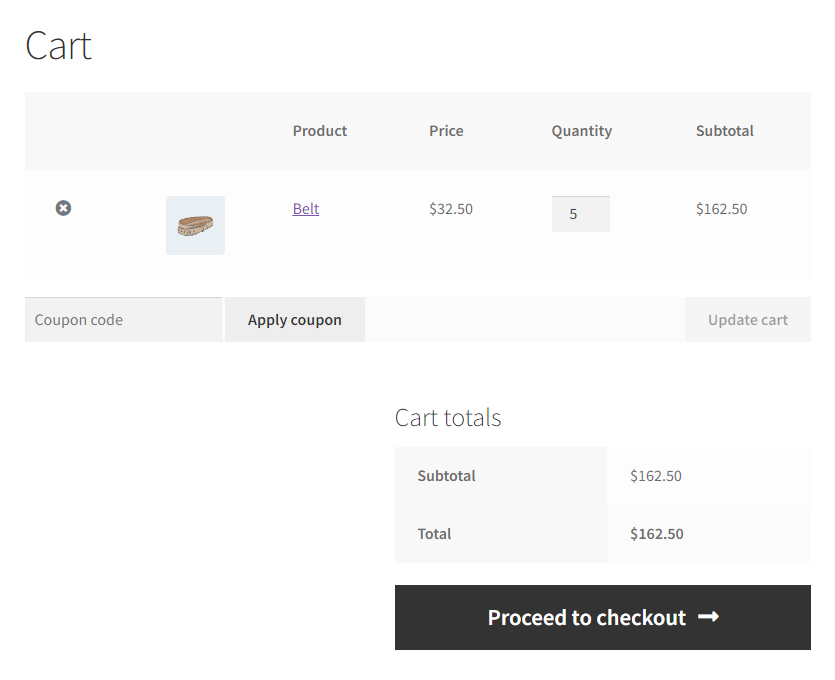
- On the Cart page, add the coupon and then click on the Apply Coupon button.

- The coupon is not applied when the Type is set to Excluded.
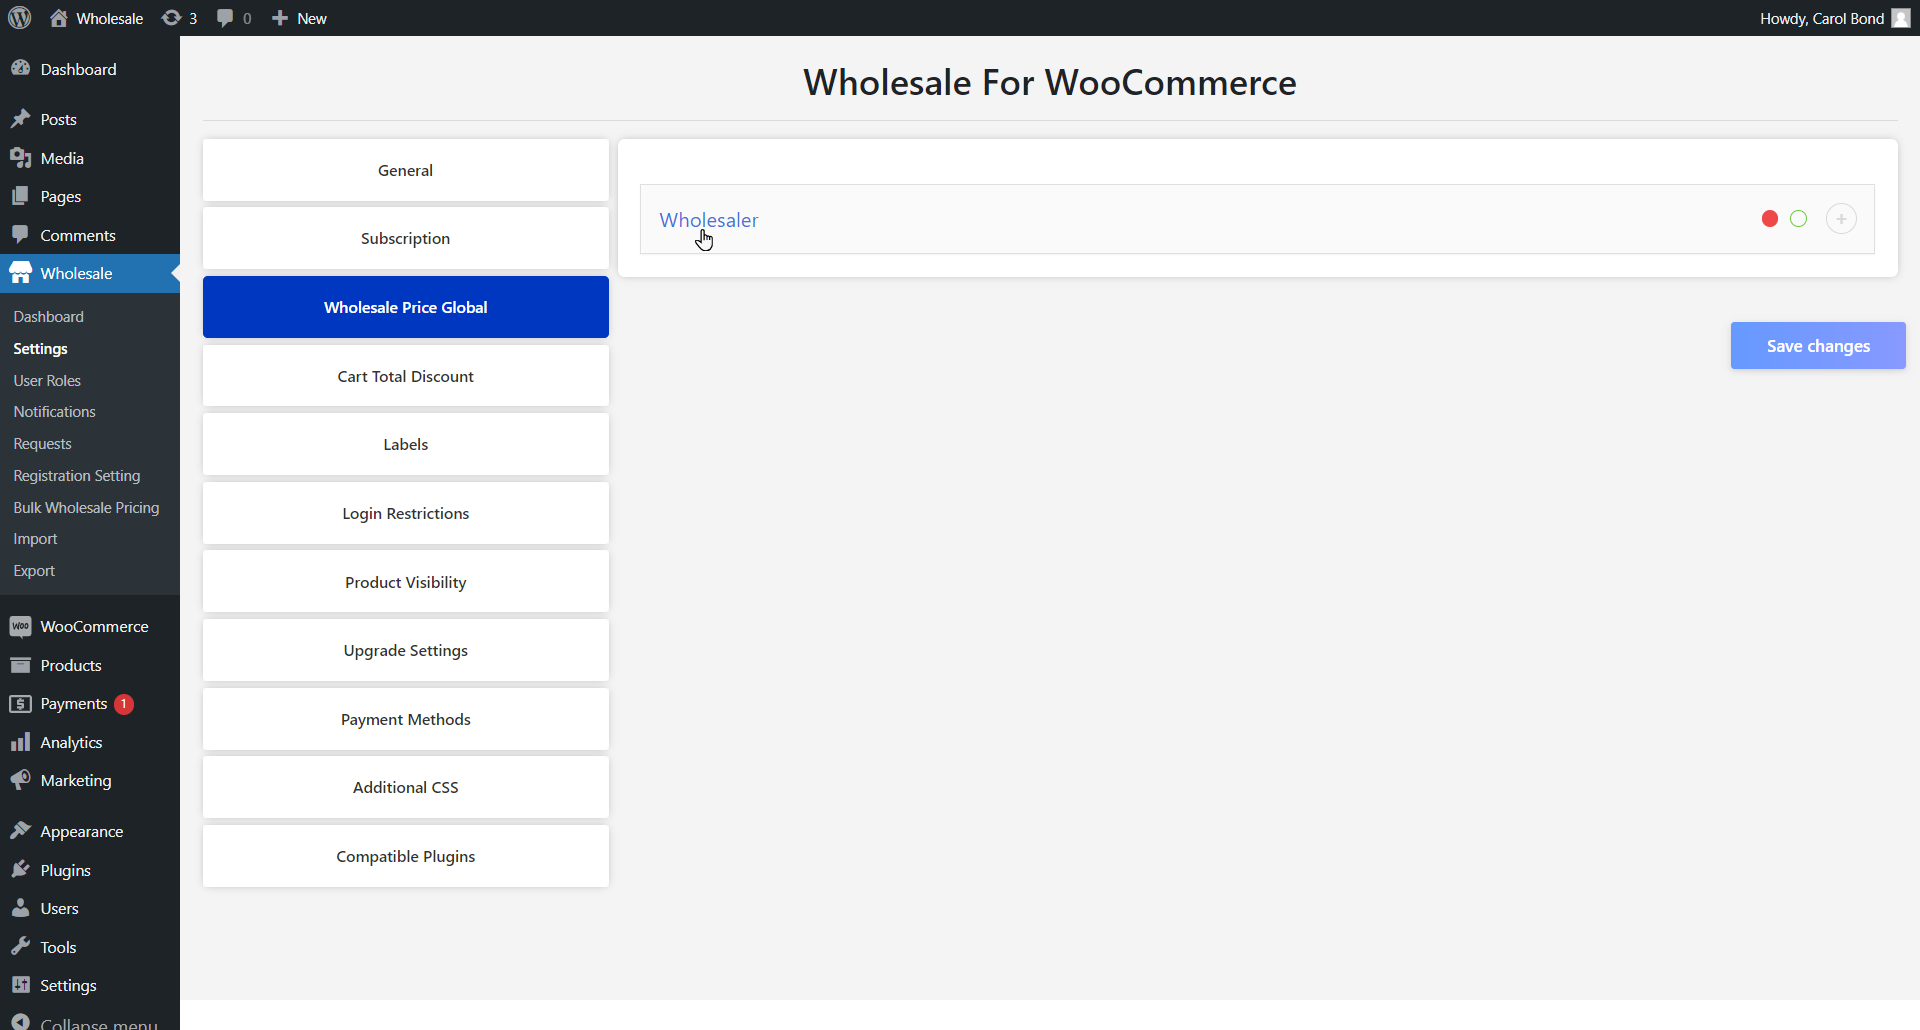
Wholesale Order Total #
- To apply Min Subtotal, navigate to Wholesale.
- Select Settings.
- A new page will appear. Select the Wholesale Price Global tab.
- Here, the Admin can select the Wholesaler. Click on the wholesale user role on which you want to configure
- When the Admin can select the Wholesaler.
- Checkmark the Enable Role checkbox in the Role Activation option.
- Set the Discount Type.
- Set the Wholesale Value.
- Set the Min Quantity.
- Set the Min Subtotal: The Minimum Subtotal Setting ensures that wholesale rates are applied only when customers meet the specified criteria for the subtotal amount, as defined by the admin.
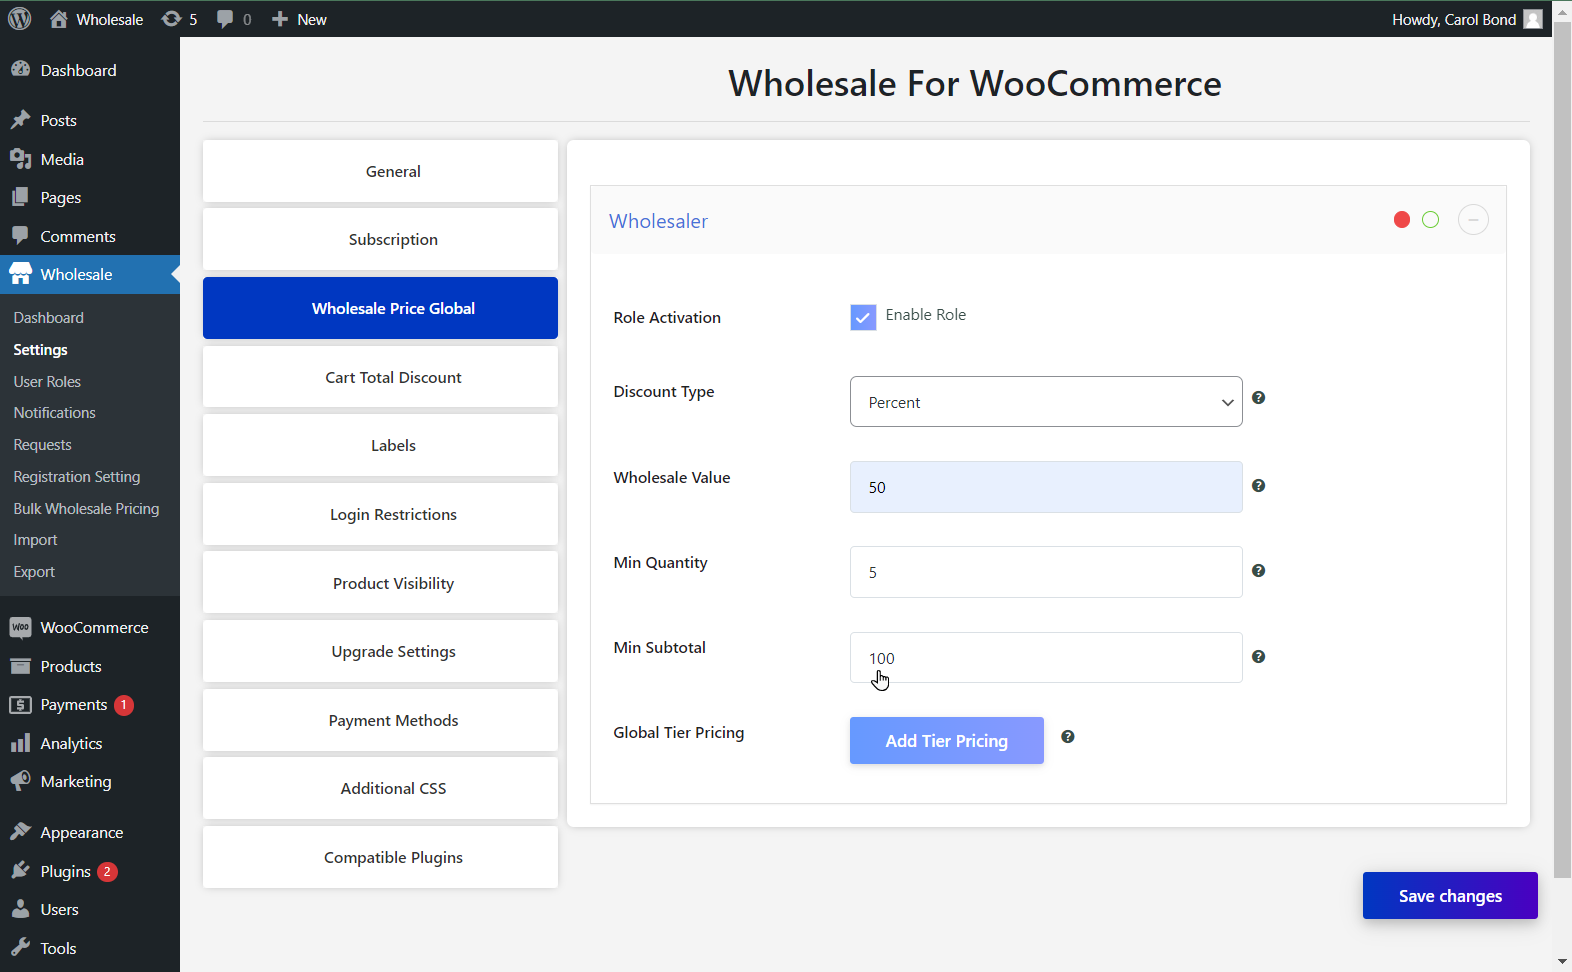
- Once done, click on the Save Changes button.

Frontend Impact #
- Login as a wholesaler and navigate to the Shop page.
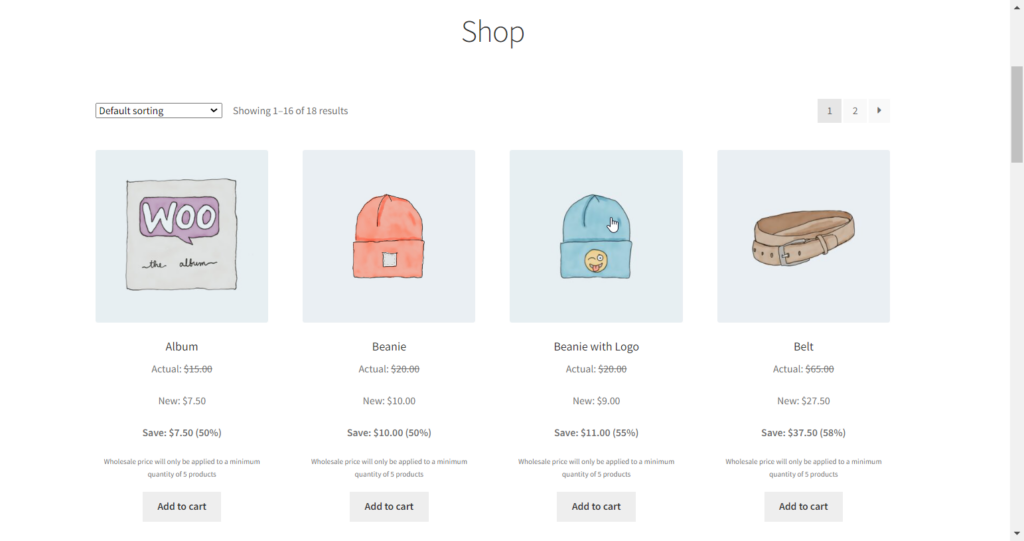
- Add the desired specified product to the cart.
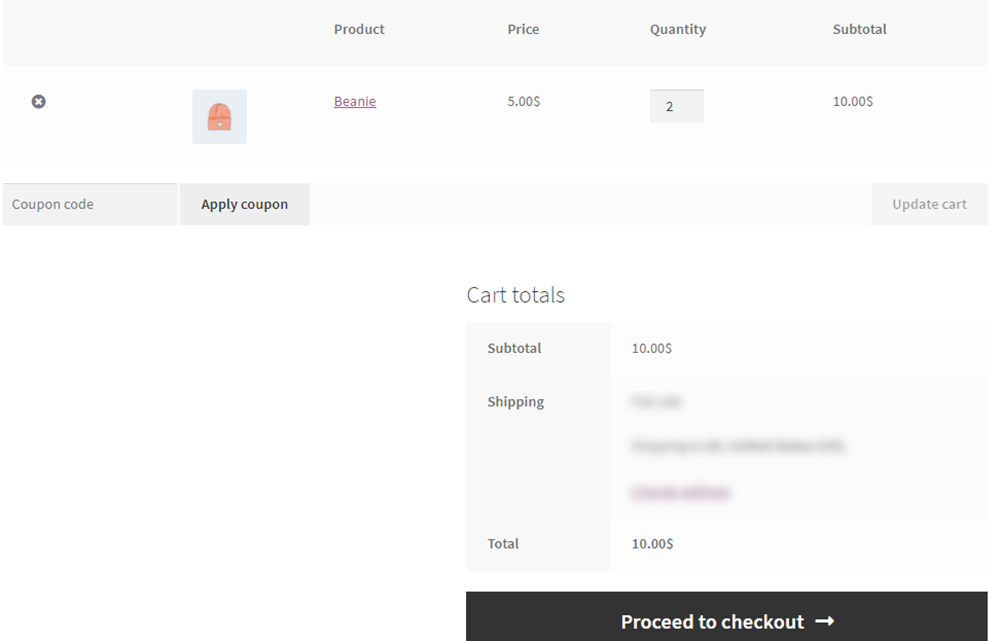
- On the Cart page, the user can view the validation regarding the subtotal of the wholesale price.
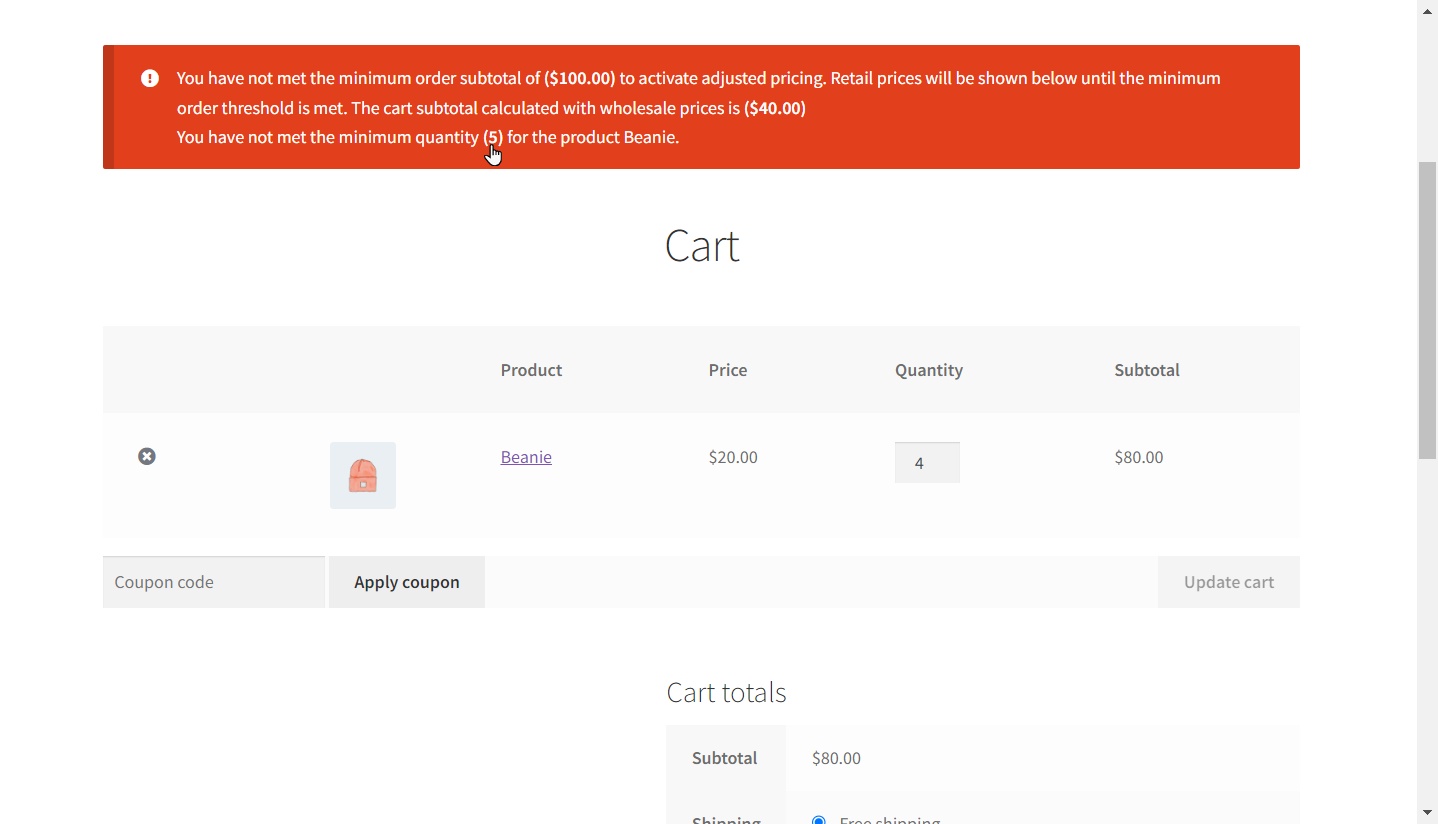
NOTE: In our case the pricing offers wholesale rates for quantities greater or equal to 5, applying when the wholesale price subtotal surpasses $100; otherwise, the standard $20 per beanie rate is applicable.
- Upon reaching the minimum quantity threshold, the minimum quantity validation will be automatically removed from the Cart page, even if the wholesale price requirement remains unmet. However, users will continue to receive validation notifications concerning the subtotal of the wholesale price.
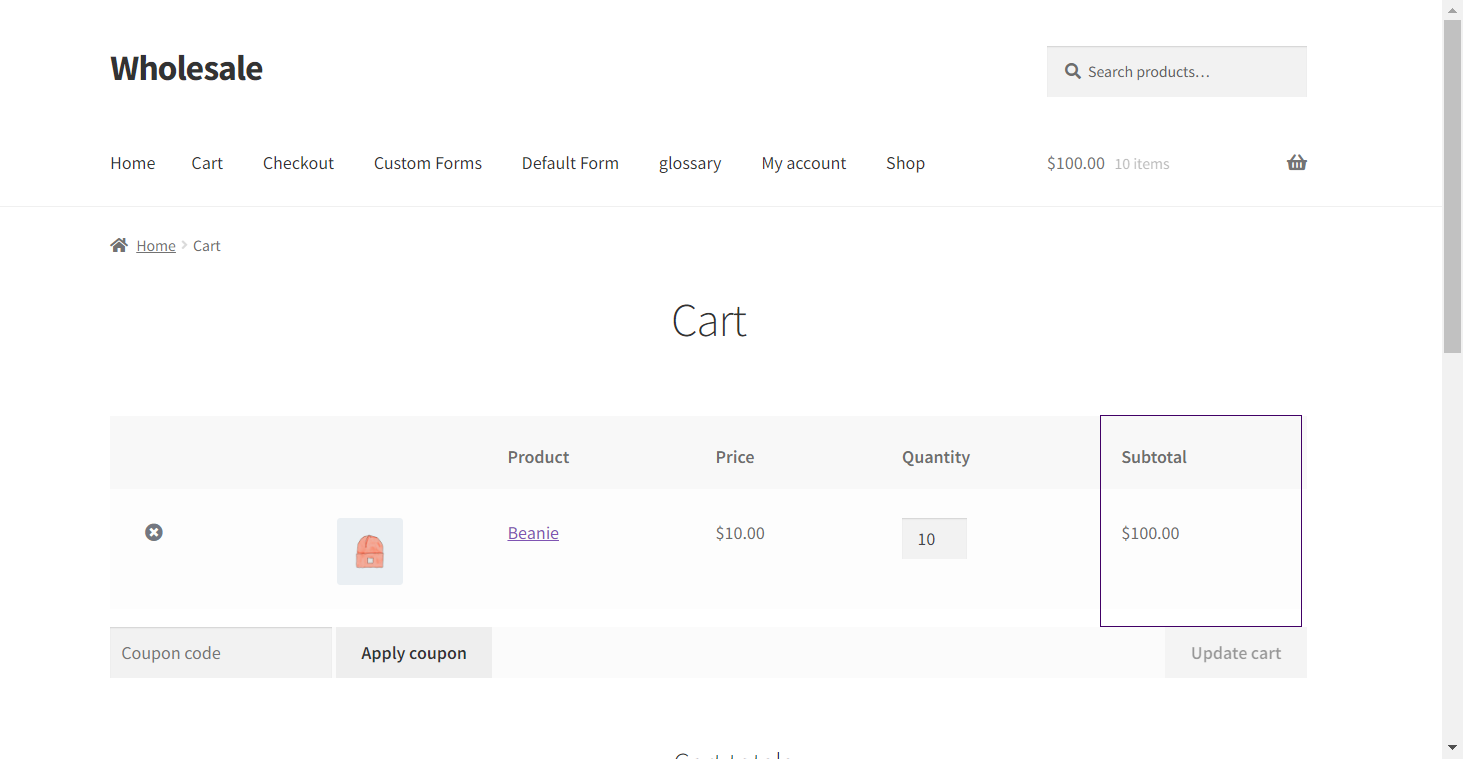
- In order to apply the wholesale price, the cart subtotal should meet the wholesale subtotal amount otherwise, retail prices will be shown. For example, if the retail price is $10 and the wholesale price is $5 per item. The minimum subtotal set by the admin is $100. The user needs to add 20 items to the cart to achieve the wholesale minimum subtotal and apply the wholesale discounted price.
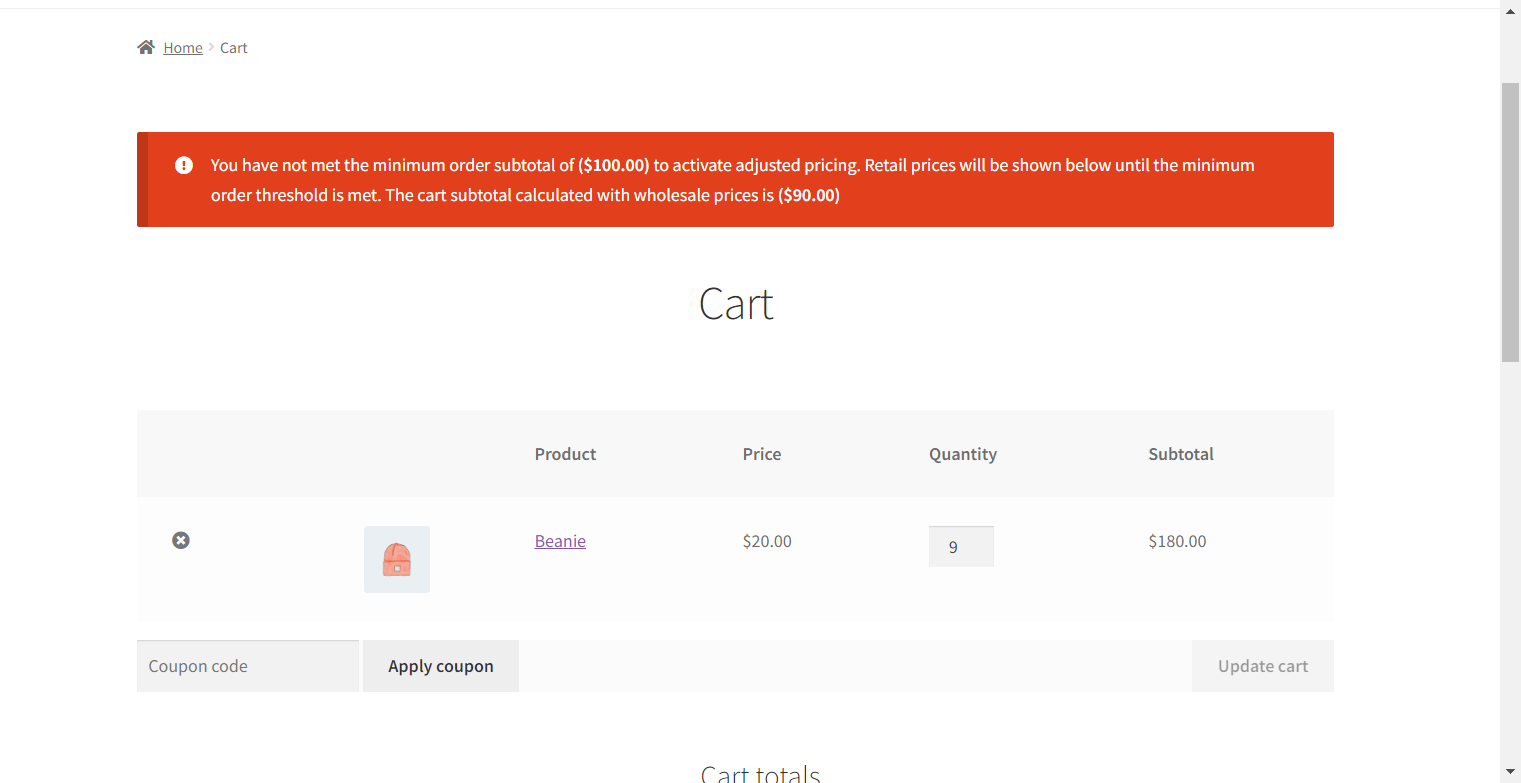
- Once the requirement is met the validation will be removed and the wholesale will be applied.
Wholesale Tier Pricing #
Tier Pricing #
Wholesale For WooCommerce Tier Pricing feature allows you to create multiple prices on multiple quantities of a product. Individual pricing can be set for different quantities of products. Tier Pricing can be applied from Products, Categories and Global according to Wholesale Roles. Wholesale prices and Tier pricing can be applied at a time but the first priority will be Tier then Wholesale.
Prices can be created based on the following priorities:
- Product Based Tier
- Product Based Wholesale (If wholesale price not entered then retail price will be applied)
- Category Based Tier
- Category Based Wholesale (If wholesale price not entered then retail price will be applied)
- Global Based Tier
- Global Wholesale (If wholesale price not entered then retail price will be applied)
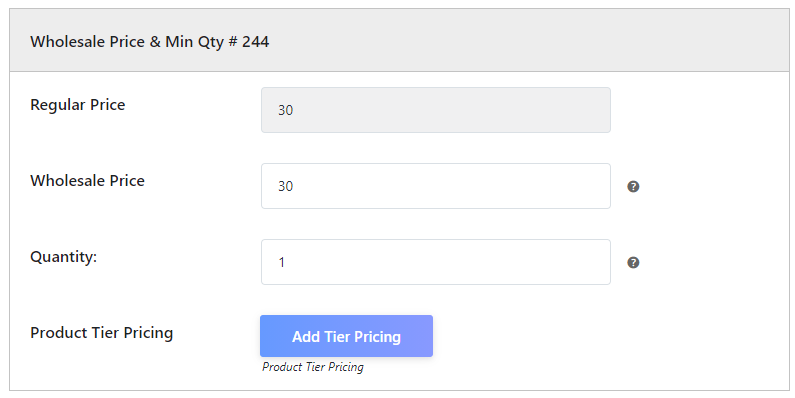
Product Based Tier: #
- Go to Products > Edit
- Select any Role > Enable Role by checkbox
- Select Discount Type (Fixed/Percentage)
- Click on Add Tier Pricing
- Enter min and max qty range then enter Wholesale Tier amount
- Click on Save changes
Backend #
- Fixed Tier Discount
Notice: Please do not leave any fields blank, do not enter any alphabets and special characters in the Tier Pricing field.

Notice: Once you click on Save changes wait till the reload then click on update button and if you want to delete the last column add one more column then delete.
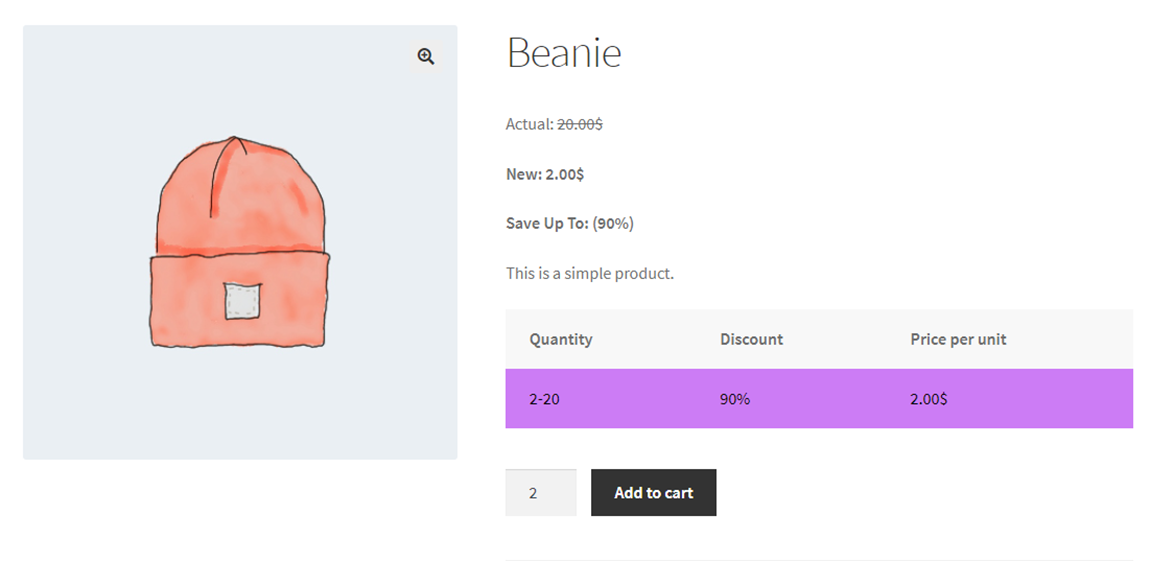
Frontend: #
Backend: #
- Percentage Tier Discount

Frontend: #

Backend: #
- Variable Product Fixed Tier


Notice: You can delete the wholesale price in order to apply only Tier Pricing, if both are enabled, Tier Discount will apply first but we will recommend you use only one discount at a time Wholesale OR Tiered

Frontend: #

Backend: #
- Variable Product Percentage Tier

Frontend: #
Notice: Percentage Price calculation is same as wholesale Percentage calculation, see Wholesale Discount section in documentation.
Category Based Tier: #
- Go to Products > Categories > Edit
- Select any Category > Enable Role by checkbox
- Select Discount Type (Fixed/Percentage)
- Click on Add Tier Pricing
- Enter min and max qty range then enter Wholesale Tier amount
- Click on Save changes
Backend: #

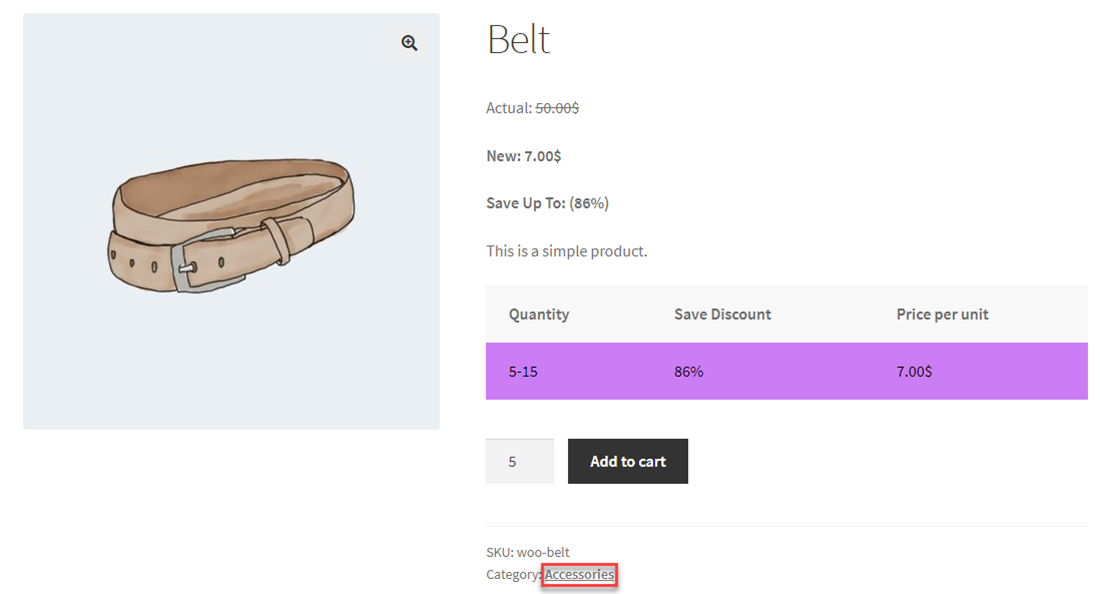
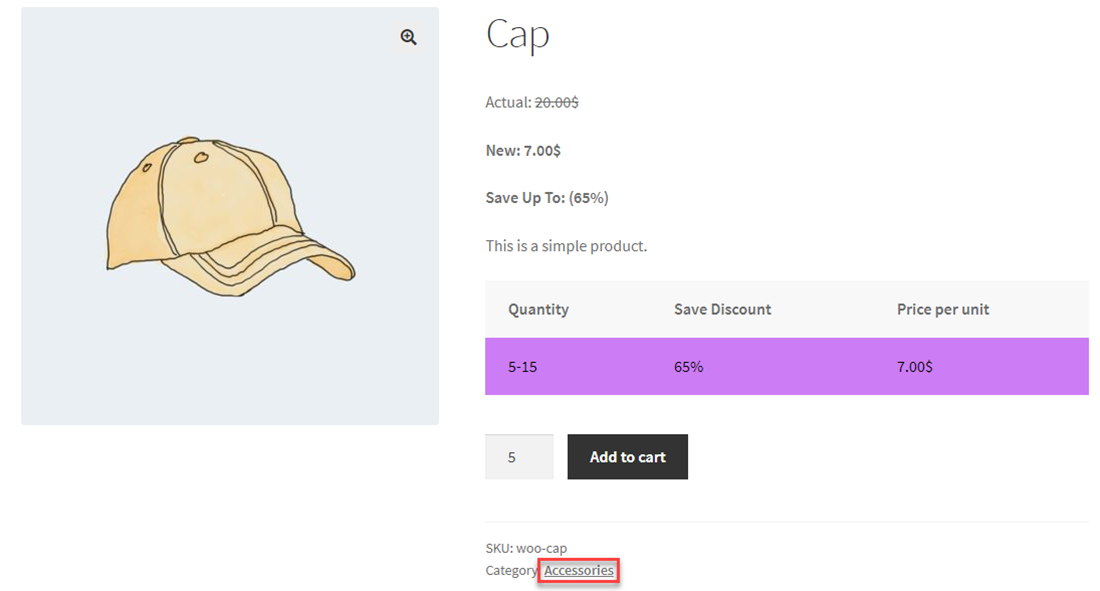
Woocommerce after single product summary # #
Frontend: #
- All these products lie in the Category Accessories, so Category Based Tier will be applied except for Hoodie in which Product based Tier is applied according to Tier Priority.

Global Based Tier: #
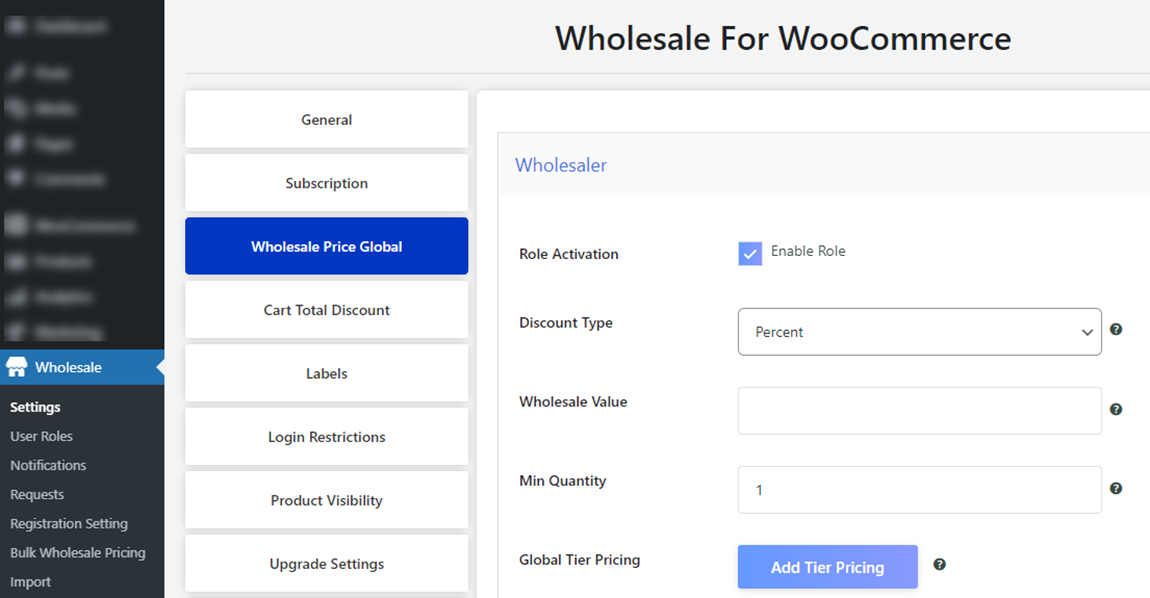
- Go to Wholesale > Settings > Wholesale Price Global
- Select any Role > Enable Role by checkbox
- Select Discount Type (Fixed/Percentage)
- Click on Add Tier Pricing
- Enter min and max qty range then enter Wholesale Tier amount
- Click on Save changes
Backend: #
Frontend: #
- Global Tier Discount will be applicable on all the products except for ones in which Product or Category based Tier is applied.
Wholesale Product & Price Visibility #
Product Visibility – General Settings #
Control who can see which products in your store is really important once you start selling products to wholesale customers.
- Restrict Product Visibility: Enable this option to control the visibility of your products. Hide non-wholesale products from wholesale customers. Retail price products will be hidden from wholesale customers when they are logged in as wholesalers.
- Add to Cart Minimum Quantity: Enforce the minimum quantity requirement on products, let wholesaler add to cart minimum quantity as defined by admin. Enable for wholesale prices to be applied when the minimum quantity is added to cart. Give minimum quantity value from wholesale pricing section.
Front-end

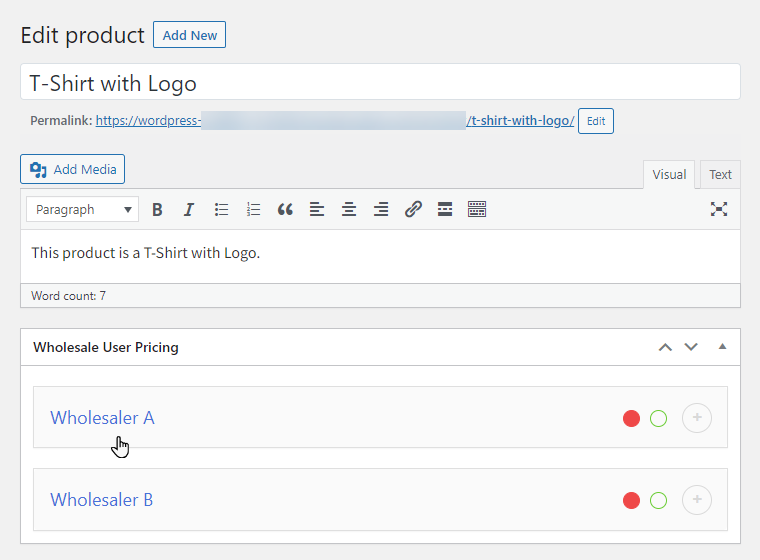
Individual Product Visibility #
Set product visibility for individual products on single and multiple wholesale role levels. You can also set the product visibility on simple and variable products.
Product Visibility option field for both simple and variable products can be found in the Wholesale Tab.
Go to WooCommerce Products 🡪 Add or Edit a product.
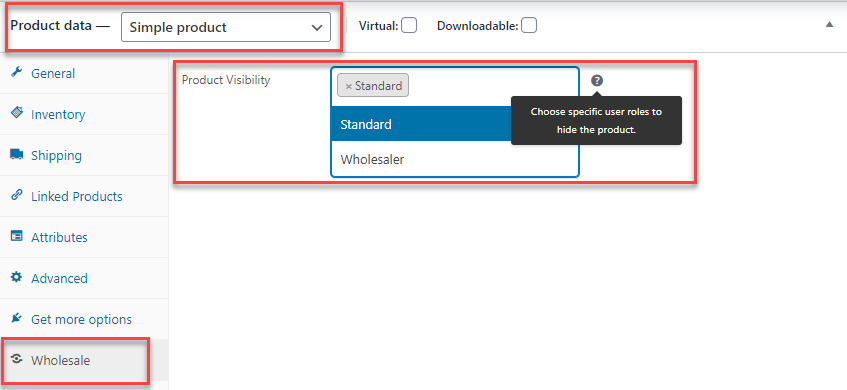
How-to-steps – Configure product visibility for single user role #
- Select Simple or Variable product from product data.
- Go to the Wholesale tab.
- Enable the Product Visibility option to hide this particular product from this wholesaler role.
- Product Visibility Checkbox option for both simple and variable products will be found in the Wholesale Tab.
- Update product.
Simple Product settings

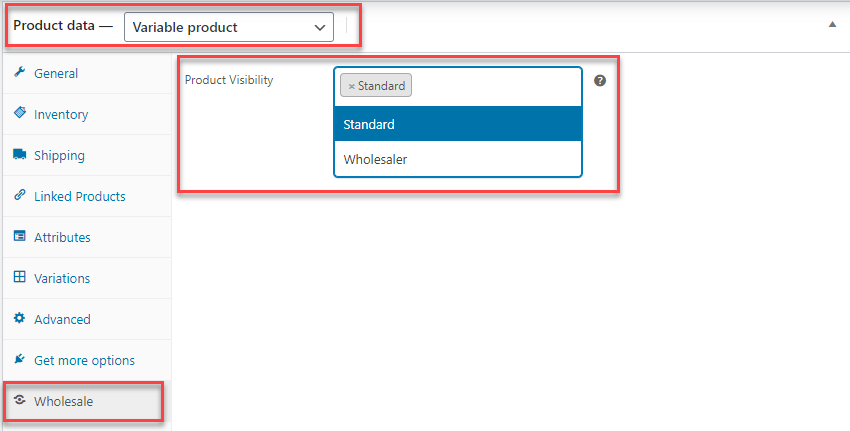
How-to-steps – Configure product visibility for multi-user role #
- Go to the Wholesale tab.
- Select Wholesale Role from product visibility field to hide this particular product from this wholesale role.
- Update product.
Simple Product settings
Variable Product settings
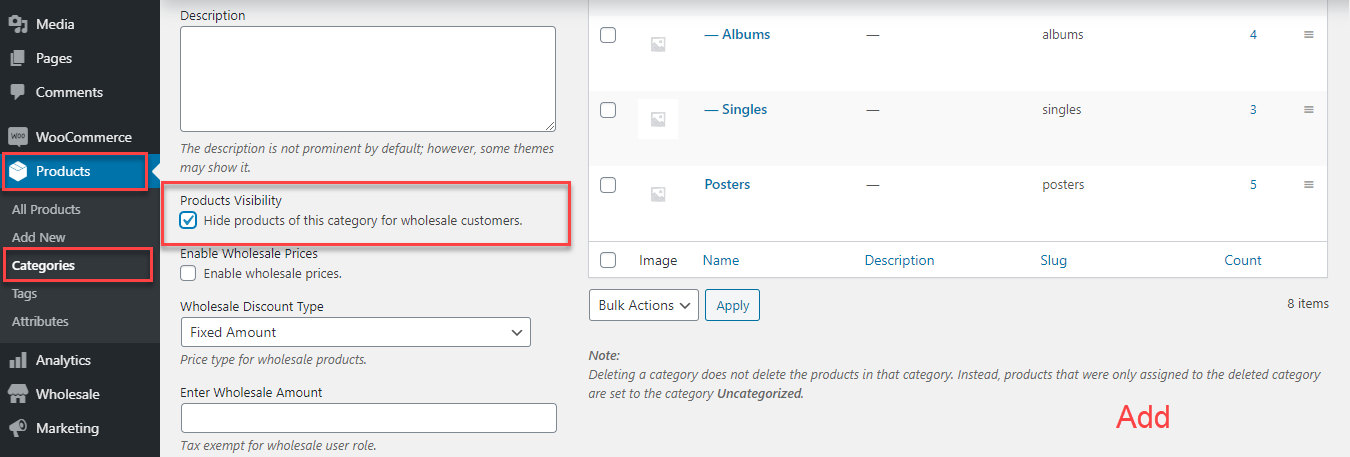
Enable/Disable product visibility for a product category #
Setting product visibility to product categories will apply the settings to all products that are associated with that particular category. You can choose different categories for different wholesale roles.
Go to WooCommerce Products 🡪 Categories.
How-to-steps – Configure product visibility for single user role #
- Add or Edit a Category.
- Enable the Product visibility option to hide this category product from the wholesale users.
- Add or Update Category.

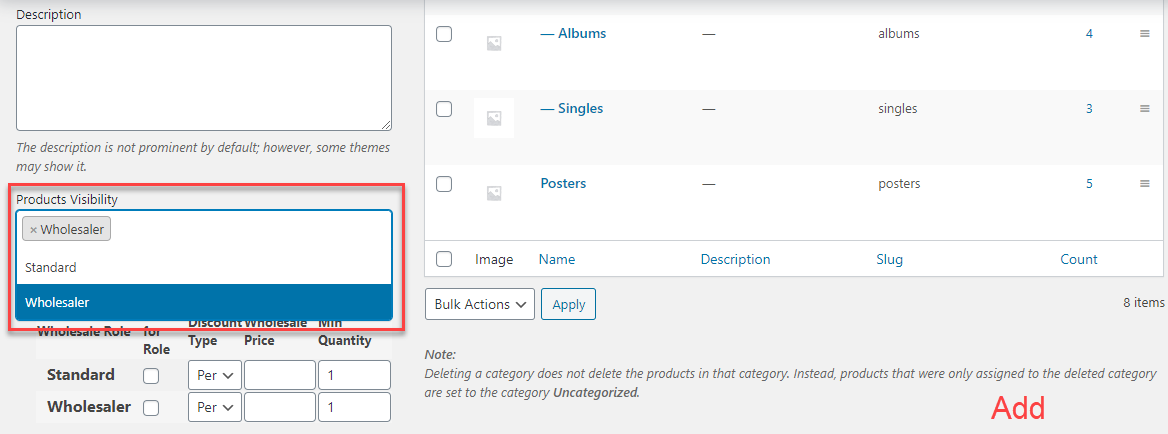
How-to-steps – Configure product visibility for multi-user role #
- Add or Edit a Category.
- Select Wholesale user role from Product visibility field to hide this category product from selected wholesale roles.
- Add or Update Category.
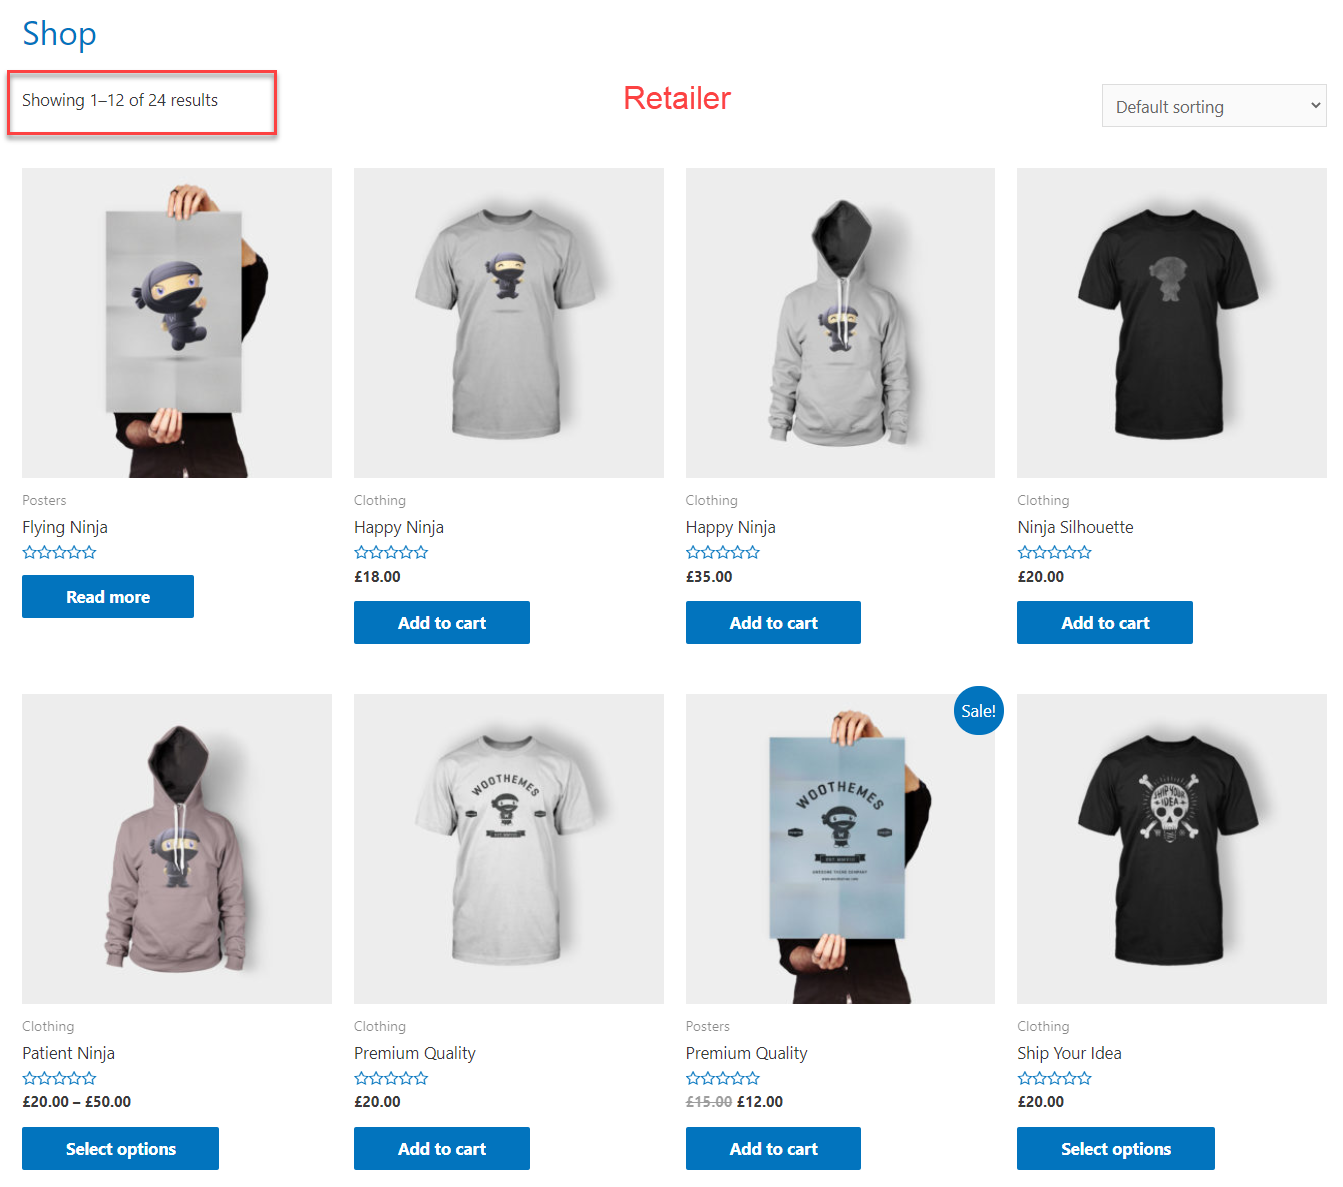
Hide Wholesale Products from non-wholesale/retail users & visitors #
This feature allows you to hide all wholesale products from non-logged-in users and guests from the shop page. Enabling the “Hide Wholesale Products” option in Wholesale > Settings will automatically hide all wholesale products.
You can apply wholesale prices on Global, Product-based, or Category-based types and then enable the “Hide wholesale products” option from Wholesale > Settings.
How-to-steps – Hide wholesale products from non-wholesale/retail users & visitors #
- Go to Wholesale > Settings
- Go to the Product Visibility tab
- Enable the “Restrict wholesale products globally from non-wholesaler customers” option
- Click on Save changes
- To test login with non-wholesalers and visitors

Hide Wholesale or Retail products from customers #
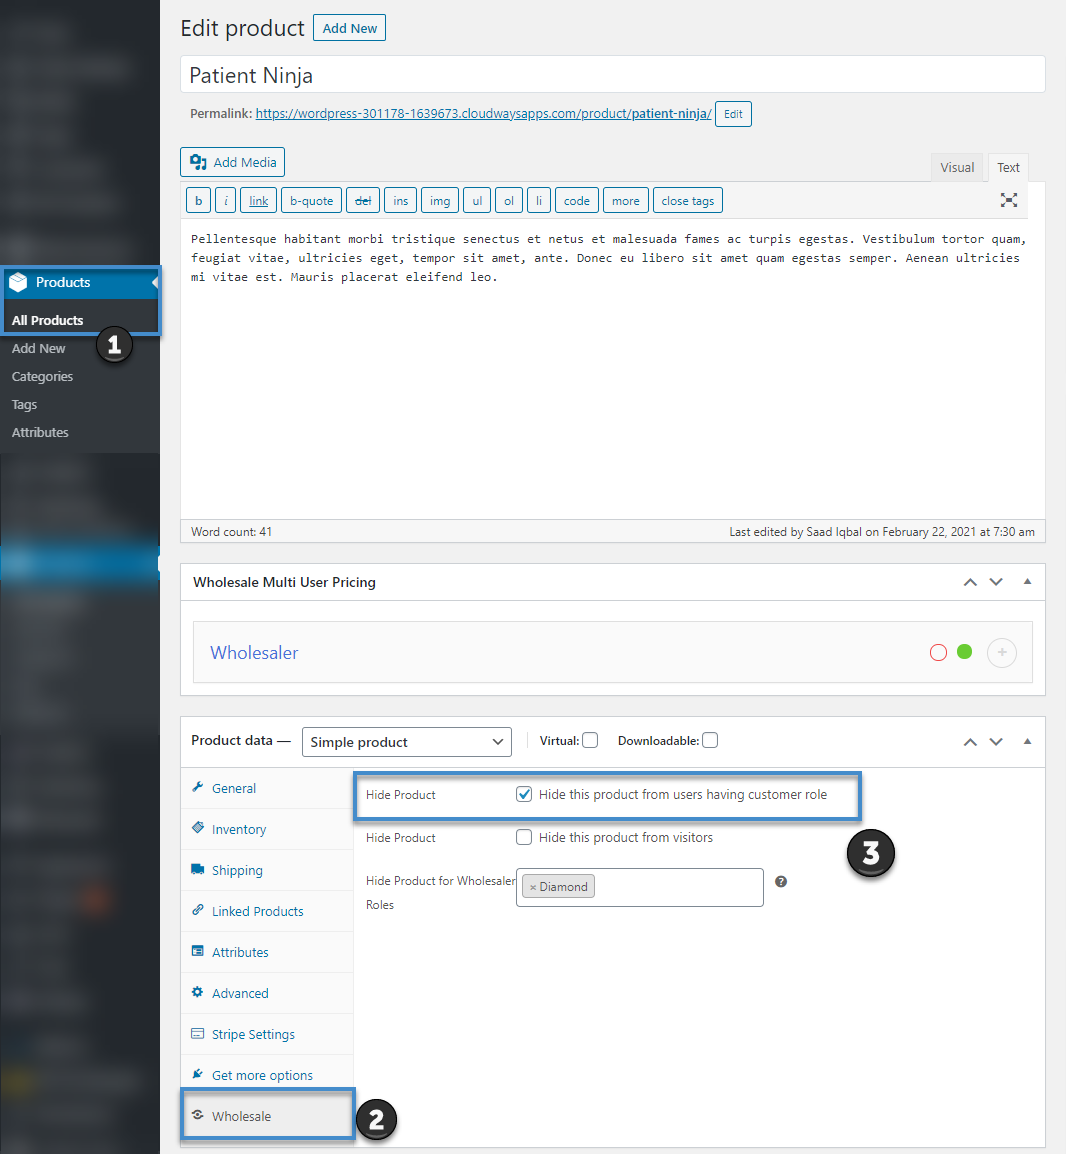
Hide products from customer roles whether the products are for wholesalers or non-wholesalers. If you don’t want to show any particular product to customers, you can hide the product from product settings. Once you enable this option, the product will no longer be for the customer’s role and customers will not be able to see the product.
For this, you need to go products > settings > wholesale tab then enable hide product option.
How-to-steps – Hide Wholesale or Retail products from customers #
- Go to Products > All products
- Select any product then go to the wholesale tab
- Check on the “Hide this product for customer” option
Front-End View:

**Note* This feature works only for WordPress customer roles, and not for Subscriber, Editor, or Author roles unless you change the New User Default Role to Customers from General > Settings.
Hide Price Labels (Retail and Save price) from wholesale customers #
This feature allows you to hide “Retail and save Price” labels from Wholesale customers. This is the best solution for store owners who do not want to display retail prices on wholesale products.
Store owners who do not want to show retail and save prices can click on the “hide price labels” option from Wholesale > Settings. This will hide “Retail and Save” price labels from the shop and product page.
How-to-steps – Hide price labels #
- Go to Wholesale > Settings
- Click on the Labels tab
- Click on the “Label Hide” check box
- Click on Save changes

Front-End View
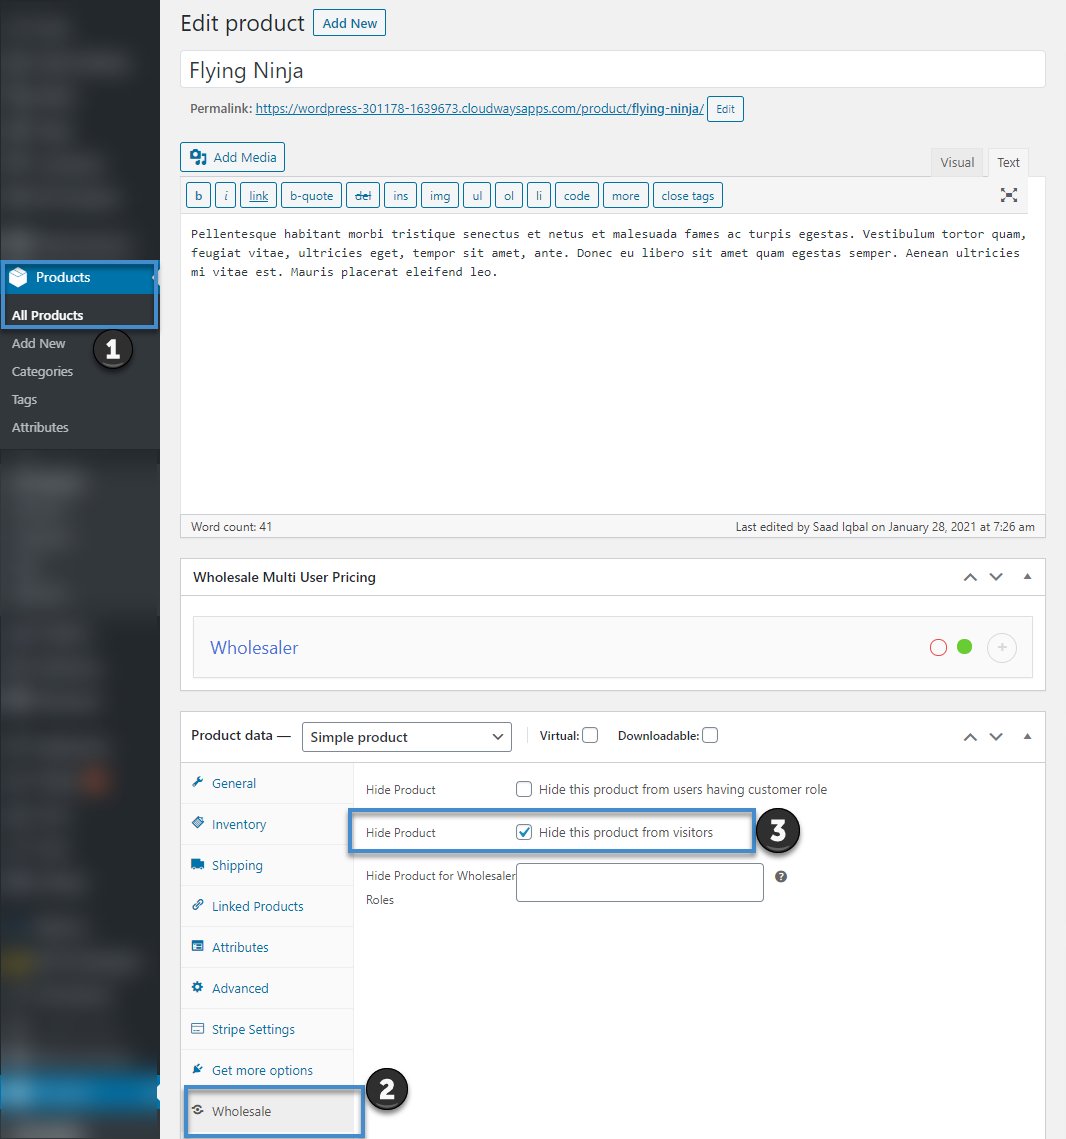
Hide Wholesale or Retail products from visitors #
This feature allows you to hide products from guest users and visitors. If you do not want to show products to visitors, you can hide product(s) from product settings. Once you enable this option, the product will no longer be shown to visitors.
How-to-steps – Hide products from visitors #
- Go to Products > All products
- Select any product then go to the wholesale tab
- Check on the “Hide this product for visitor” option
- To test visit your store without a login
Front-End View

Product Attachments #
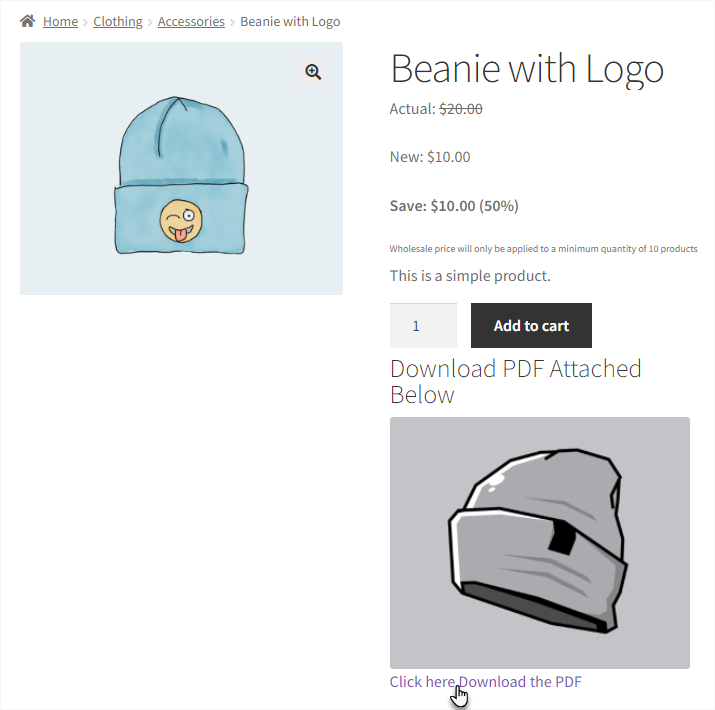
- Product attachments allow the Administrator to attach downloadable files to the product. Users can download the files from the product page linked by the administrator. The Administrator can also define the attachment locations that will appear on the product page.
- Only Wholesale customers would have the ability to view the attachment file on the product page and download the attached file through a download link set by the Administrator from the product settings page.
How-to-steps – Add product attachments #
- Navigate to WordPress Admin Dashboard → Wholesale → Dashboard.

- Now you’re on the Wholesale For WooCommerce Settings page.
- Go to the General tab.
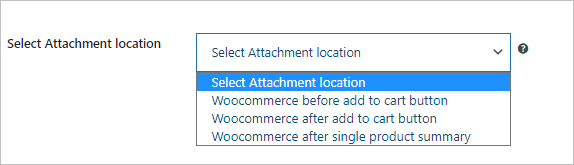
- Navigate to the Select Attachment Location option and click on it.
- There are three options mentioned in the dropdown menu.
- Navigate to the WordPress Admin Dashboard → Products → All Products.
- On the Products page, hover on any existing Simple Product to view the suboptions.
- Click on the Edit suboption.
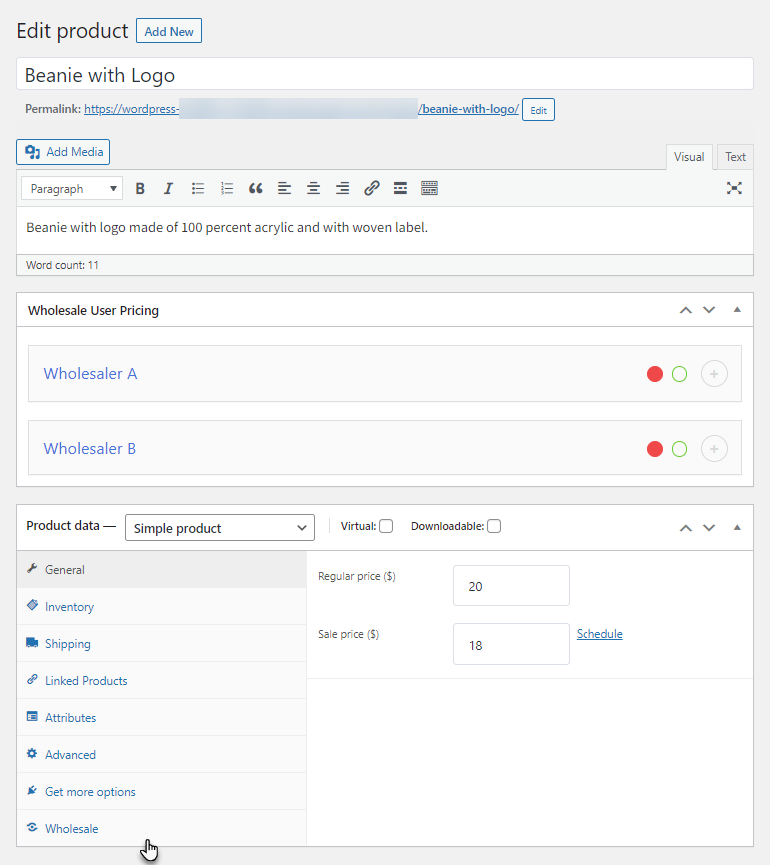
- On the Edit Product page, navigate to the Product Data section and go to the Wholesale tab.
- On the Edit Product page, navigate to the Product Data section and go to the Wholesale tab.
- Navigate to the Select Attachment File section.
- Upload the Icon for the attachment.
- Upload the Attachment.
- Set the Custom Title for the attachment.
- Set the Text for Download Link for the attachment.
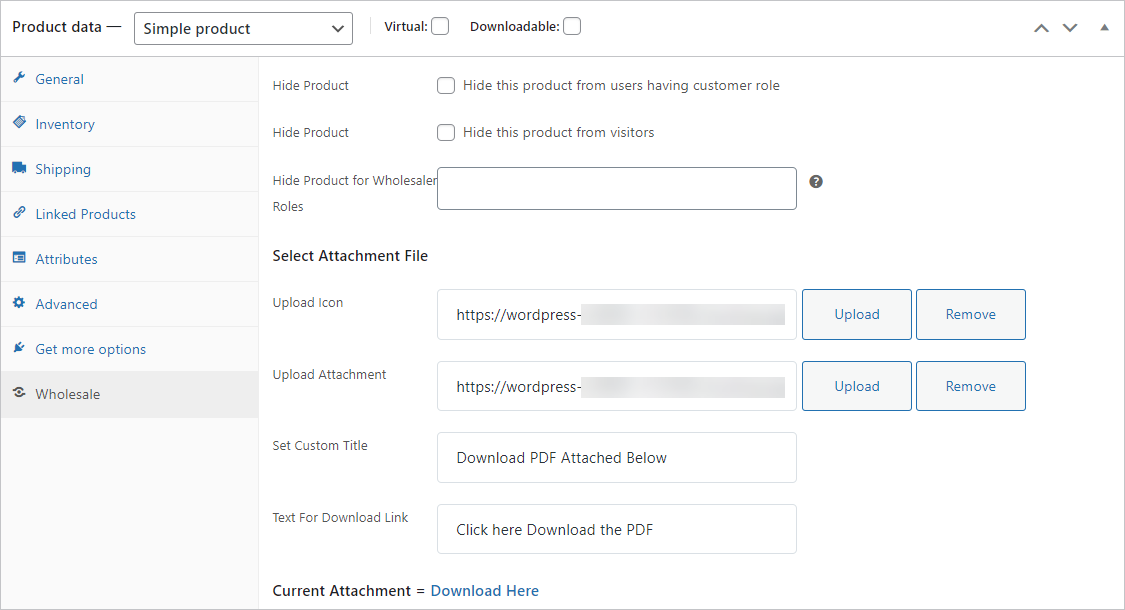
- Click on the Update button.
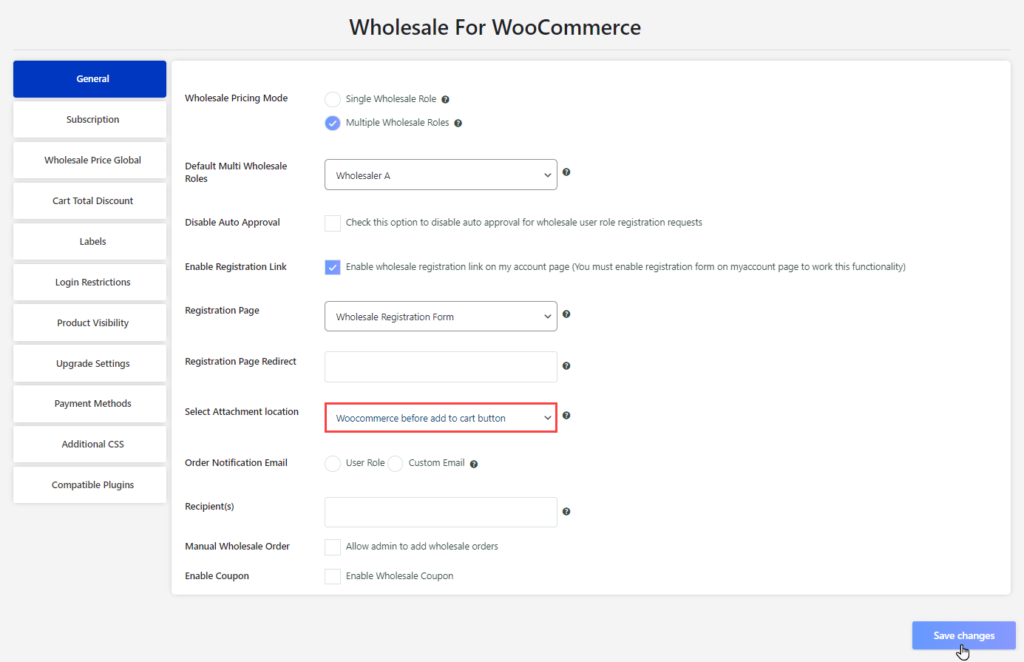
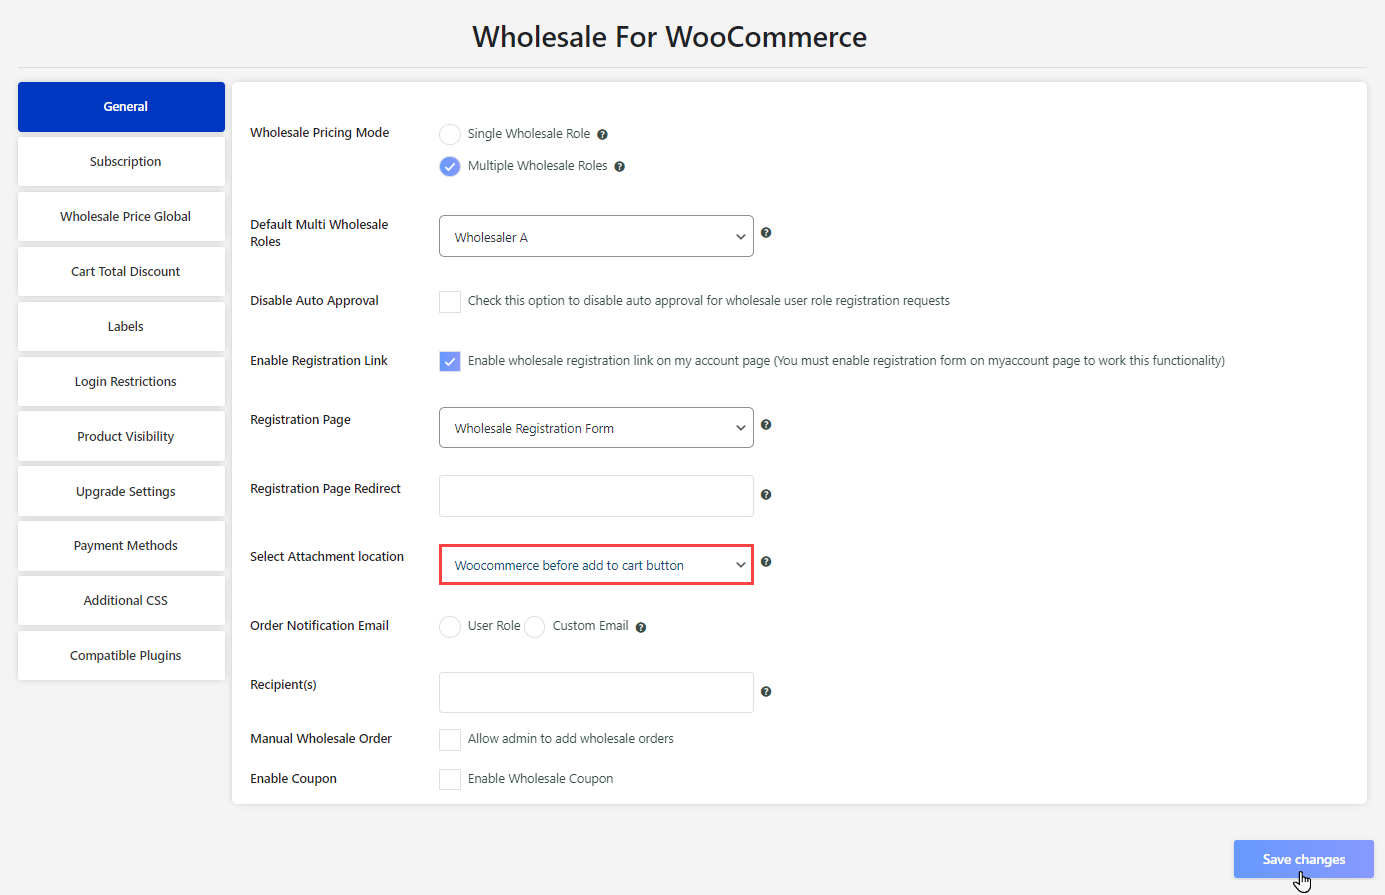
Woocommerce before Add to cart button #
- Navigate to WordPress Admin Dashboard → Wholesale → Dashboard.
- Go to the General tab.
- Go to the Select Attachment location option and select Woocommerce before Add to cart button from the dropdown menu.
- Click on the Save changes button.
Frontend screenshots #
- A wholesale user will log in to the website.
- The user will visit the shop page.
- The user will click on the Beenie with Logo product to navigate the Single Product Page

- On the Single Product page, we can see the Icon for the attachment, Custom Title for the attachment, and the Text for Download Link for the attachment configured in the Edit Product page will appear before the Add to Cart button.
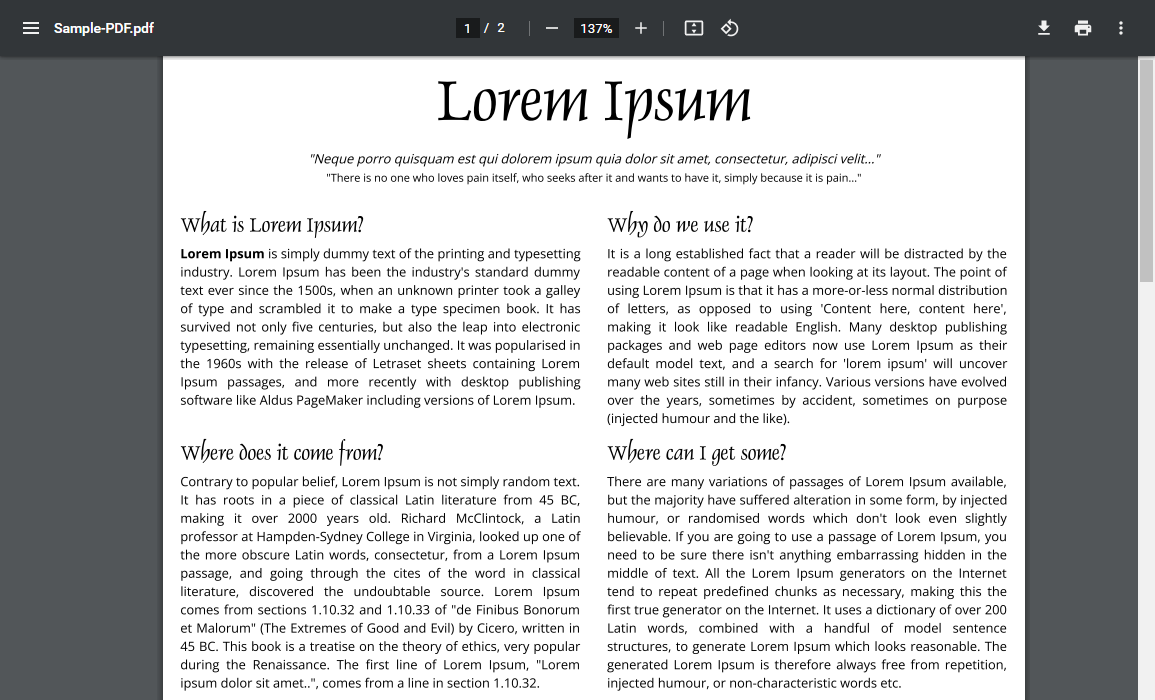
- Click on the text configured in the Text for Download Link for the attachment to download the Uploaded Attachment for the product.

- The user will be redirected to a new tab in the browser, and the attachment will appear. The user can also download this attachment.
Woocommerce after Add to cart button #
- Navigate to WordPress Admin Dashboard → Wholesale → Dashboard.
- Go to the General tab.
- Go to the Select Attachment location option and select Woocommerce after Add to cart button from the dropdown menu.
- Click on the Save changes button.
Frontend screenshots #
Woocommerce after single product summary #
- Navigate to WordPress Admin Dashboard → Wholesale → Dashboard.
- Go to the General tab.
- Go to the Select Attachment location option and select Woocommerce after single product summary from the dropdown menu.
Frontend screenshots #
- A wholesale user will log in to the website.
- The user will visit the shop page.
- The user will click on the Beenie with Logo product to navigate the Single Product Page.

- On the Single Product page, we can see the Icon for the attachment, Custom Title for the attachment, and the Text for Download Link for the attachment configured in the Edit Product page will appear after the Add to Cart button.
- Click on the text configured in the Text for Download Link for the attachment to download the Uploaded Attachment for the product.

- The user will be redirected to a new tab in the browser, and the attachment will appear. The user can also download this attachment.
- A wholesale user will log in to the website.
- The user will visit the shop page.
- The user will click on the Beenie with Logo product to navigate the Single Product Page.

- On the Single Product page, we can see the Icon for the attachment, Custom Title for the attachment, and the Text for Download Link for the attachment configured in the Edit Product page will appear after the single product summary.
- Click on the text configured in the Text for Download Link for the attachment to download the Uploaded Attachment for the product.
- The user will be redirected to a new tab in the browser, and the attachment will appear. The user can also download this attachment.
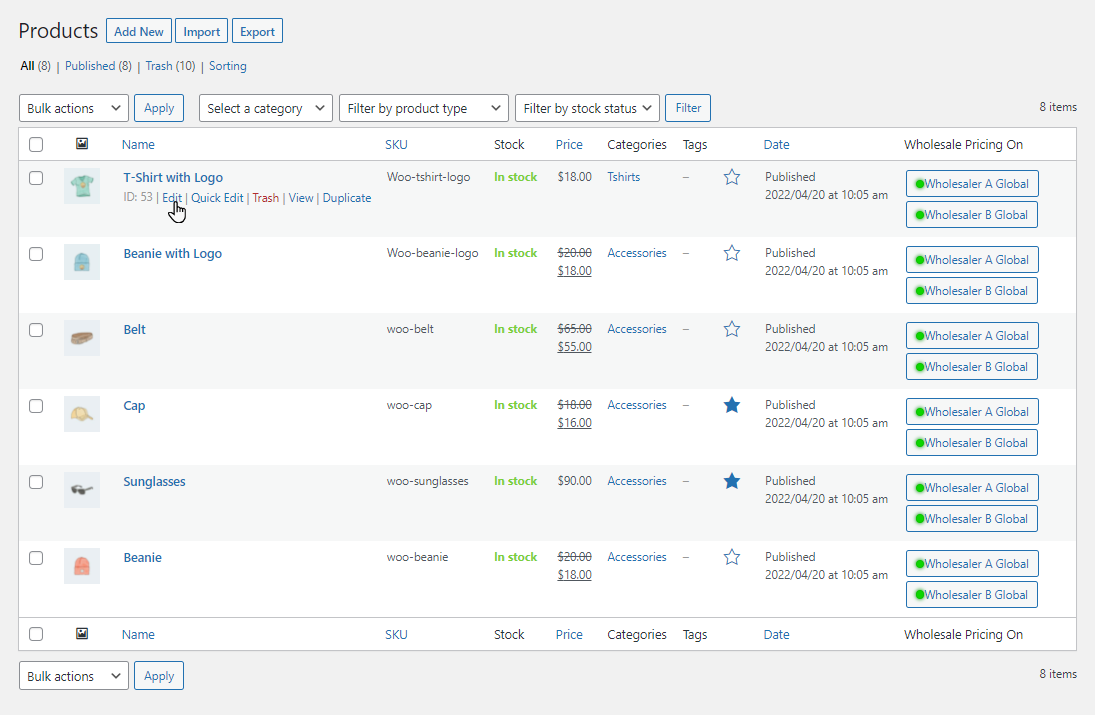
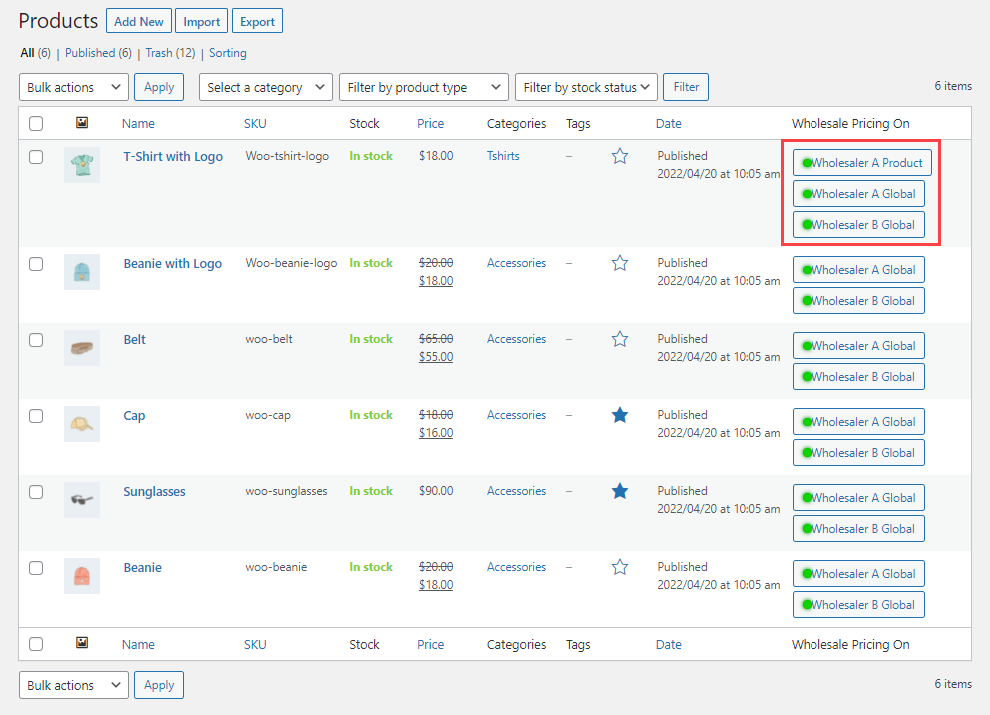
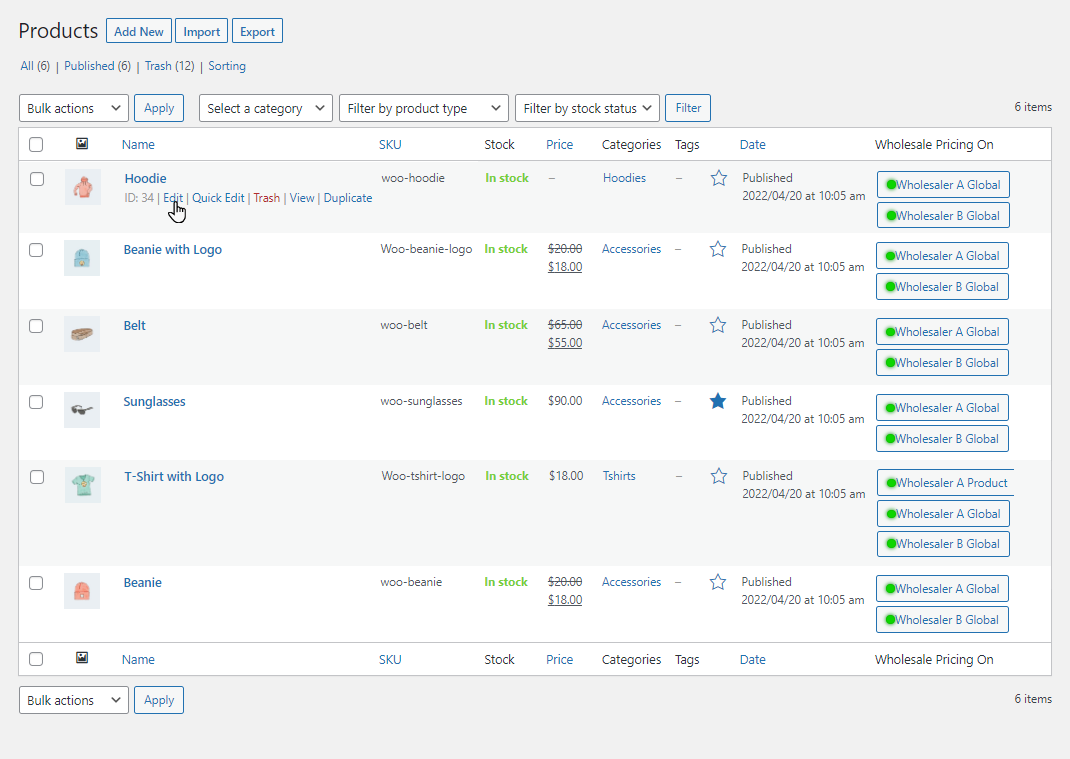
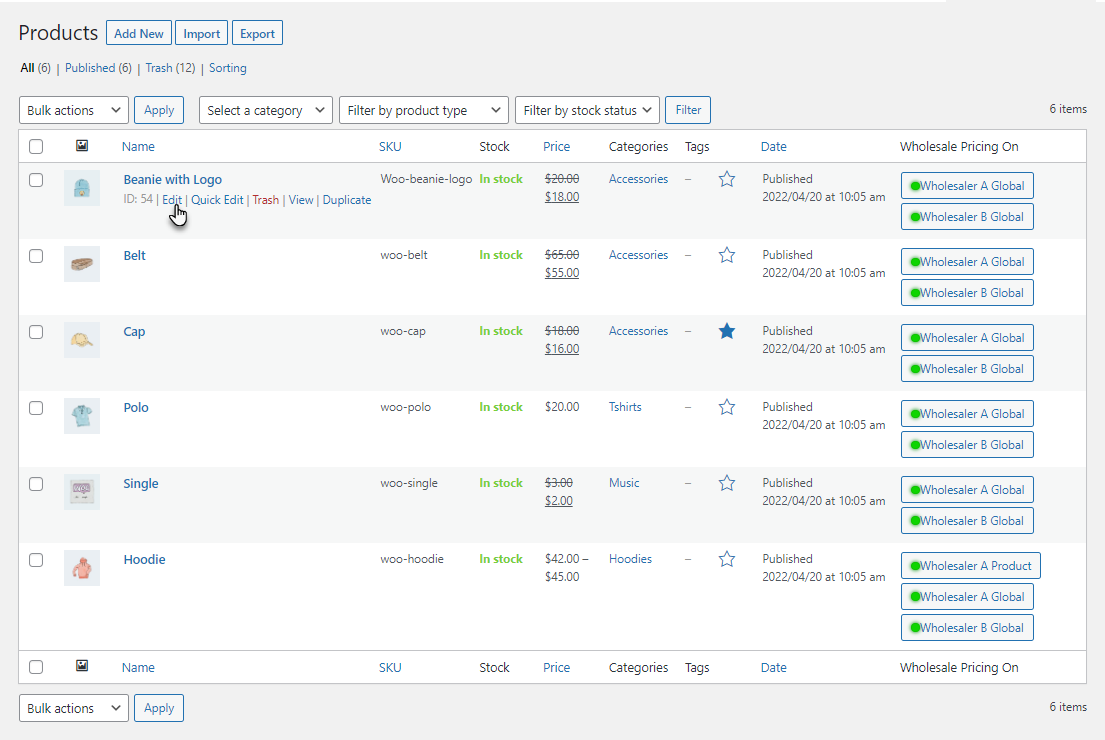
Wholesale pricing column on products #
- Navigate to WordPress Admin Dashboard → Products → All Products.

- Once you’re on the Products page, we can see a new column added titled Wholesale Pricing On.
- It will represent which type of Wholesale Pricing is enabled on that product.

- There are three types of Wholesale pricing types.
Wholesaler Product #
- This tag highlights that the wholesale price is applied to the product.
- Navigate to the WordPress Admin Dashboard → Products → All Products.

- On the Products page, hover on any existing product to view the suboptions.
- Click on the Edit suboption.

- Go to the Wholesale User Pricing section once you’re on the Edit Product page.

- Click on the wholesale user role on which you want to configure this tag.

- Checkmark the Enable Role checkbox in the Role Activation option.
- Set the Discount Type.
- Set the Wholesale Price.
- Set the Min Quantity.
- Set the Product Tier Pricing. (Optional)

- Once done, click on the Update button.
- Now navigate to the WordPress Admin Dashboard → Products → All Products.
- We can see the Wholesaler A Product tag in the Wholesale Pricing On column on the product it is configured.

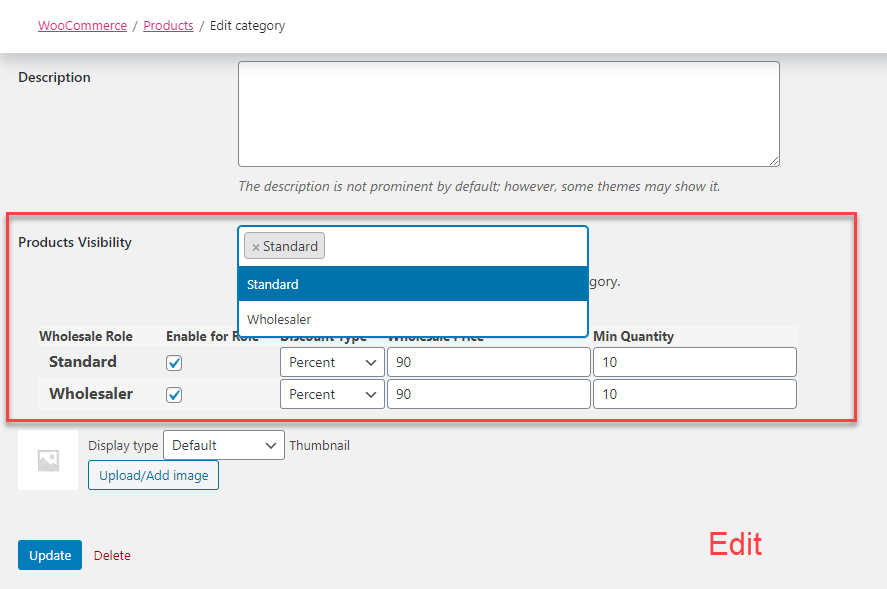
Wholesaler Category #
- This tag highlights that the wholesale price is applied to the product.
- Navigate to the WordPress Admin Dashboard → Products → Categories.

- On the Product categories page, hover on any existing category to view the suboptions.
- Click on the Edit suboption.

- Go to the Wholesale Role section once you’re on the Edit category page.

- Click on the wholesale user role on which you want to configure this tag.

- Checkmark the Enable Role checkbox in the Role Activation option.
- Set the Discount Type.
- Set the Wholesale Price.
- Set the Min Quantity.
- Set the Category Tier Pricing. (Optional)

- Once done, click on the Update button.
- Now navigate to the WordPress Admin Dashboard → Products → All Products.
- We can see the Wholesaler B Category tag in the Wholesale Pricing On column on the configured category.

Wholesaler Global #
- This tag highlights that the wholesale price is applied to the product.
- Navigate to the WordPress Admin Dashboard → Wholesale → Settings.

- Now navigate to the Wholesale Price Global tab.
- Click on the wholesale user role on which you want to configure this tag

- Checkmark the Enable Role checkbox in the Role Activation option.
- Set the Discount Type.
- Set the Wholesale Price.
- Set the Min Quantity.
- Set the Global Tier Pricing. (Optional)
- Once done, click on the Update button.

- Now navigate to the WordPress Admin Dashboard → Products → All Products.
- We can see the Wholesaler A Global tag in the Wholesale Pricing On column is applied globally.

CSV Import/Export Wholesale Prices #
Wholesale store owners can import/export wholesale prices for each user role. Wholesale store owners will easily able to update prices in bulk instead of manually changing them individually.
In Wholesale settings you will see the following options:
- Import
- Export
How-to-steps – Export CSV #
- Export from Wholesale > Settings
- WooCommerce importer/exporter menu will appear.
- Click on the “Generate CSV” button

In the CSV file, you will see the following options for each wholesale role:
- Wholesale_type
- Wholesale_price
- Wholesale_quantity
Wholesale_type: In CSV file you will see the Wholesale_type column as attached in the screenshot which you create from Wholesale > User Roles, all the wholesale roles will display in a CSV file, if any wholesale roles disabled from the product level wholesale prices will not import in a CSV,file if you enter the wholesale prices and minimum quantity in Wholesale_price and Wholesale_quantity column and then export again wholesale role automatically activate and wholesale prices will be applied.
Wholesale_price: In a CSV file you will see the Wholesale_price column of wholesale products, you can edit or change wholesale prices and export, if you export the CSV file without entering Wholesale_price then the wholesale role will not activate and no prices will apply on wholesale products.
Wholesale_quantity: You will see the Wholesale_quantity column in a CSV file, you can also edit or change the wholesale product’s quantity and export. Do not leave the Wholesale_quantity column blank if you want to apply or activate the wholesale role after export.

Note Wholesale CSV import/export will only work on product pricing. You can not import/export Global, Categories, wholesale prices.
How-to-steps – Import CSV #
When you click on the import button you will see the CSV file upload option where you can upload a file with new prices or update existing products by selecting multiple checkboxes.

Note When importing/exporting the unique identifier is the product ID, please make sure that the product ID will remain the same when updating the existing product prices.
Once the file upload and click on continue, you will see the mapping option, from the mapping option you can select wholesale roles which you want to import.
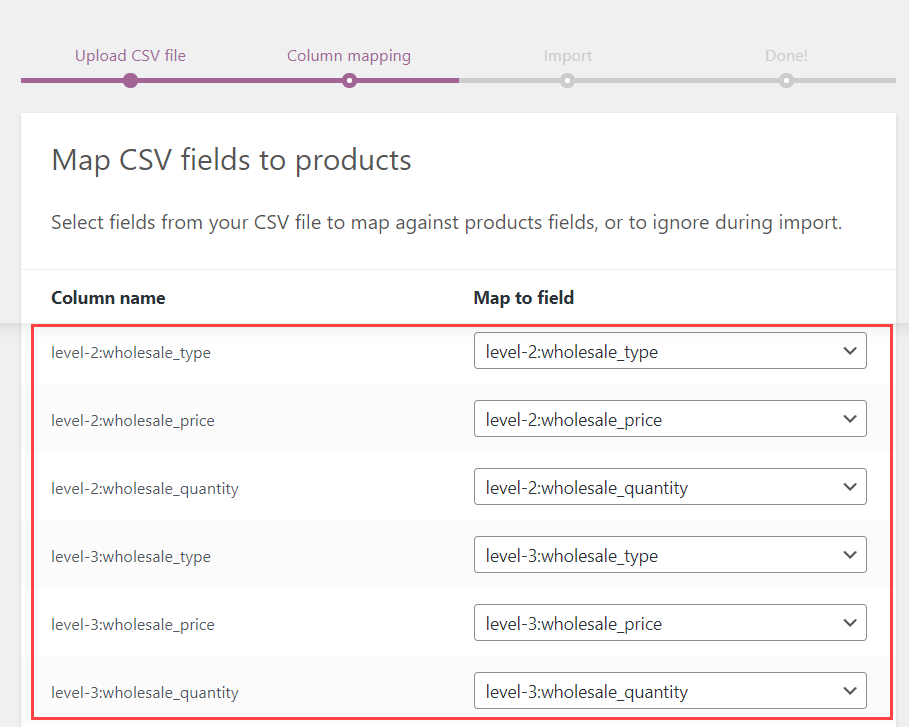
If you do not want to import a specific role then select “do not import” so the not imported roles will be not activated and no prices will apply on those roles.

Note When importing either you can update the pricing of the existing products or add a new product both cannot be possible at the same time.
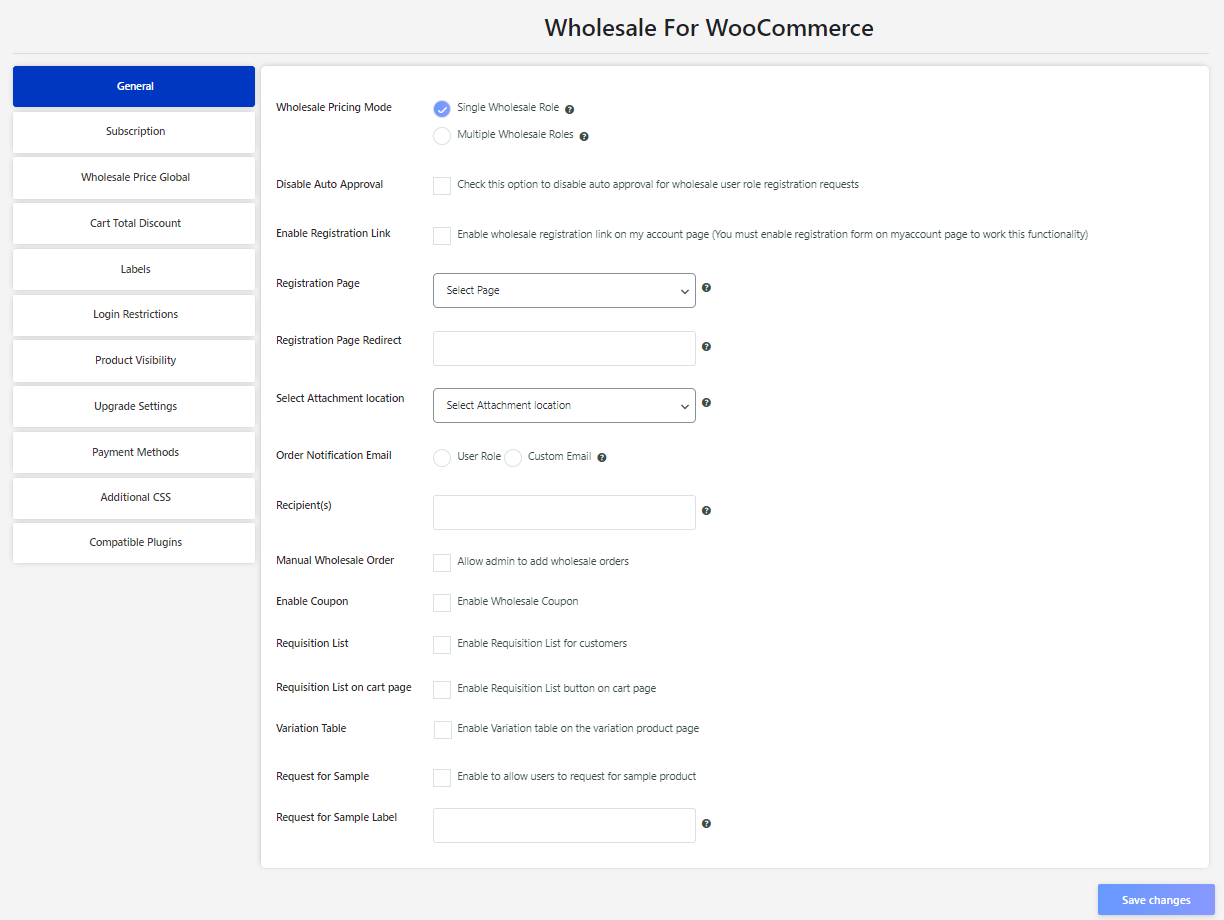
Wholesale Manual Orders #
In Wholesale manual Orders, admin would be able to add wholesale products in orders manually. Wholesale manual orders can be created using the Woocommerce order creation option. By selecting wholesale customers and wholesale products will show with wholesale prices.
- Go to Wholesale > Settings > General > Enable Manual Wholesale Order Checkbox
- Go to WooCommerce > Orders > Add Order
- Select Customer > Select user based on wholesale Role
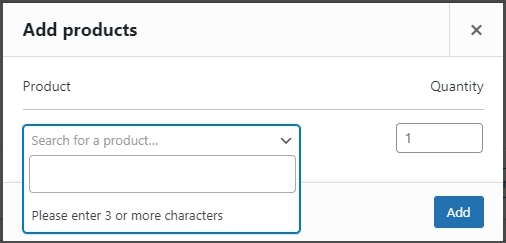
- Click on Add item > Click on Add Products > Select Products from dropdown > Click on Add Button
- Select Update Button
Notice: Wholesale manual only compatible with Wholesale pricing module not with Tier Pricing module.


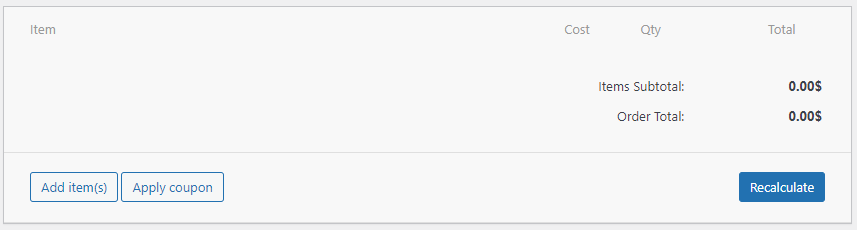

Adding a product on which wholesale prices are applied will show as following:
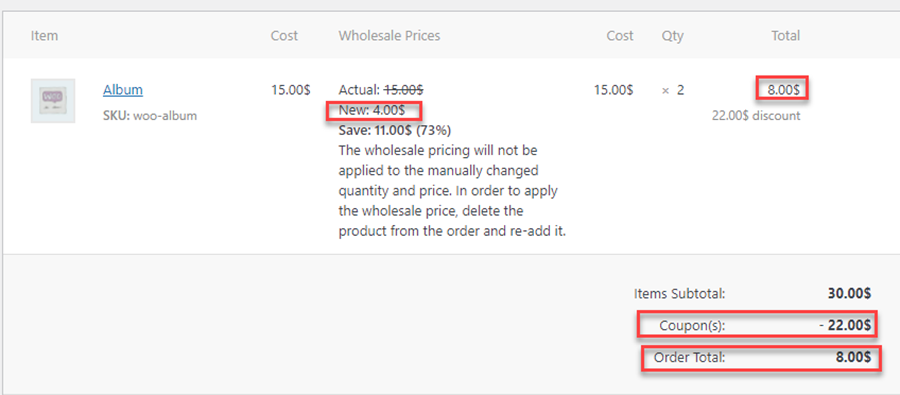
Notice: Total shown will be according to the wholesale price. (4×2=8) The retail Cost of the product is 30 whereas the wholesale price is 8. So the Total Discount will be (30-8=22)
Notice: You cannot edit orders manually on run time, you need to delete and create a new one.
Request Sample #
- Navigate to WordPress Admin Dashboard → Wholesale→Settings.

- Now you’re on the Wholesale For WooCommerce Settings page.
- Go to the General tab.
- Enable the checkbox for Request for Sample.
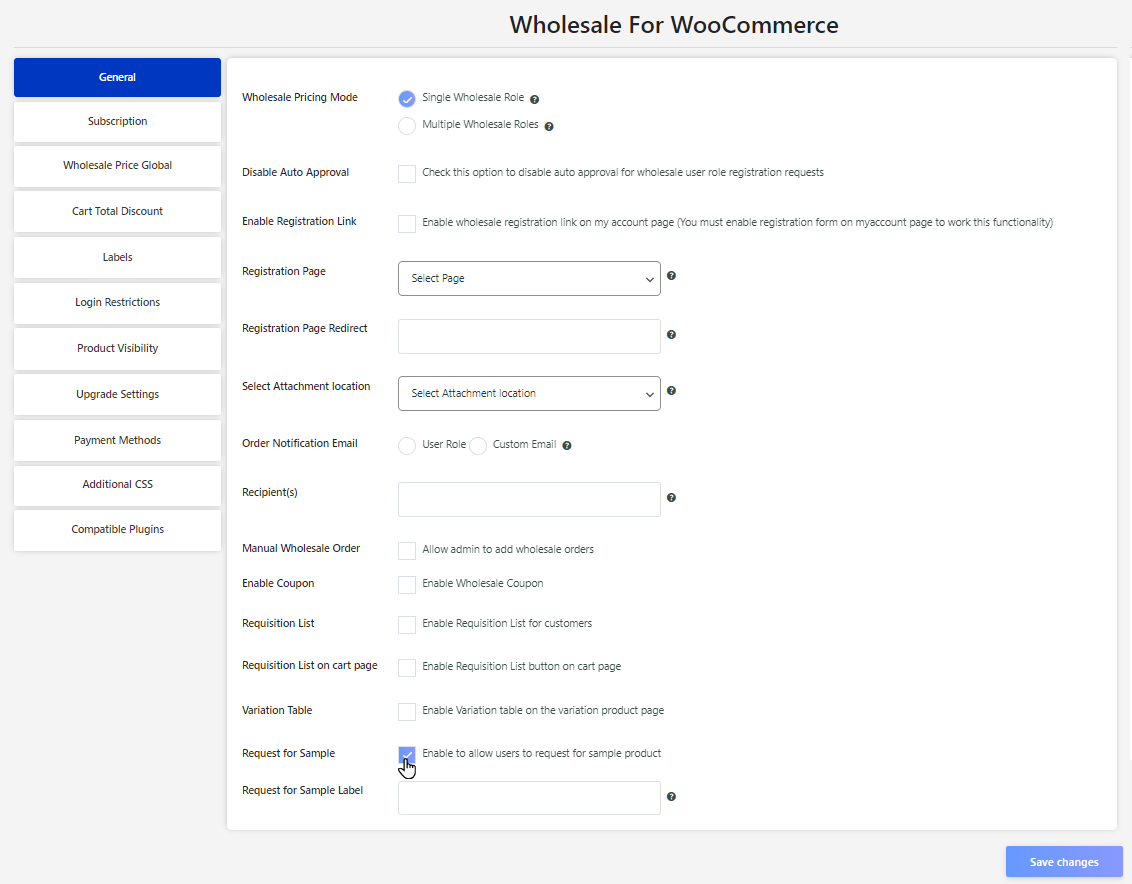
- Admin can Add the custom label for the Request for Sample Button.

- Select the desired Product and click edit.

- Navigate to Wholesale.

- Enable the Sample Product checkbox.

- Select the Sample Product under the label Select Sample Product.

Frontend Impact #
- Before
- After
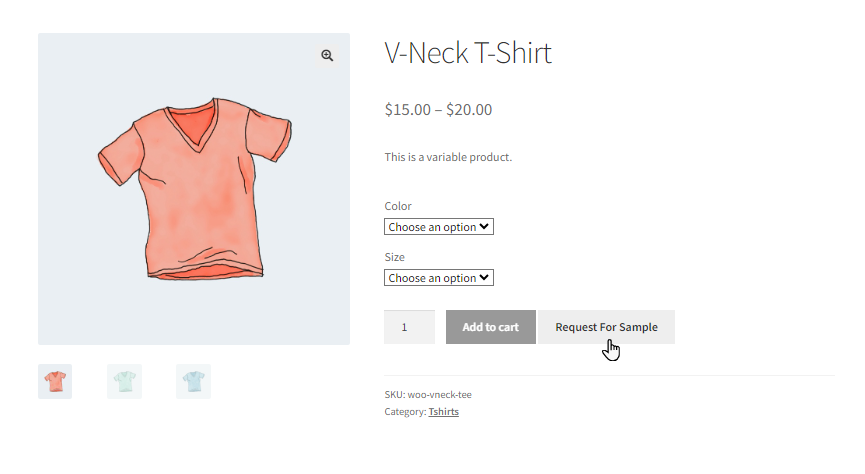
- Click on the Request For Sample button.
- Checkout page will appear user can now select the desired payment method and request the sample product after placing the order.
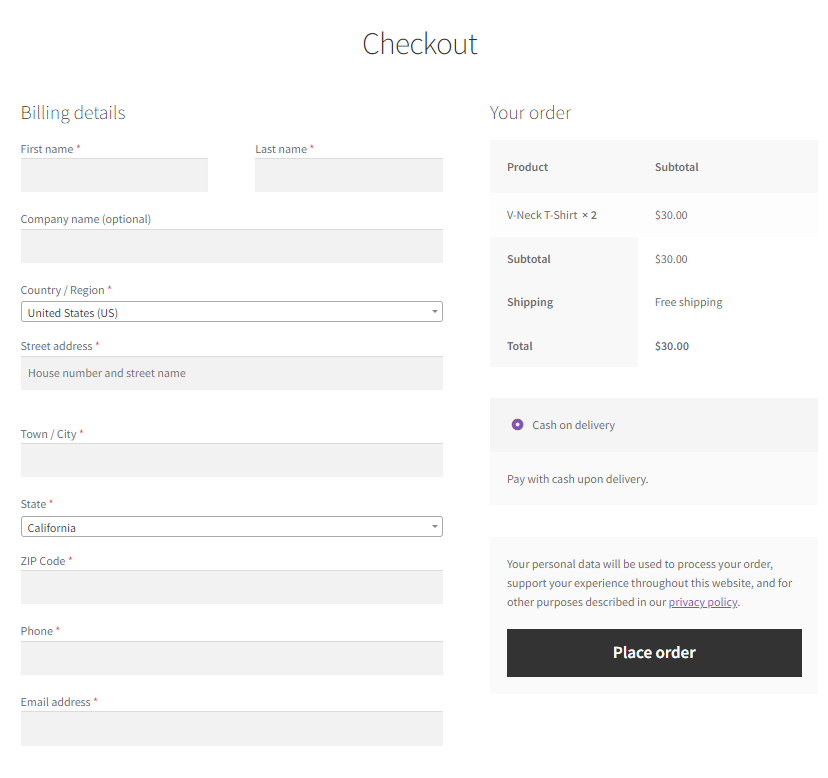
Note: To offer a free sample set the price of the sample product to $0.
Non-logged-in Users #
- This option allows the admin to display the wholesale prices to the non-logged-in users with a custom message.
- To enable, navigate to Wholesale >Settings >General.

- Once the General tabis clicked, a settings page will appear.
- Scroll down to Non-Logged in Settings.
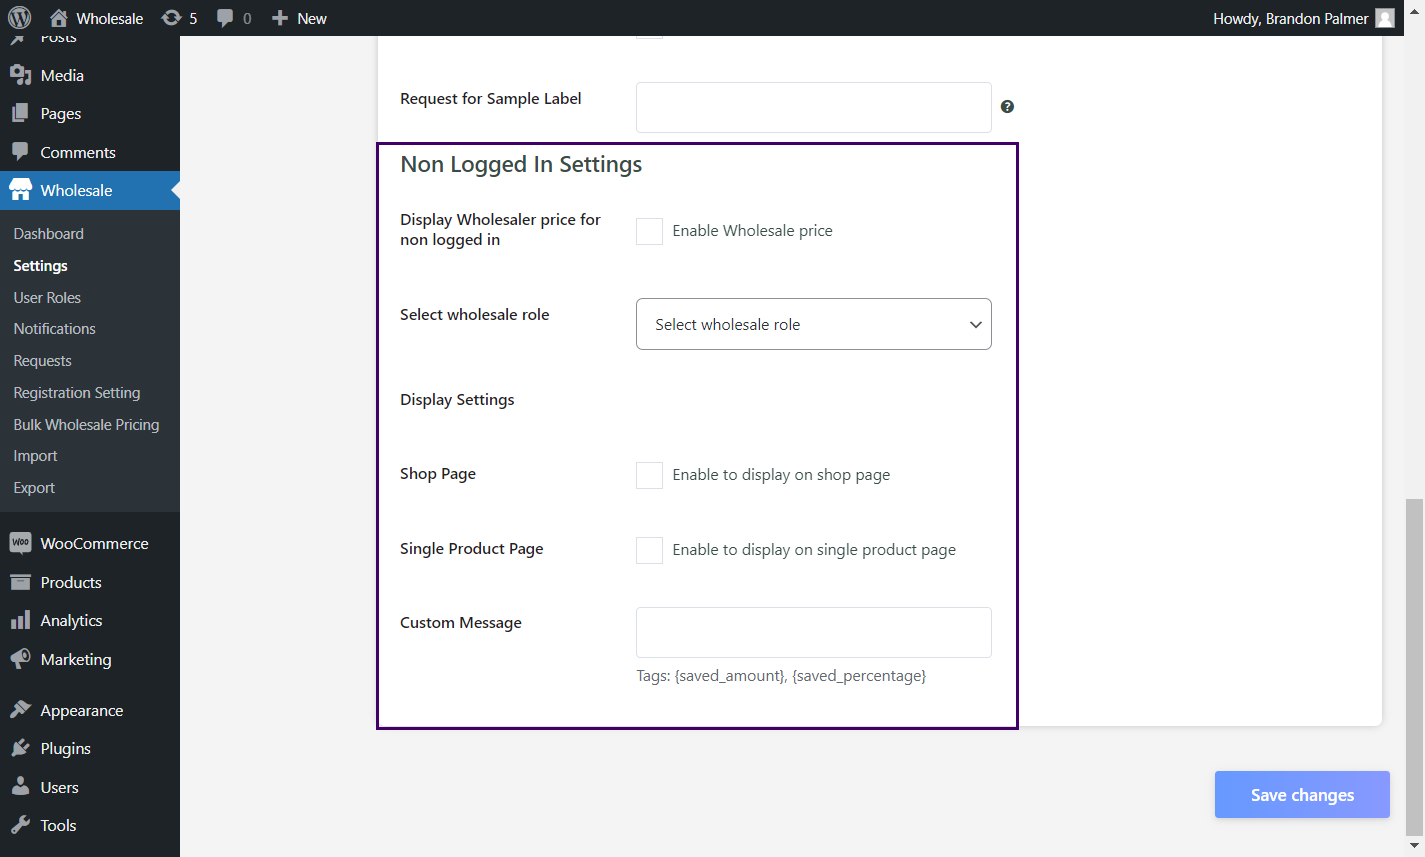
- There will be an enable / disable checkbox to Display Wholesale price for non-logged in users.
- Click the checkbox to enable the Display Wholesale price for non-logged in users.
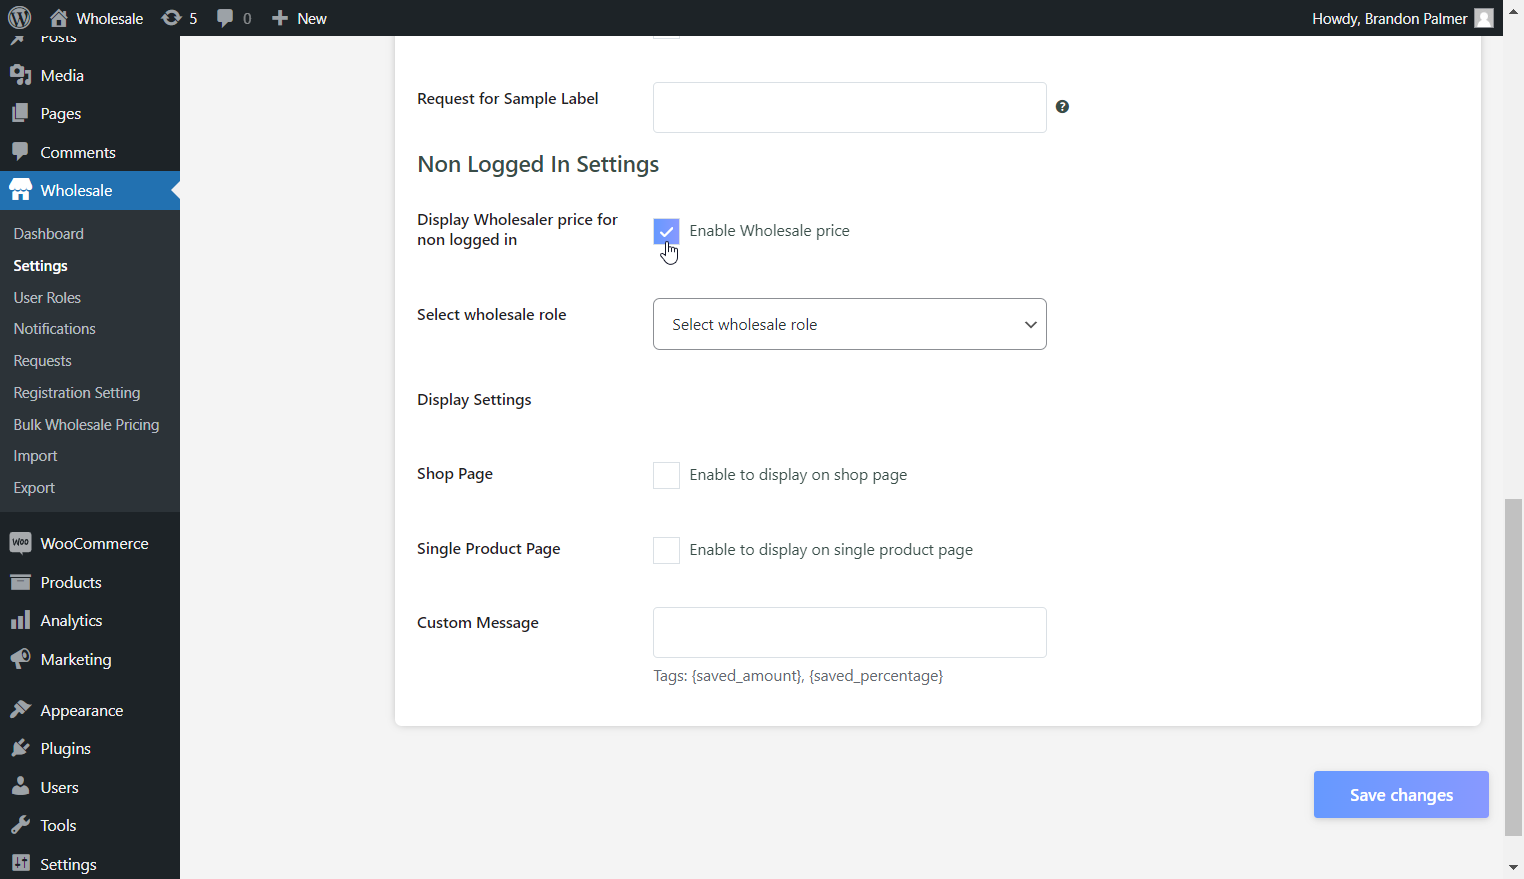
- Select the role from the Select wholesale role dropdown. This option allows the admin to select the wholesale role. Whatever role is selected. That role pricing will be displayed on the front-end to the non-wholesale users.
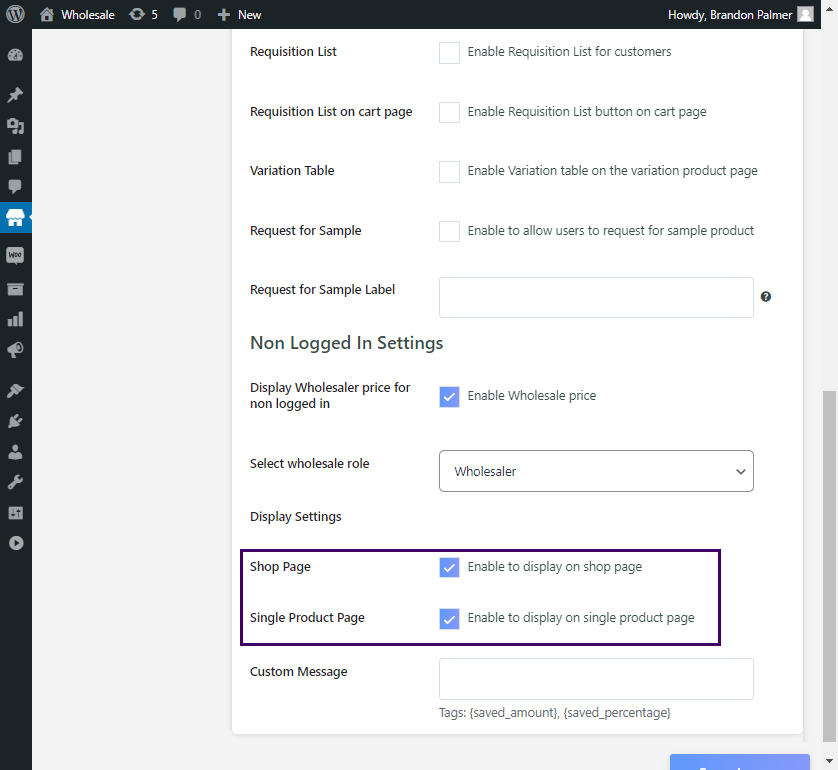
- Admin can also select where to display the wholesale price and custom message from the Display Settings.
- There will be two options under the Display Settings:
- Shop page: enabling Shop page will display the wholesale price and message on the shop page.
- Single Product page: enabling Single Product page will display the wholesale price and message on the single product page.
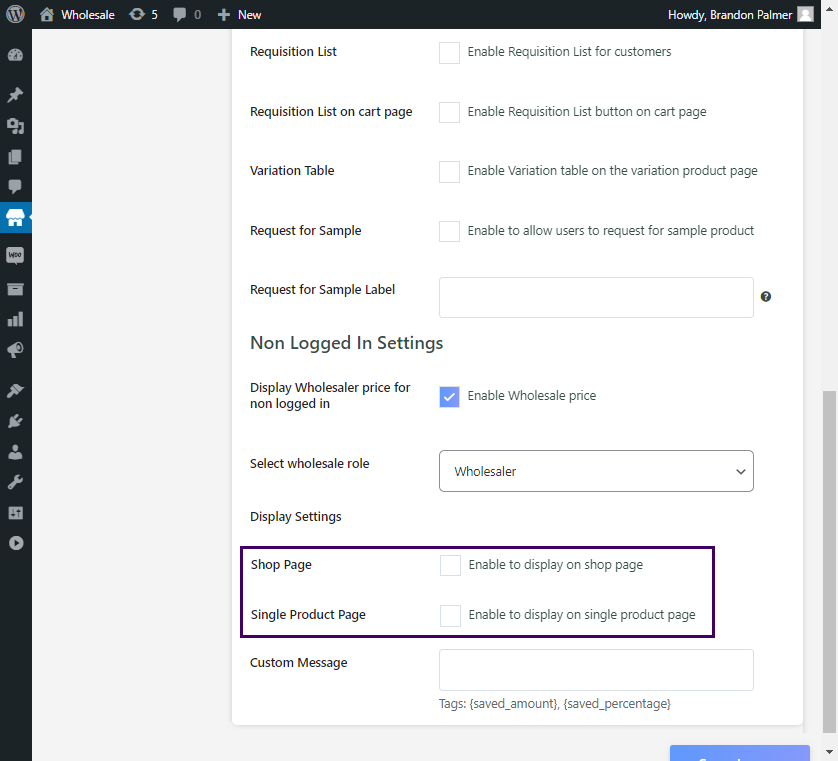
- Here, we are enabling both the Shop and Single Product Page.
- Now under the Custom Message tab admin add the desired message.

- Admin can also add the Tags i.e. {saved_amount} and {saved_percentage}
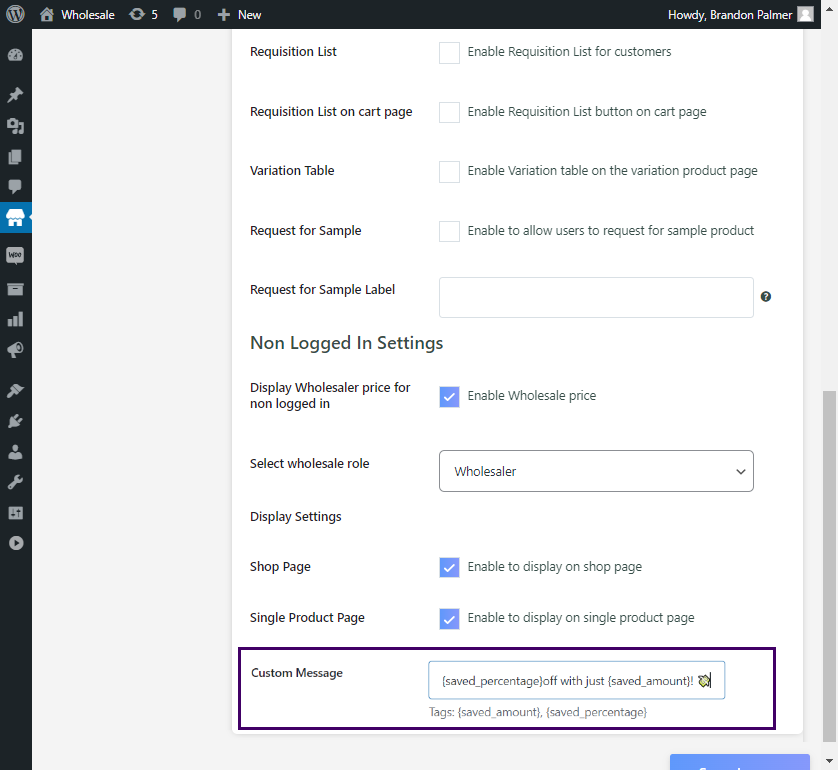
- Once done, click the Save Changes button, and the wholesale price and message will be displayed on the desired page, i.e., the Shop Page and the Single Product Page.
Frontend Impact #
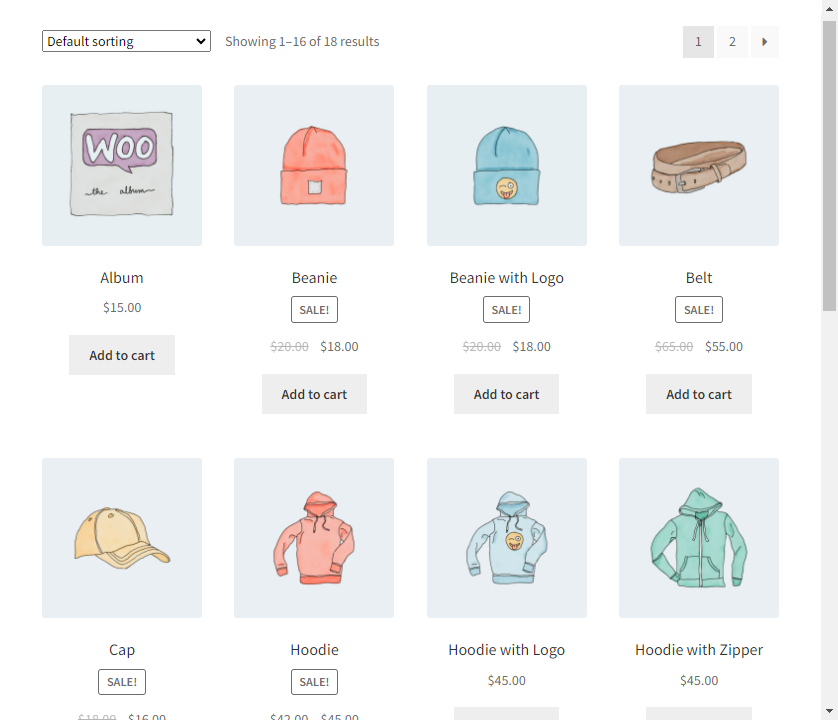
Before
- Nothing is displayed on the Shop Page.
- Nothing is displayed on the Single Product Page.
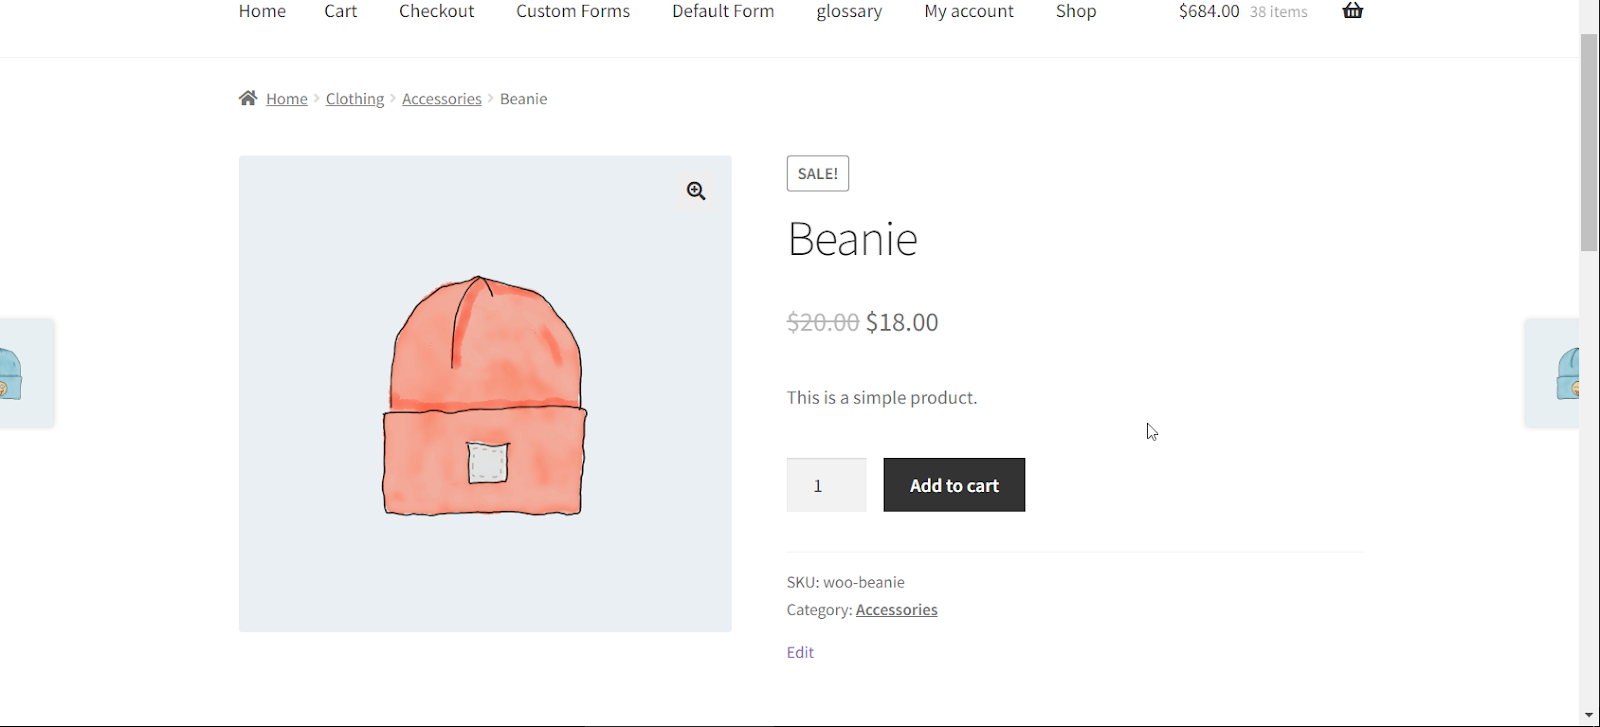
Note: To display the message on both the Single Product Page and Product Page user must be logged out.
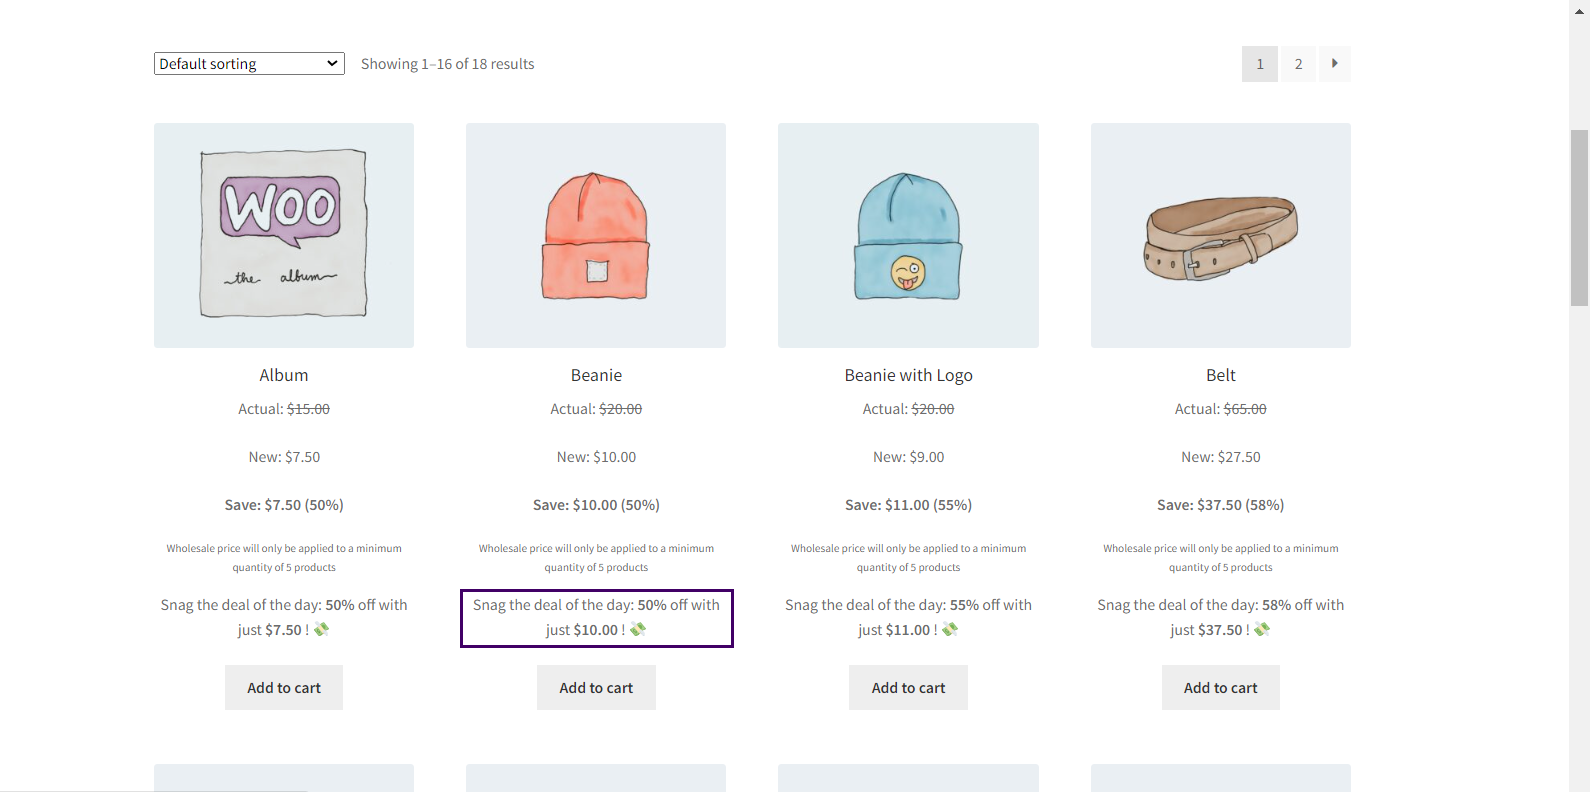
After
- Displayed on the Shop Page for non-logged-in users.
- Displayed on the Single Product Page for non-logged-in users

Strike-Through Price #
- This option allows the admin to display strike through the original price.
- To enable, navigate to Wholesale > Settings > Label.
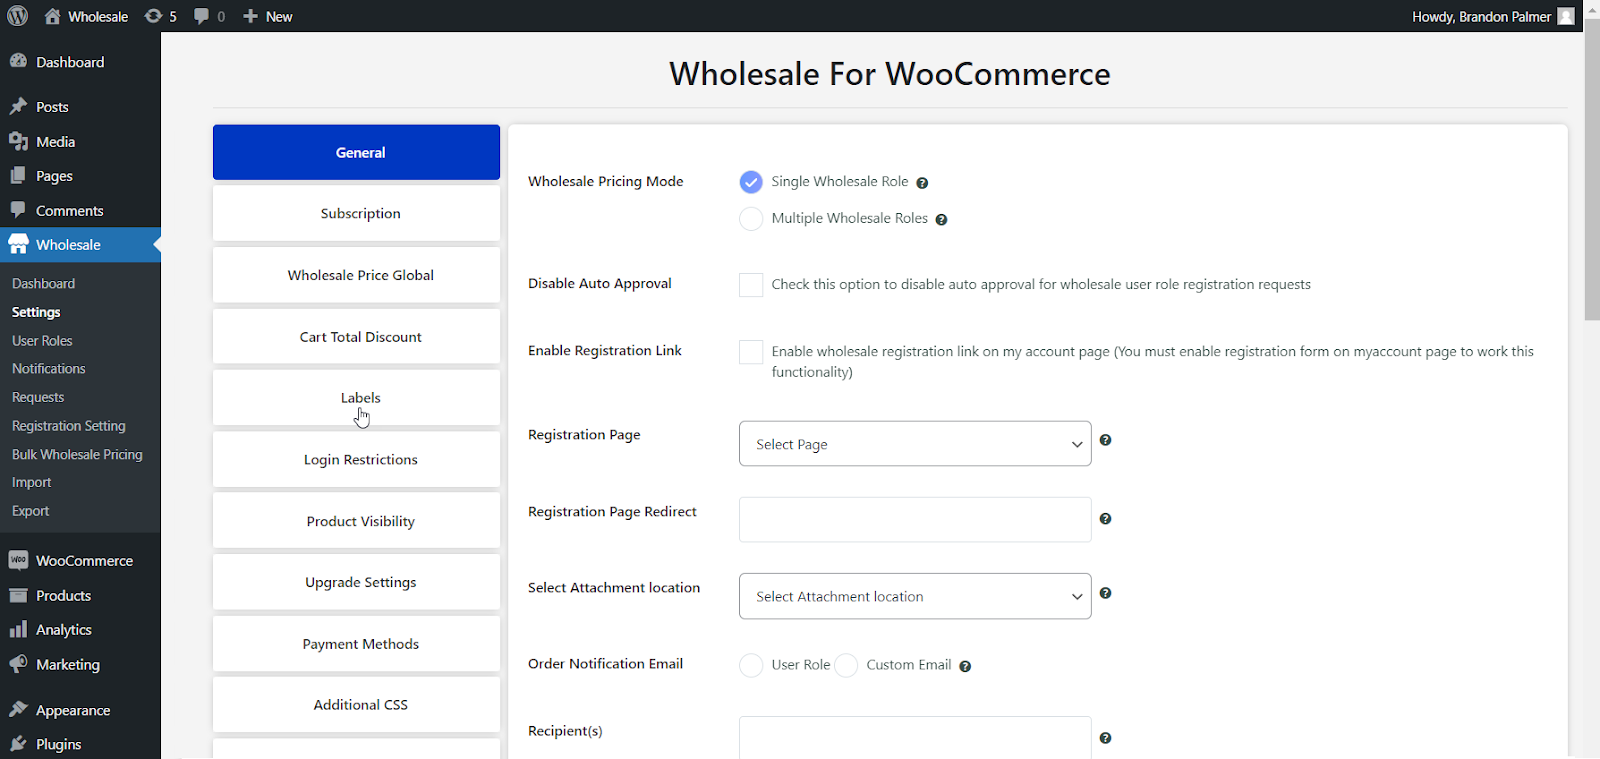
- Once clicked there will be a checkbox to enable/disable this functionality.
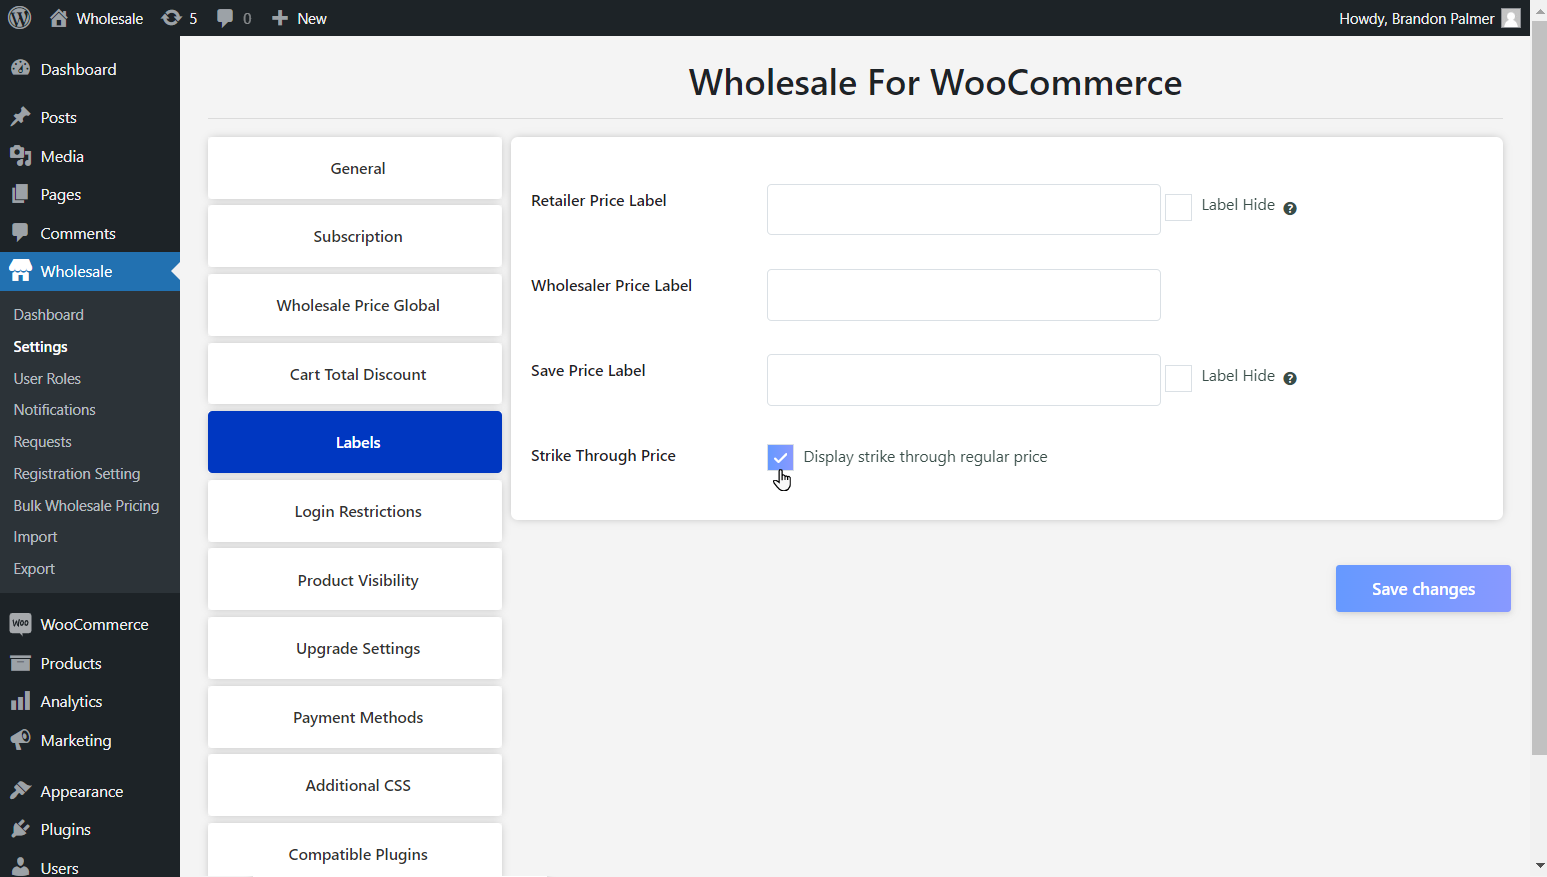
Note: By default, Strike through will be enabled
- When disabled then the original price will be displayed without strike through on all pages.

Frontend Impact #
Before

Note: The strike-through will be displayed to the Wholesaler or Non-Logged in Users only.
After
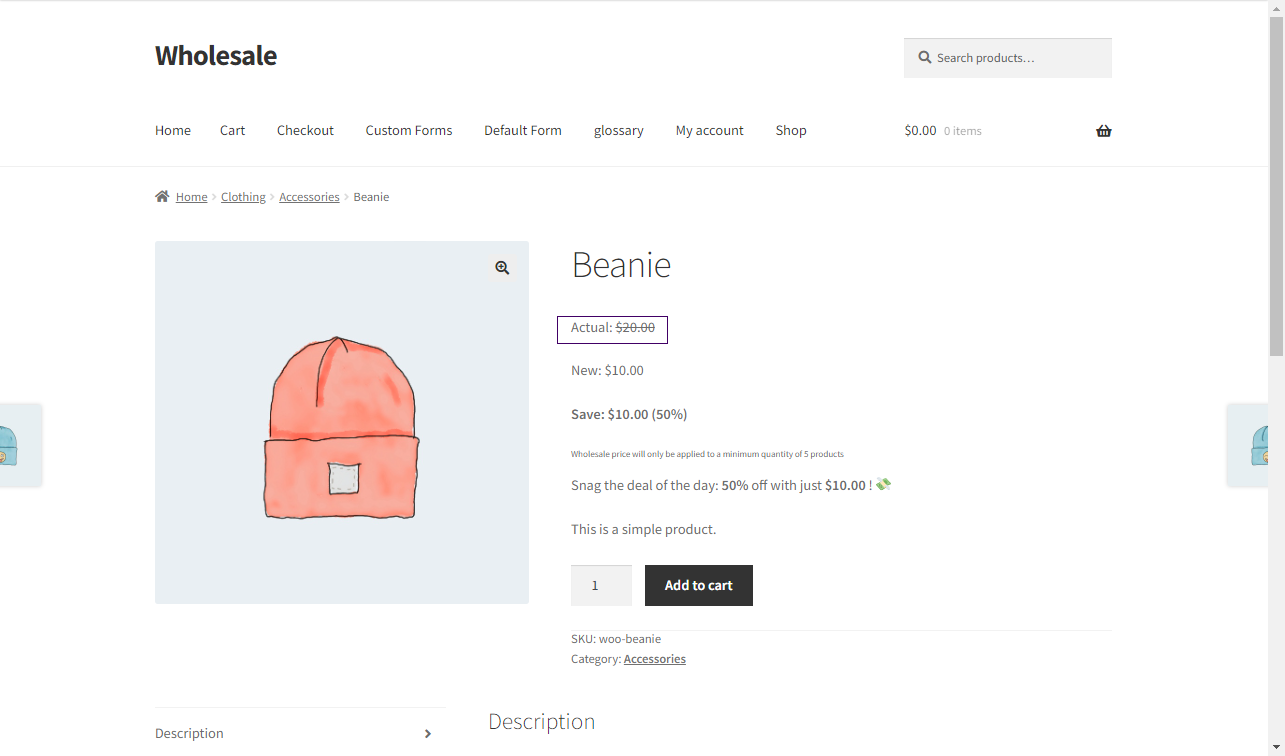
Wholesale Registration Form #
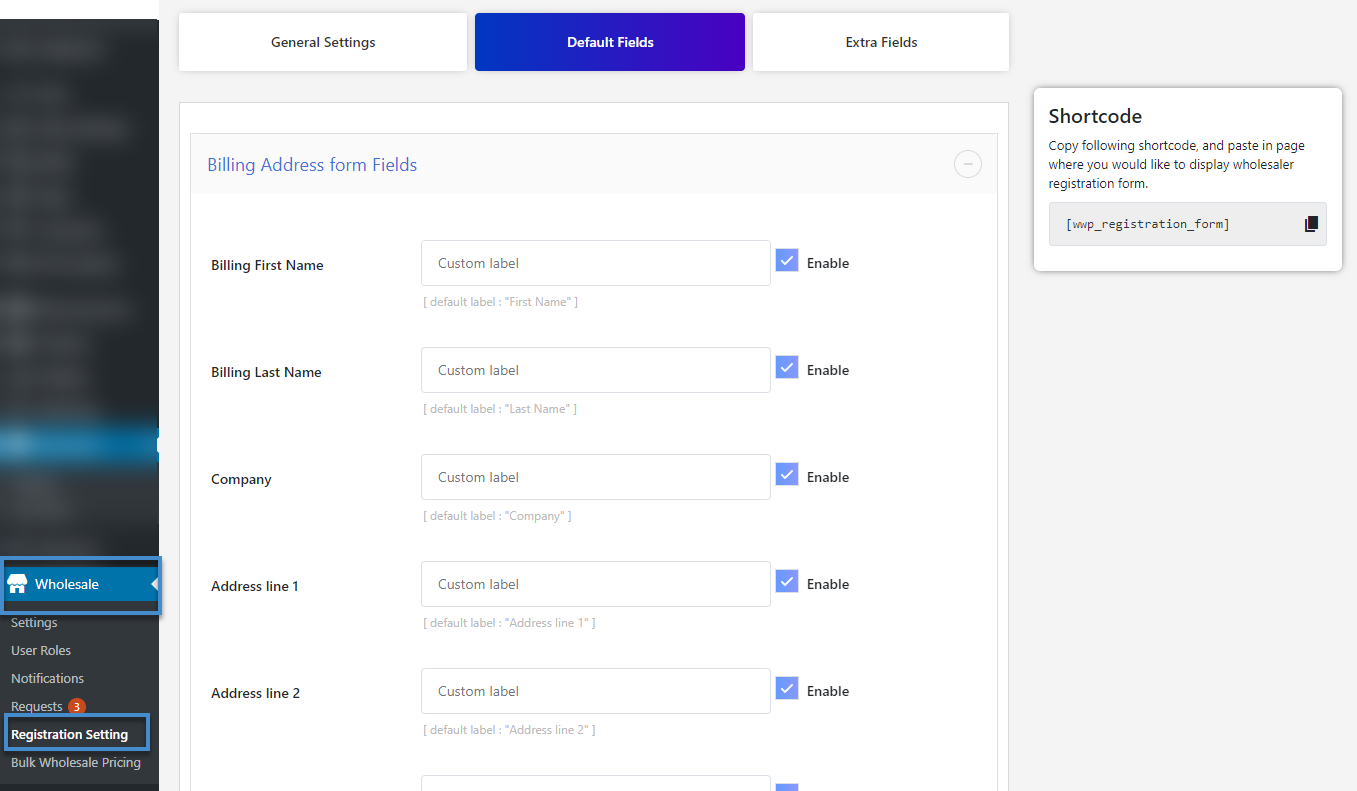
Default & Custom Fields #
Go to Wholesale 🡪 Registration > Default Fields tab.
You can enable disable form fields to display at the front-end with the help of the shortcode [wwp_registration_form].
Just copy the shortcode and place it on any page to display the wholesale registration form for users to submit their requests. To disable the whole section just turn off the toggle, for individual fields checkmark each option available. Also, change the label of the fields.
Default form fields or billing address field #
You can select which field to show or hide as per your requirement:
- First Name
- Last Name
- Company
- Address Line 1
- Address Line 2
- City
- Postcode/zip
- Countries
- States
- Phone
Shipping Address Fields #
- Shipping First Name
- Shipping Last Name
- Company
- Address Line 1
- Address Line 2
- City
- Postcode/zip
- Countries
- States

Custom Fields #
- Tax ID
- File Upload
- Custom field 1
- Custom field 2
- Custom field 3
- Custom field 4
- Custom Text Area
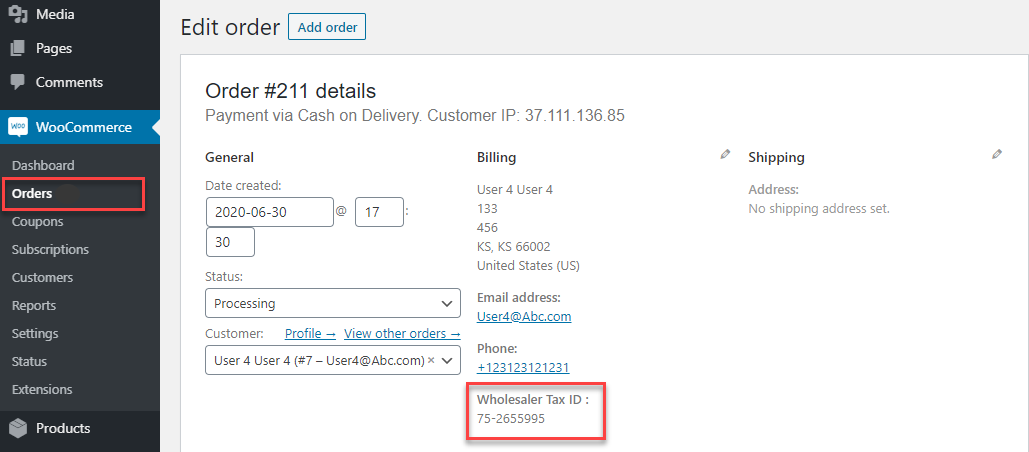
- Display Tax ID in billing address (enable this option to display tax id in billing address in Woocommerce orders).

Front-end Tax ID

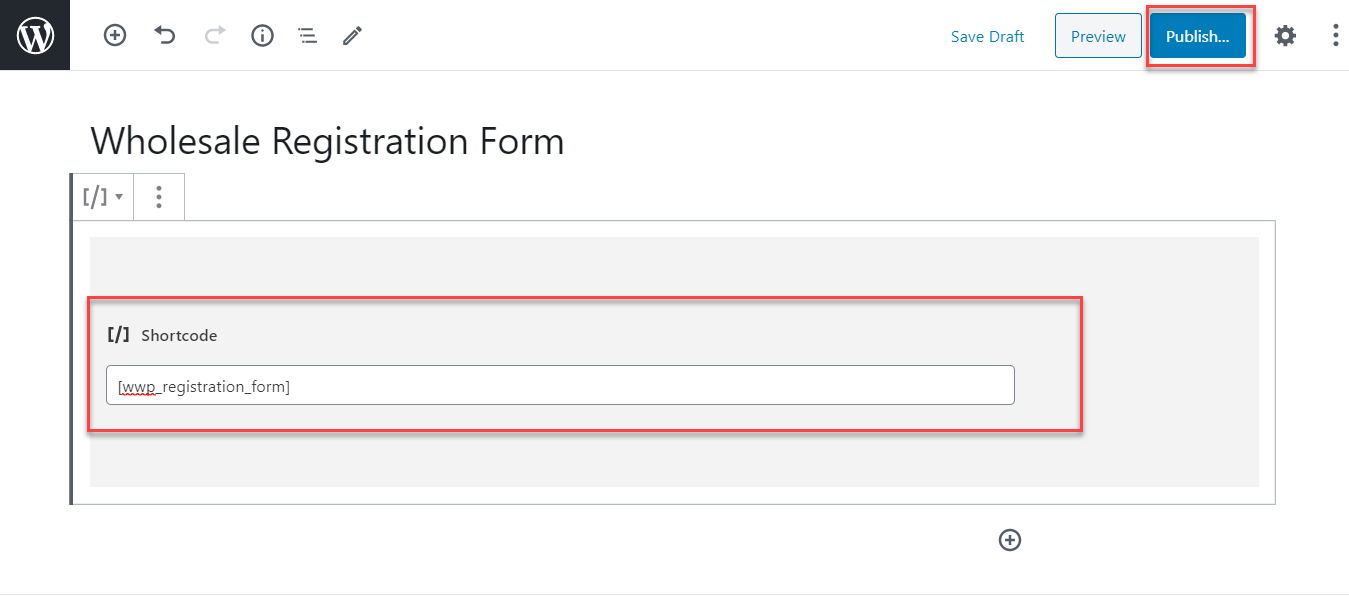
Shortcode #
- Go to Pages 🡪 Add new or Edit.
- Place the shortcode [wwp_registration_form].Publish / update.
Advanced Form Builder #
Advanced Form Builder allows you to add extra fields to the registration form. You can customize your registration form by adding various fields including Text Field, Text Area, Select, Checkbox, Date e.t.c.
You can display Form Builder fields on the My-account page and Checkout page along with the registration form.
Once a user registers with customizable fields, the data is stored in their respective user profile.
**Note* Only one form can be used for the Registration, Checkout, and My-account page.
How-to-steps – Configure advanced form builder settings #
- Go to Wholesale > Registration Settings
- Click on the Extra Fields tab
- Enable tabs as per your requirements
- Drag and drop the fields, edit as per your requirement, and display them on the front-end

Backend Form Builder View

Front-End View of Form Builder in Registration page
Form Builder on the Checkout page #
You can use Form Builder on the Checkout page which will allow wholesale customers to submit their orders with extra data. After the order is placed, the data will be stored in WooCommerce > Orders, so the admin can view all data in orders.
- You just need to enable the tab from General > Settings, see the above screenshot to enable Form Builder on the Checkout page
Front-End View of Form Builder on my-account page
Front-End View of Form Builder data in Orders
Form Builder on the My-Account page #
The purpose of Form Builder on the My-Account page is to allow customers to submit their forms with extra fields or data. Customers with rejected requests can also submit their forms again through the upgrade account tab.

Approve/deny user requests #
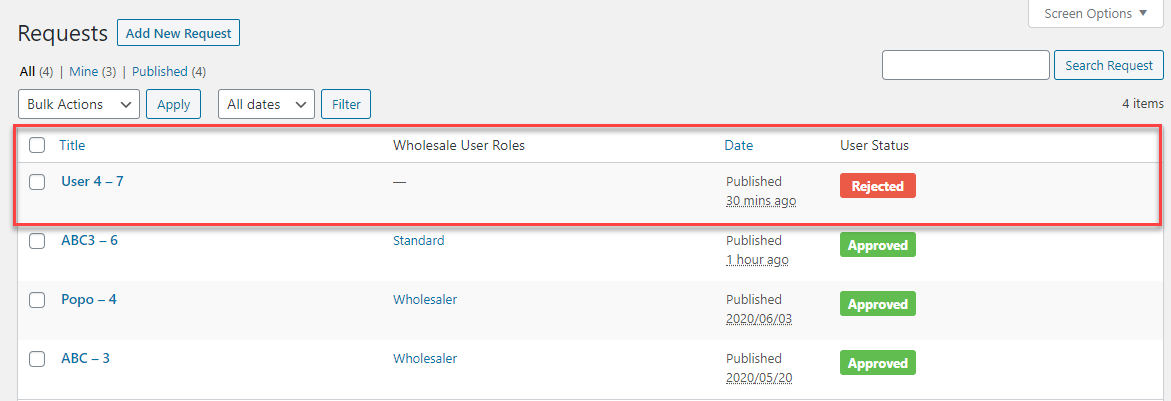
All registration requests will drop in the request section. The admin has the ability to accept requests both manually and automatically.
When the auto-approval option is disabled, the admin can approve or reject the requests manually. Admin can also assign a wholesaler role to the customer while their request is pending, although this option will only appear when multiple pricing option is enabled.
For User Requests: Go to Wholesale 🡪 Requests.
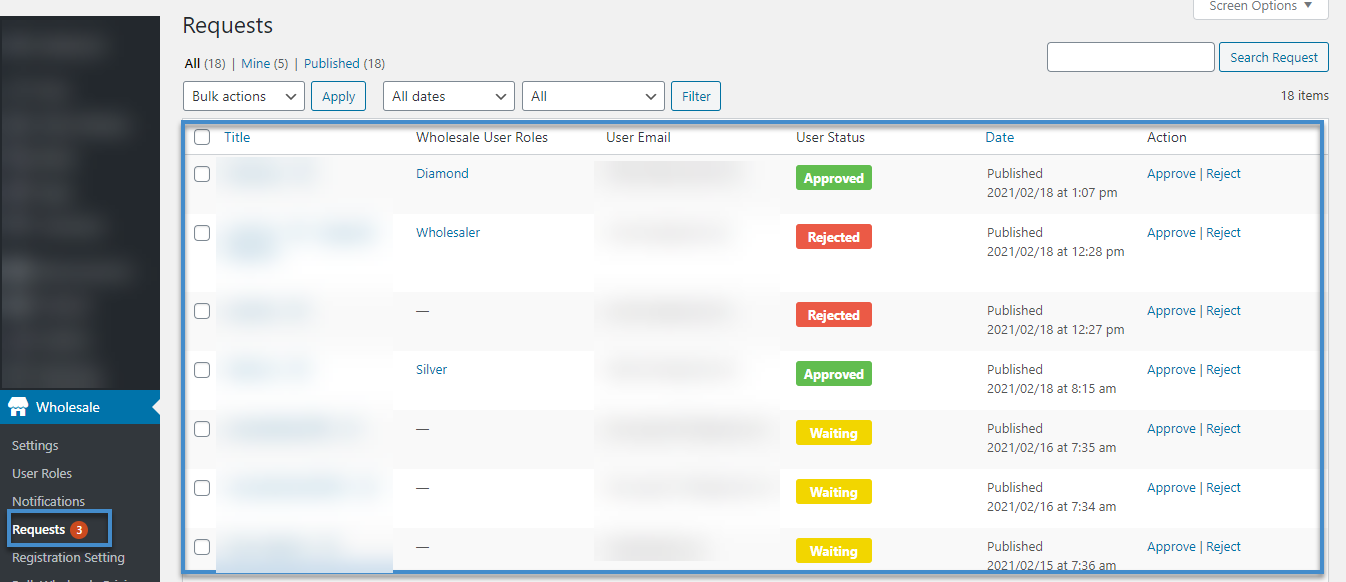
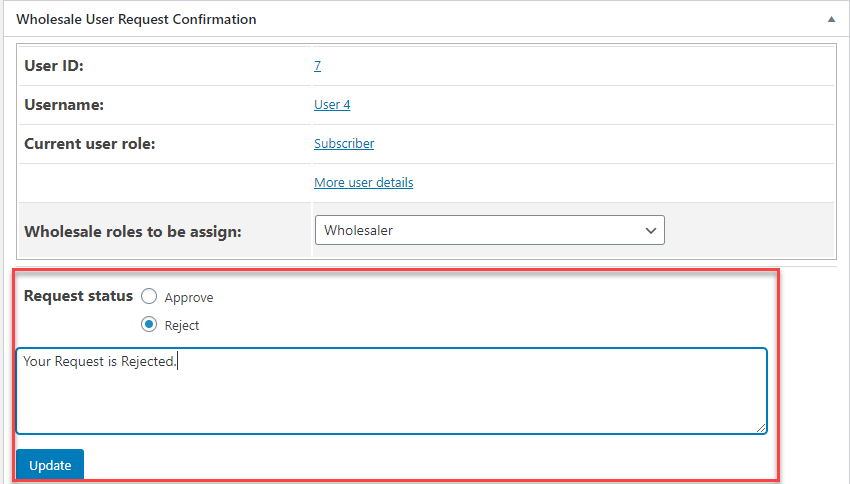
You can even add a rejection note for the user stating why the request is being rejected.

When you’re assigning a wholesale user role to a user request, you will be able to see multi-role settings BUT only if the multi pricing option is enabled from the general settings.

How-to-steps – Change user request status #
Select Approve request and Update settings.
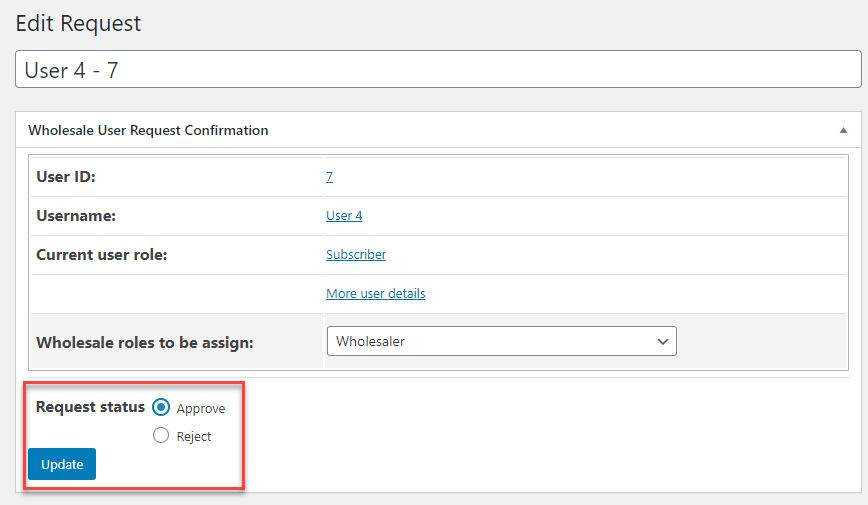
Or you can reject the request with a rejection note and update settings.
Email notifications #
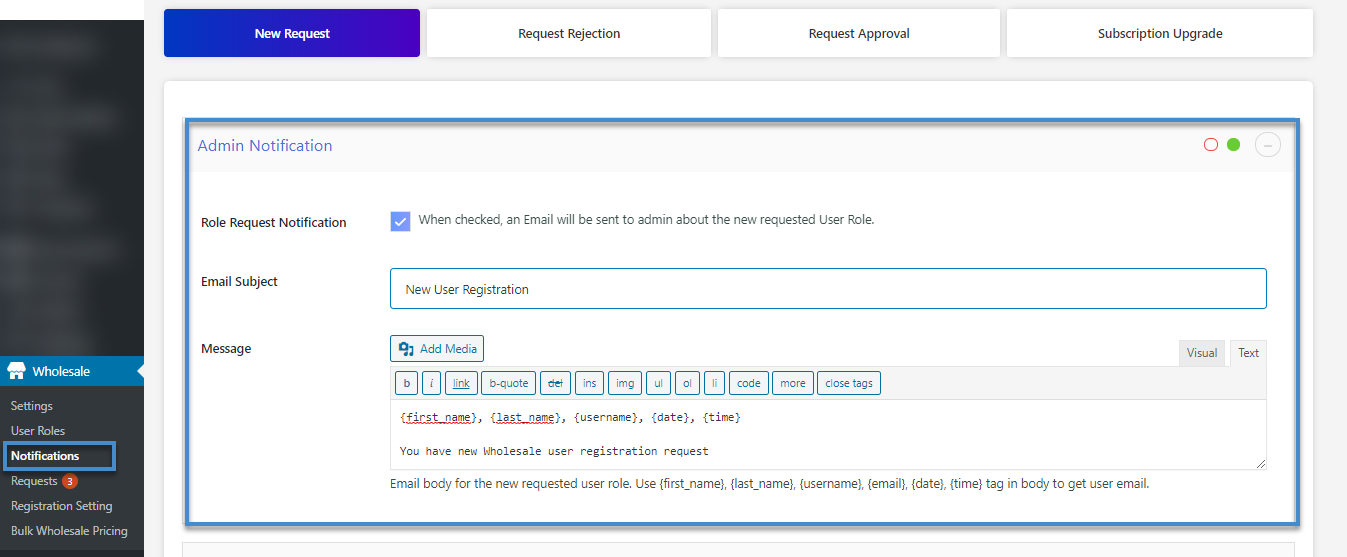
You can set up email notifications for your users as well as the admin. Admin will get notified via Email when a new registration request is made. Users will get notified when their request is approved and rejected.
How-to-steps – Notification settings for admin #
For Admin (this email will be sent to admin when a new user gets registered as a wholesaler).
- Go to Wholesale 🡪 Notifications 🡪 New Request.
- Enter Email subject.
- Enter Tags and messages to be sent to admin.
How-to-steps – Notification settings for user registration #
User Registration (this email will be sent to the user when registered as a wholesaler).
- Enable Notification.
- Enter Subject.
- Enter tags and message that will be sent.

How-to-steps – Notification settings for user request approval #
For User Request Approval (this email will be sent to the user after the wholesale registration request is approved by the admin).
- Enable Notification.
- Enter Subject.
- Enter tags and message to be sent.
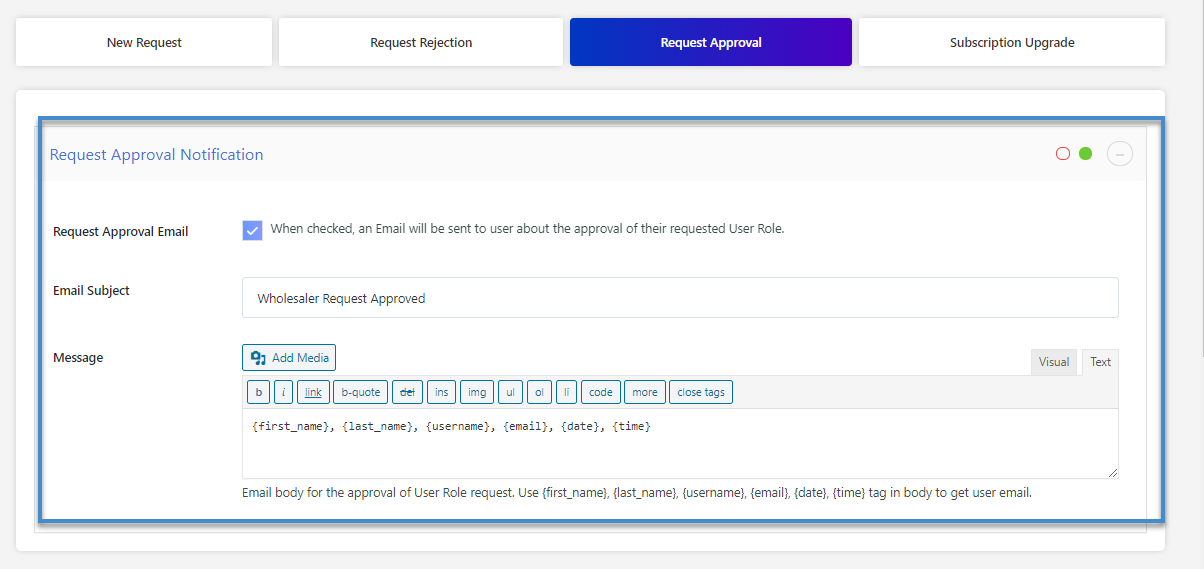
How-to-steps – Notification settings for user request rejection #
For User Request Rejection (this email will be sent to the user after the wholesale registration is rejected by the admin).
- Enable Notification.
- Enter Subject.
- Enter tags and message to be sent.
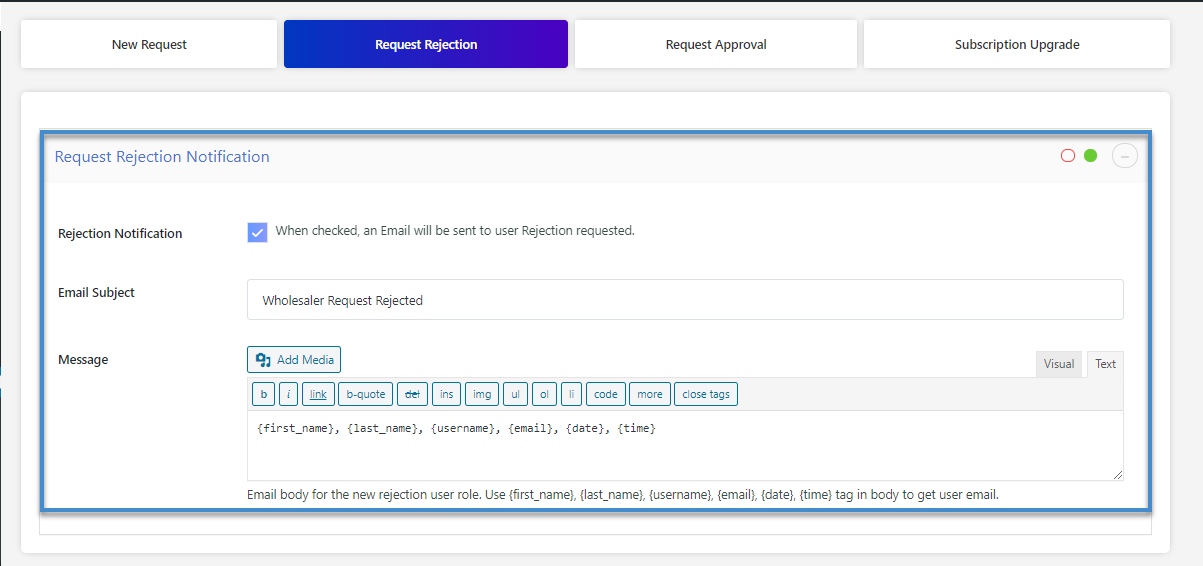
Page redirection on specific products/pages #
Send users to the custom page and on specific products after successful user registration, you can select a specific page and specific products from the drop-down menu, all the pages and products will be displayed in the drop menu once the customer register successfully he/she lands on the specific page or specific product.
How-to-steps – set up page user registration page redirection #
- Go to Wholesale > Settings
- Select page and product from the drop-down menu
- Save Changes

Overriding WooCommerce’s default registration page on my-account page #
This feature allows you to override WooCommerce’s default registration form on your my-account page with the advanced wholesale registration form.
This action will enable any guest user to register as a wholesaler on your website’s my-account page directly.
How-to-steps – Overriding WooCommerce’s default registration page #
- Go to Wholesale > Settings
- Go to the Login Restrictions tab
- Click on the checkbox to enable “Override registration form on the my-account page”
- To test go to the front-end (my-account page)

Wholesale new order email notification #
Option to select order notification email based on user role and also custom email. Wholesale Order email can be sent to Any role or can be sent to a custom email address which you have entered.
Backend: #
- Go to Wholesale > Settings > General
- Select Order Notification Email > Select User Role or Custom Email Radio Button.
- Select User Role Radio Button > Select Role from Role Dropdown.
- Select Custom Email > Enter Email address in Recipient(s) field.
User Role-Based Order Notification Email #
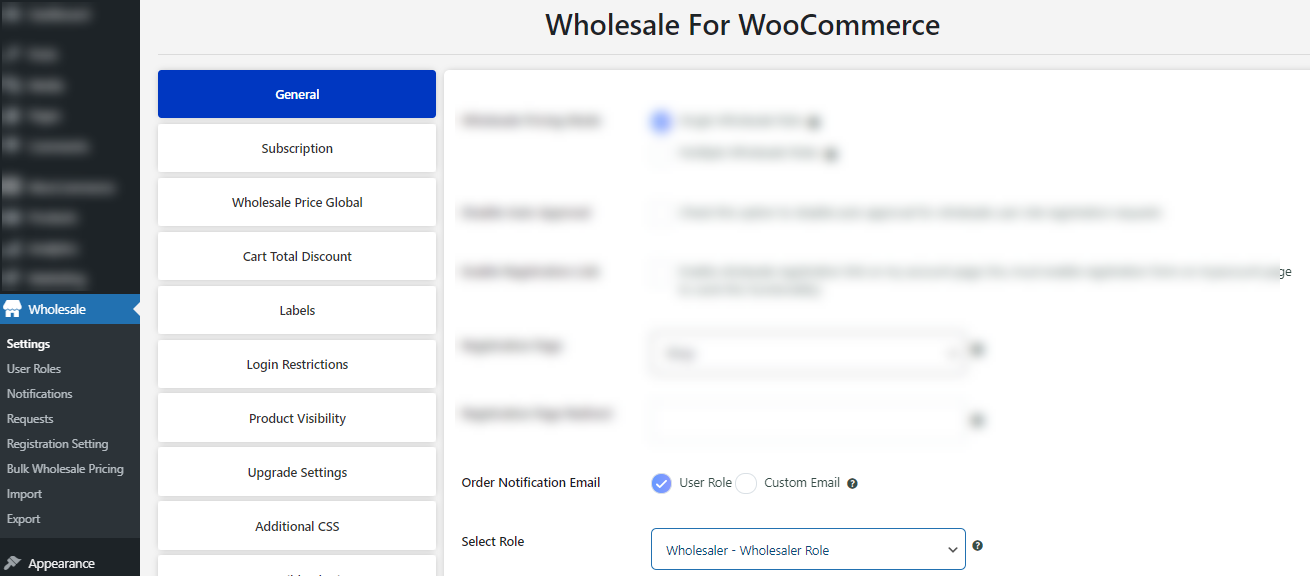
Frontend: #

- Order is received in the wholesale Role email address as defined above.

Custom Email-Based Order Notification Email #
In custom Order email notification, you can use multiple email addresses separated by commas.

Frontend: #
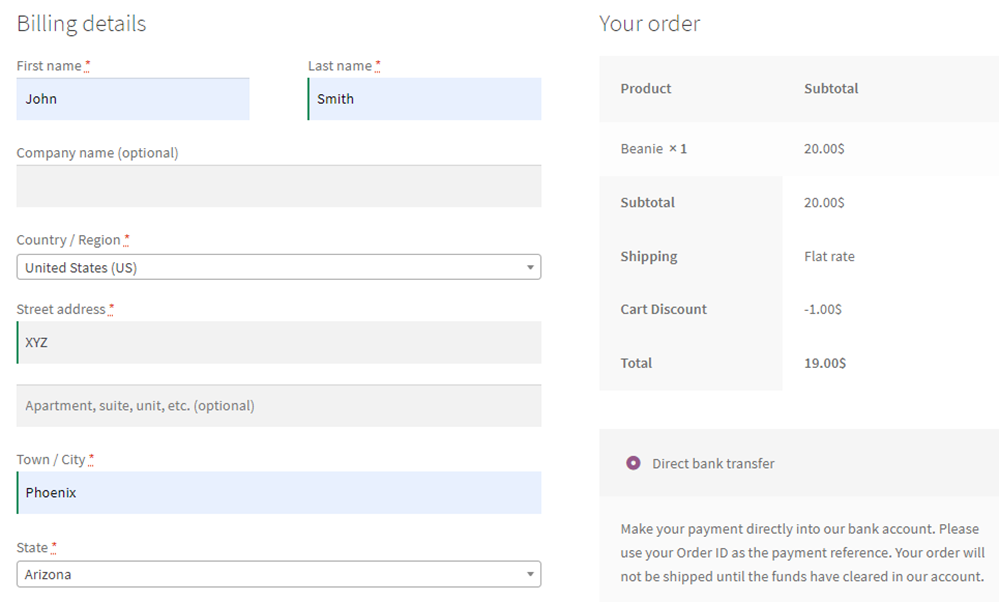
- Order is received in a custom email address as defined above.

Confirm Password Field #
Option to enable Extra Password field. This will add an extra confirm password field on the wholesale Registration form.
- Go to Wholesale > Registration Setting > Default Fields > Other Fields
- Enable Extra Password Field checkbox
- Create wholesale registration page using shortcode
- Go to Wholesale registration page
Backend: #

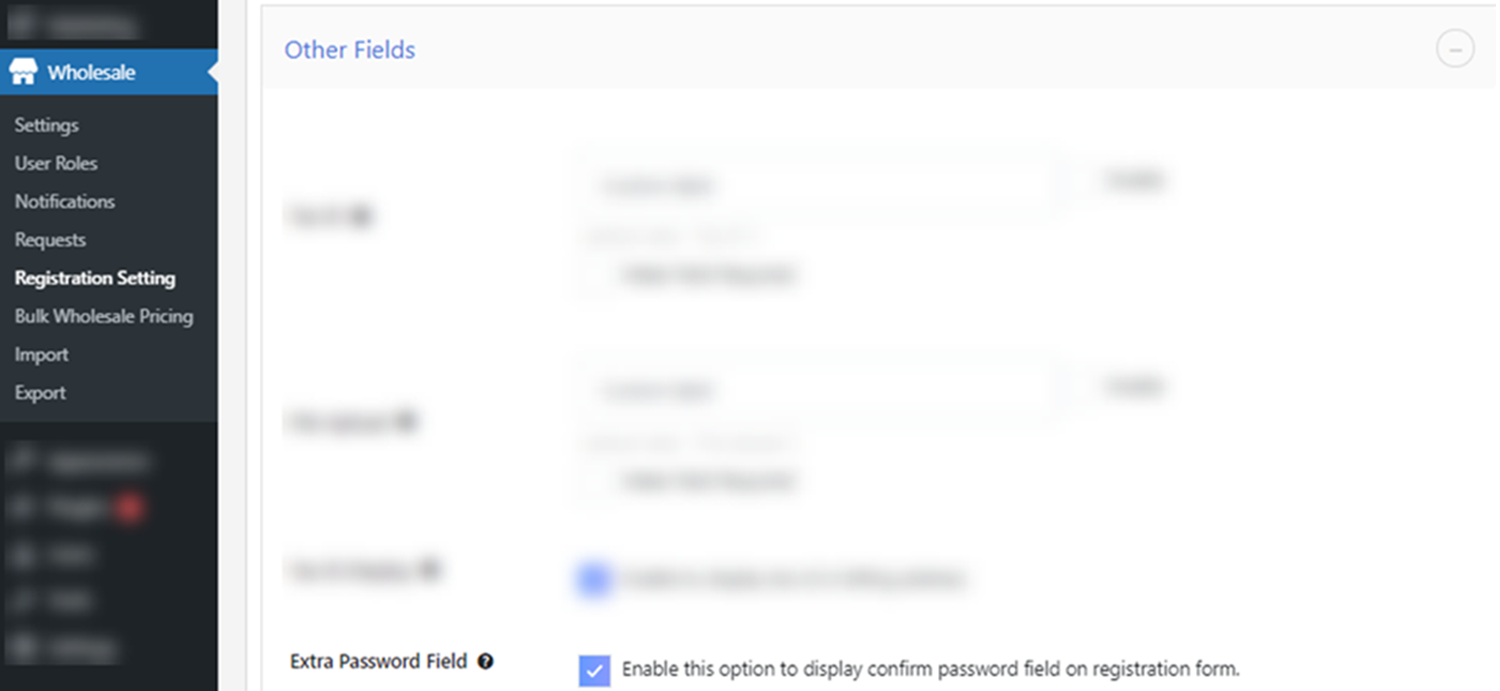
Frontend #
- Wholesale Registration form is showing confirm Password field which was enabled from backend settings as defined above.
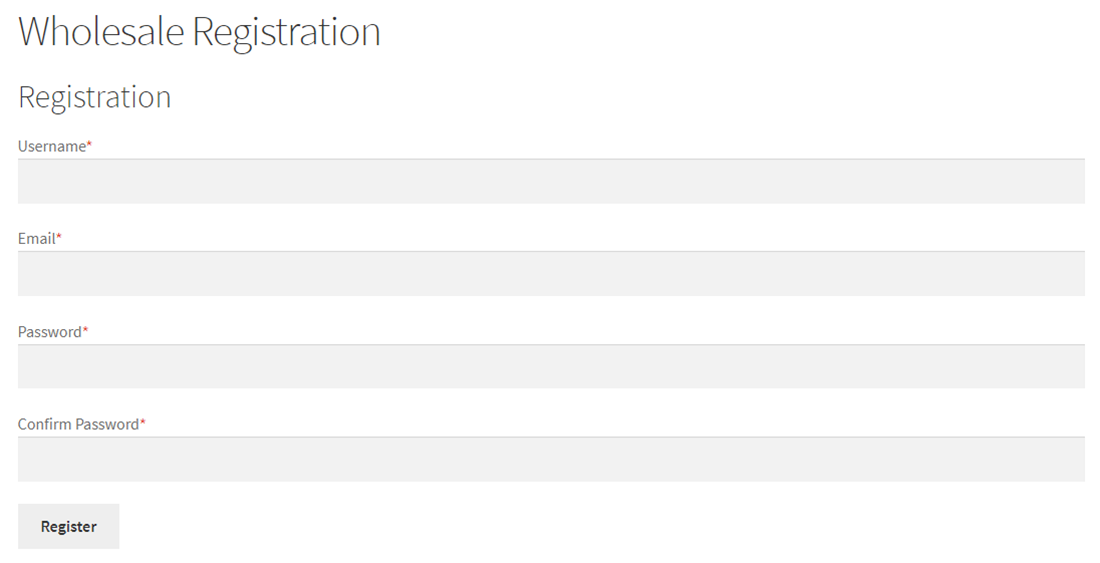
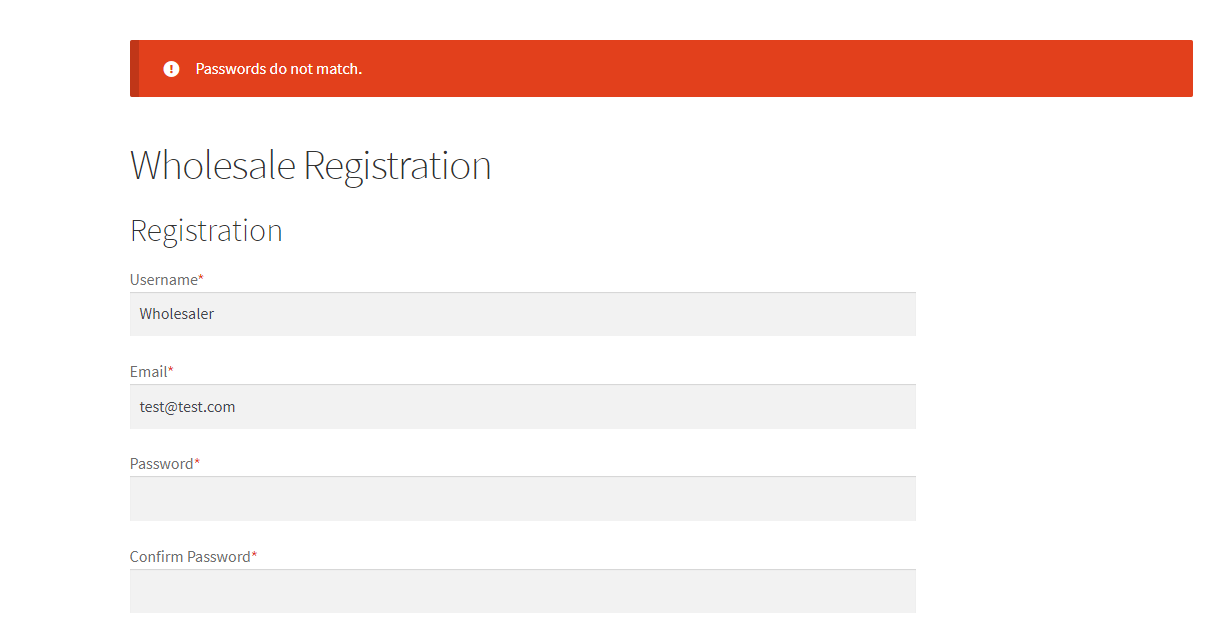
Sales Dashboard and Reports #
How to view the wholesale sales dashboard #
Navigate to WordPress Admin Dashboard → Wholesale → Dashboard.

Sales summary for B2B & B2C orders #
In the Sales Summary (B2B) – (B2C) tab, we can see a few statistics and their visual representation in the form of a Graph.
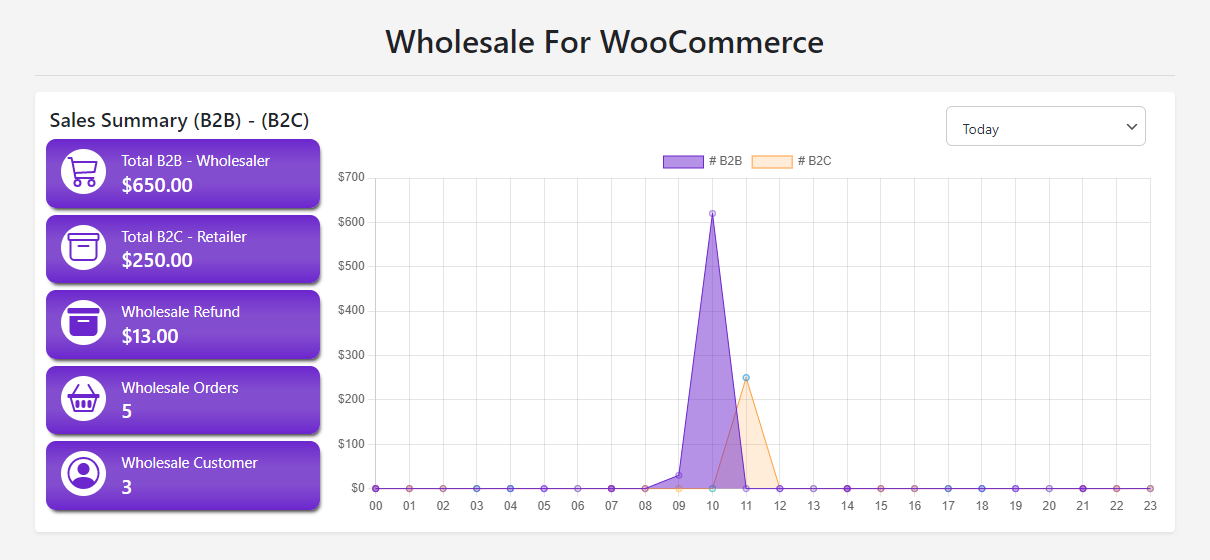
B2B sales amount for wholesale orders #
This section represents the total amount received by wholesale customers through wholesale orders (B2B).
B2C sales amount for retail orders #
This section represents the total amount received by retail customers through retail orders (B2C).
Refund amount for wholesale orders #
This section represents the total amount refunded on the wholesale orders.
Wholesale order count #
This section represents the total number of wholesale orders.
Wholesale customer count #
This section represents the total number of wholesale customers.

Data graph and filters #
The purple lines highlight the B2B sale summary data, and the orange lines highlight the B2C sale summary data on the graph.

We can also filter the sale summary data by clicking on the B2B box and B2C box.

We can also filter the sale summary data from the dropdown menu present on the top right side of the graph.

Today filter #
When the Today filter is selected, the graph shows the total amount on the Y-axis and Time (hrs) on the X-Axis.
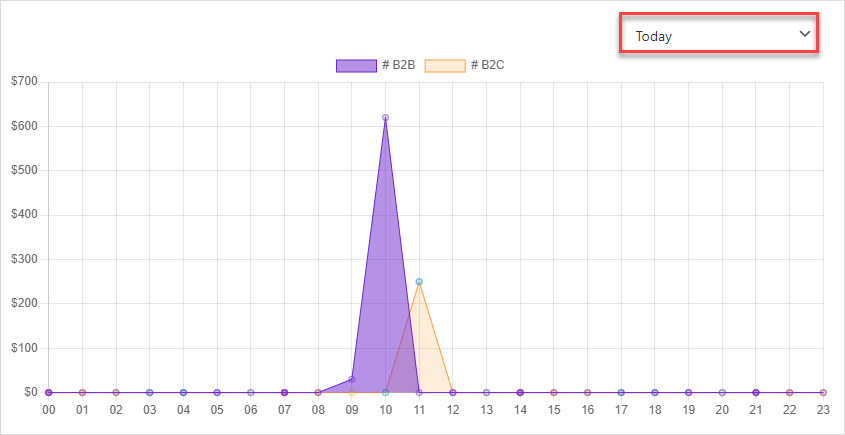
Last 7 Days filter #
When the Last 7 Days filter is selected, the graph shows the total amount on the Y-axis and the Date (date of the last 7 days) on the X-Axis.

Last 31 Days filter #
When the Last 31 Days filter is selected, the graph shows the total amount on the Y-axis and the Date (date of the last 31 days) on the X-Axis.
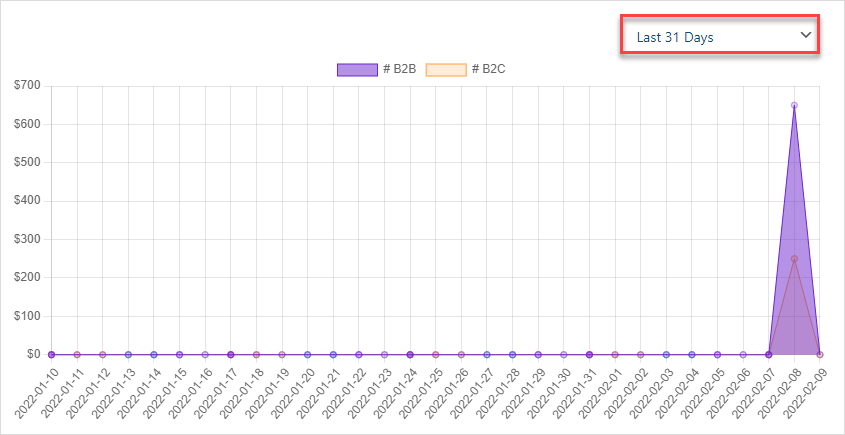
Annual filter #
When the Annual filter is selected, the graph shows the total amount on the Y-axis and the annual dates on the X-Axis.
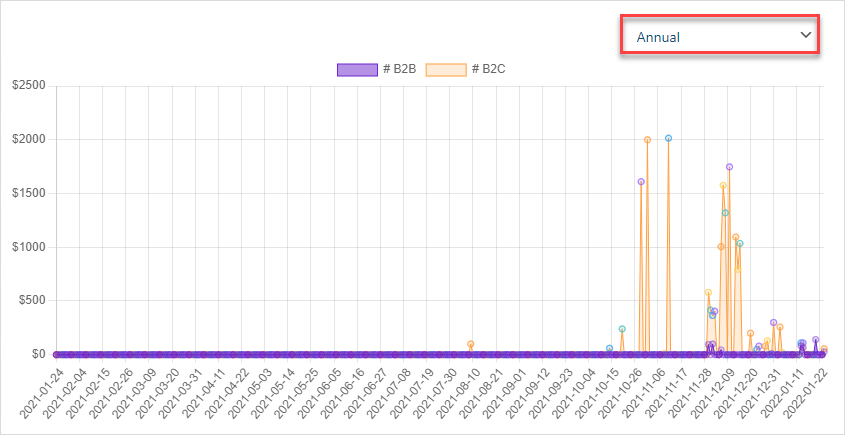
Custom filter #
When the Custom filter is selected, the graph shows the total amount on the Y-axis and the Date (date of the last 31 days) on the X-Axis.

Set your customized dates and see the sales summary data that occurred between those dates on the graph.

New Registrations Approval Needed #
- In the New Registrations Approval Needed tab, we can see all the registrations received via the Wholesale Registration Form “shortcode: [wwp_registration_form].”
- The Administration can view the Name, Email, User Role, and Status of the user who applied for registrations from the dashboard.
- The Administration can also Approve or Reject those registrations from the dashboard.

- On the right side of the New Registrations Approval Needed tab, we can see the Total Wholesale Users, Pending Request, and Reject Request.
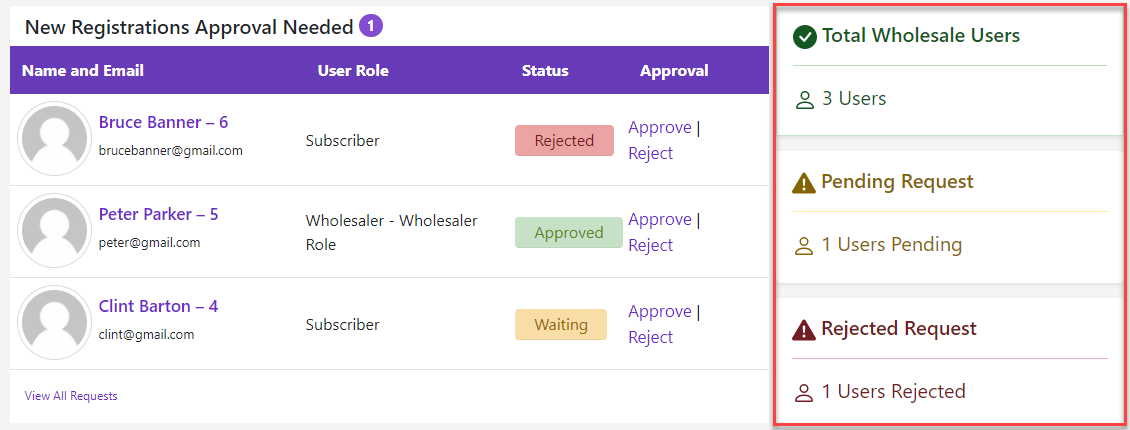
- Click on the View All Request button at the bottom of the New Registrations Approval Needed tab.
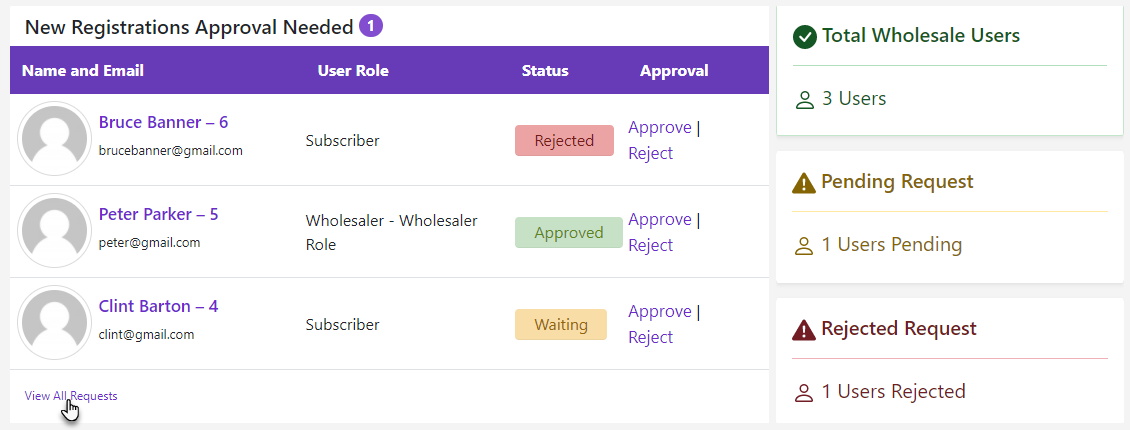
- Once done, it will redirect us to the Requests page.
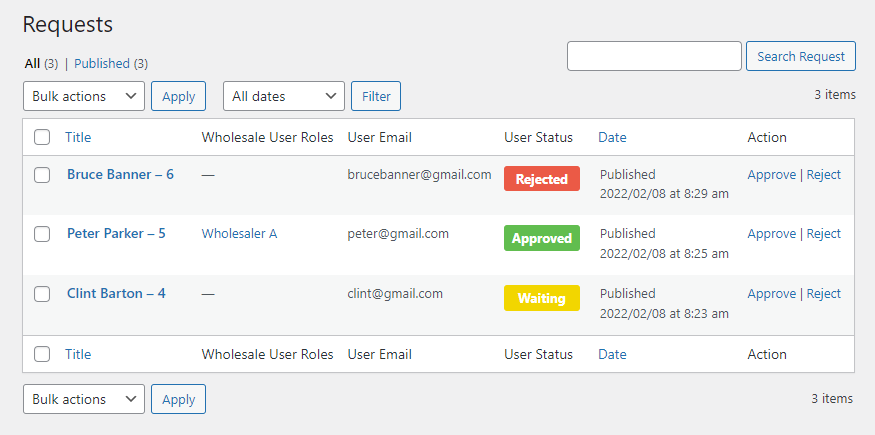
Recent Wholesale Orders #
- We can only view all wholesale orders from the dashboard in the Recent Wholesale Orders tab.
- The Administration can view the Order Number, Date, Status, and Total of each order.
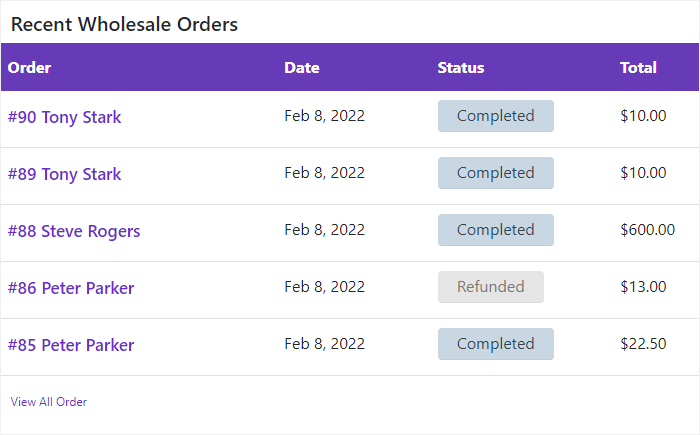
- Click on the View All Request button at the bottom of the New Registrations Approval Needed tab.
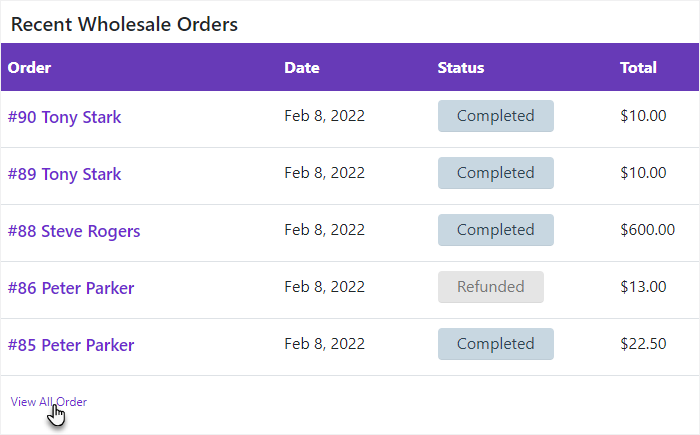
- Once done, it will redirect us to the Orders page.
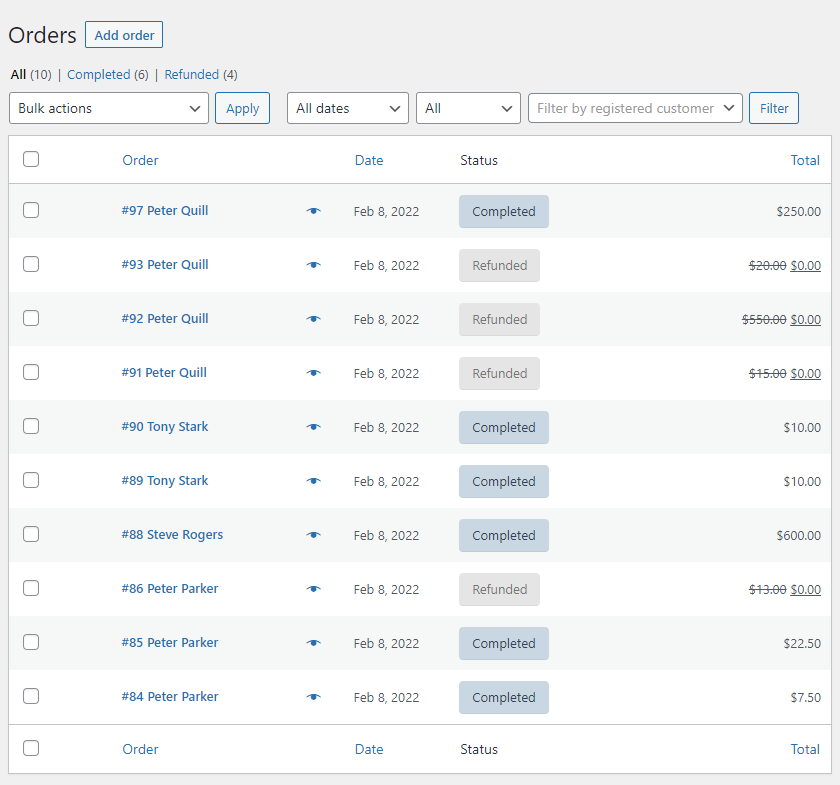
Private Store for WooCommerce #
How to set up a private wholesale store #
This feature allows the site visitors (Guest users) to enter wholesale stores through a protected password provided by the admin to check how the wholesale store works, only those users can access wholesale stores from my-account page who have protected password.
Admin can set a protected password to Individual wholesale roles from Wholesale > User Roles settings, display a custom message on shop page and my-account page to guest users For Example:” Please login with your protected password provided by an admin” however when
Protected password store option is enabled from Wholesale > Settings, no products will display to guests users until the user gets logged in with a password
After a successful login using a password, guests user would be able to buy wholesale products, once the customer buy wholesale products or we can say
place an order from the Checkout page he/she automatically approved as a wholesaler customer.
To set up, follow the instructions. Account & Privacy settings should be set as per the below steps then set a protected password on wholesale roles.
Setting up account and privacy settings #
How-to-steps – set up account & privacy settings #
- Go to WooCommerce > Settings
- Click on Account & Privacy tab
- In the Guest section Uncheck “ Allow customers to place orders without an account”
- In the Account, creation section check the “Allow customers to create an account during checkout” option
- Check the “When creating an account, automatically generate an account password” option
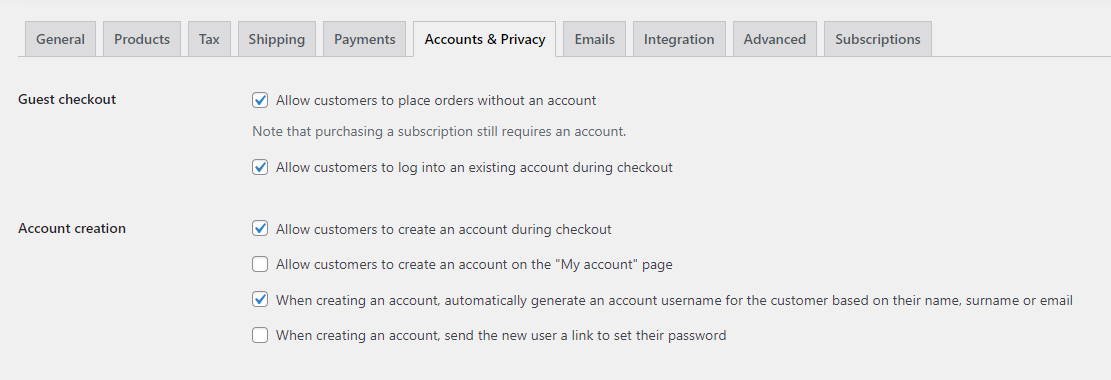
Steps to setup full-store access permissions & restrictions #
How-to-steps – set up full-store access permissions & restrictions #
- Go to Wholesale > Settings
- Go to the Login Restrictions tab
- Enable Restrict Full Store Access option
- Enter Message to display on shop & my-account page

**Note* After successful login with a protected password from the user side and place an order, concern wholesale role will assign to guests users.
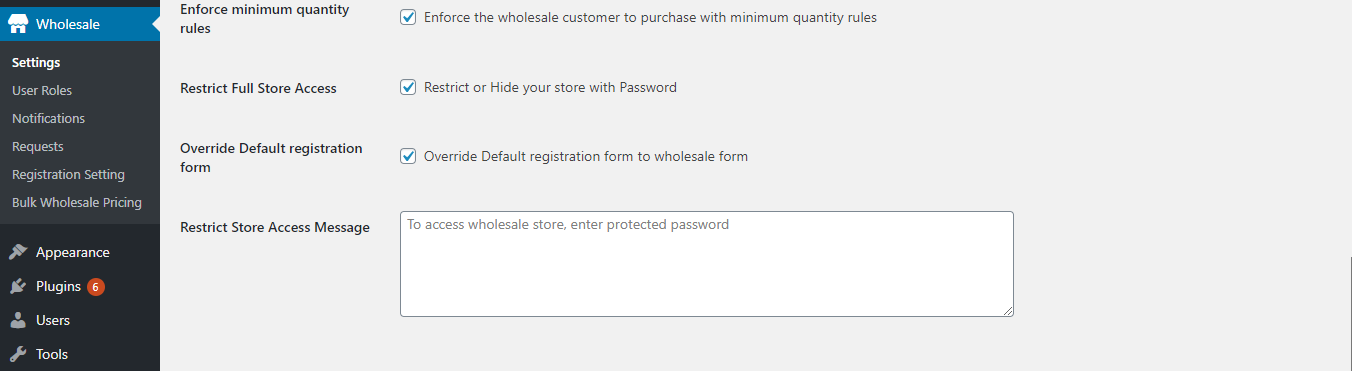
Steps to set up password-protection for your store #
How-to-steps – set up password-protection for your store #
- Go to the my-account page
- Enter protected password
General login settings #
Restrict price and store access for your users. If you are running a wholesale store only then these options are very helpful.
- Hide Price: Enable this option to display prices to log in users only. Product prices will not be displayed to non-logged-in or guest users.
- Login Link Label: Set your custom label for the login link generated if the hide price option is enabled.
Front-end

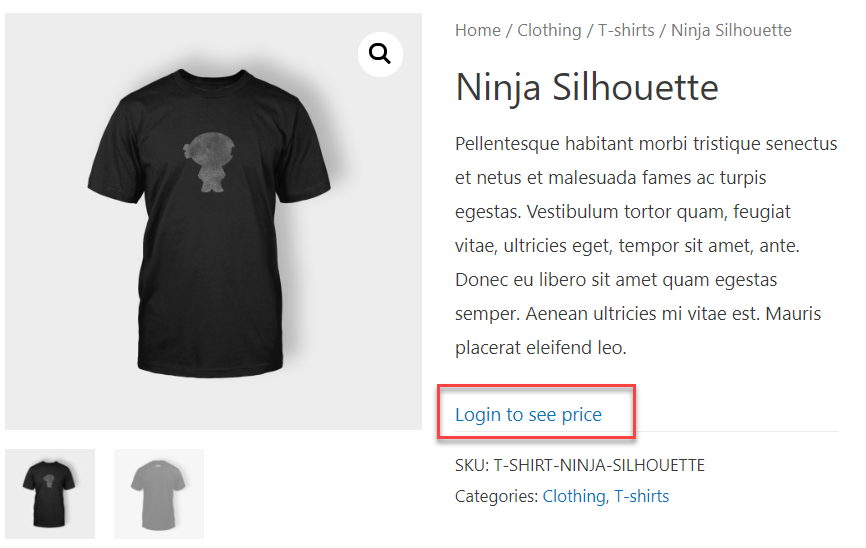
- Restrict Store Access: Enable this option to allow access to only approved wholesale users. Users whose request is pending will not be able to access the store. A custom message will be displayed for pending requests.
- Custom Message: You can enter your custom message for Pending and Rejected Requests to display at the front-end.
Front-end


Requisition List #
- Navigate to WordPress Admin Dashboard → Wholesale → Settings.
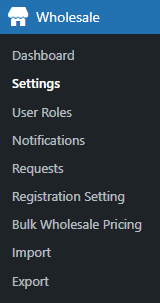
- Now you’re on the Wholesale For WooCommerce Settings page.
- Go to the General tab.
Enable Requisition List #
- Navigate to the Requisition List option and checkmark the checkbox to enable the requisition list for the customers.
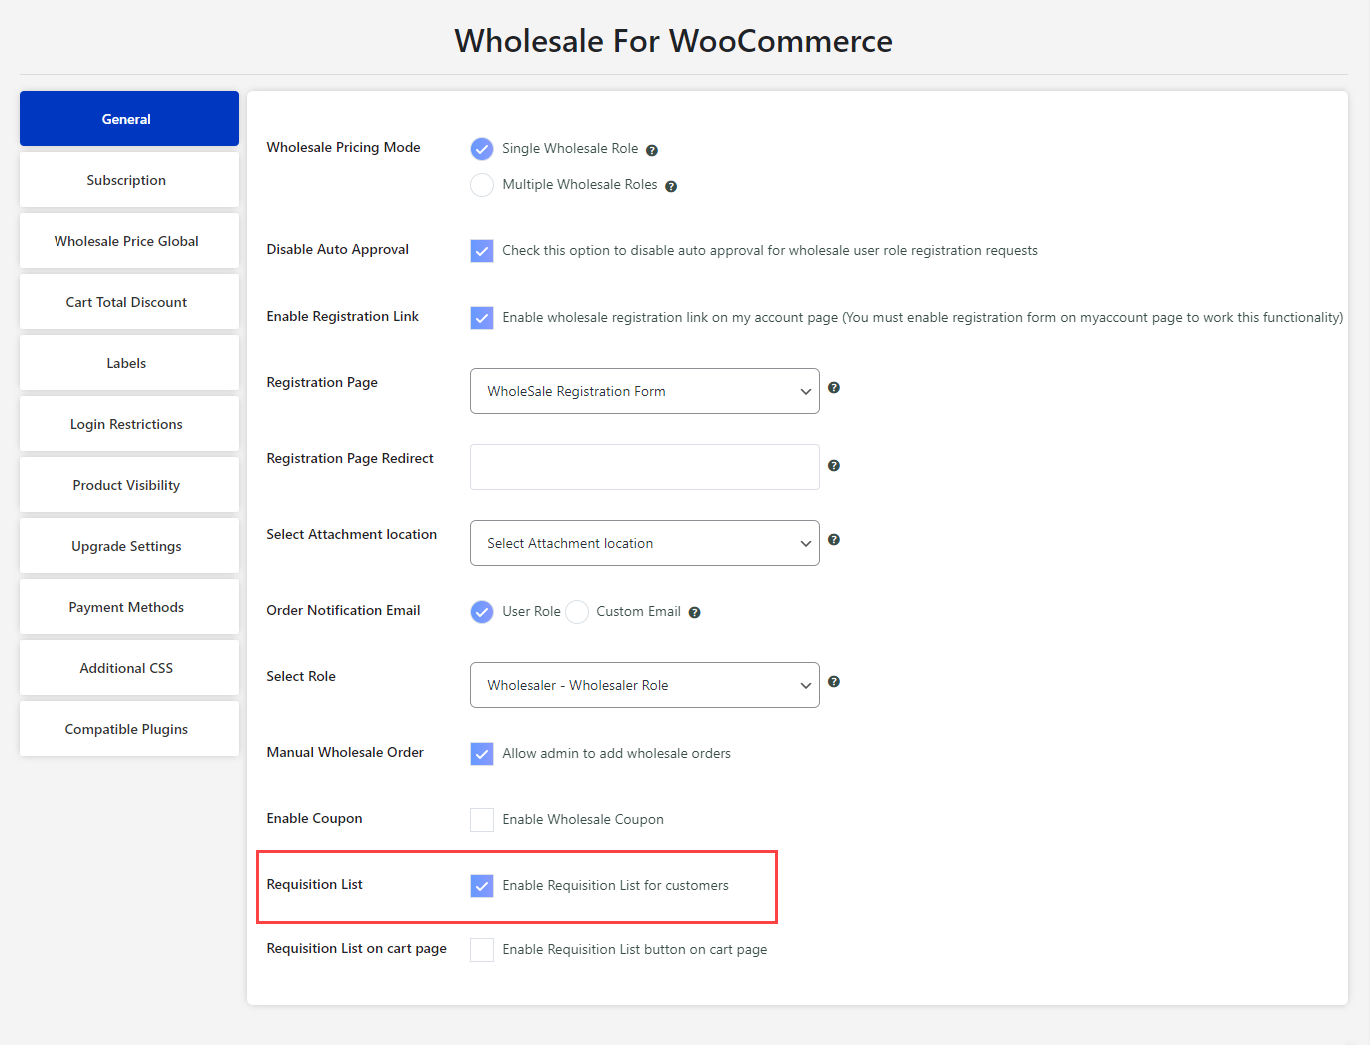
Requisition List – Wholesale Customer/ Regular Customer View #
- Go to the website.
- The customer will log in and navigate to the My Account page.
- On the My Account page, navigate to the Requisition List tab.
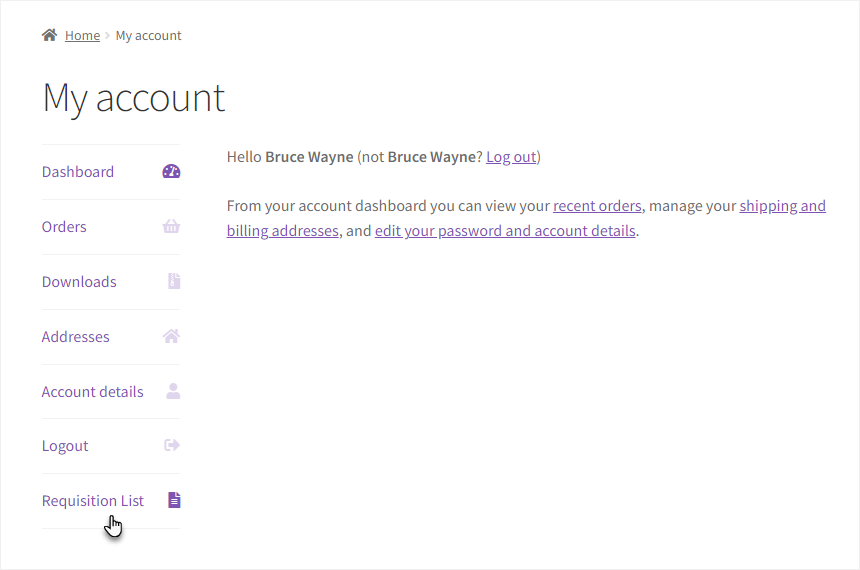
How to Create a Requisition List? #
- Once in the Requisition List tab, click on the + New List button.
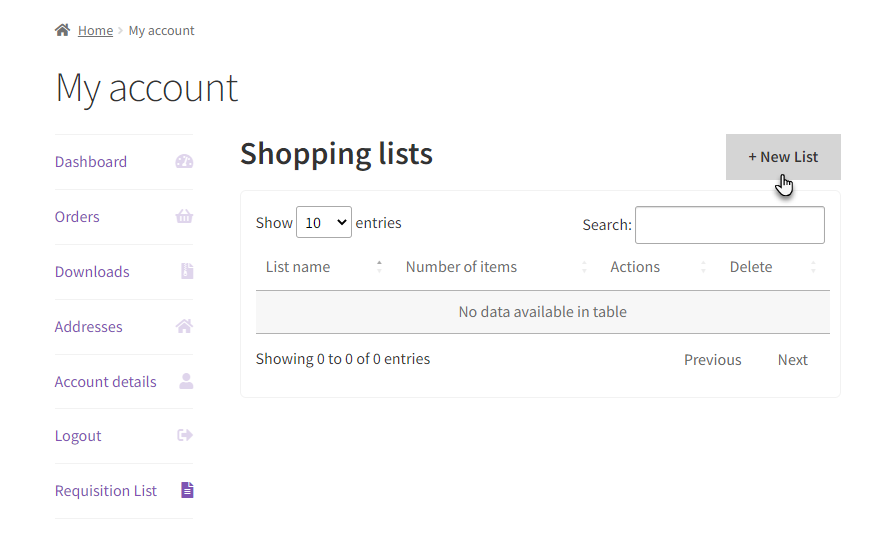
- A Requisition List popup will appear.
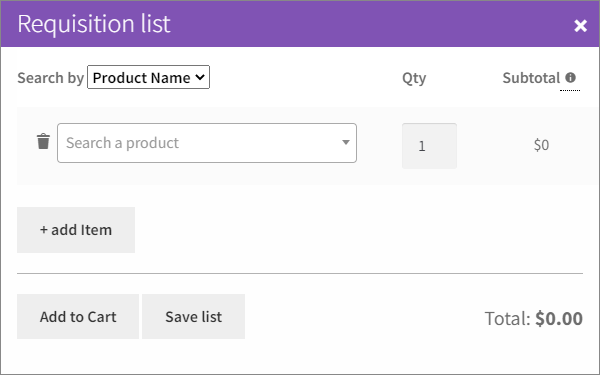
- While creating the requisition list, we can search the items using their Product Name or SKU.
- Set the Search by field to Product Name to search the products with their name in the search product field.
- Set the Search by field to SKU to search the products with their SKU in the search product field.
NOTE: Enter the complete SKU to search for the product using the SKU.

- Click on the Clear button against the Search Product field to deselect the product.
- A Quantity field is present against every Search Product field.
- Set the quantity of each product in the Quantity field.

NOTE: Inventory will be managed on the Cart page only, not on the Requisition List.

- Click on the Delete icon to remove the items added to the requisition list.
- Click on the + Add Item button to add the Item field.

- Add items and then set the quantity of the items according to your requirement.
- The Subtotal and Total prices will change according to the items added and their quantity.
- Once done, click on the Save List button.

- A popup will appear, enter the name of the requisition list and then click on the OK button.
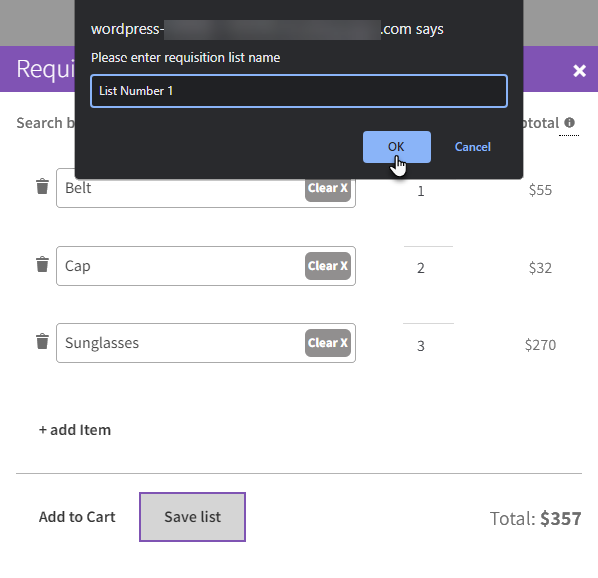
- The requisition list is created successfully and will appear in the Requisition List tab.

NOTE: If the Wholesale minimum quantity is set to 1 then the Wholesale price will be displayed in the Requisition list.

If the Wholesale minimum quantity is set greater than 1 then the Wholesale price will not be displayed in the Requisition list.

How to Update the Requisition List? #
- Click on the Open List button against any requisition list.
- Update the list according to your requirements.
- Once done, click on the Update List button.

- A popup will appear, enter the name of the requisition list and then click on the OK button.

- The requisition list is updated and will appear in the Requisition List tab.
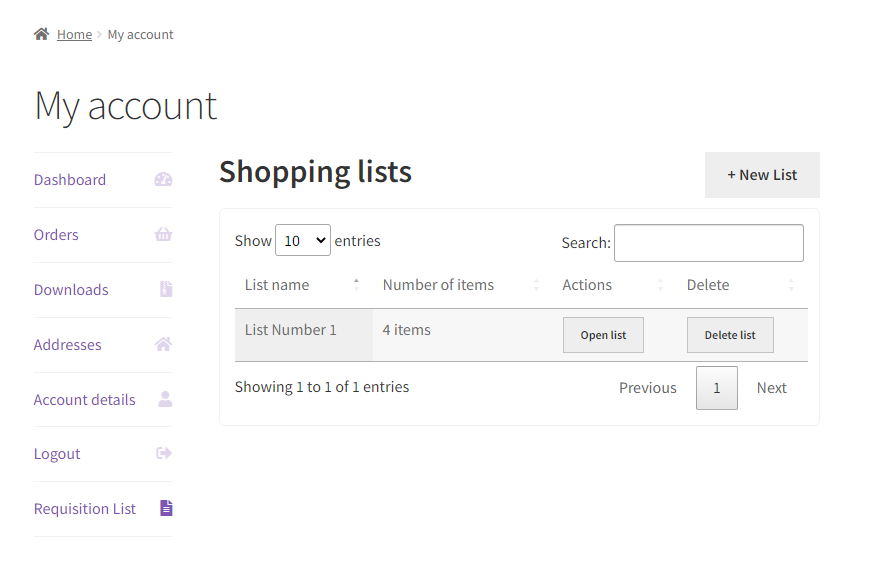
How to Delete the Requisition List? #
- Click on the Delete List button against any requisition list.
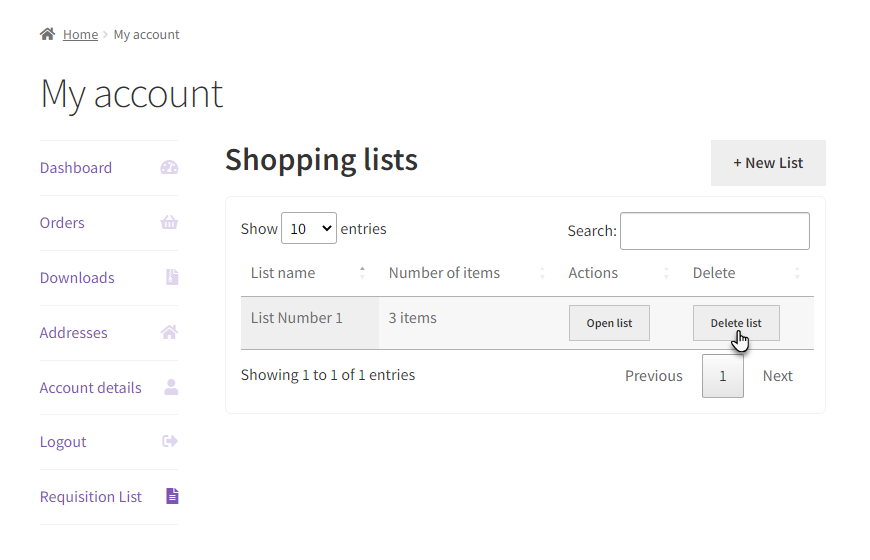
- That specific requisition list will be deleted.

How Does the Requisition List work? #
- Click on the Open List button against any requisition list.
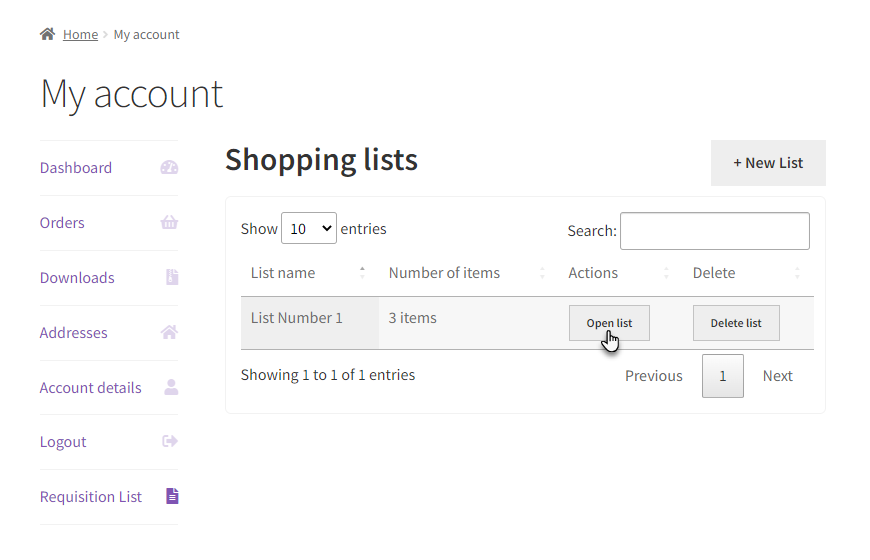
- Click on the Add to Cart button.

- A popup will appear indicating that the products in the list are successfully added to the cart.
- Click the OK button, and you’ll be redirected to the Cart page.

- All the products in the requisition list will appear on the Cart page.
- Click on the Proceed to checkout button.
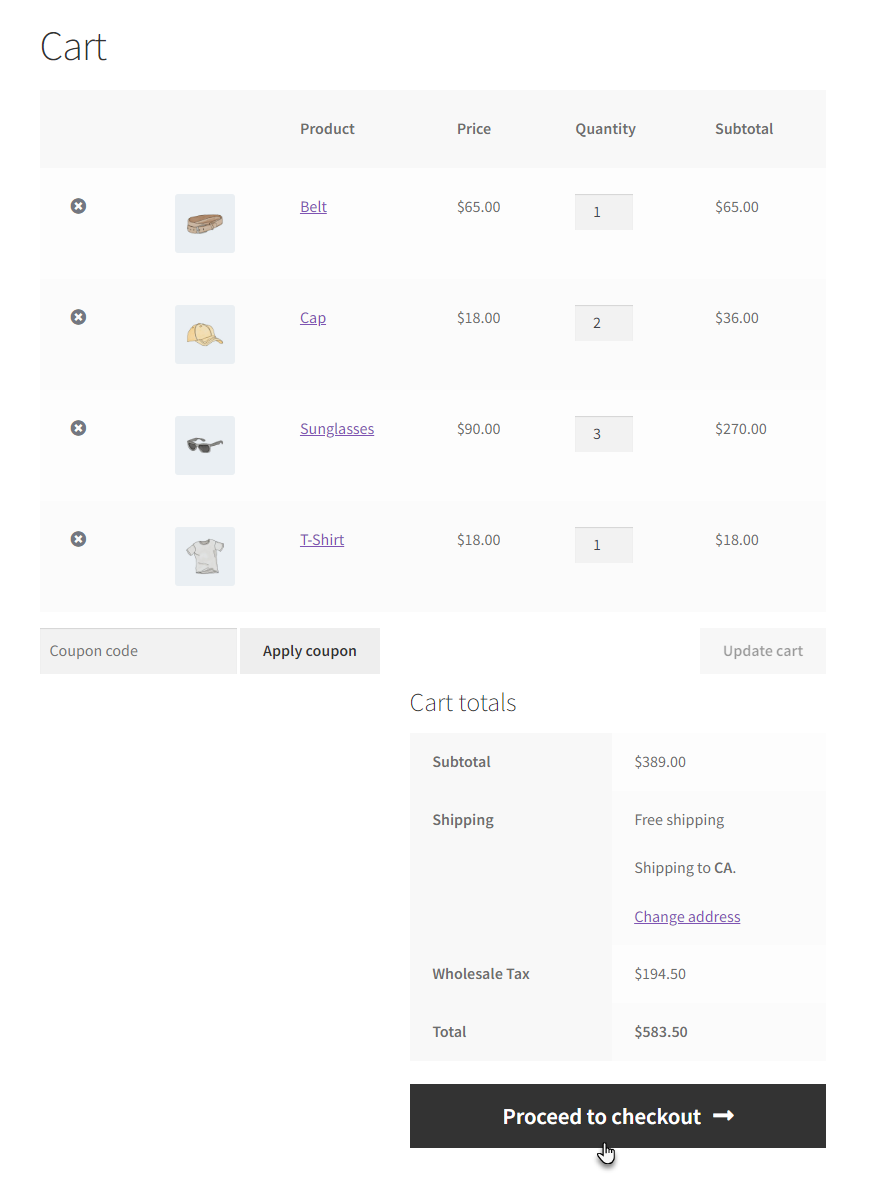
- On the Checkout page, click on the Order order button.
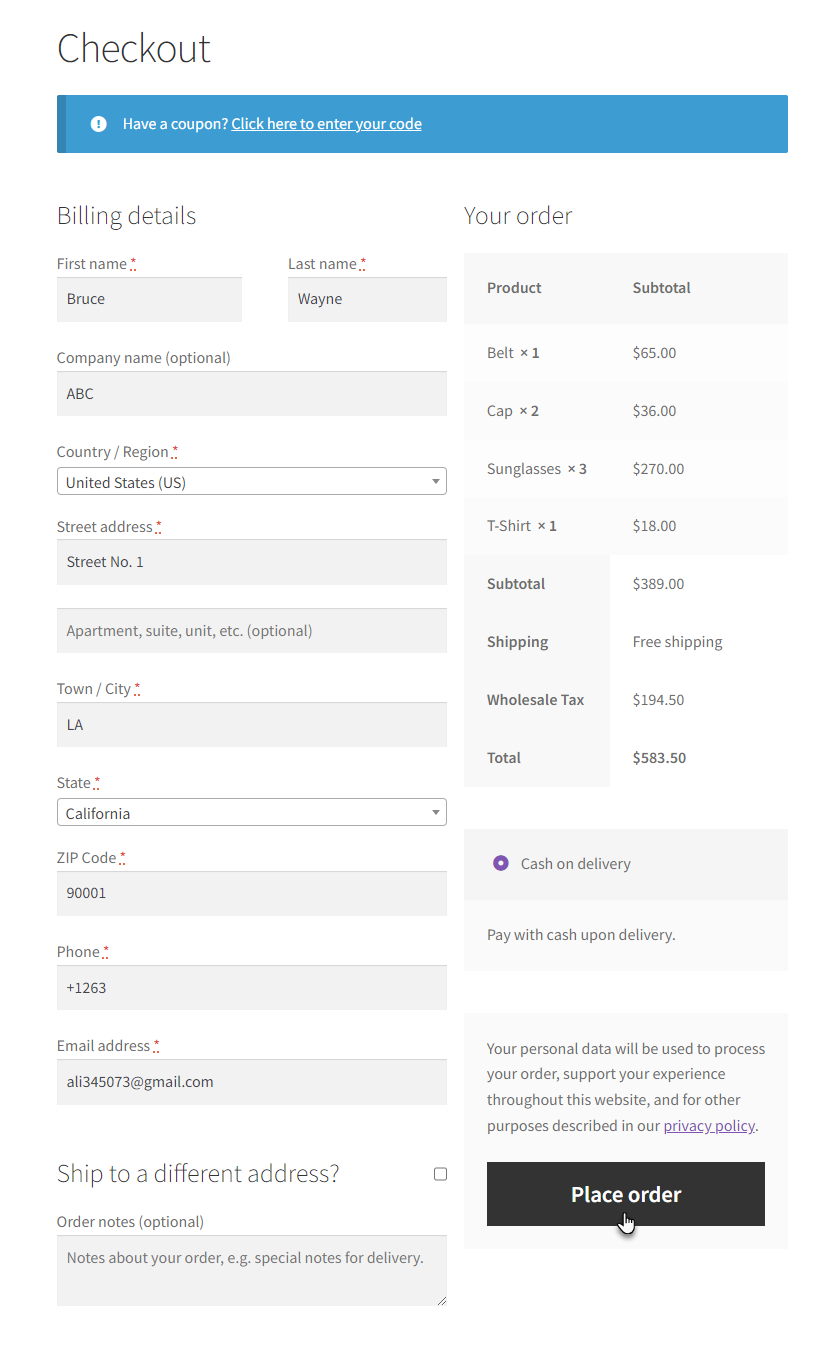
- Once the order is placed successfully, all the products will appear in the Order details section.

NOTE: Navigate to WP Admin Dashboard → WooComerce → Settings. Navigate to the Tax tab. Set the Display prices in the shop option is set to Including tax and click on the Save changes button.

This will allow the plugin to display the subtotal price of each item with tax in the Requisition list.
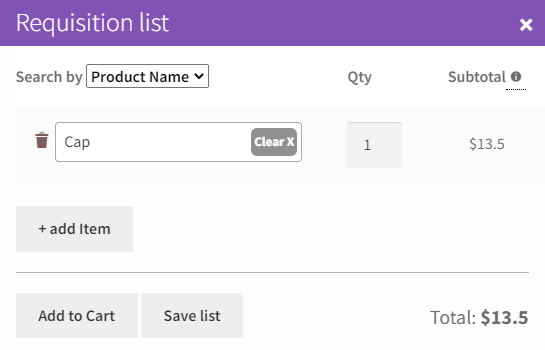
Set the Display prices in the shop option is set to Excluding tax and click on the Save changes button.
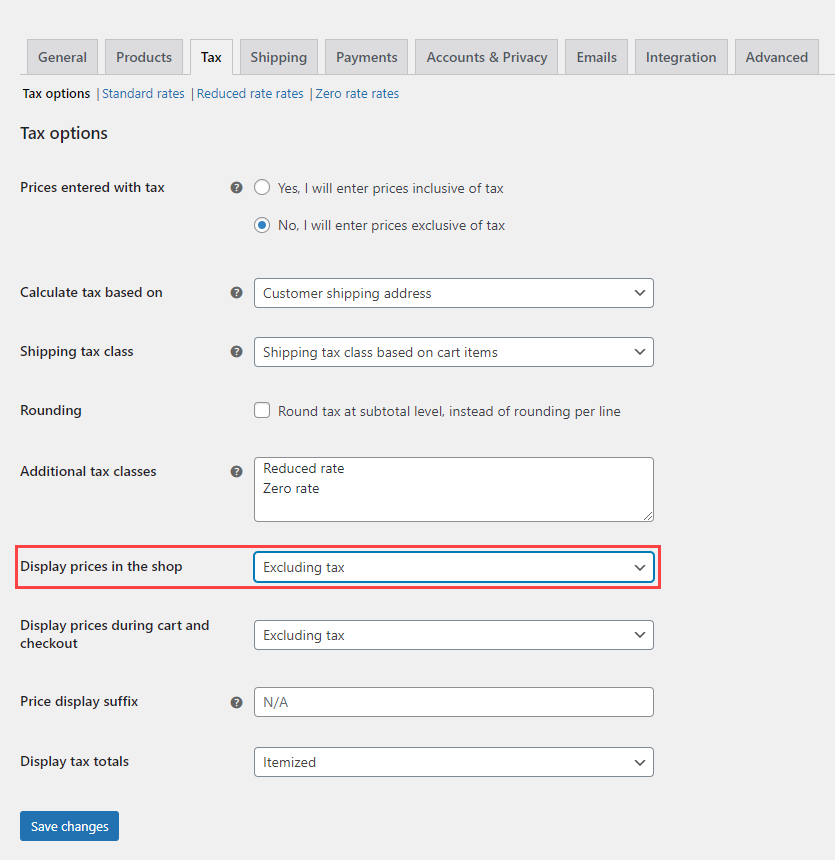
This will allow the plugin to display the subtotal price of each item without tax in the Requisition list.

Requisition List on the cart page #
- Navigate to the Requisition List on the cart page option and checkmark the checkbox to enable the requisition list for the customers on the cart page.
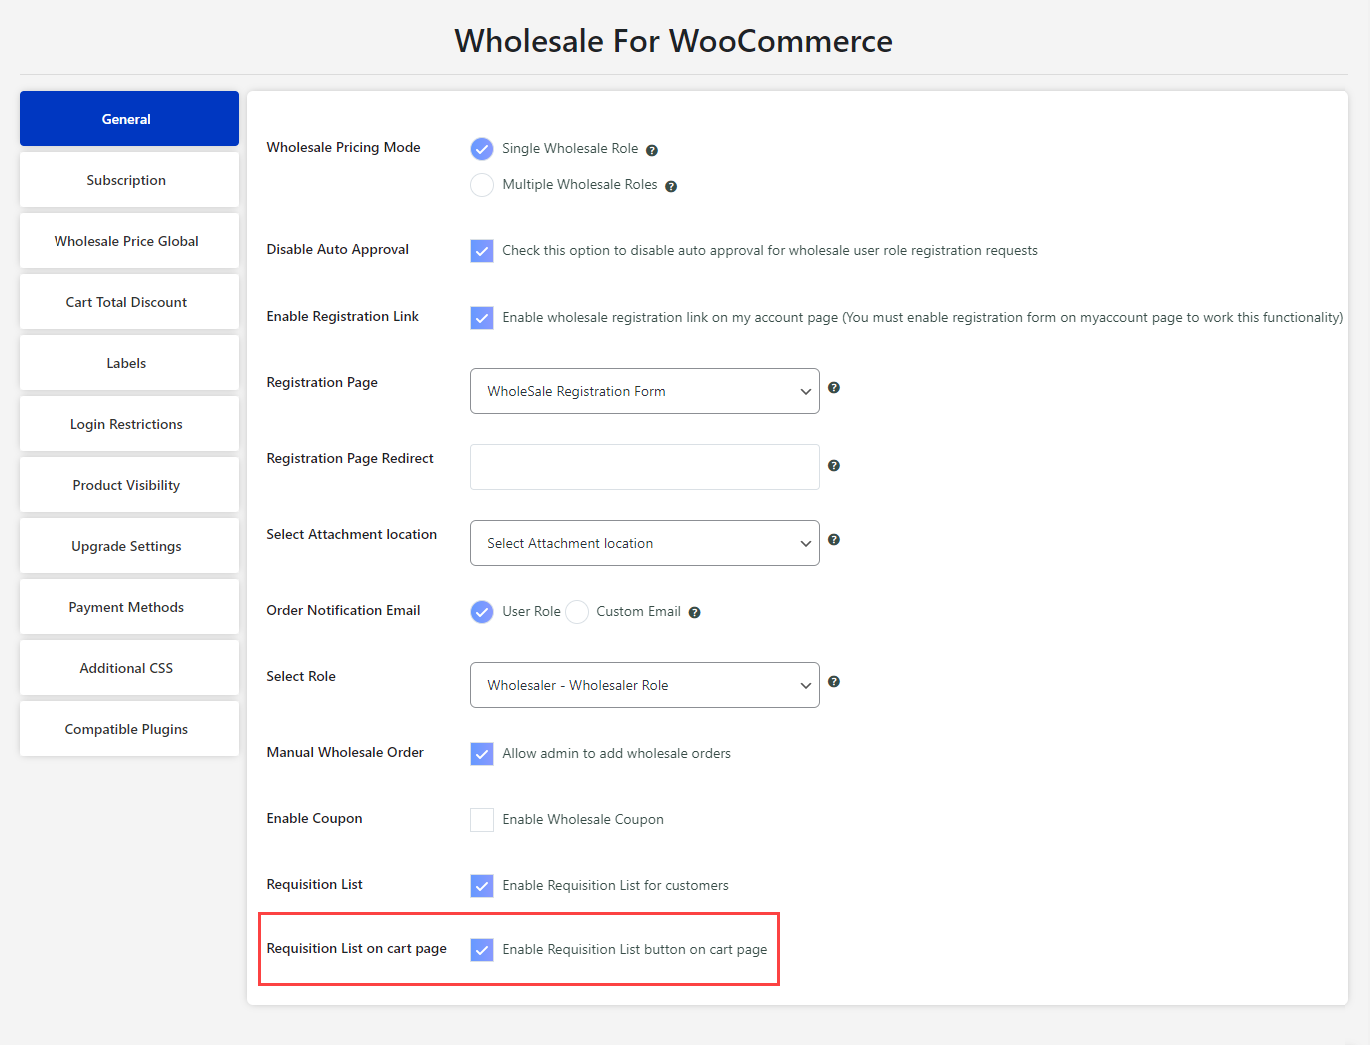
Front-End Impact #
- Go to the website.
- The customer will log in and navigate to the Shop page.
- Select the items from the Shop page according to your requirements.
- Once done, navigate to the Cart page.

- On the Cart page, click the Save as Requisition List button to make a new requisition list containing all the items currently added to your cart.

- A popup will appear, enter the name of the requisition list and then click on the OK button.

- A popup will appear indicating that the requisition list has been added successfully.

- Navigate to the My Account page.
- On the My Account page, navigate to the Requisition List tab.
- The new requisition list created will appear.

- Click on the Open List button against any requisition list.

- All the items added to the cart are not in the new requisition list.

Tax Management #
Enable/disable tax-exemption #
Enable/disable tax exemption for a specific wholesale role or on all roles. Simply select the wholesale role and enable tax exemption. You’ll find these tax-exempt settings in Wholesale user role settings. You can either enable tax-exempt when adding a new wholesale role or edit and enable tax-exempt in the existing wholesale role. If tax exemption is enabled, orders will be placed excluding tax for those customers who are associated with these exempted roles.
How-to-steps – set up tex-exempt settings #
- Go to Wholesale 🡪 User Roles.
- Add a new Role or Edit Existing Role.
- Enable tax-exempt.
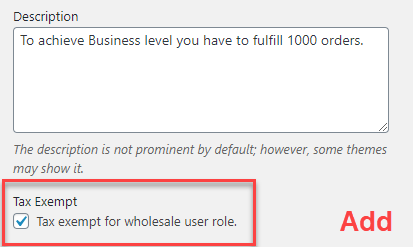
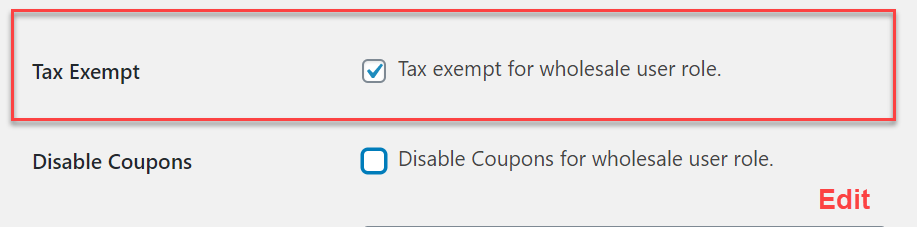
Setting tax type for specific wholesale roles #
- Navigate to WordPress Admin Dashboard → Wholesale → User Roles.

- Now hover on any already existing user roles to view the suboptions.
- Click on the Edit suboption.
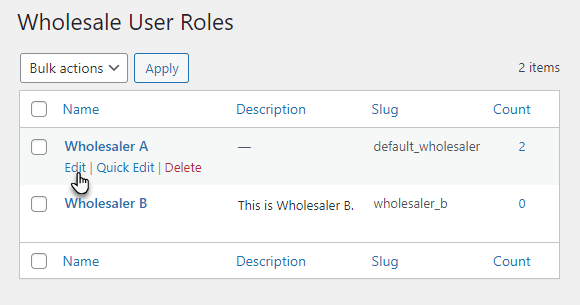
- Once done, you’re on the Edit User Role page.
- Now go to the Tax Class option.
- Select Reduced rate from the dropdown menu.
- Once done, click on the Update button to save your changes.
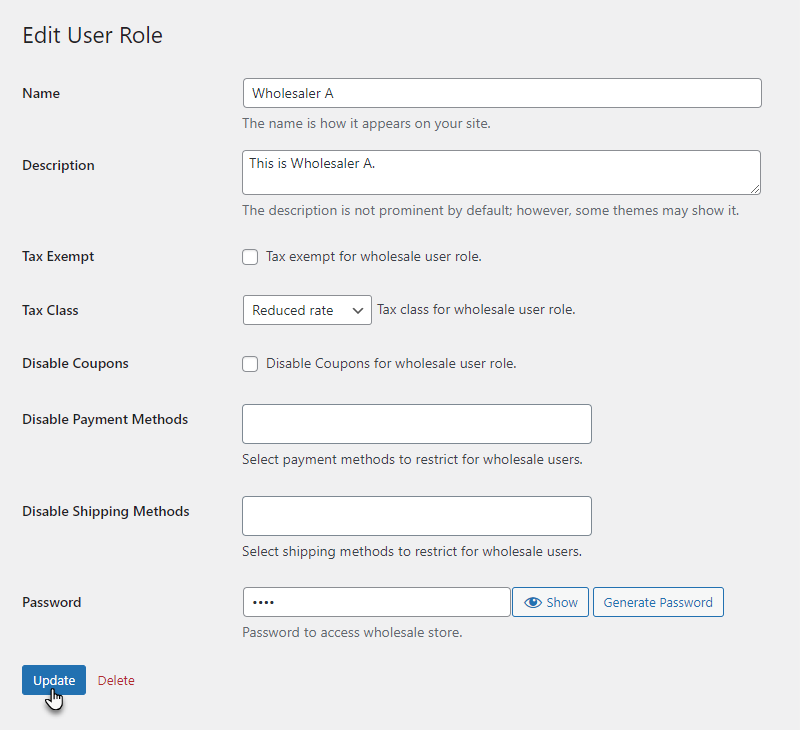
- Now navigate to WordPress Admin Dashboard → WooCommerce → Settings.

- Now navigate to the Tax tab.
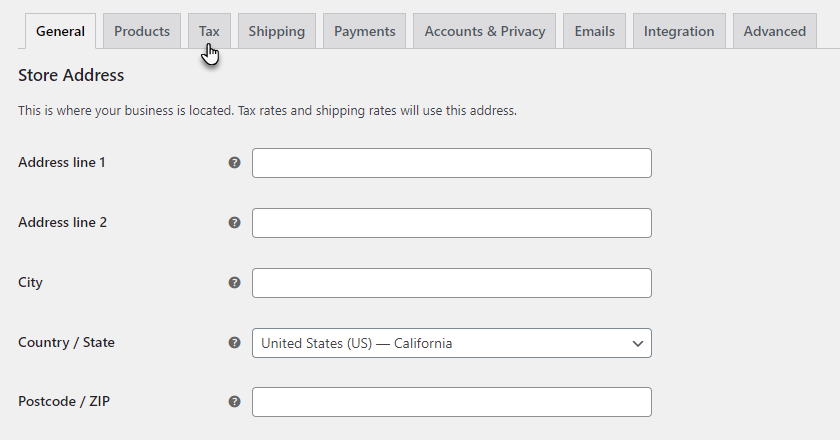
NOTE: If the Tax tab is not visible, navigate to the General tab, checkmark the Enable taxes option in the General options section, and click on the Update button.
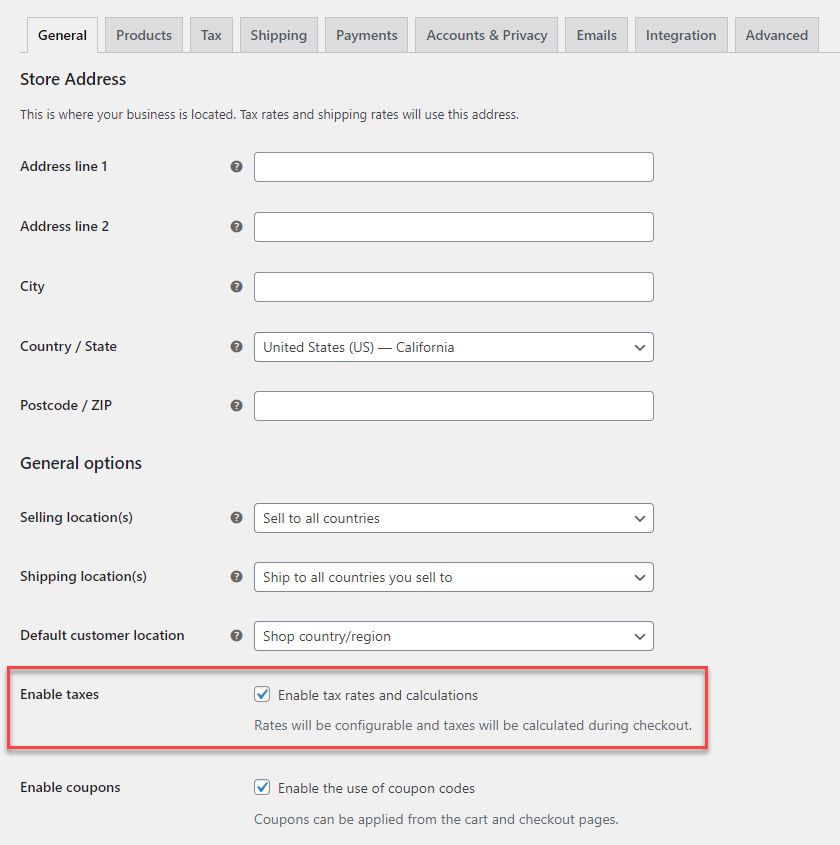
- Now navigate to the Reduced rate rates subtab.
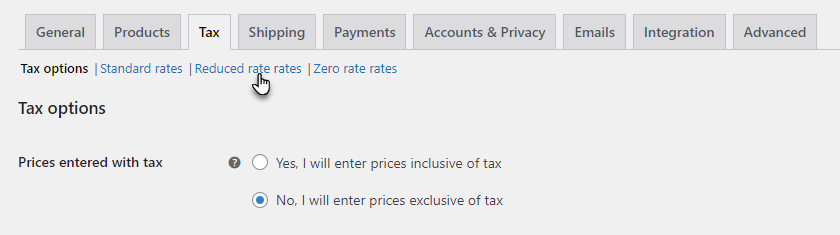
- Click on the Insert row button.
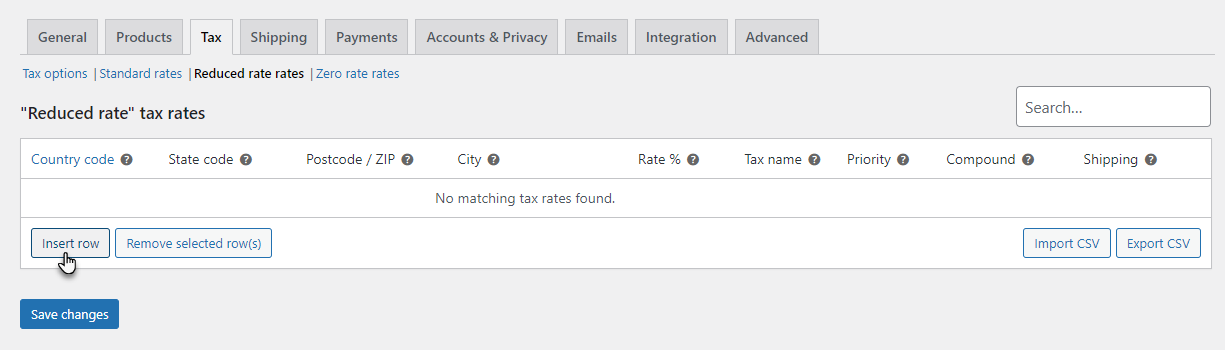
- Enter the credentials according to your requirement.
- Once done, click on the Save changes button.
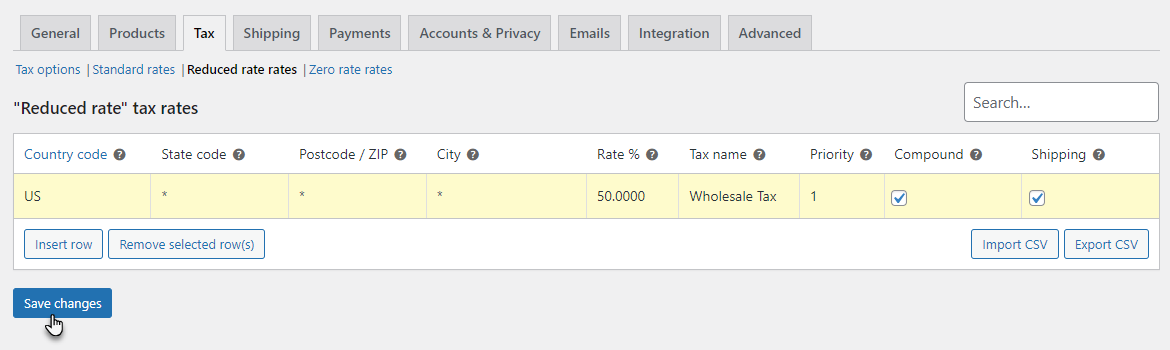
Front-End Impact #
- The user will go to the website.NOTE: In the previous images, we indicate that we have set the Reduced rate in the Tax Class option in the Wholesaler A configuration. The tax will be only applicable to the user having the user role Wholesaler A.
- The user will visit the shop page.
- The user will click on the Add to Cart button against any product.
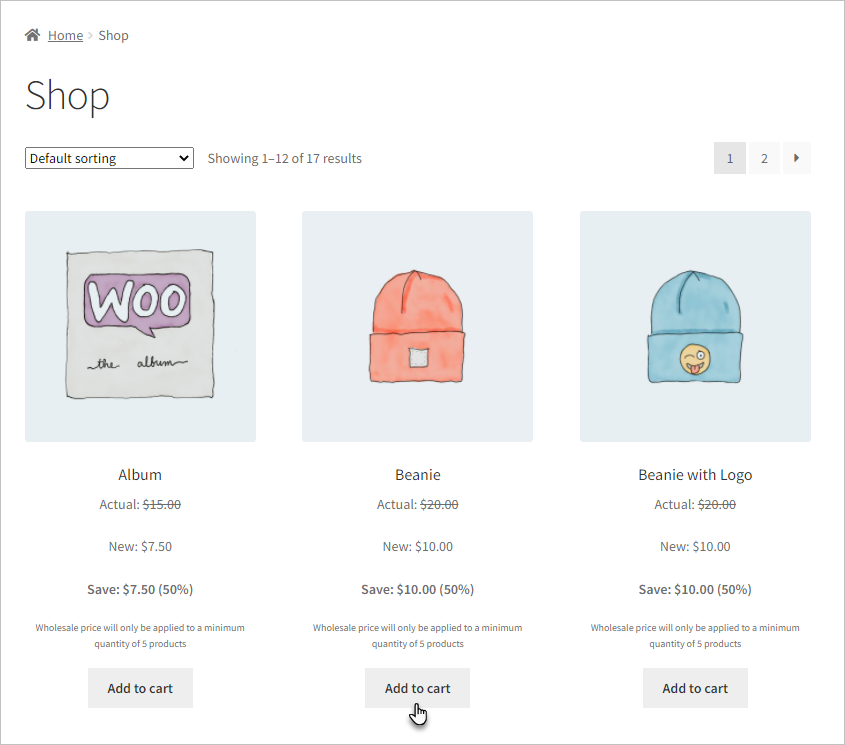
- Now the user will click on the View Cart button.

- Once the user is on the Cart page, the Wholesale Tax will be mentioned in the Cart totals section.
NOTE: In the previous images, we can see that the Reduced rate which was applied had Rate% of 50%. According to the Reduced rate, the calculation Subtotal = $50, so the 50% of $50 will be $25, so the Tax added $25. - Navigate to the Checkout page.

NOTE: The Tax will be applied irrespective of whether the Wholesaler Rule is applied.
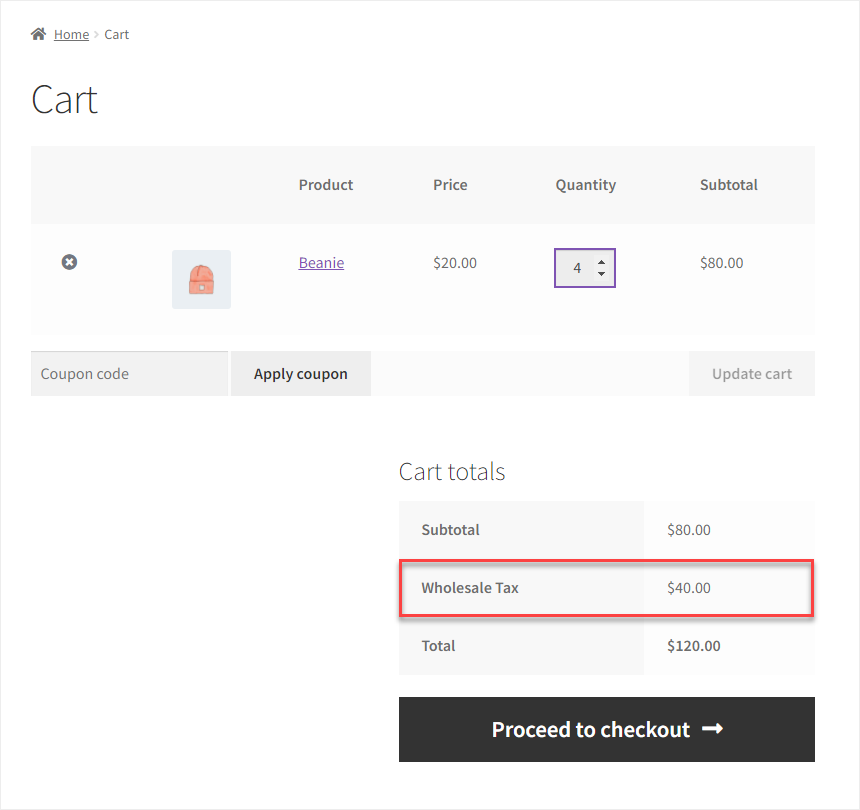
- The Tax is also mentioned in the Your order section on the Checkout page.
- Click on the Place order button.

- The Tax is also mentioned on the Edit order page.

Shipping and Payment Gateway Management #
Enable/disable payment methods #
Restrict your wholesale customers on using particular payment gateways (conditional payment gateways) such as PayPal or Cash on Delivery method when ordering. You can enable conditional payment gateway options for a specific wholesale role or all.
This option is useful when you are dealing in multiple locations where certain payment gateways are not supported.
How-to-steps – set up payment gateway settings #
- Go to Wholesale 🡪 User Roles.
- Add a new Role or Edit Existing Role.
- Enter payment gateways you want to disable for this user role.
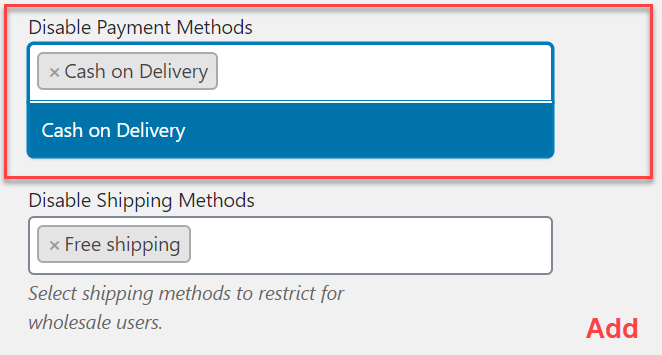
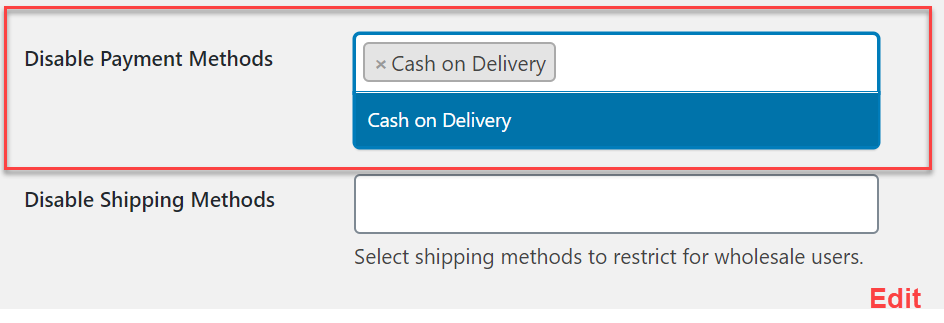
Enable/disable shipping methods #
Restrict wholesale users to use particular shipping methods. Different shipping methods can be set for different wholesale customers with different shipping rates. The shipping methods you restrict will not be visible to wholesale customers at the checkout.
How-to-steps – set up shipping method settings #
- Go to Wholesale 🡪 User Roles.
- Add a new Role or Edit Any Existing Role.
- Enter shipping methods you want to restrict for that role.
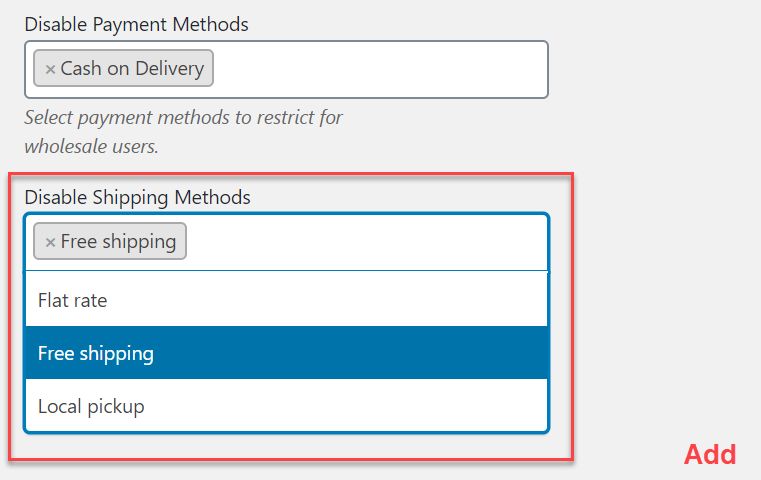

Add custom payment methods #
The intent of adding a payment method is to allow users to introduce customized payment methods.
How-to-steps – set up custom payment methods #
- The administrator would be able to activate/deactivate and add/remove payment methods from Wholesale → Settings → Payment Methods.
- In the payments tab, there’s enable checkbox. The administrator will select the checkbox to enable payment methods. These are payment methods created to facilitate the customer.
- Navigate to WordPress Admin Dashboard → Wholesale → Dashboard.

- Now you’re on the Wholesale For WooCommerce Settings page.
- Go to the Payment Methods tab.
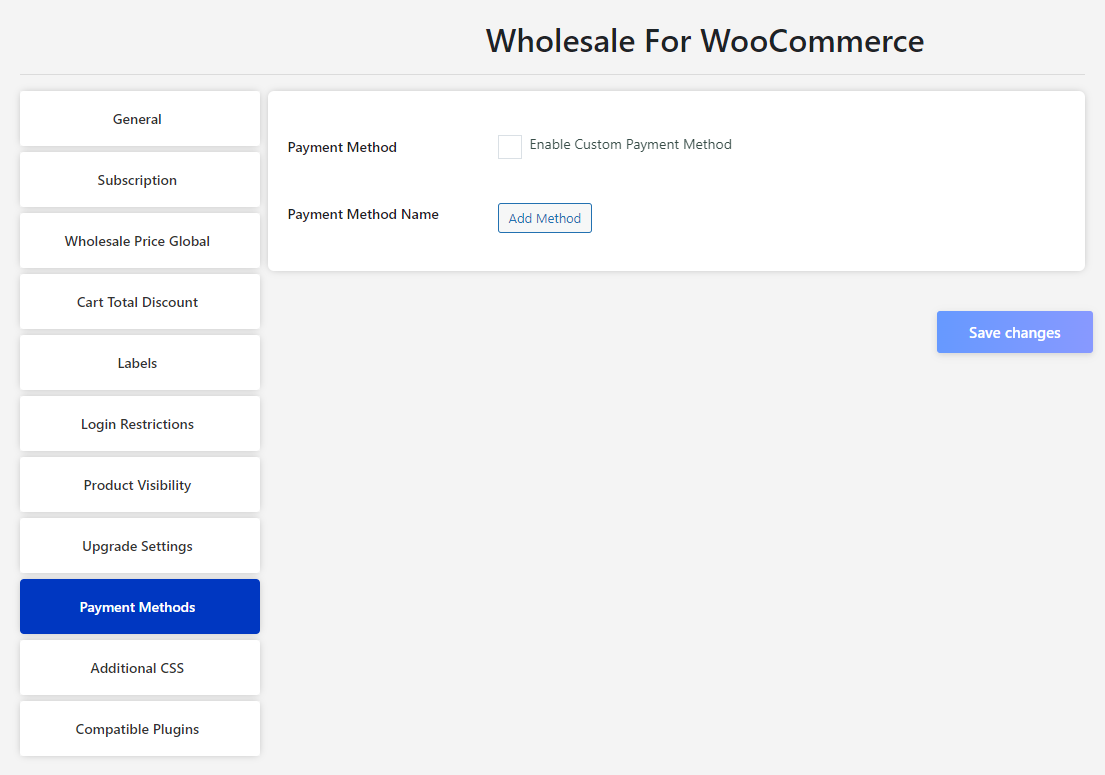
- Checkmark the Enable Custom Payment Method checkbox in the Payment Method option.
- Click on the Add Method button in the Payment Method Name option.

- Click on the Add Method button in the Payment Method Name option.

- Click on the Save Changes button.
- Similarly, you can add different Payment Methods according to the requirement.

- Once done, navigate to the WordPress Admin Dashboard → Wholesale → User Roles.

- Now hover on any already existing user roles to view the suboptions.
- Click on the Edit suboption.

- Once done, you’re on the Edit User Role page.
- All the Payment Methods configured in the Wholesale Settings page will appear on the Edit User Role page.

- Checkmark the checkbox to select the specific payment methods for the user role.
- Click on the Update button to apply your settings.
- Once done, you’re on the Edit User Role page.
NOTE: All the custom payment methods added in the Wholesale → Settings → Payment Methods will appear in the WooCommerce → Payments.

Frontend Screenshots #
- A user with the user role Wholesaler A (because the configuration was done for user role Wholesaler A) will log in to the website.
- The user will visit the shop page.
- The user will click on the Add to Cart button against any product.

- Now the user will click on the View Cart button.

- Navigate to the Checkout page.
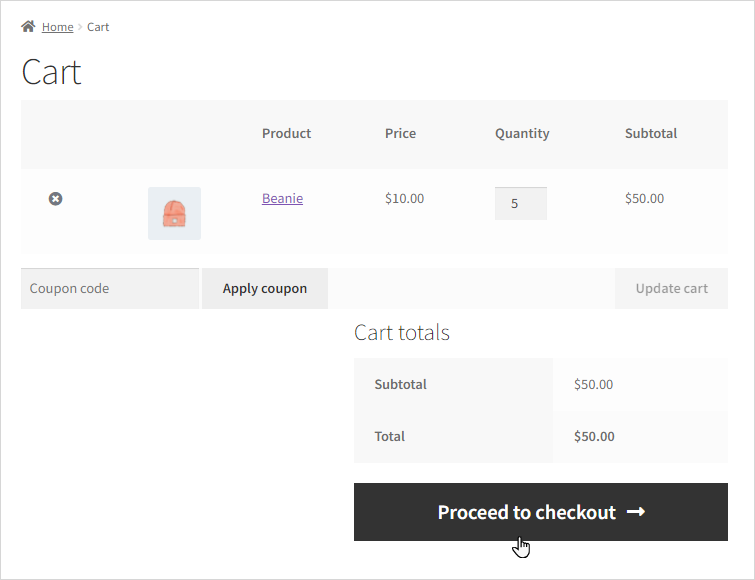
- Since we only added the Mobile Payment payment method for Wholesaler A on the Edit User Role page, only it will appear on the Checkout page.
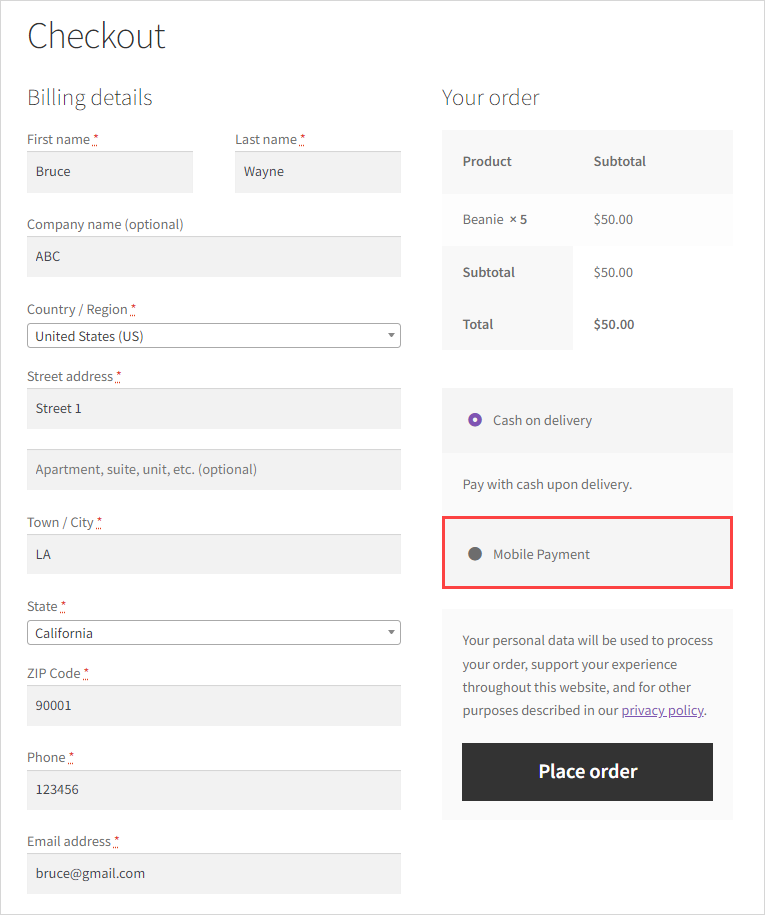
- Select the Mobile Payment payment method and click on the Place order button.
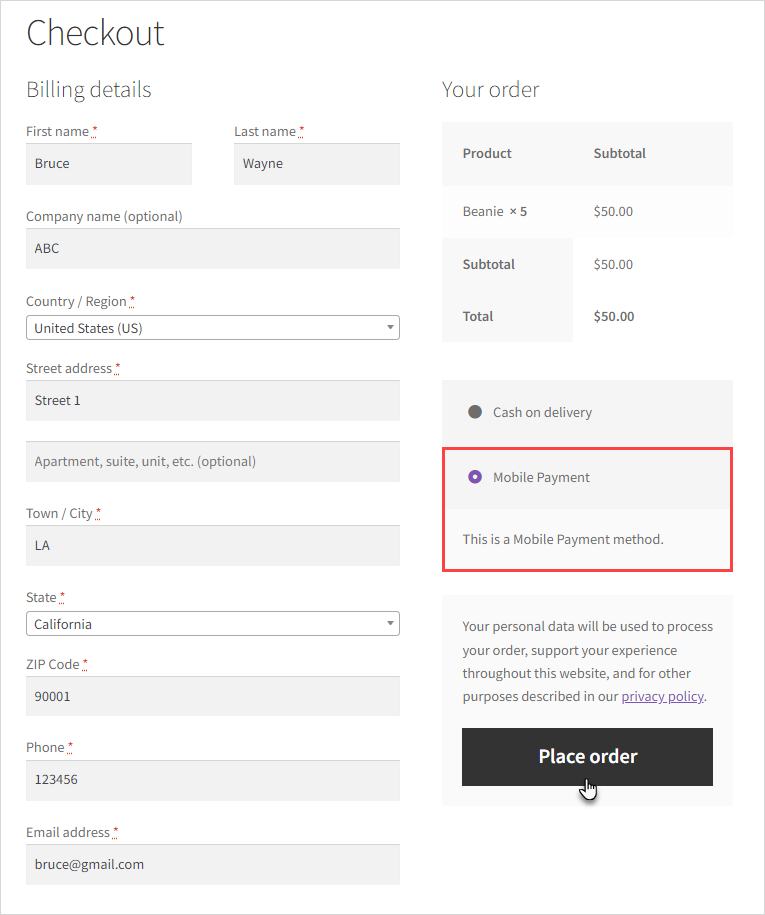
- Your order will be placed using the Mobile Payment payment method.

- An email will be sent to the user, and the custom payment method will be mentioned in the invoice.

Wholesale order filters #
Wholesaler/Non-Wholesaler Orders Filters #
In this feature, Orders will split into two categories Wholesalers Orders and Non- Wholesaler Orders, this feature allows the admin to categorized both orders using filters on a page so the admin will not be confused in the orders page which orders are from wholesale customer and which are from normal customers.
All the orders are organized through filters, admin can see both Wholesaler and Non-Wholesaler orders using filters
How-to-steps – set up wholesaler/non-wholesaler order filter #
- Go to WooCommerce > Orders
- Click on the Filters dropdown
- Choose between two options (wholesaler and non-wholesaler) to filter your orders

Customization options #
How-to-steps – customize wholesale price labels #
1. Wholesale Settings 🡪 Price labels.
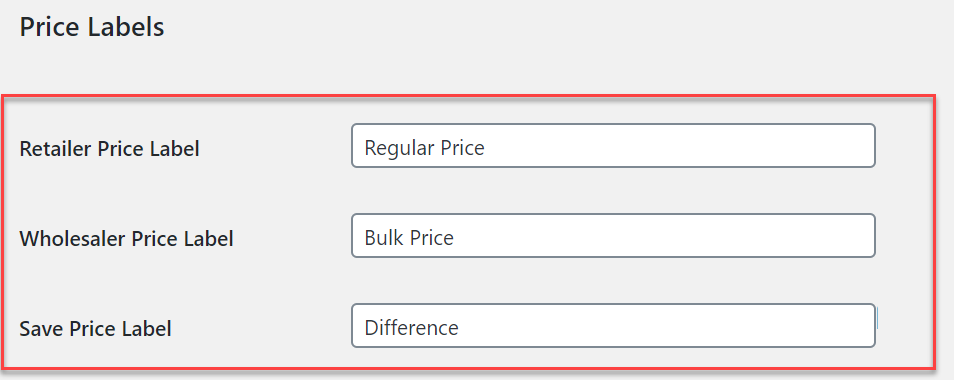
How-to-steps – Styling #
You have the option to insert custom CSS for styling of the registration page.
You can find this in Settings under the Additional CSS section.
Please enter the CSS script without the style tag.

How-to-steps – Create custom labels #
Custom Label option is also available for registration form fields. You can set the field labels of every field in the forms.
- Go to Wholesale 🡪 Registrations and set labels.
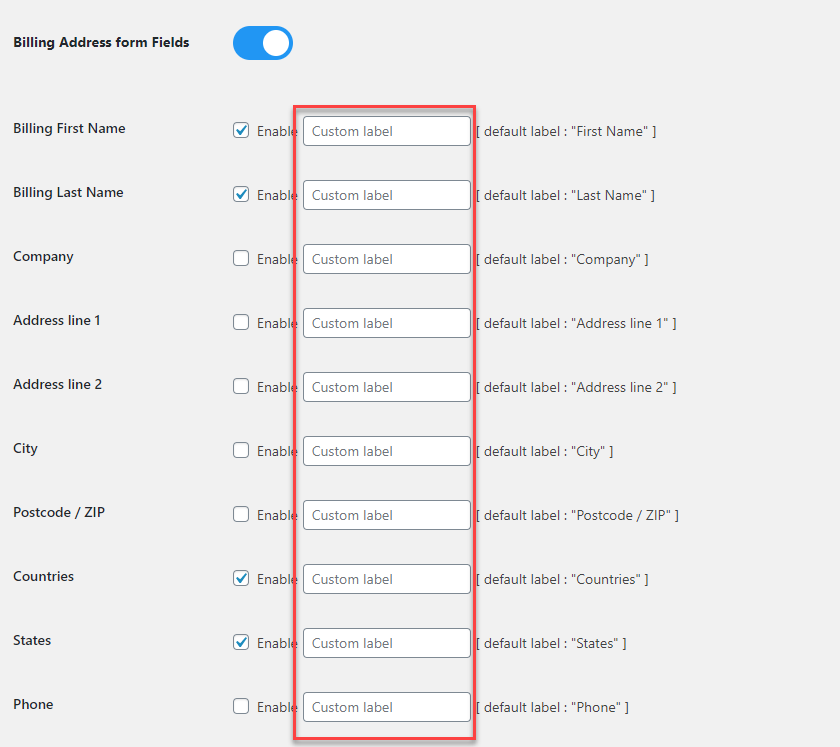
Compatibility and integrations #
Wholesale for WooCommere works with the following plugin. Please go through the compatibility section of each plugin because Wholesale for WooCommerce doesn’t provide deep integration so it may not work 100% with the plugins mentioned in the compatibility section.
Bulk Order Form for WooCommerce #
Wholesale for WooCommerce works with Bulk Order form for WooCommerce which allows wholesale customers to add products to their cart from a tabular form in just a few clicks. Retail customers will see regular prices and wholesale customers will see wholesale prices in the bulk order form.
Create one-page wholesale bulk order forms with Bulk Order Form for WooCommerce. Create simple, flexible, and responsive product tables with the power to add the following options (search fields, sorting, pagination, filters, and more).
WooCommerce Subscriptions (with Limitations) #
WooCommerce Subscriptions give you the ability to create Variable Subscriptions with corresponding attributes.
- Enable customers to subscribe to a given role.
- Customers are allowed to upgrade and downgrade between different subscription products.
- Create multiple variations to a variable subscription product.
- Customer’s wholesale role changes automatically depending on their choice of different subscription packages defined by the admin.
- Change subscription price on each variation, e.g., Sign up fee, Subscription price, Free Trial, e.t.c.
- Canceling a Subscription will automatically revert your customers to a default role.
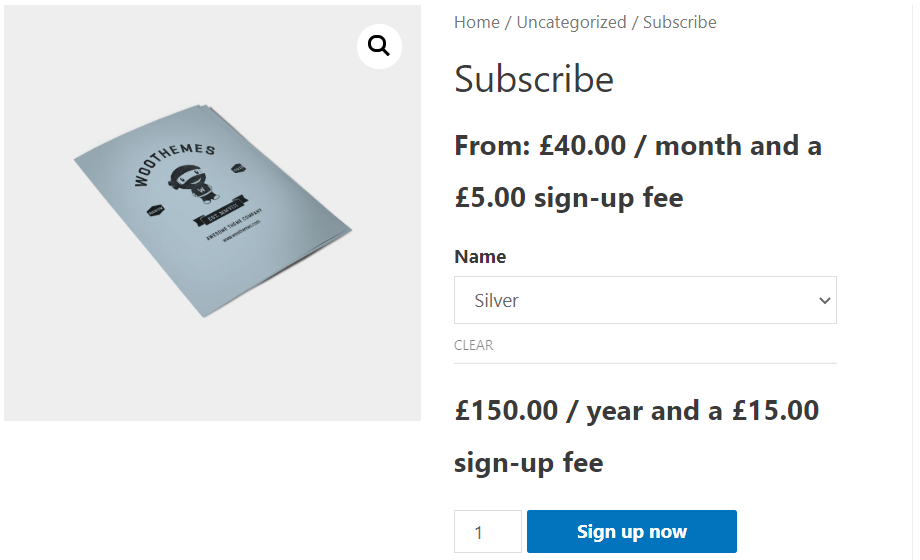
Bulk Shop for WooCommerce (with Limitations) #
The Bulk Shop for WooCommerce extension makes it fast to bulk shop products and variables using a responsive table. Features include: Dynamic pricing, manage donation lists using Name your price extension, display products in a list view, and more.
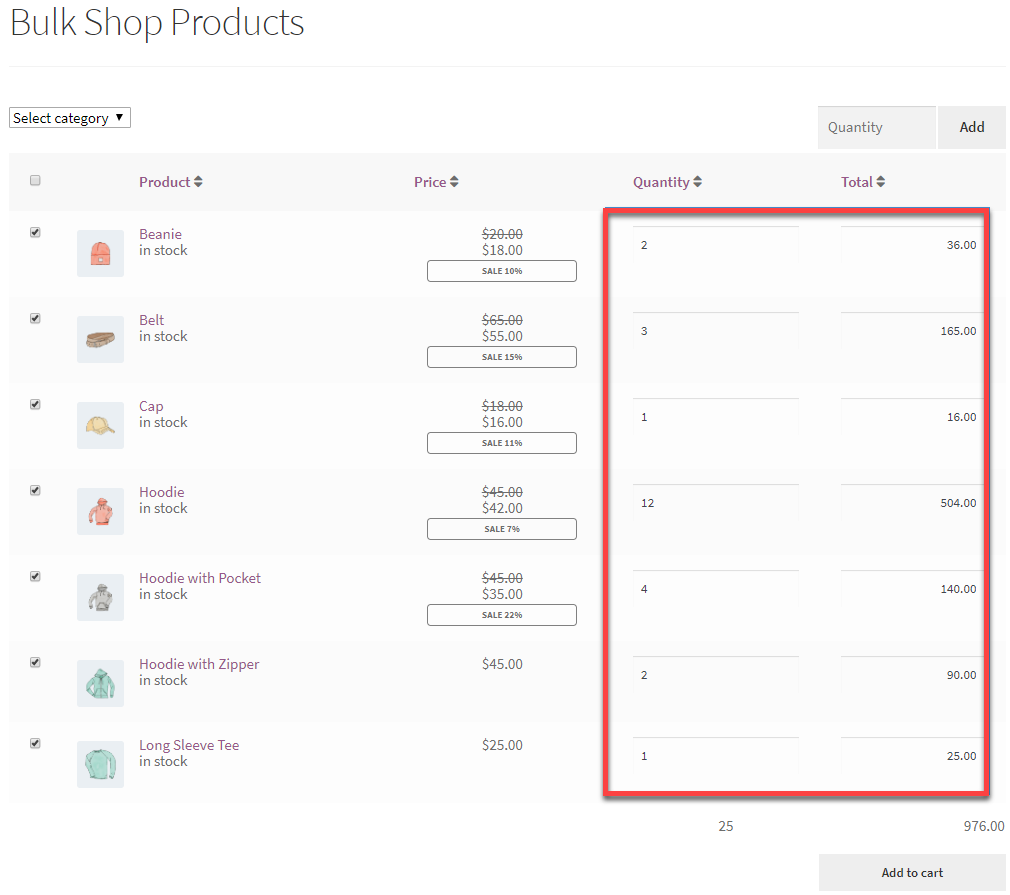
Bulk Variation Forms (with Limitations) #
WooCommerce Bulk Variation Forms allows your users to add multiple variations of a product to their cart from a single form. Easily configure products that have two variation attributes for bulk input.
- Wholesale amount fields
Do not use the “$” sign when creating a wholesale amount, otherwise, it will display $0.00.
- Variable Products
Minimum quantity text will not display on the shop page for variable products. This is mainly because it is not possible to display each variation’s minimum quantity text on the shop page (all at the same time).
- Registration with the same username
Do not register with a username that already exists in the database, otherwise, an error message will be displayed: “Username already exists”.
- Backend access for shop manager(s) or any other wholesale roles
You can give access to shop Manager(s) and any other roles with the PublishPress Capabilities plugin.
- Manual orders
Currently, Admin cannot create manual orders with wholesale prices from WooCommerce Orders.
Back-end

Front-end

WooCommerce Pre-Orders #
You can Set up pre-orders in your WooCommerce store, so customers can order products before they’re available for the general masses.

Compatible with Currency Switcher For WooCommerce #
Currency Switcher for WooCommerce is a widget that allows visitors to switch between currencies according to their Location. The Geo-Location IP feature allows the currency on your website to automatically change as per the customer’s current location.
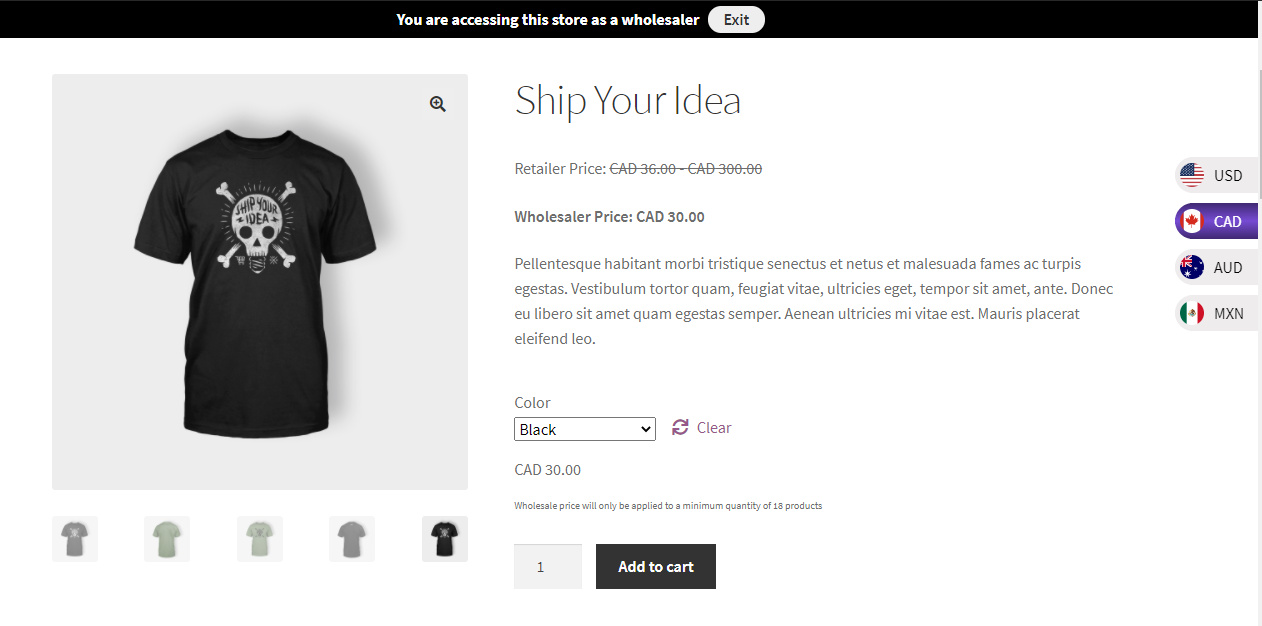
Compatible with Quote For WooCommerce #
Quote for WooCommerce extension adds a Request-A-Quote button to shop, product, or cart pages. It is ideal for B2B and wholesale customers who expect to negotiate for the best possible prices, discounts, and coupons when they buy in large quantities.
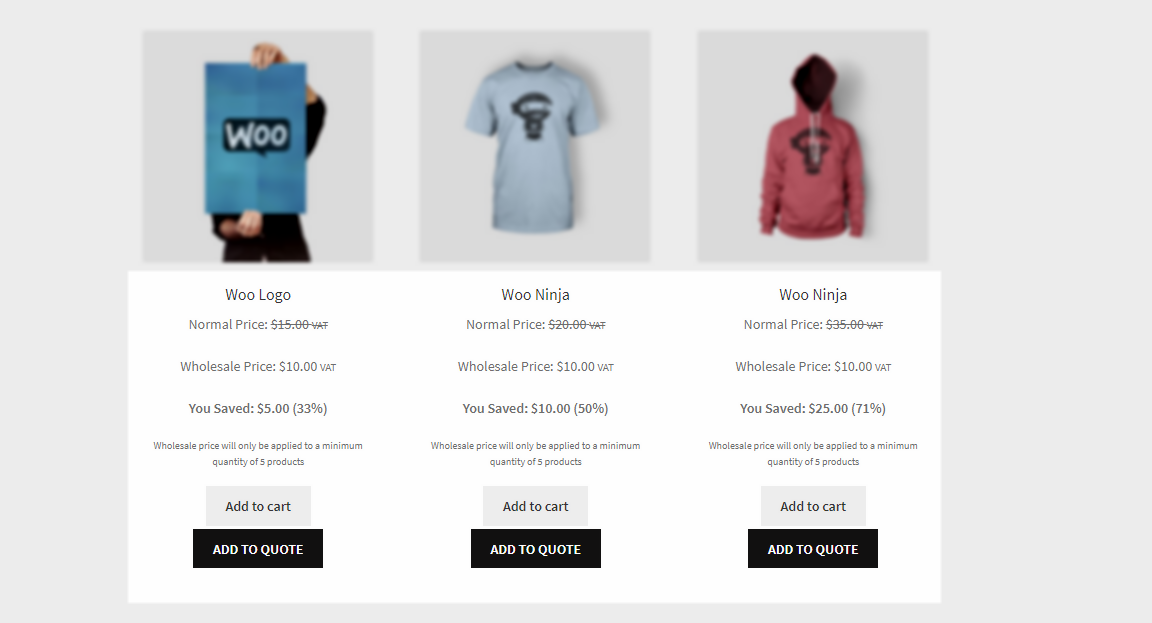
Compatible with Invoice Payment Gateway for WooCommerce #
Wholesale for WooCommerce is fully compatible with Invoice Payment Gateway for WooCommerce that allows wholesale customers to pay with an invoice instead of immediate payments. Wholesale customers who opt to choose Invoice Payment Gateway as their payment option will receive an order email with a PO number.
When the admin completes their orders, the wholesale customer will receive the invoice number. Invoice Payment Gateway works by selecting specific wholesale roles from invoice payment gateway settings.
How-to-steps – Enable Invoice Payment Gateway for specific user roles #
- Go to WooCommerce > Settings > Payments
- Select Wholesale roles from Enable for Specific Roles
- Login with Wholesaler account then select wholesale product
- Go to the Checkout page
- On the checkout page, you will see the invoice payment option
Compatible with Product Bundles #
WooCommerce Product Bundles allows you to group existing simple, variable, and subscription products — and sell them together.
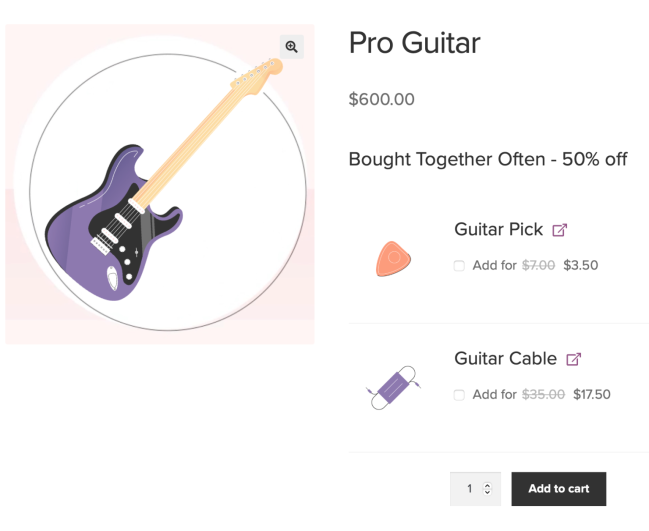
Compatible with Product Add-Ons #
WooCommerce Product Add-ons allows your customers to personalize products while they’re shopping on your online store. Offer add-ons like gift wrapping, special messages or other special options for your products
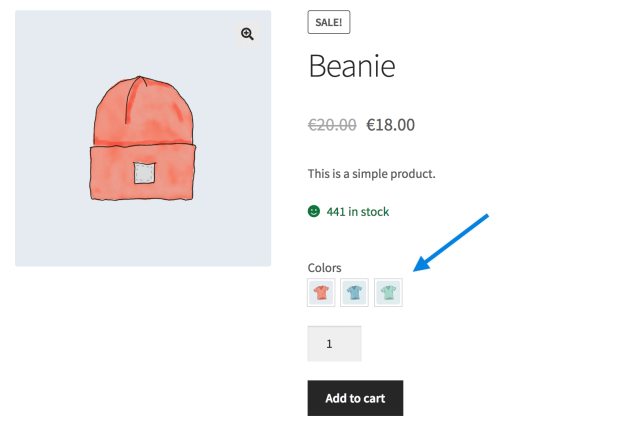
Compatible with Product Vendors #
WooCommerce Product Vendors turns your store into a multi-vendor marketplace. You can assign existing products to Vendors or they can add and edit their own.

Compatible with reCaptcha for WooCommerce #
reCaptcha V2 (checkbox) #
- Go to Admin Dashboard > Wholesale > Settings.
- Navigate to the reCaptcha tab.
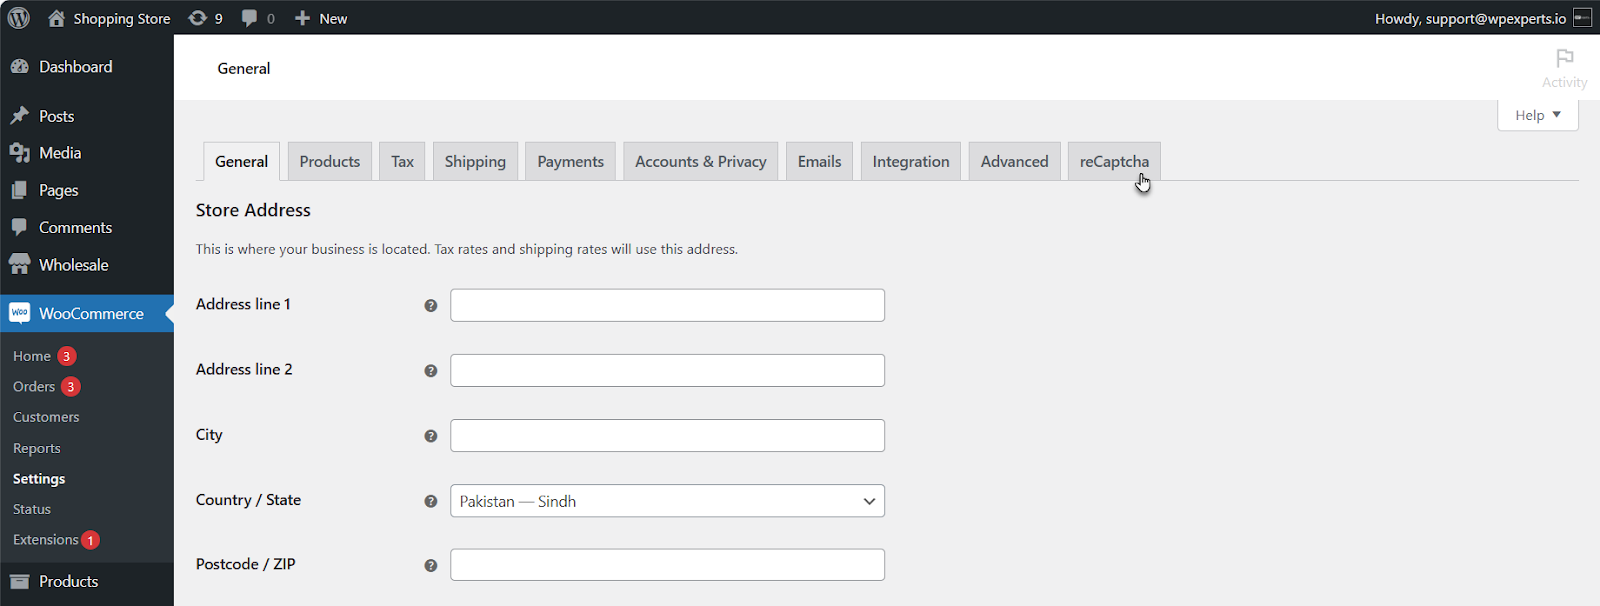
- Click the reCaptcha V2 (checkbox) button.
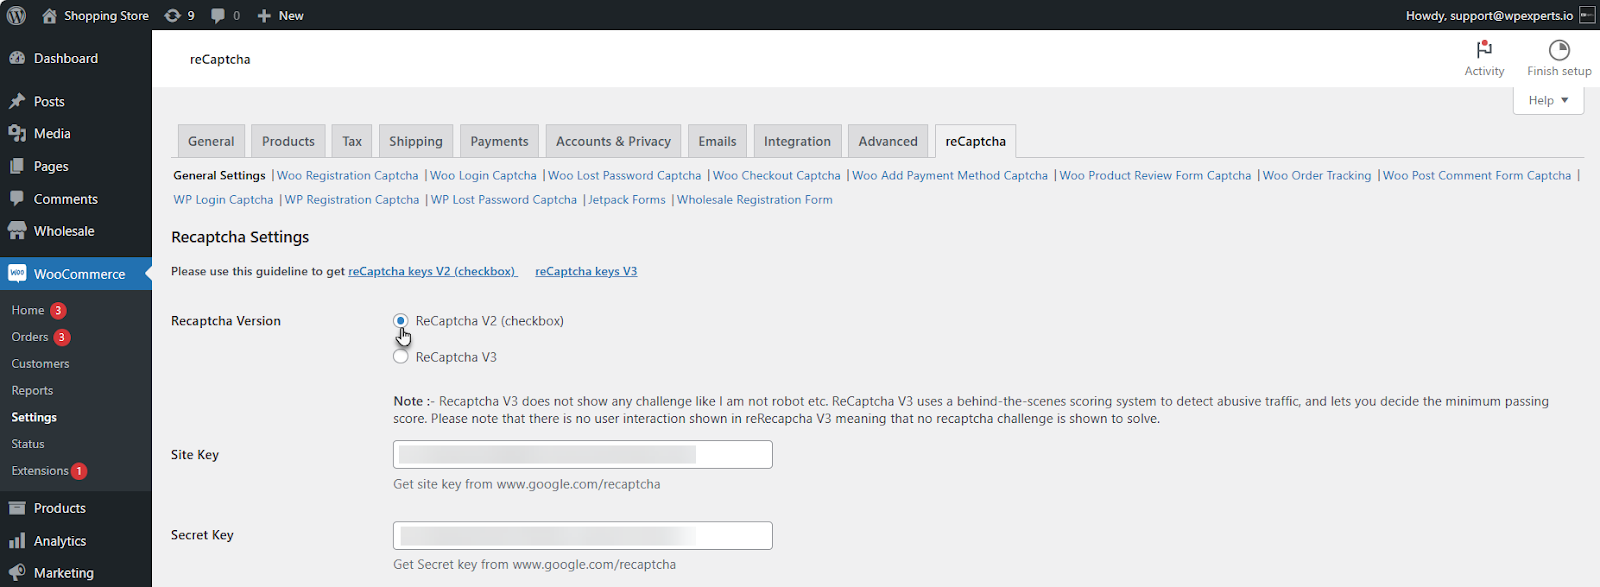
- Now click the Wholesale Registration Form subtab.

- Click the Enable reCaptcha on Wholesale Registration Form button.
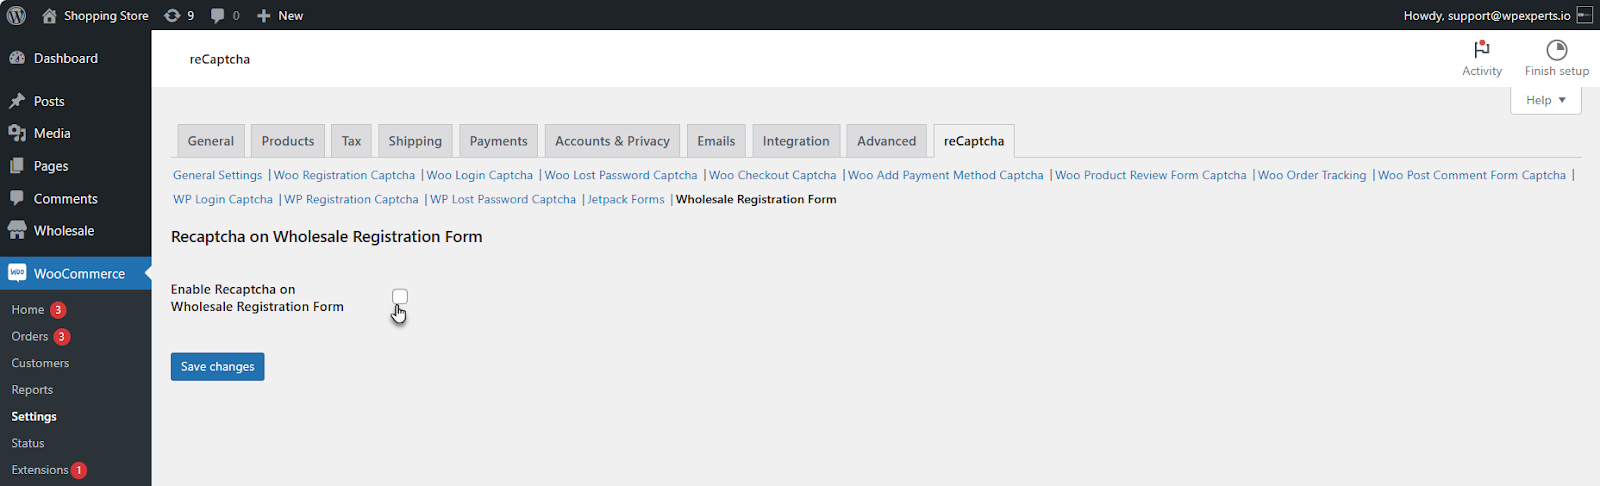
- Click the Save Changes button.

How-to-steps – Configure reCaptcha settings #
- reCaptcha Site Key
- The Administrator will need the reCaptcha Site Key in order to activate reCaptcha.
- reCaptcha Secret Key
- The Administrator will need the reCaptcha Secret Key in order to activate reCaptcha.
- Go to https://www.google.com/reCaptcha/about/
- Click on the v3 Admin Console button.
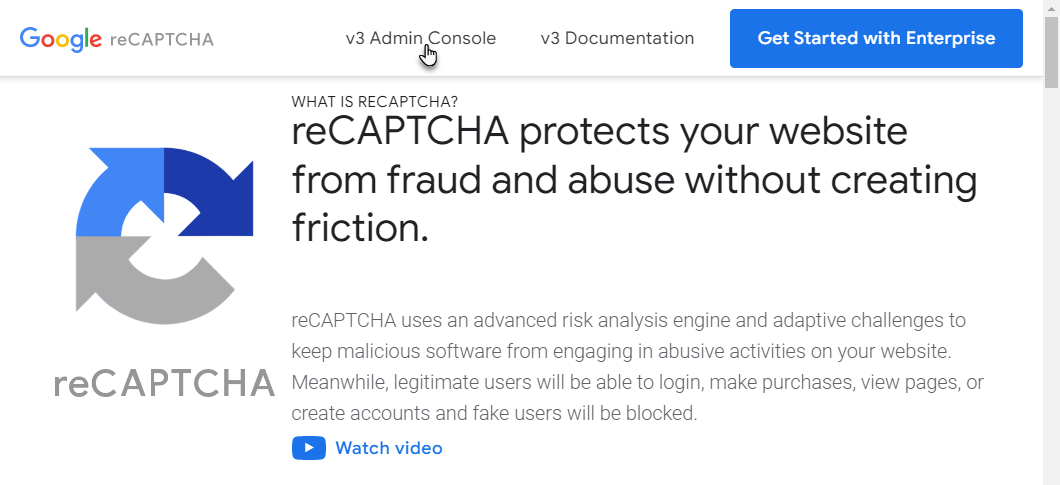
- Once done, you’re on the Register a new site page.
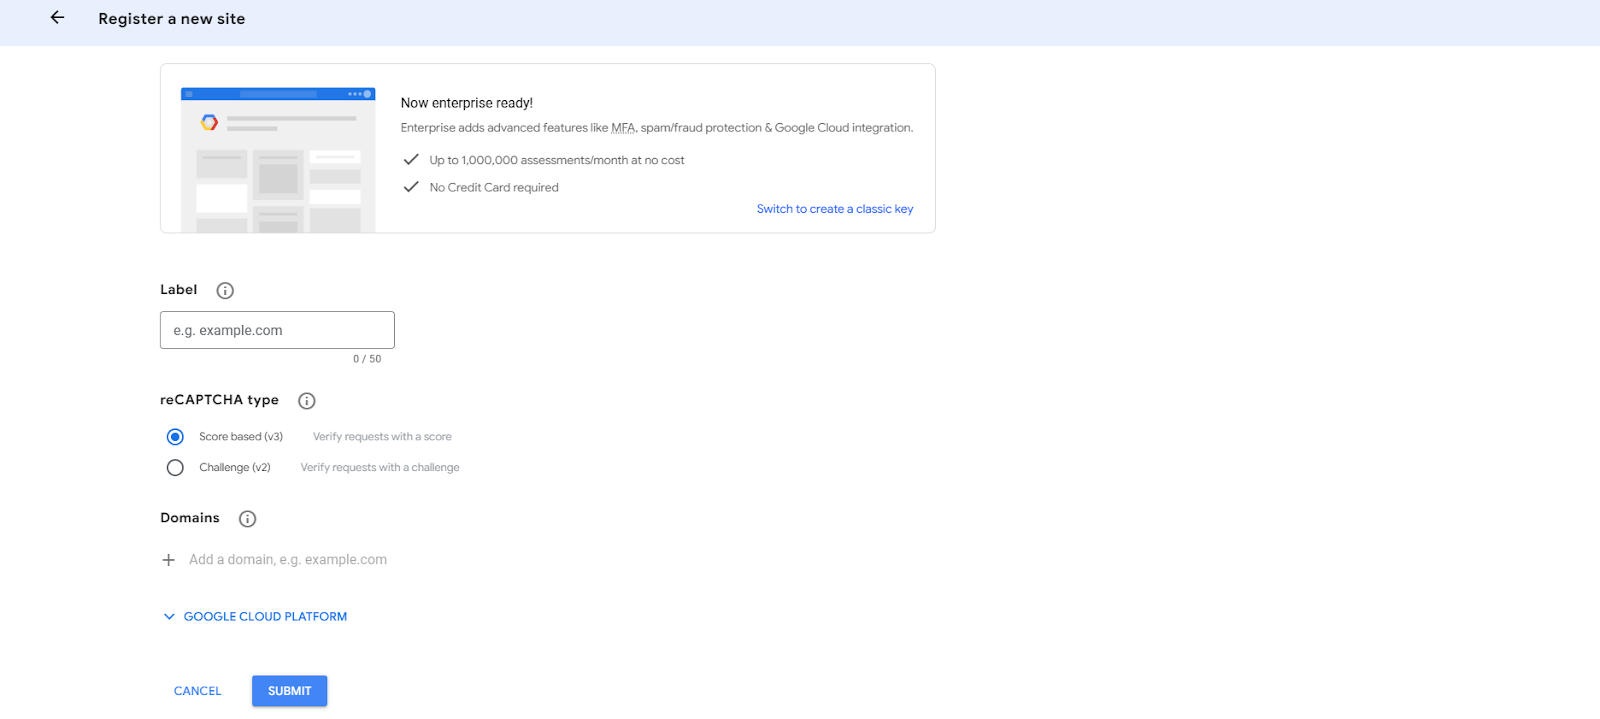
- In the reCaptcha type option, choose Challenge v2.
- Choose the “I’m not a robot” Checkbox option.
- Enter the required fields and click on the SUBMIT button.
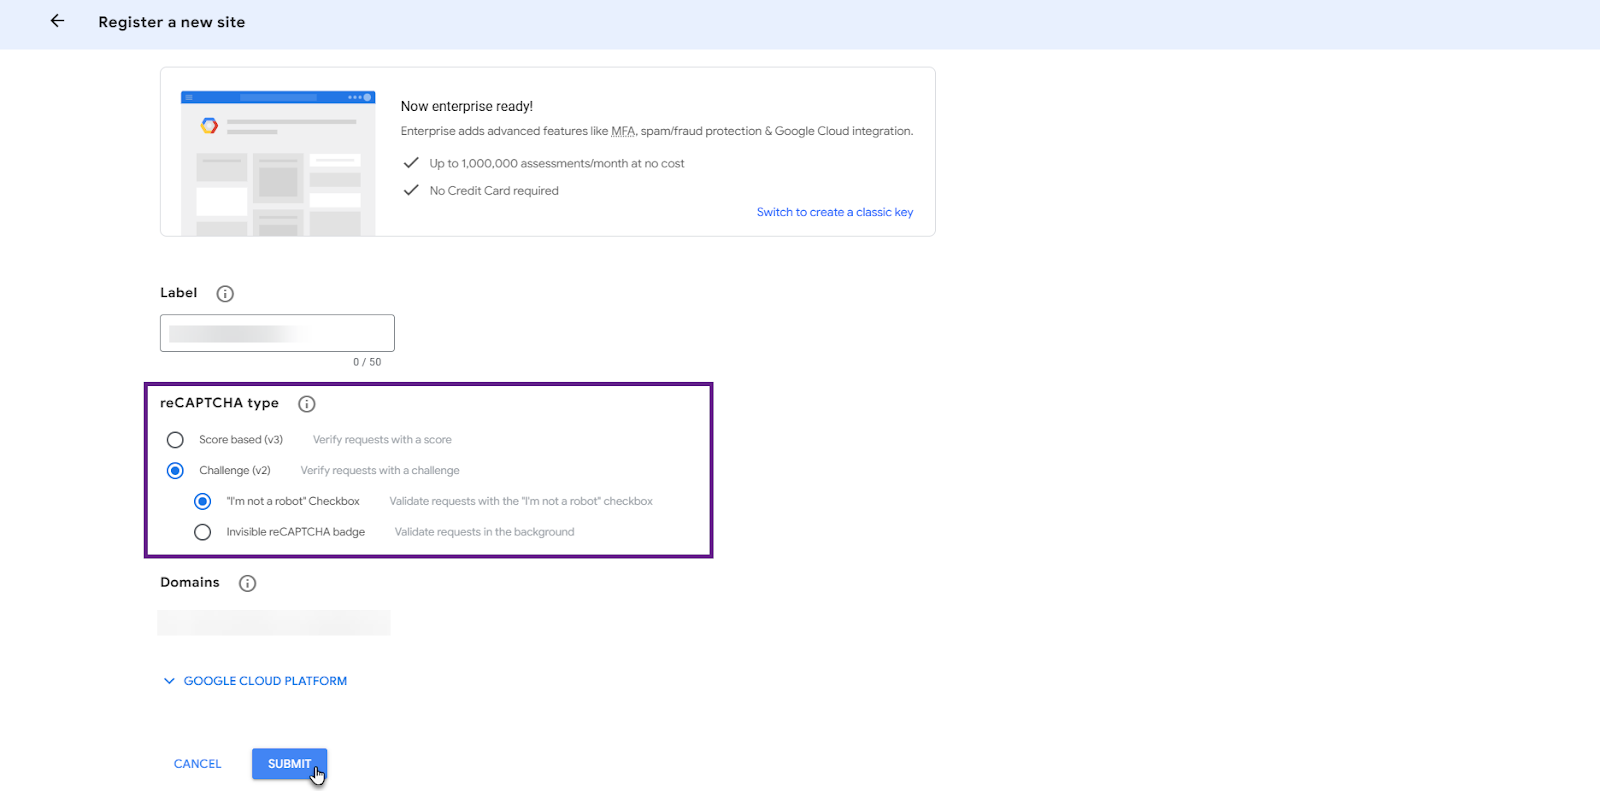
- Once done, the SITE KEY and the SECRET KEY will appear.
- Copy the SITE KEY and SECRET KEY.
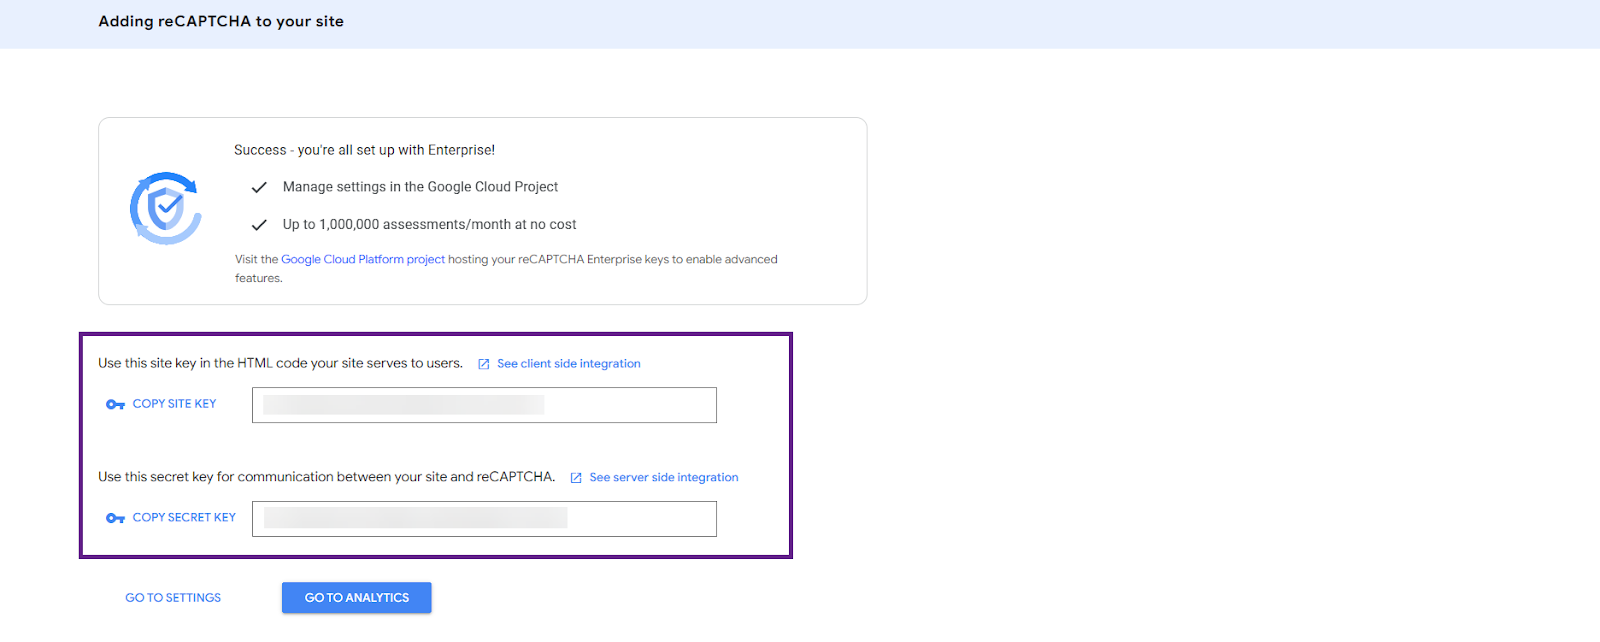
- Now go to Admin Dashboard > WooCommerce > Settings.
- Navigate to the General Settings subtab.
- Enter the Site Key and the Secret key in the Site Key and Secret key options respectively.
- Click the Save changes button.
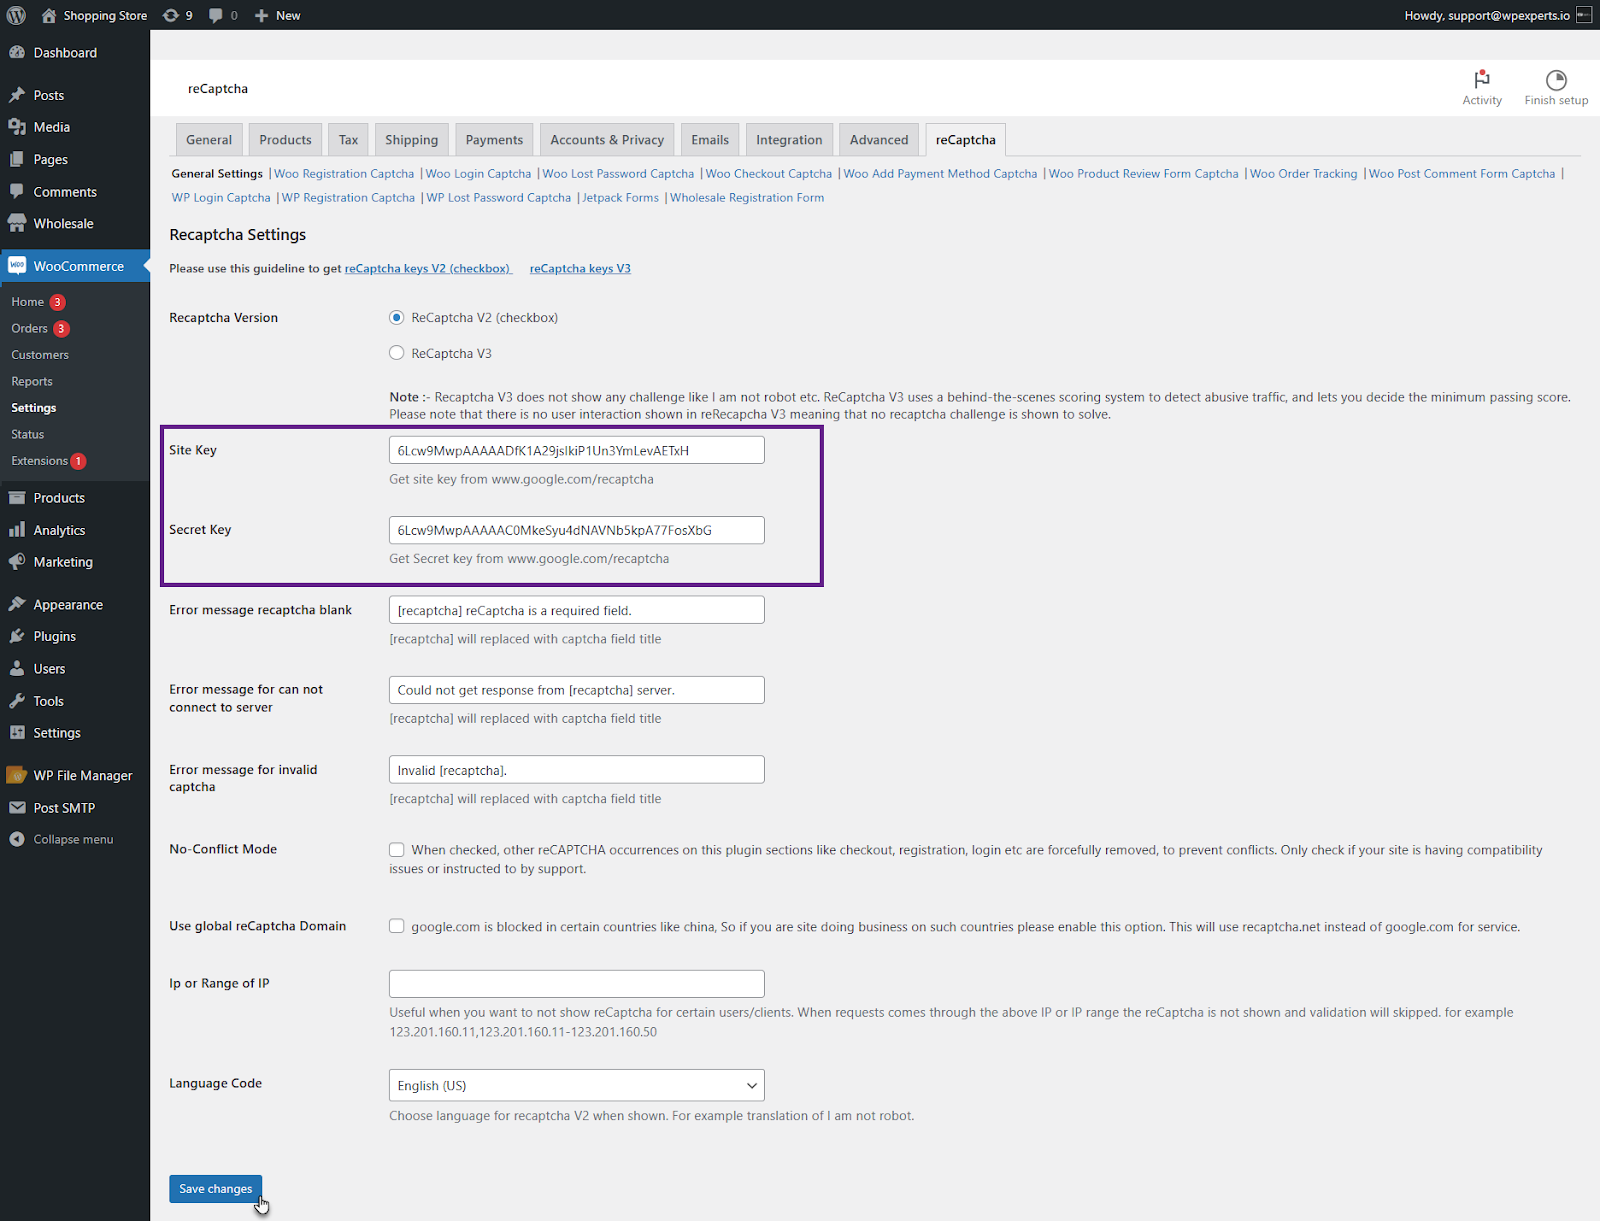
Front-End Impact #
- Go to the website
- Navigate to the Wholesale Registration page.
- As you can see, V2 reCaptcha is now visible on the Front-End.
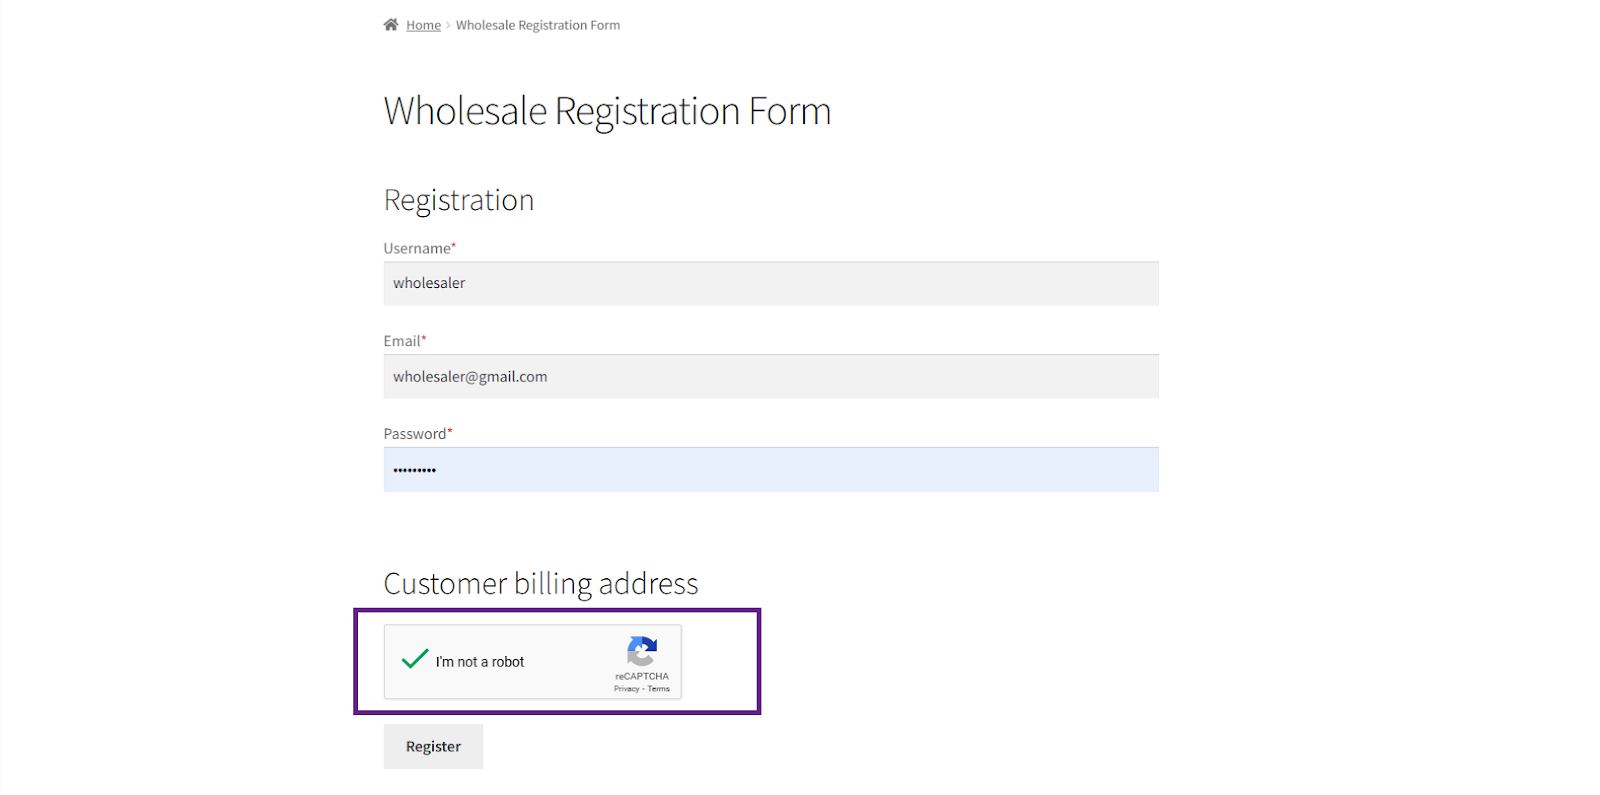
reCaptcha V3 (checkbox) #
- Go to Admin Dashboard > Wholesale > Settings.
- Navigate to the reCaptcha tab.

- Click the reCaptcha V3 button.

- Now click the Wholesale Registration Form subtab.
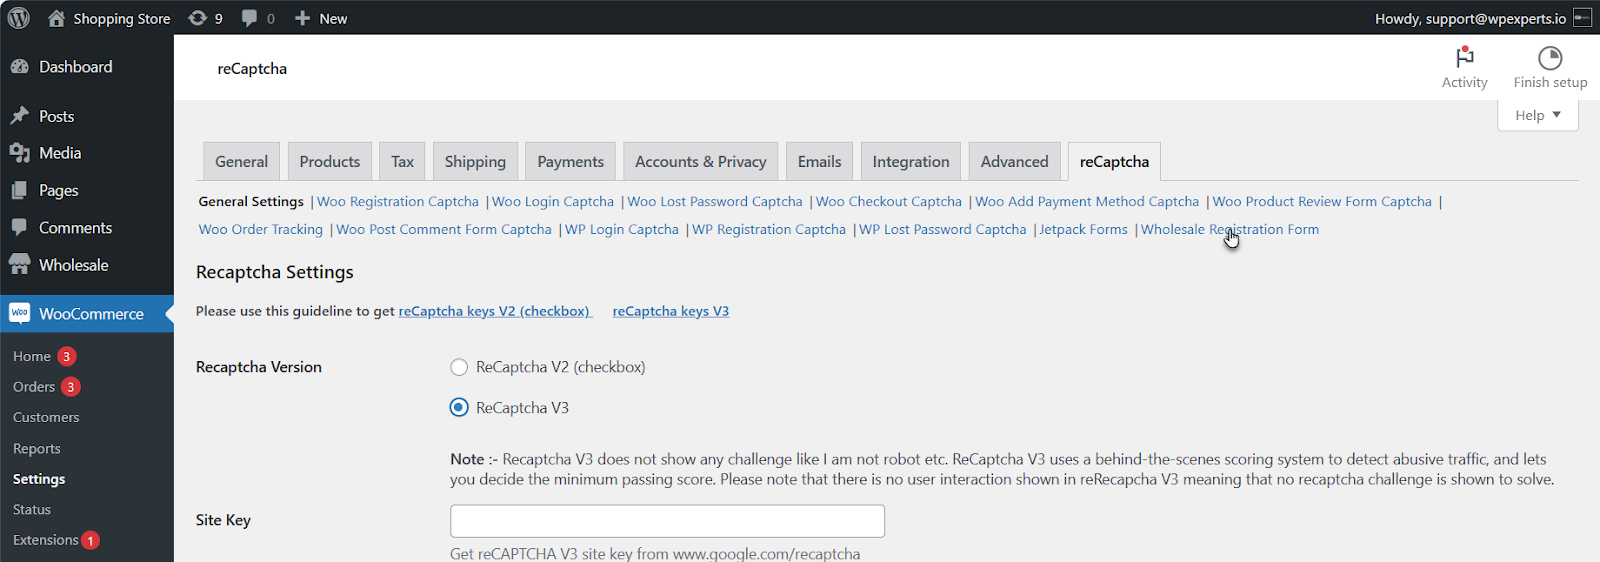
- Click the Enable reCaptcha on Wholesale Registration Form button.

- Click the Save changes button.
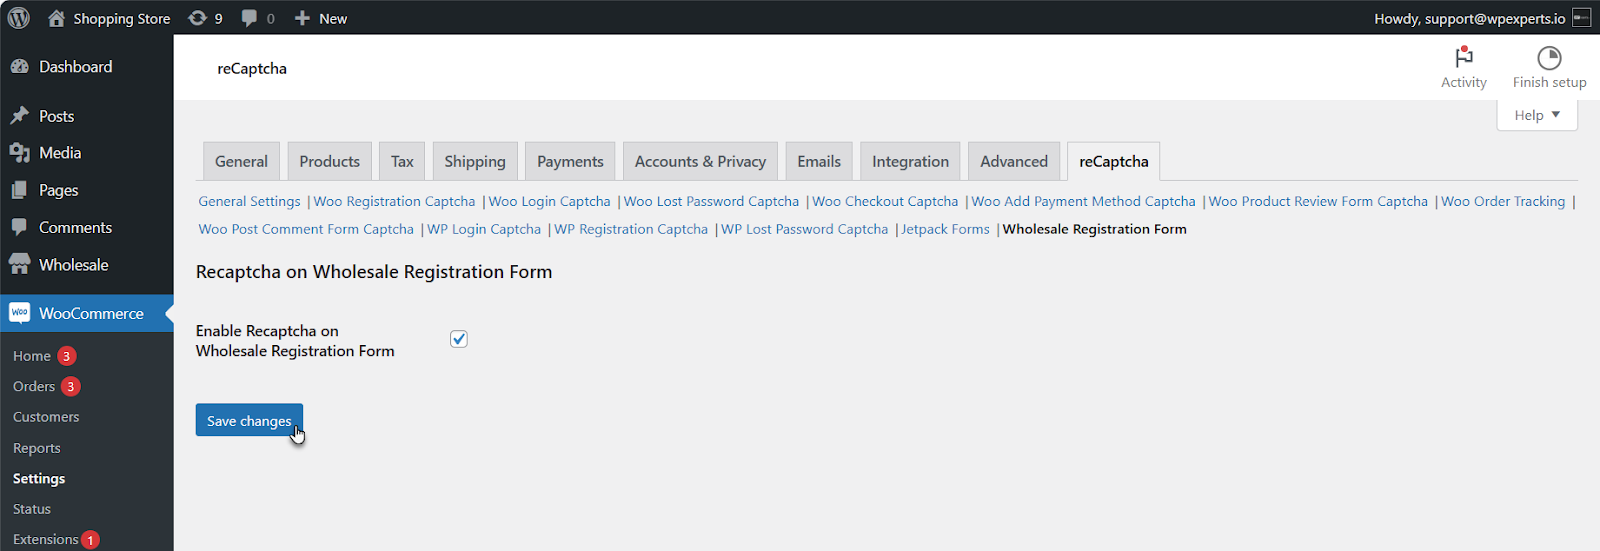
How-to-steps – Configure reCaptcha settings #
- reCaptcha Site Key
- The Administrator will need the reCaptcha Site Key in order to activate reCaptcha.
- reCaptcha Secret Key
- The Administrator will need the reCaptcha Secret Key in order to activate reCaptcha.
- Go to https://www.google.com/reCaptcha/about/
- Click on the v3 Admin Console button.

- Once done, you’re on the Register a new site page.

- In the reCaptcha type option, choose Score based (v3).
- Enter the required fields and click on the SUBMIT button.
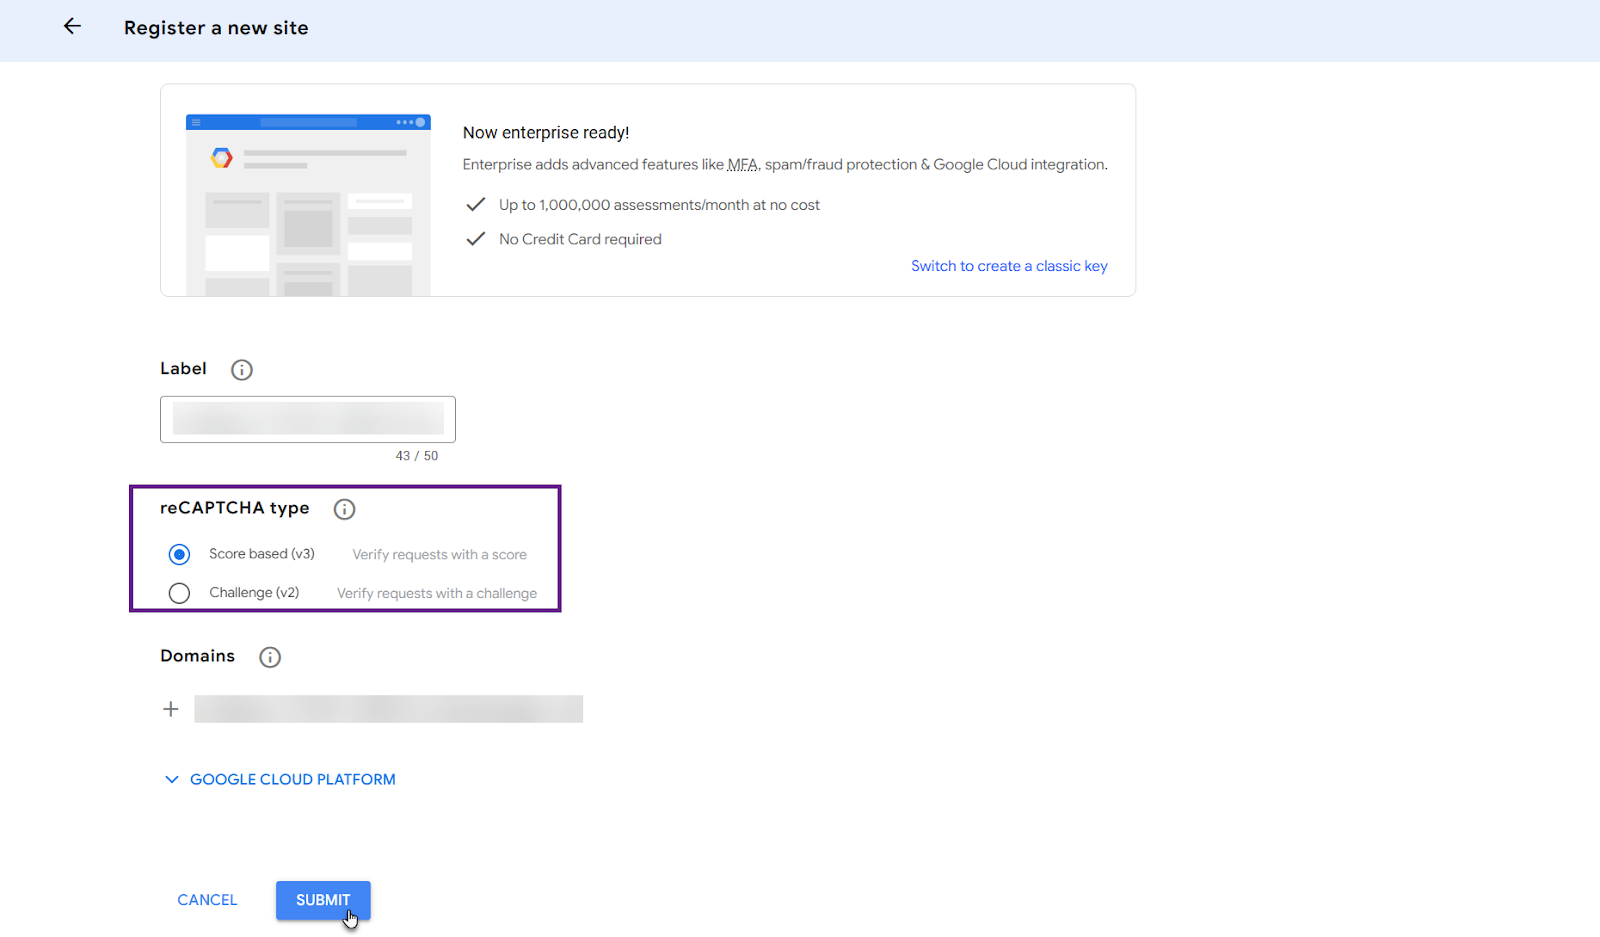
- Once done, the SITE KEY and the SECRET KEY will appear.
- Copy the SITE KEY and SECRET KEY.

- Now go to Admin Dashboard > WooCommerce > Settings.
- Navigate to the General Settings subtab.
- Enter the Site Key and the Secret key in the Site Key and Secret key options respectively.
- Click the Save changes button.
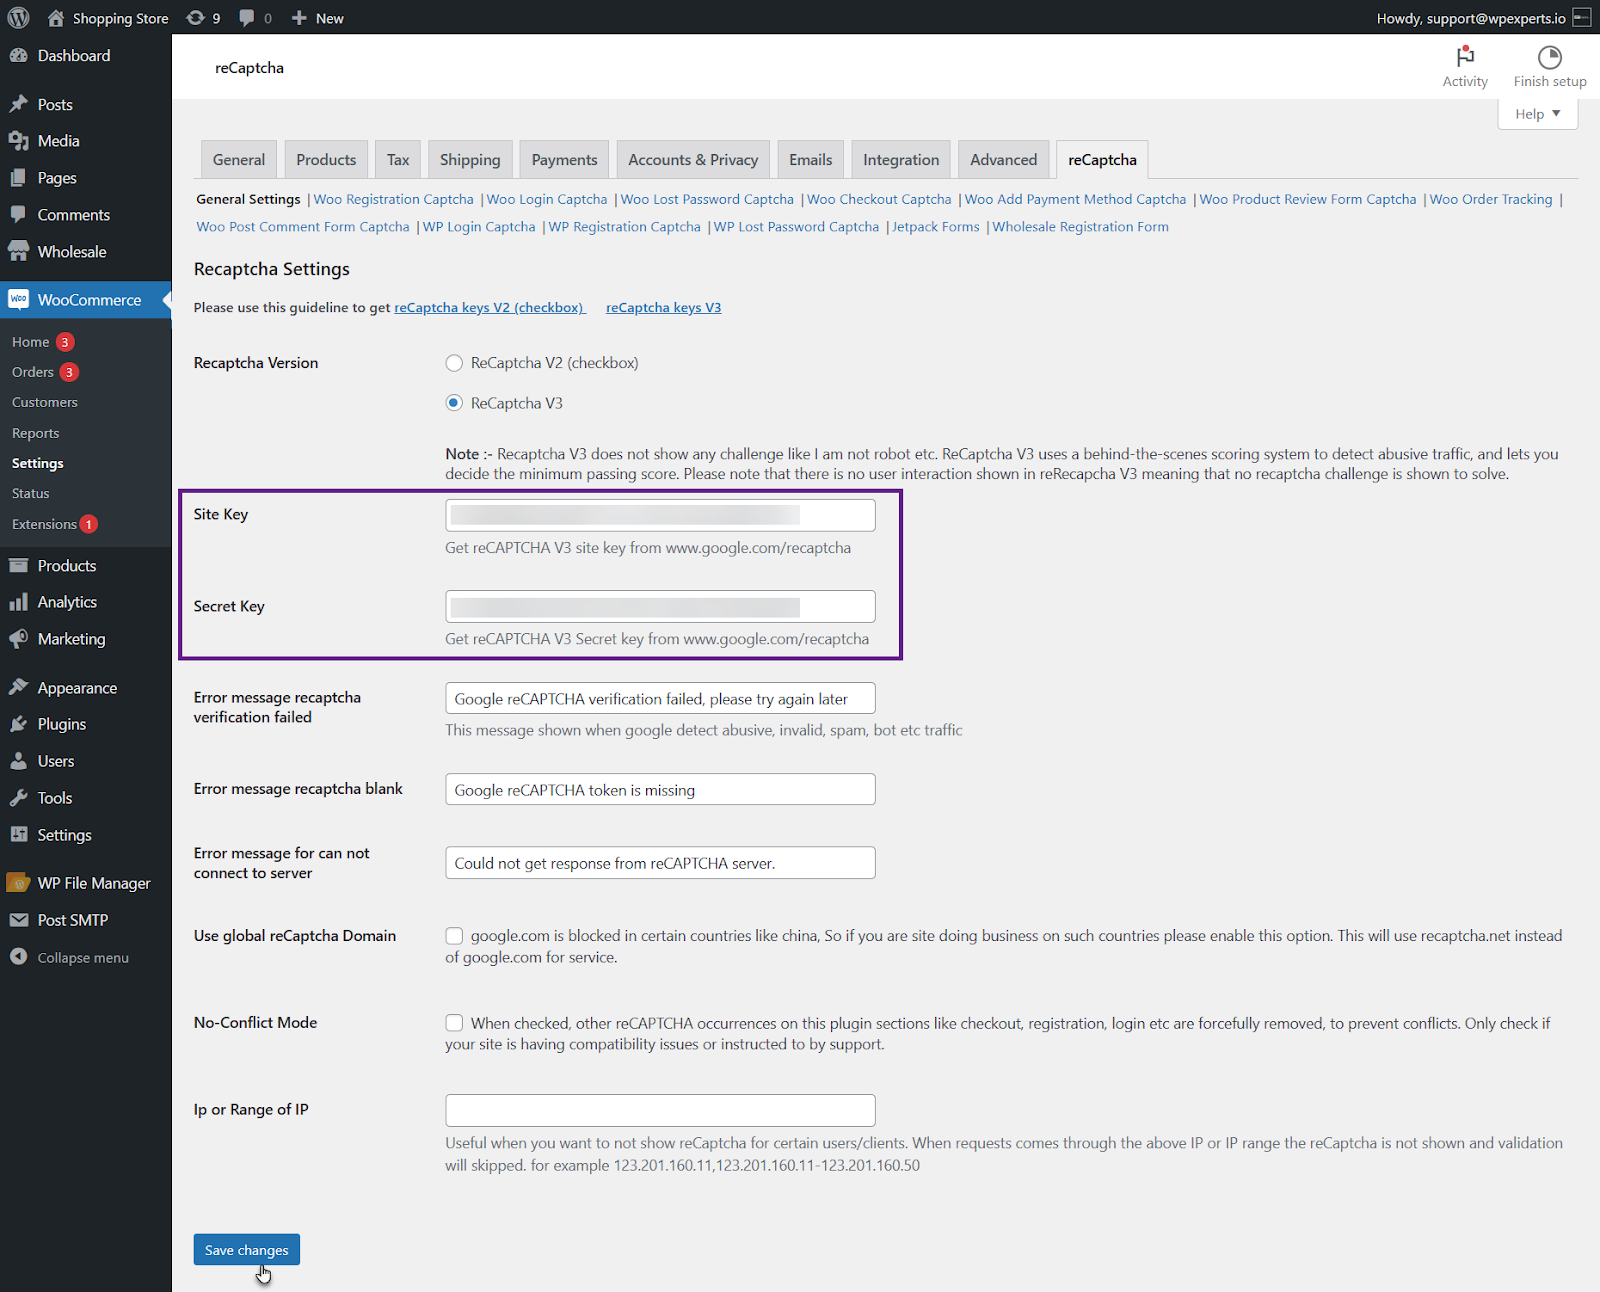
Front-End Impact #
- Go to the website.
- Navigate to the Wholesale Registration page.
- As you can see, V3 reCaptcha is now visible on the Front-End.
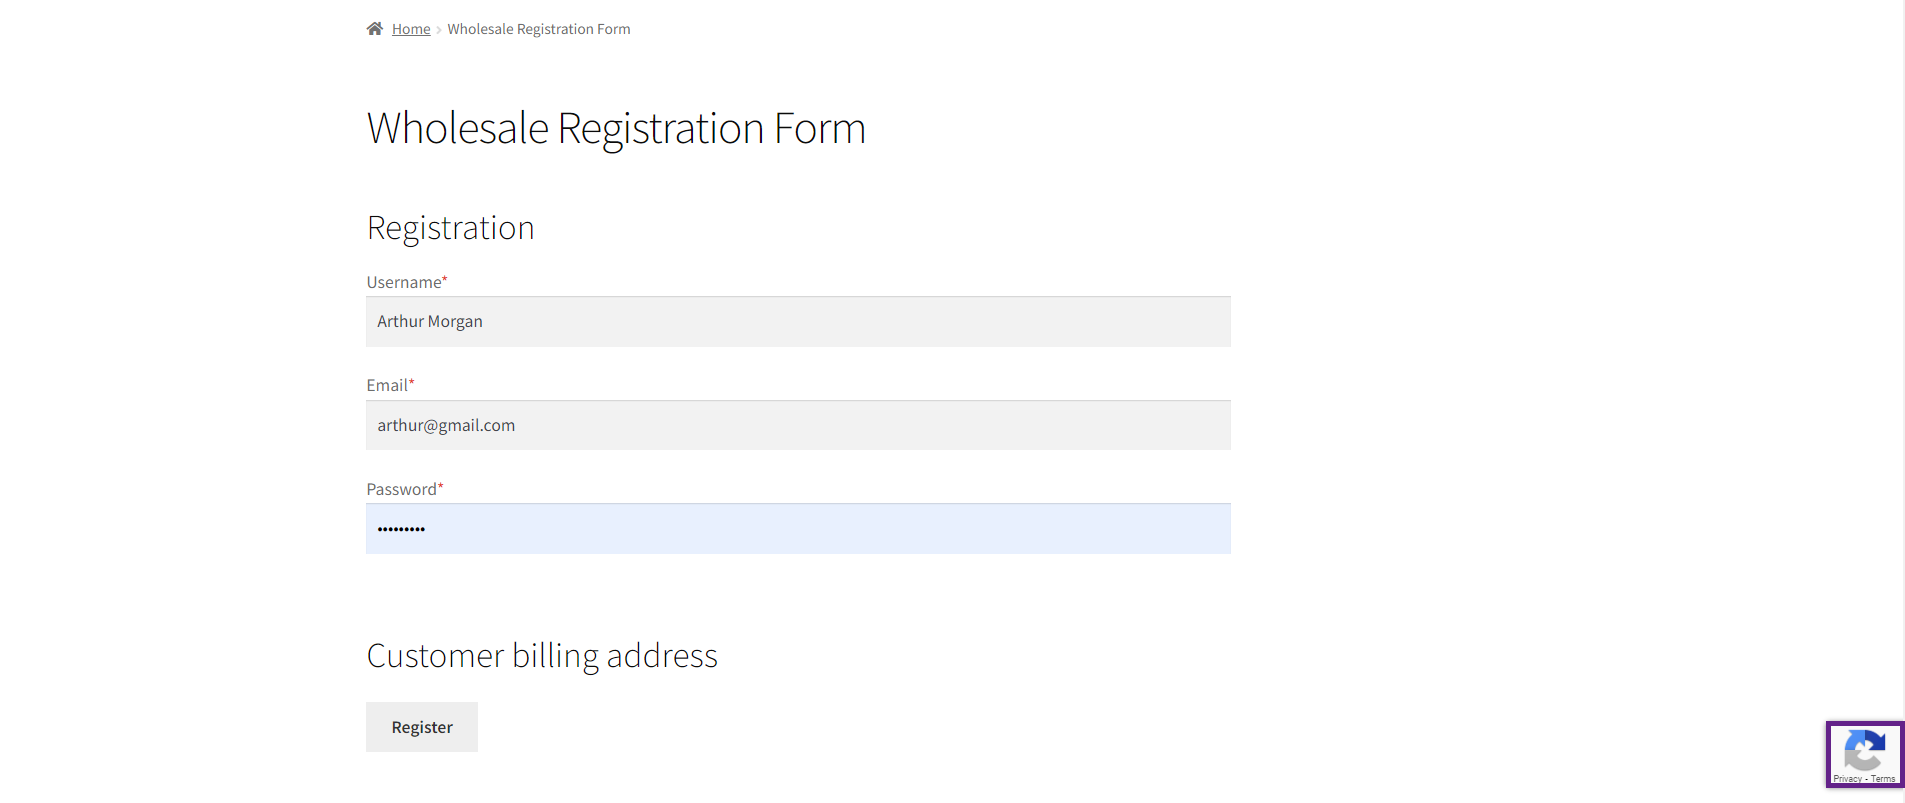
REST API #
Authorization #
- Go to Users.
- Select and Edit any user you want to assign authorization of APIs.
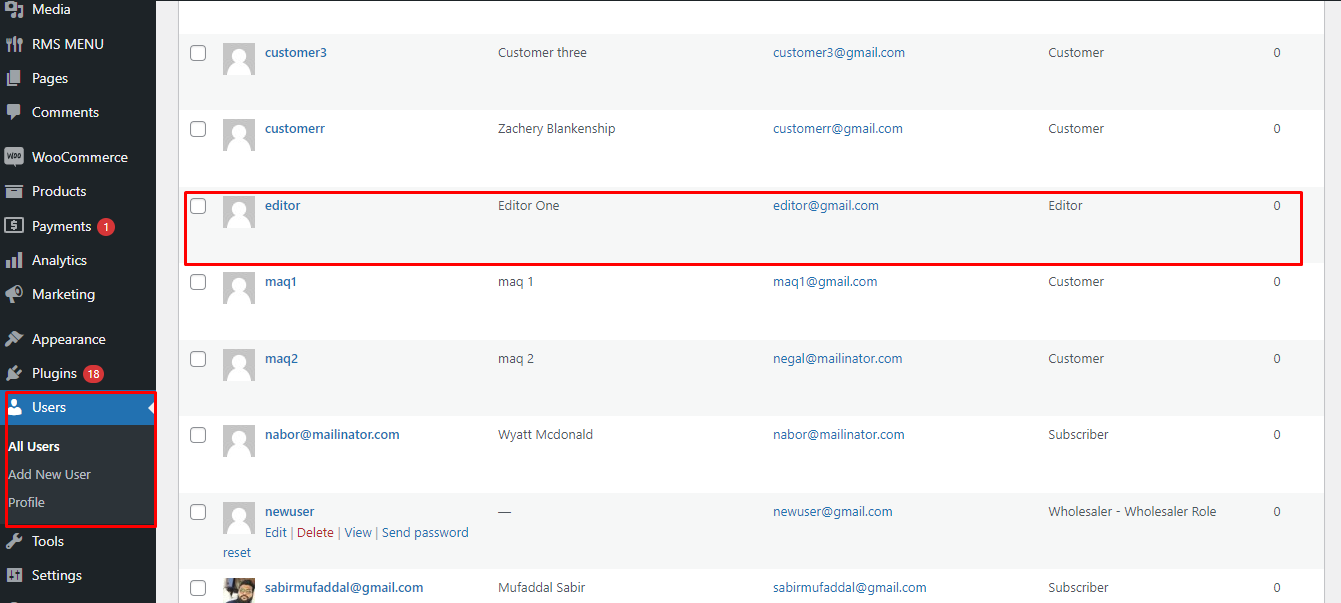
- In the User Edit Page insert any name of your application password.
- Click on the Add New Application password.
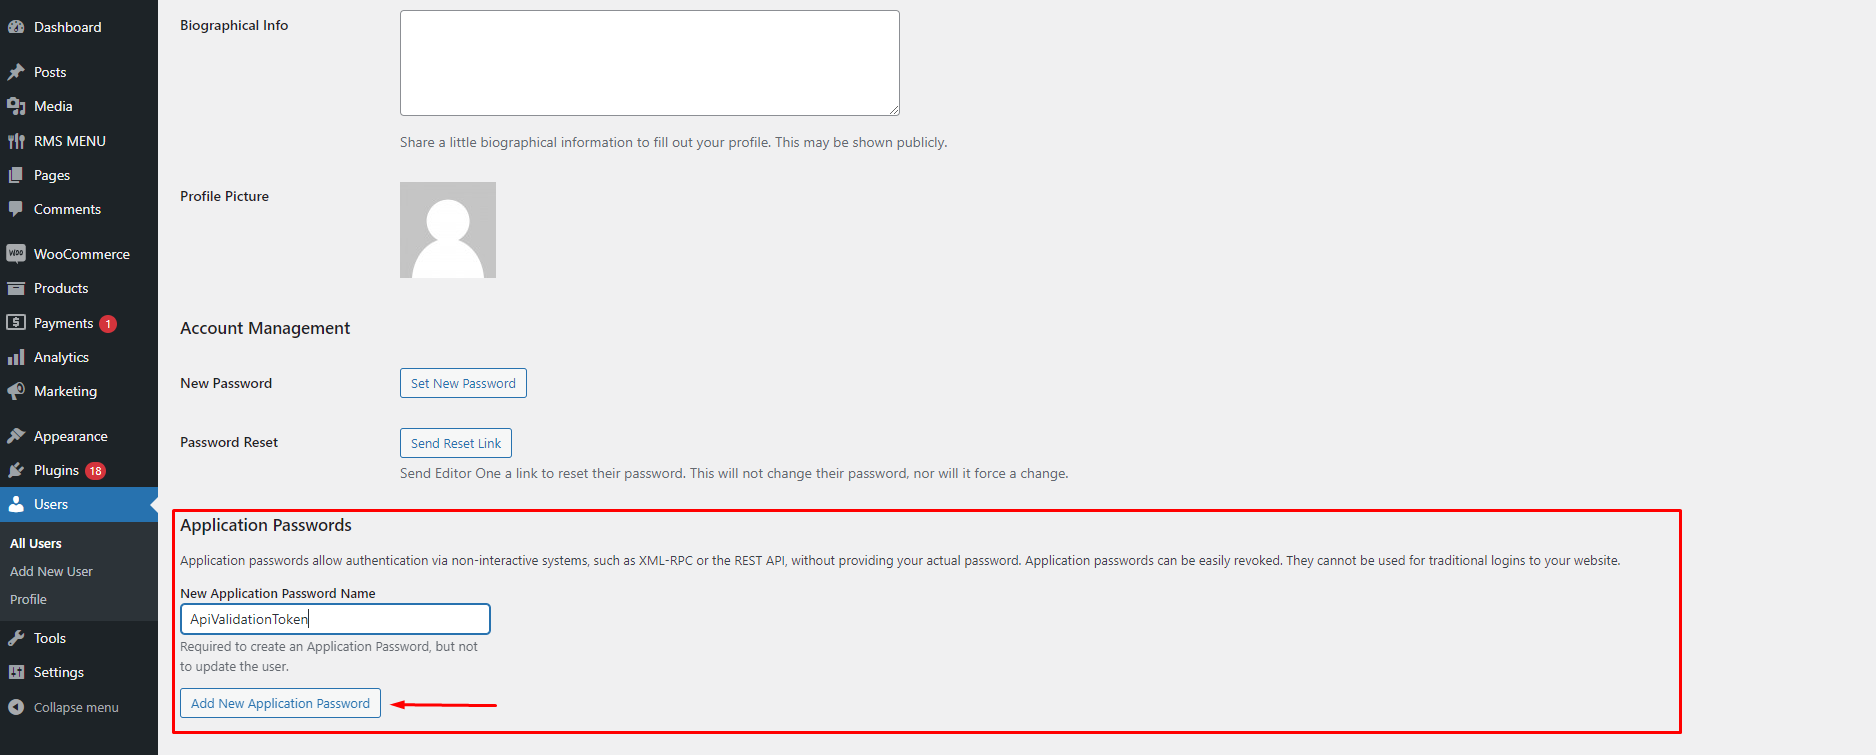
- After Click on New Application Password Unique password will be generated.
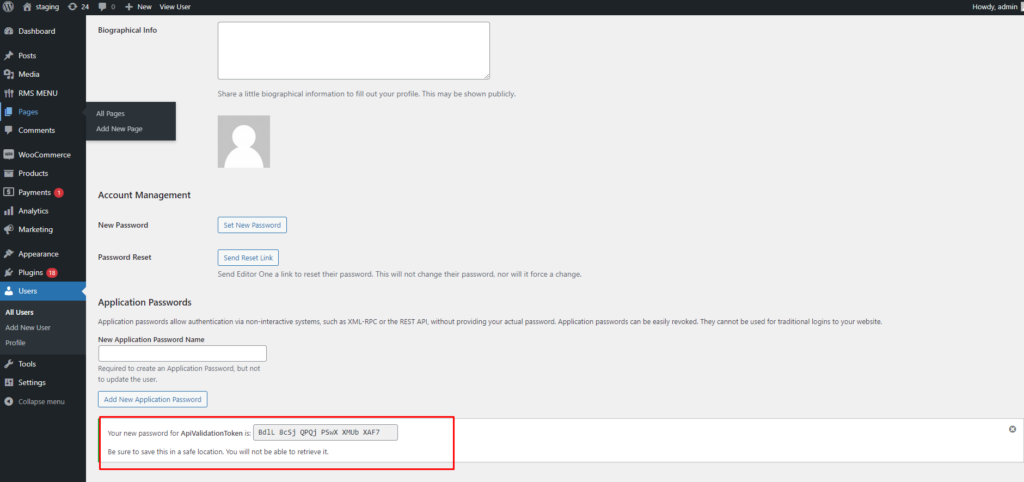
- In the Postman Select Basic Auth from Auth Type from the Authorization Tab.
- Insert username and Application password in Basic Auth.
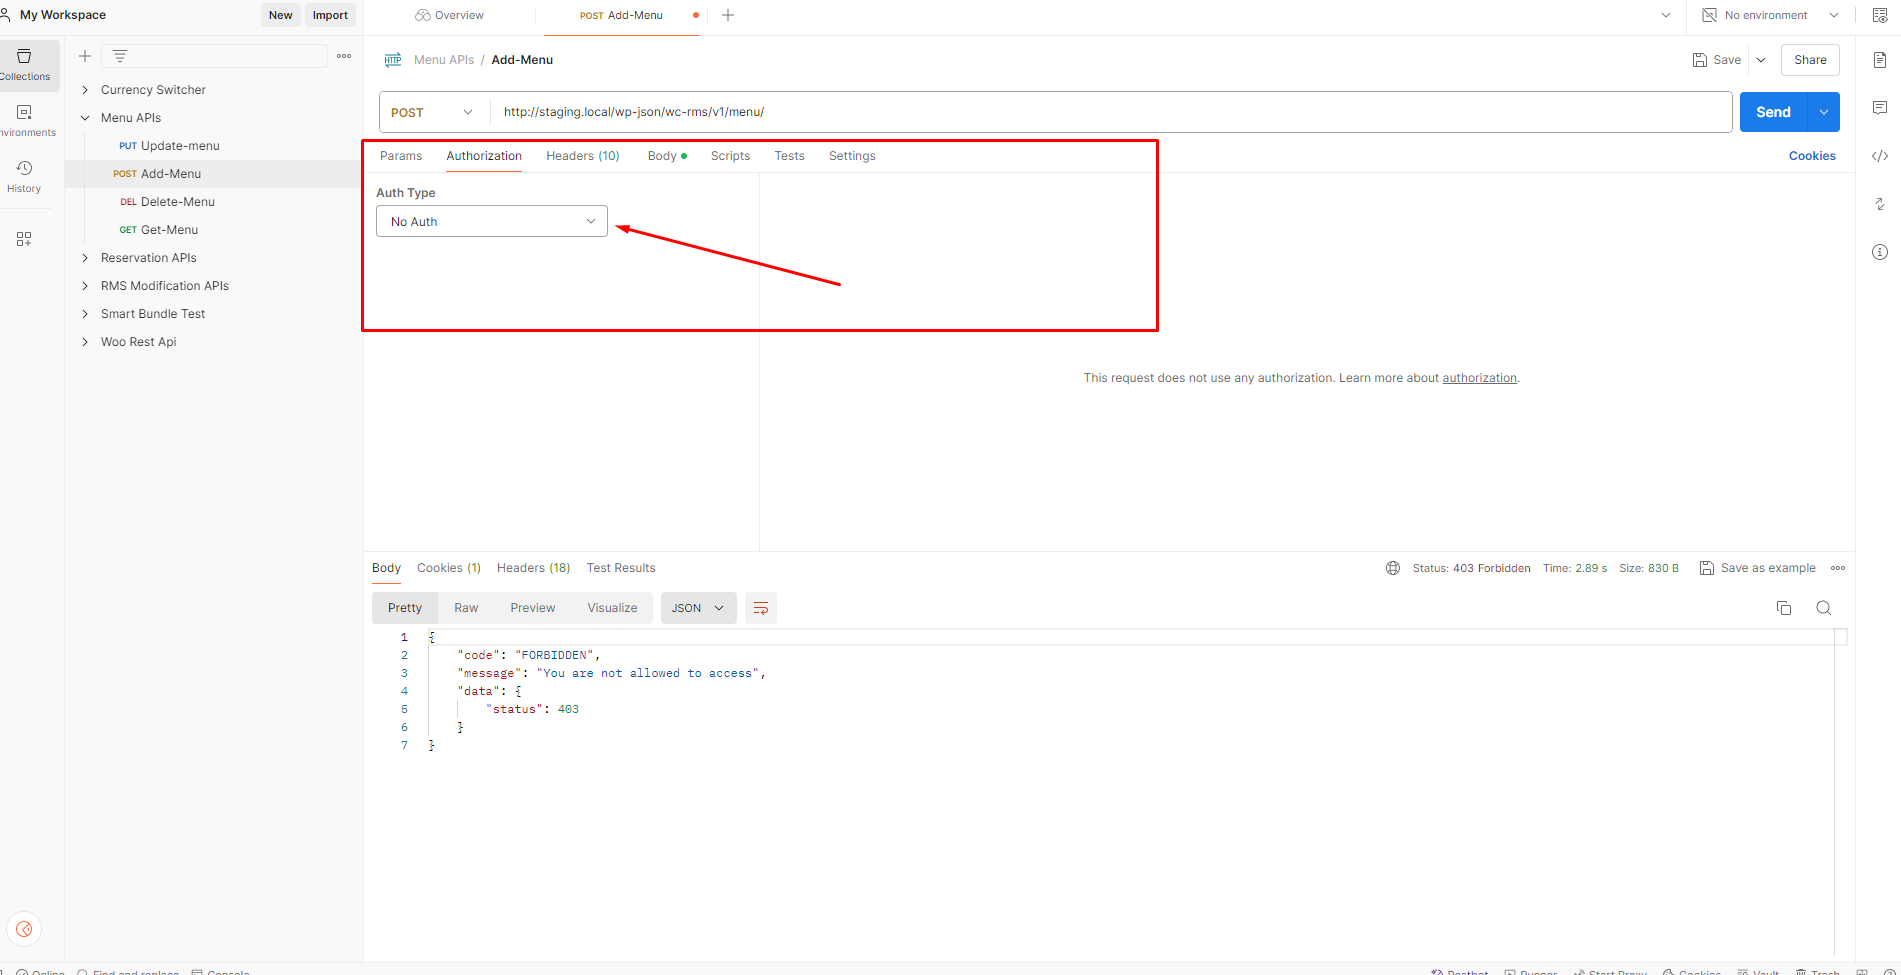
- After configuration, click on Send button to test the authorization.
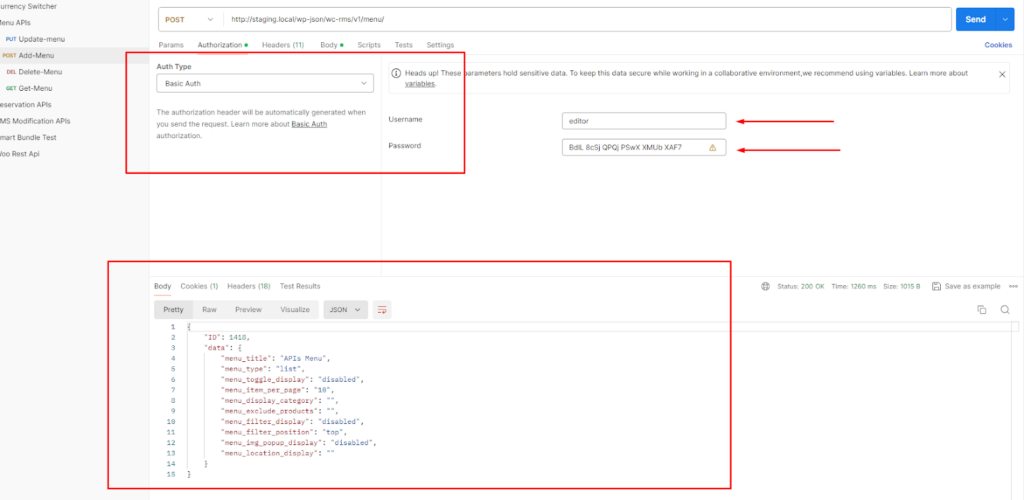
Without Authorization. #
- Trying using API without Authorization.
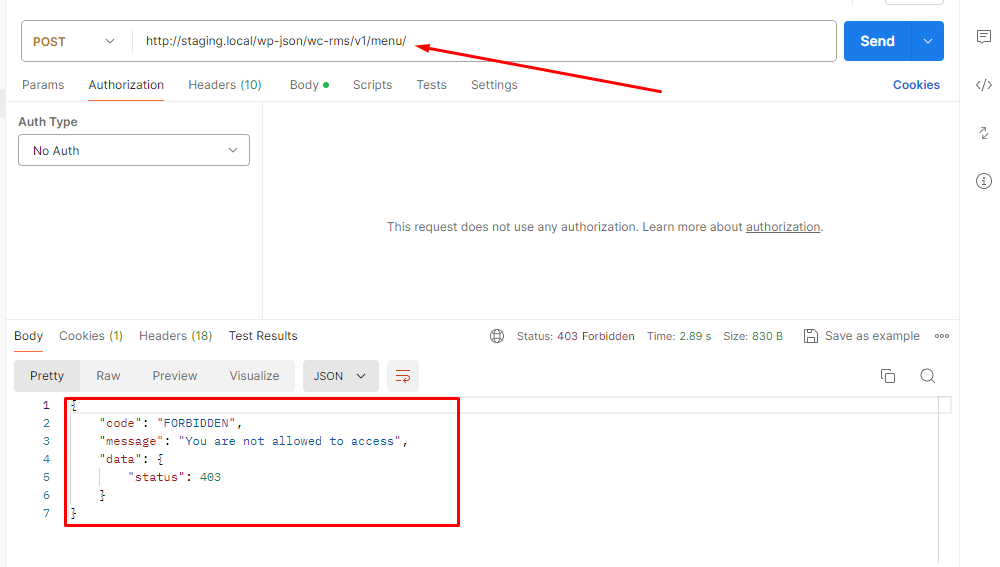


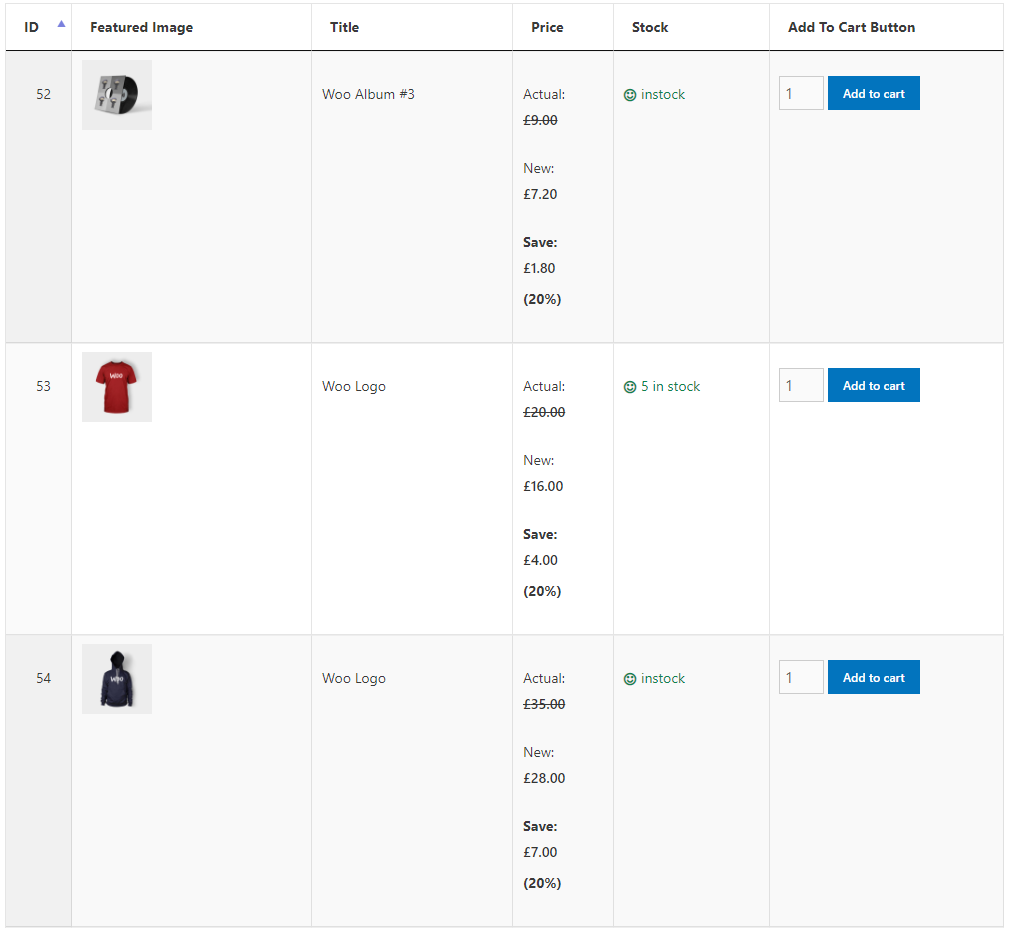