- Purpose
- Installation Guide
- Getting Started
- Product Add-ons
- Product Add-on Type
- Checkbox
- Front-End Impact
- Radio Button
- Front-End Impact
- Dropdown
- Front-End Impact
- Text Field
- Front-End Impact
- Text Area
- Front-End Impact
- Numbers
- Front-End Impact
- File Upload
- Front-End Impact
- Images
- Front-End Impact
- Color Swatches
- Front-End Impact
- Customer Defined Price
- Front-End Impact
- Date
- Front-End Impact
- Quantity
- Front-End Impact
- Text Labels
- Front-End Impact
- Visual Editor
- Front-End Impact
- HTML
- Front-End Impact
- Conditional Logic
Purpose #
This plugin enables the Administrator to add custom add-ons to WooCommerce products. The Administrator can set up various types of add-on fields and choose to display different add-ons on specific products.
Installation Guide #
- Log in to your WordPress Admin Panel.
- Navigate to the WordPress Admin Dashboard → Plugins → Add New.
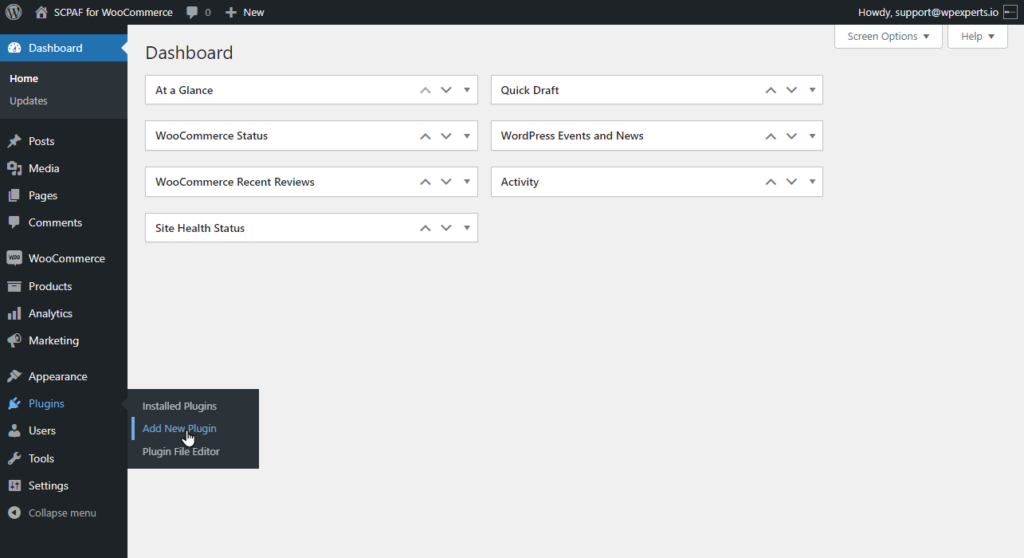
- Click the Upload Plugin button on the top left corner of your screen.
- Next, click the Choose File button in the box that appears below.
- Select the zip file that you have downloaded and upload it.
Getting Started #
Product Add-ons #
- Navigate to WordPress Admin Dashboard > Products > Product Add-ons.
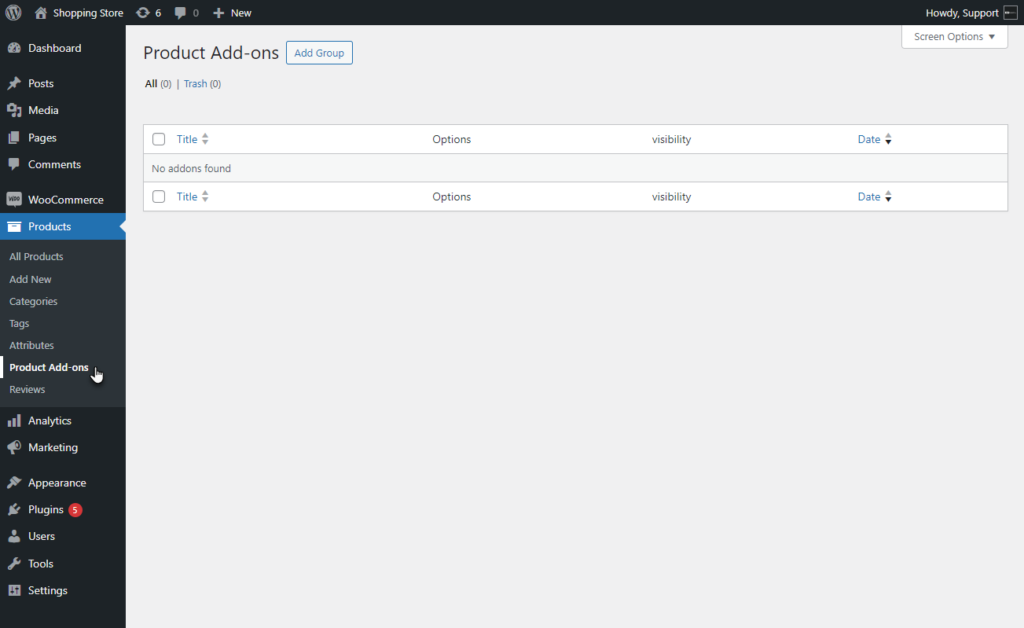
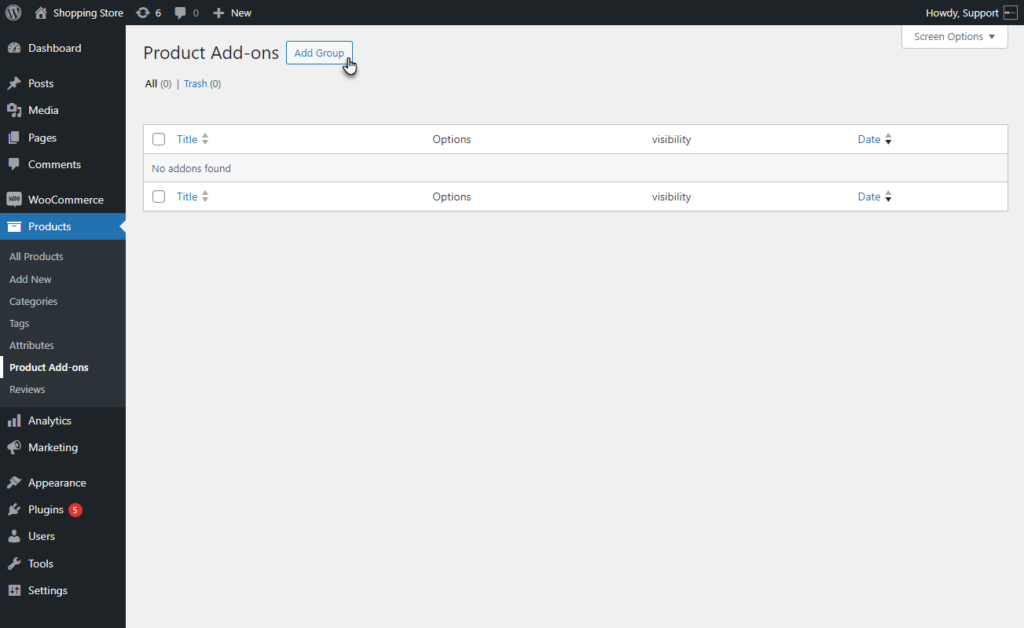
- Click on the Add Group button to create a new group.
- The Add New Group screen will appear.
- Navigate to the Create Addons section. The Administrator can configure the Addons in this section.
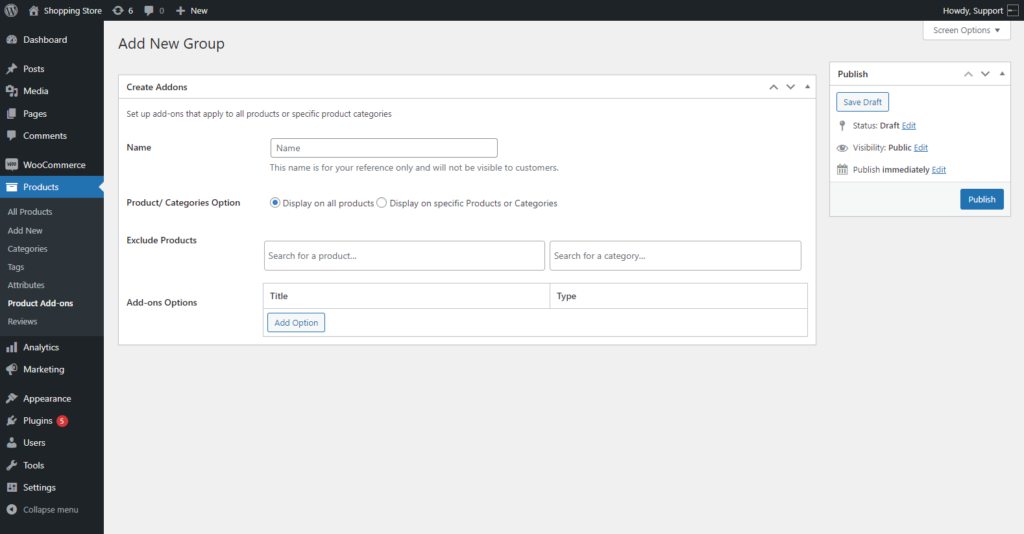
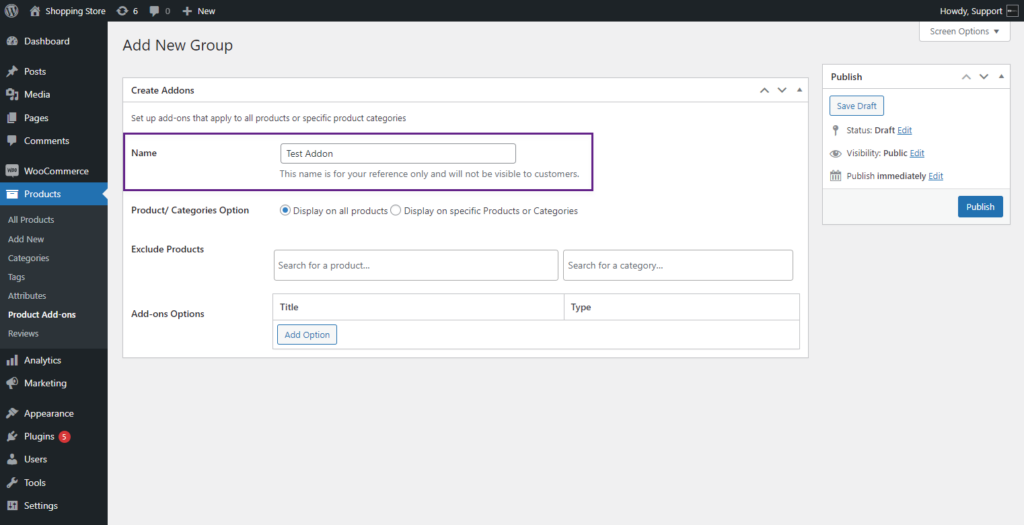
- The Administrator can set the name of the Addon for his reference only in the Name option. This name won’t be displayed to the front-end users.
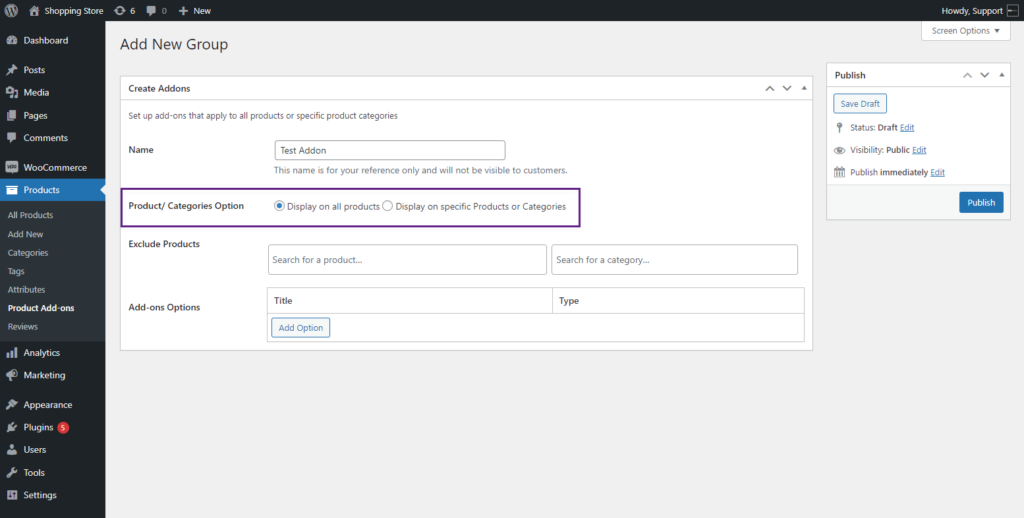
- The Administrator can create this Add-on for All Products/Categories or Specific Products/Categories.
- If the Administrator selects the Display on all Products option, the Exclude Products/Category option will appear for the Administrator.
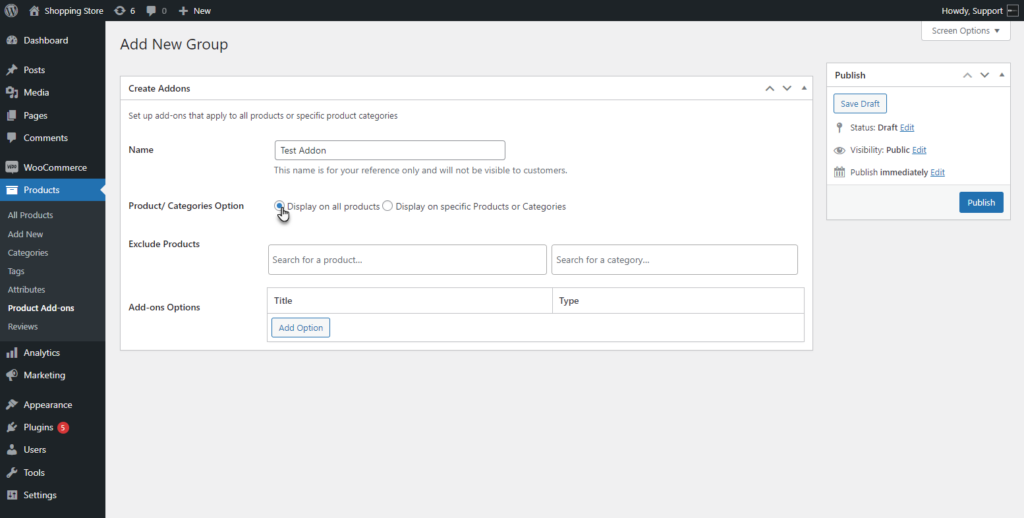
- The Administrator can search for any product or category in the Exclude Products field to exclude it from the add-on.

PLEASE NOTE: The Administrator can select a category in the Search for a Category field.
- If the Administrator selects the Display on Specific Products or Categories, the Include Products/Category option will appear for the Administrator.
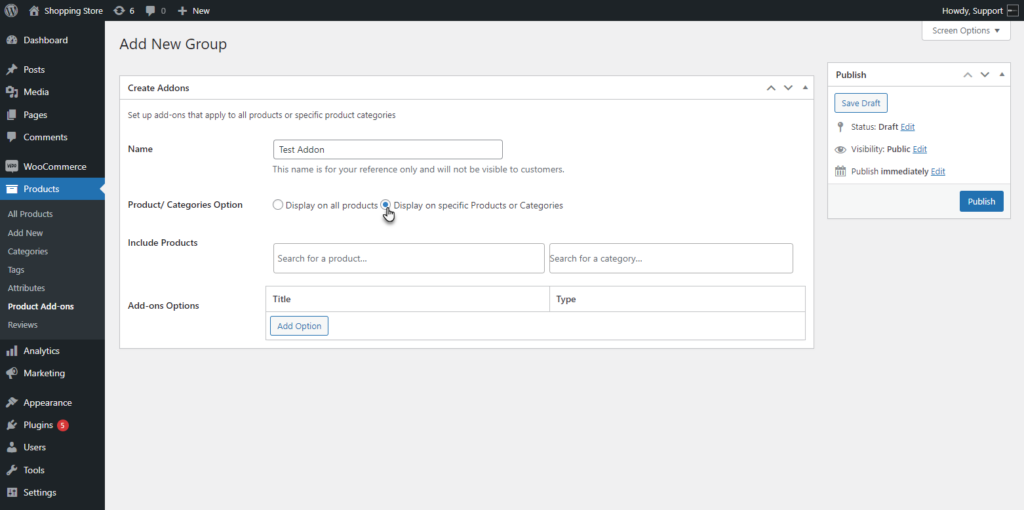
- The Administrator can search for any product or category in the Include Products field to include it from the add-on.
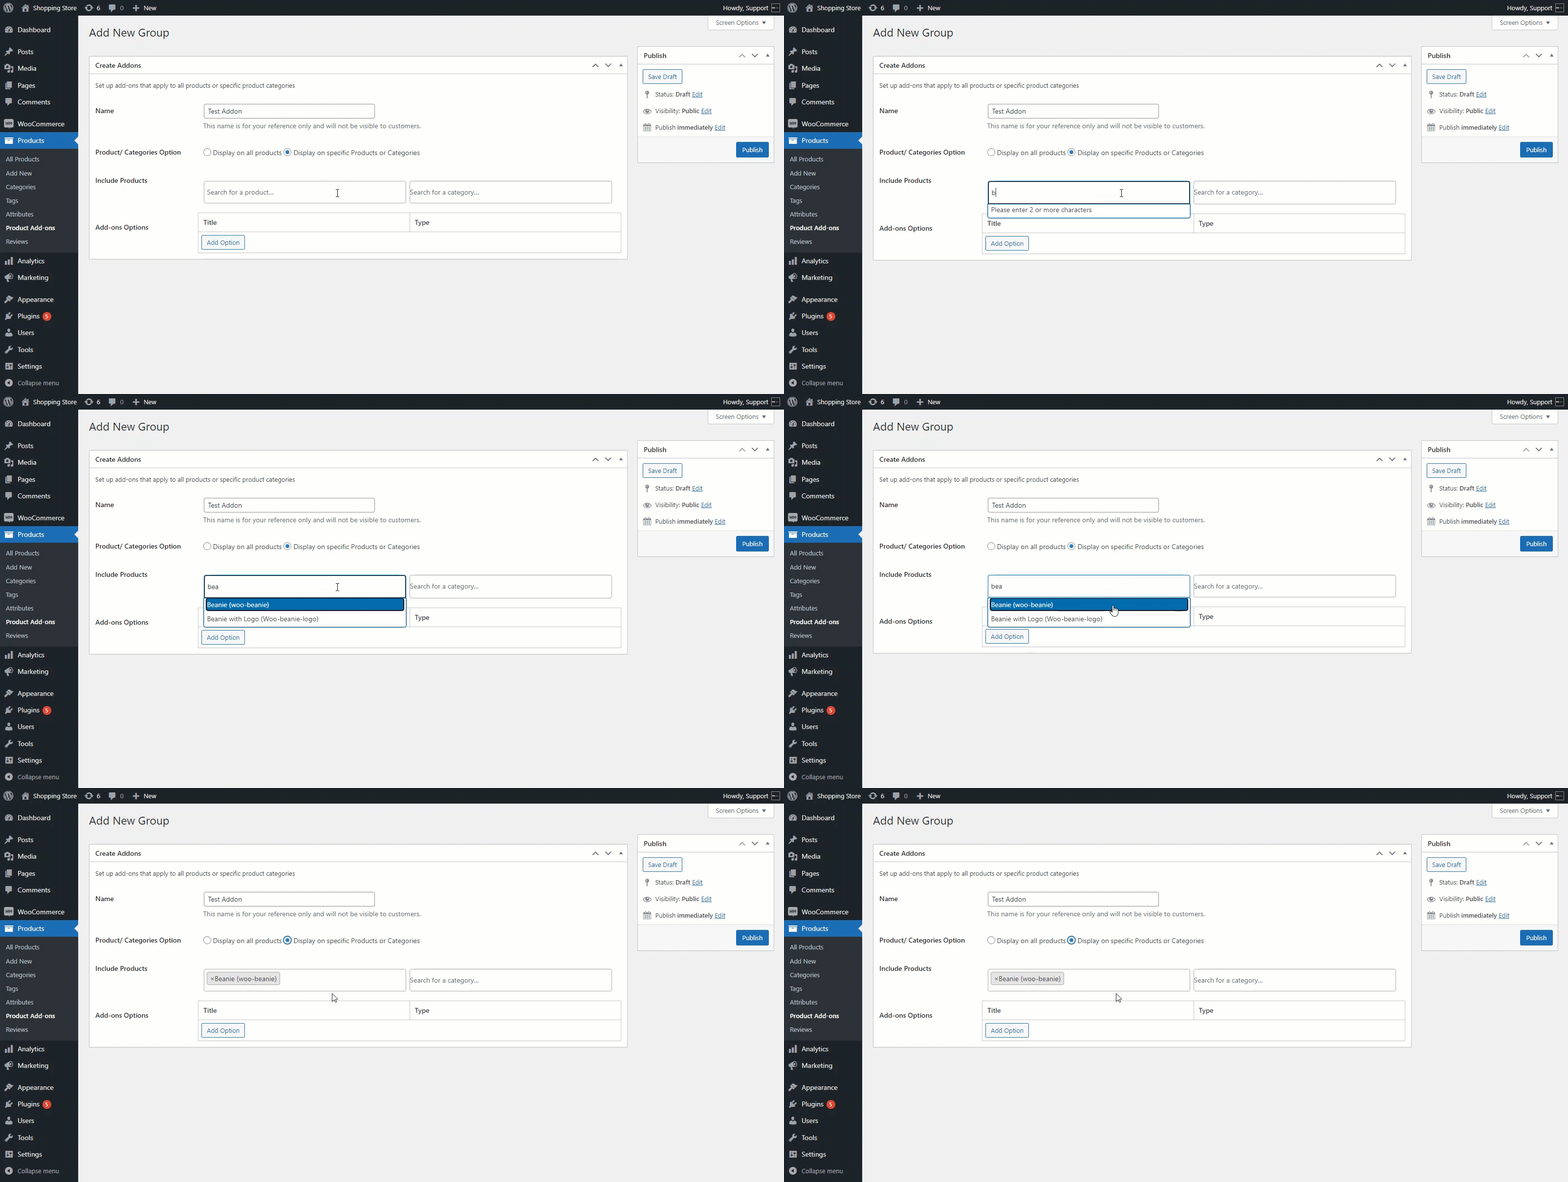
PLEASE NOTE: The Administrator can select a category in the Search for a Category field.
- Move to the Add-ons Options. This option provides the Administrator multiple options for the Addons.
- Click on the Add Option button.
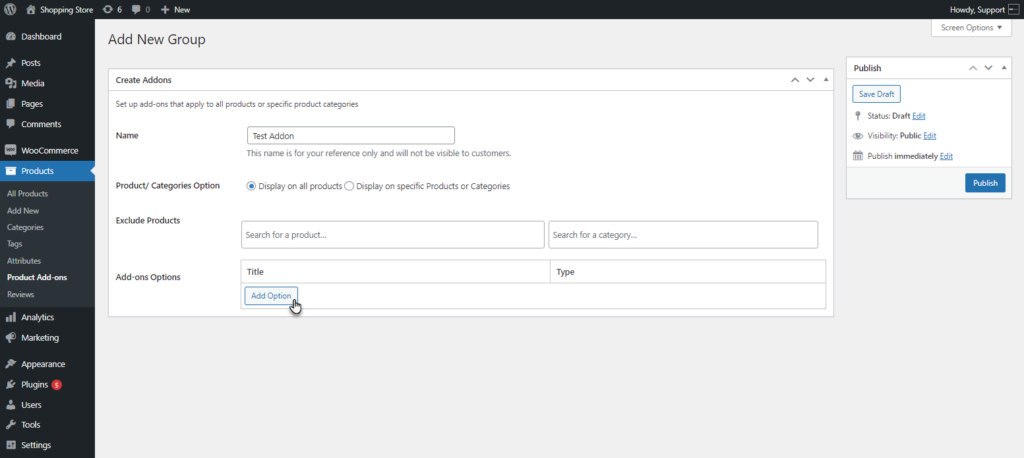
- A detailed Add-on options screen will open.
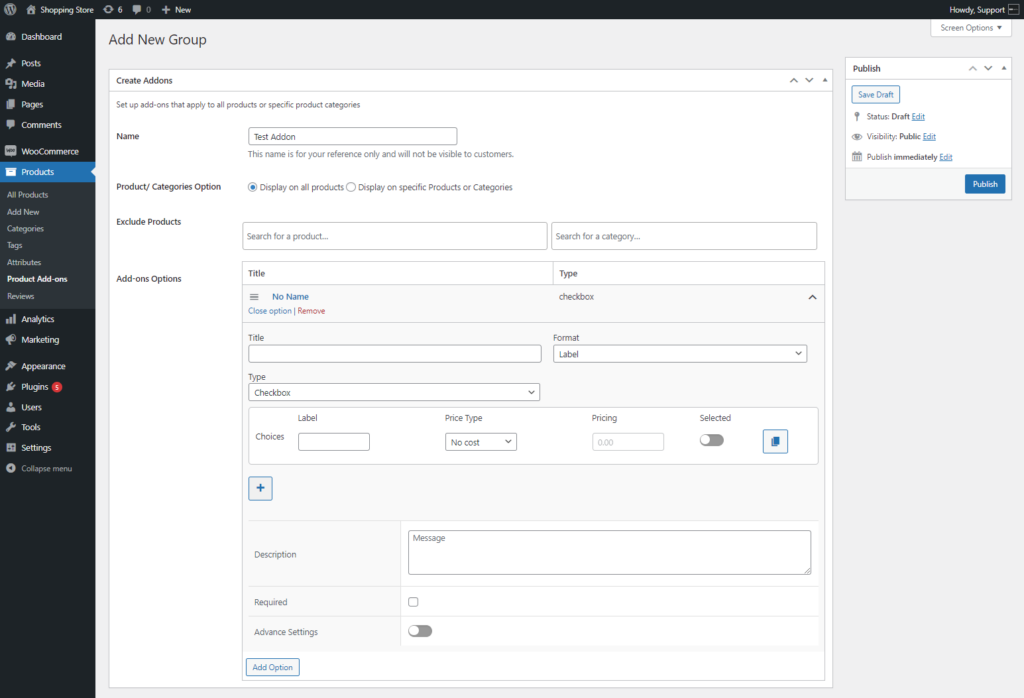
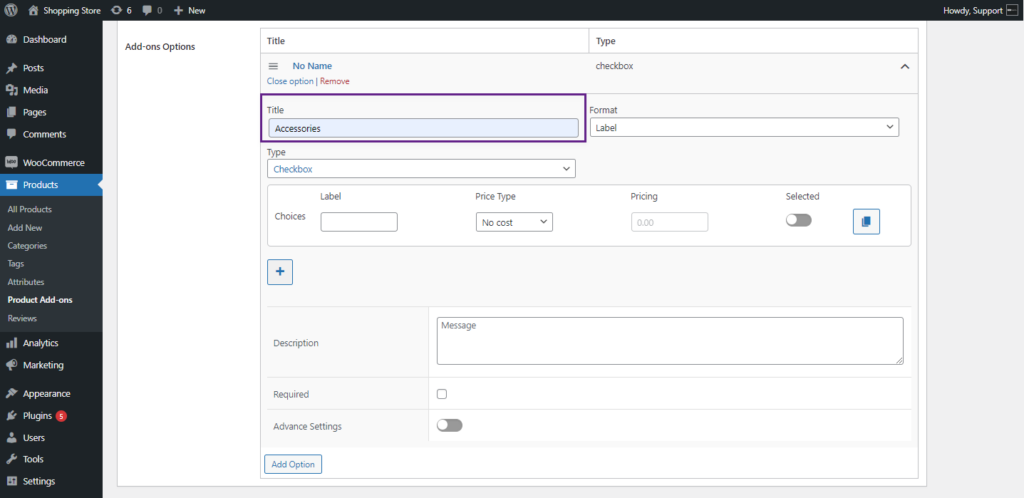
- Add a title to the Addon option in the Title field.
Product Add-on Type #
- The Administrator can set the Title format from the Format drop-down list. There are two options in the Format drop-down list (Label and Heading). The add-on option title will display on the front end.

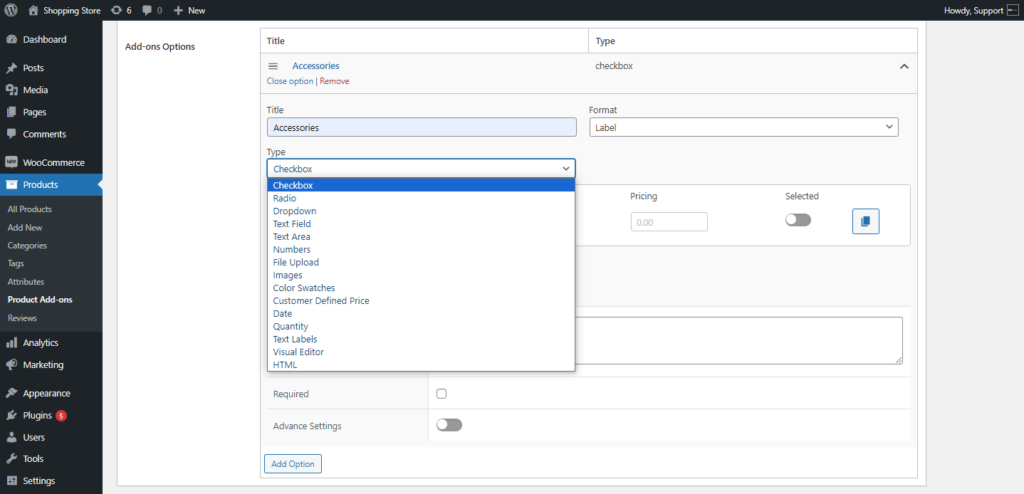
- The Administrator can select the Addon Type from the Type drop-down list. There are 15 Addon options provided.
- Checkbox
- Radio
- Dropdown
- Text Field
- Text Area
- Numbers
- File Upload
- Images
- Color Swatches
- Customer Defined Price
- Date
- Quantity
- Text Labels
- Visual Editor
- HTML
Checkbox #
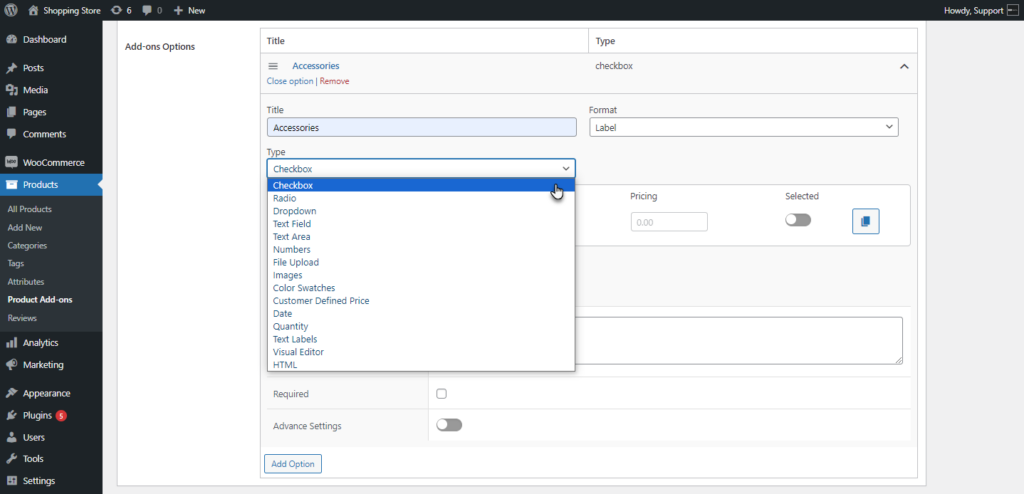
- Select the Checkbox option from the Type drop-down list.
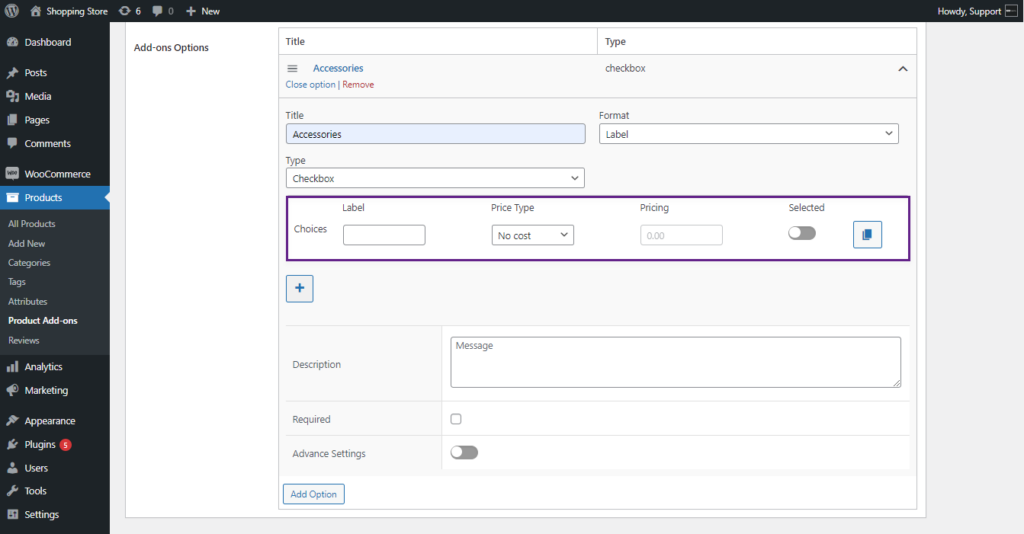
- The settings will appear for the Checkbox type.
- The Administrator can add a Choice for the addon type.
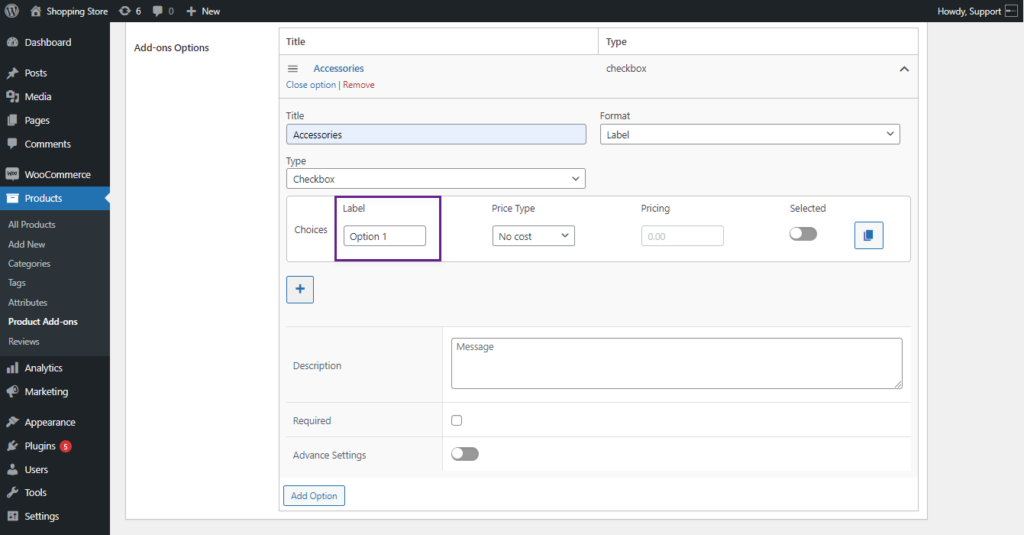
- The Administrator can set the Label for the Choices.
- The Administrator can select the price type from the Price Type drop-down list. Five Price type options are provided.
- No Cost – This choice will not affect the total product cost
- Flat Fee – A fixed amount is added to the total product cost, regardless of the quantity ordered.
- Quantity-Based Fee – A fixed amount is added to the total product cost multiplied by the quantity ordered.
- Percentage Increase – This increases the product price by the specified percentage.
- Percentage Decrease – This decreases the product price by the specified percentage.
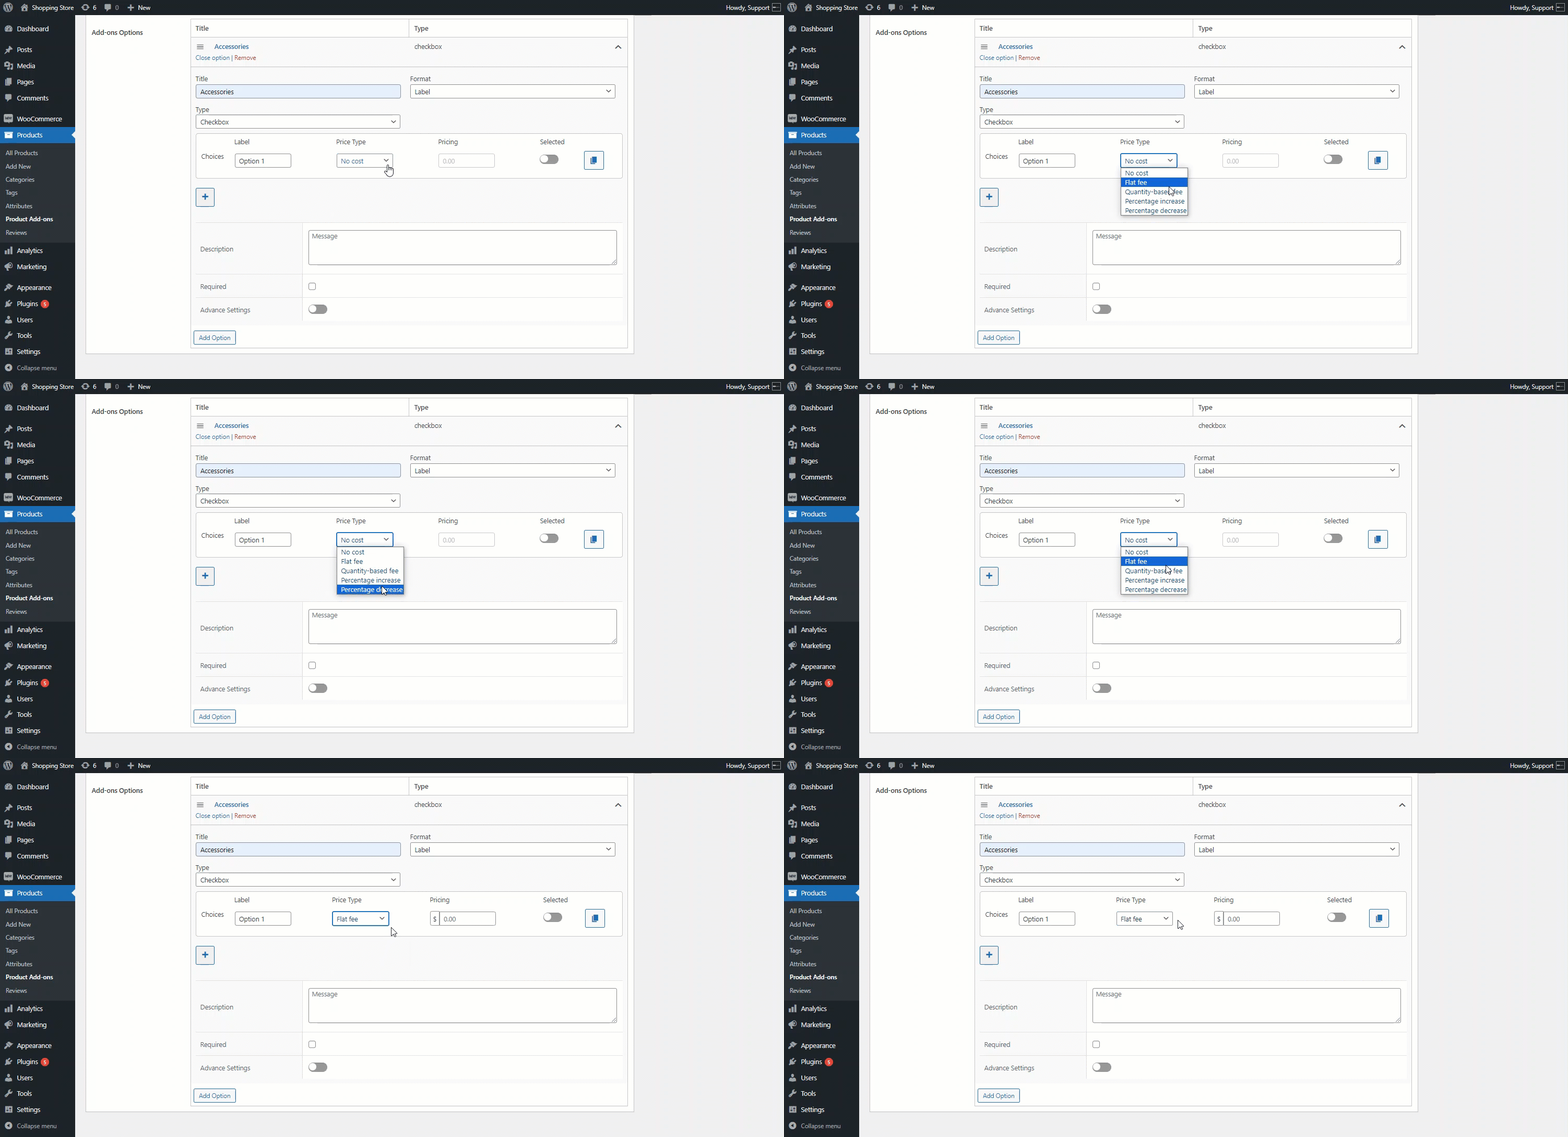
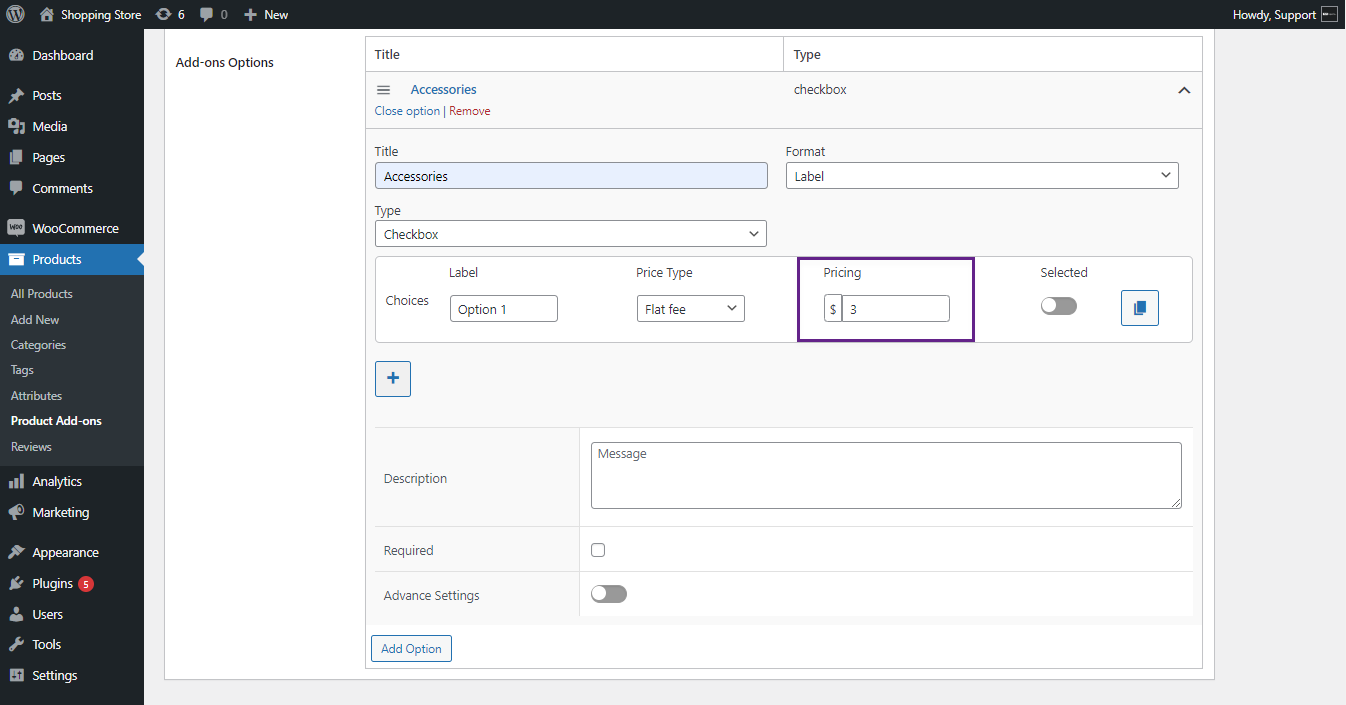
- The Administrator can set pricing in the Pricing field as per the Pricing Type selected.
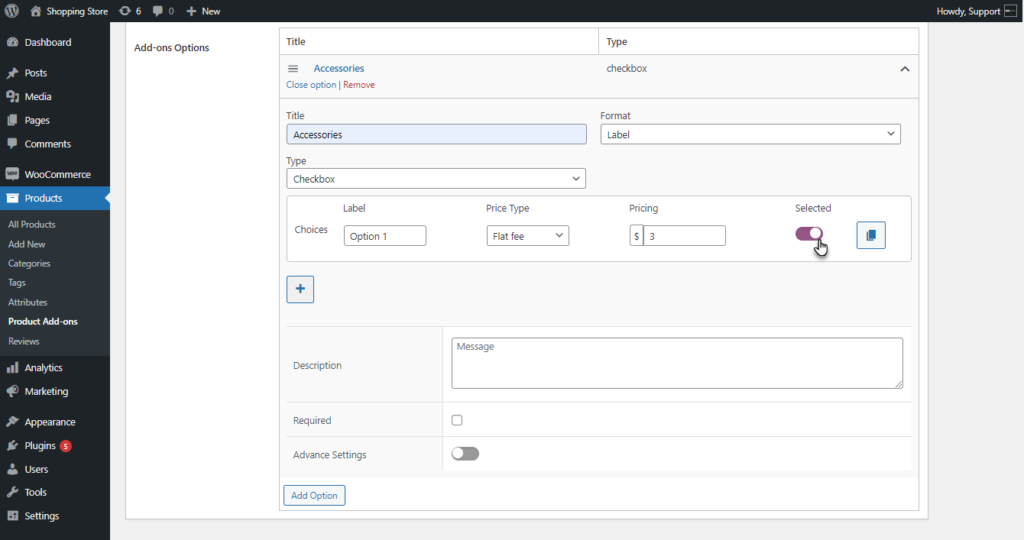
- The Administrator can select the choice by enabling the Selected toggle button. By default, this option will be selected on the front-end if enabled.
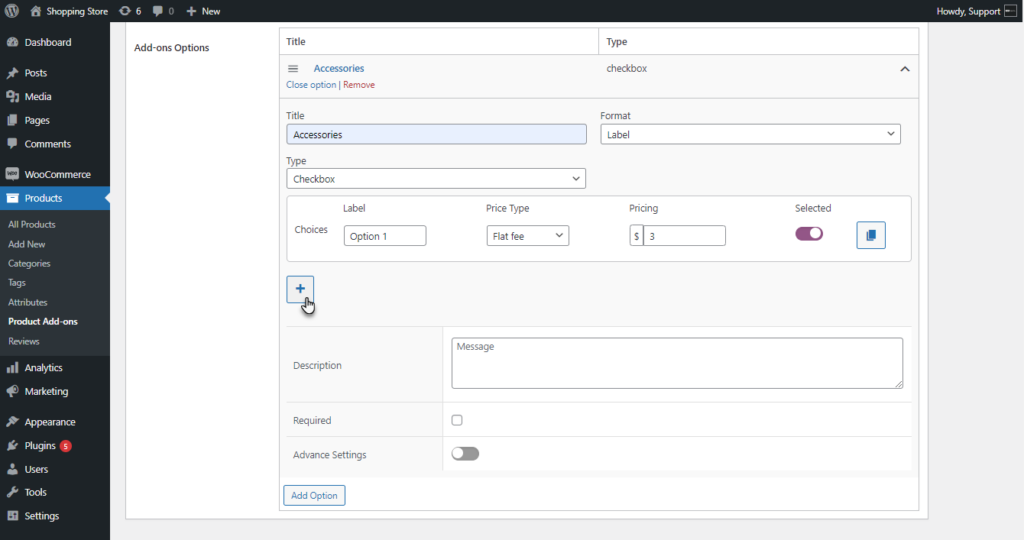
- The Administrator can add multiple choices using the ➕ sign button.
- Multiple choices are created with different Price Types with the same process as explained above.
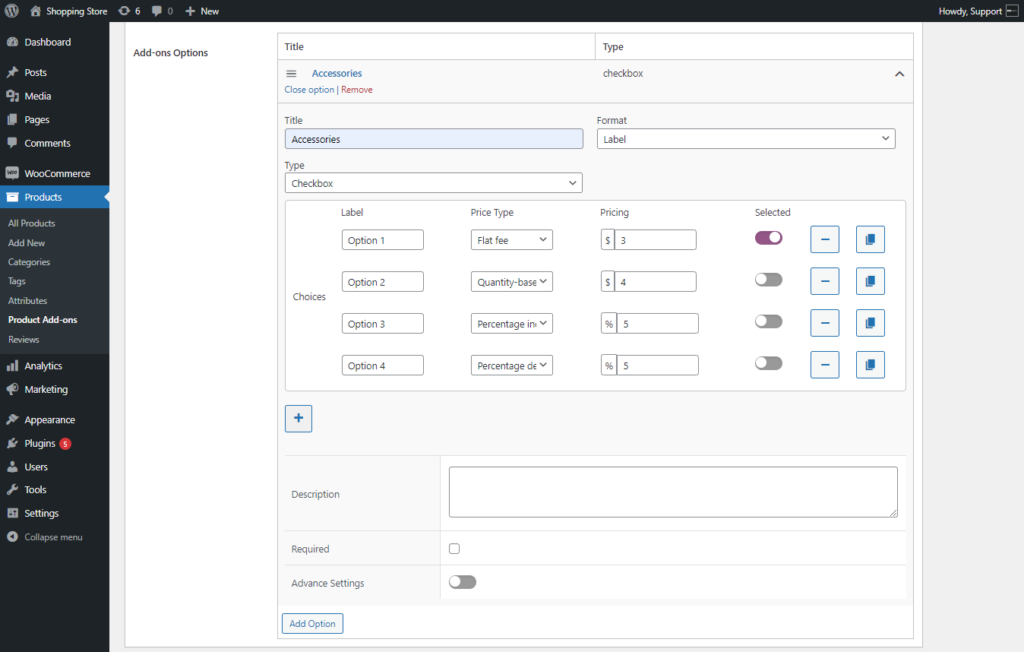
- The Administrator can delete the choice by using the Minus sign button.
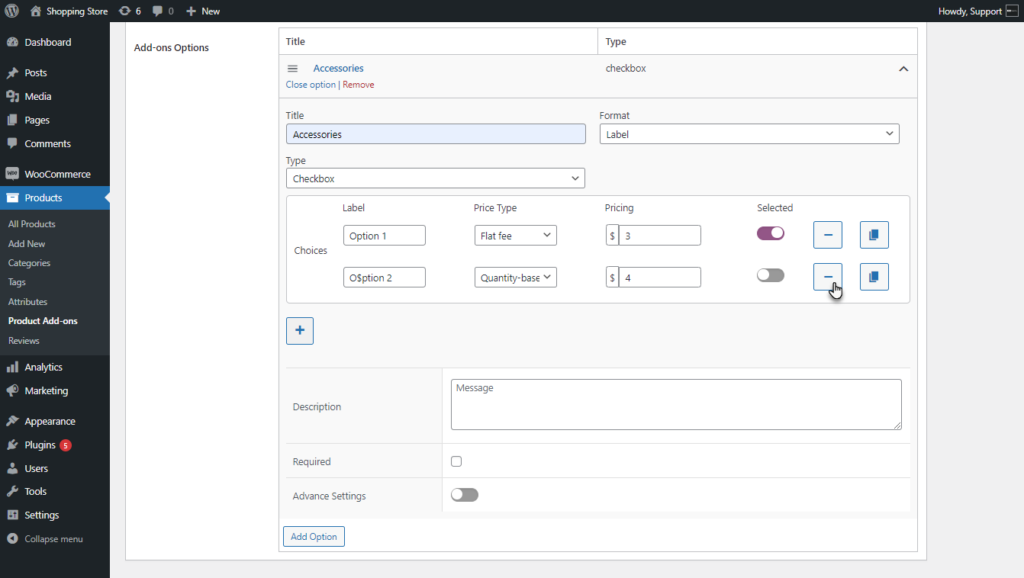
- The Administrator can duplicate the choice by clicking on the Duplicate icon button.
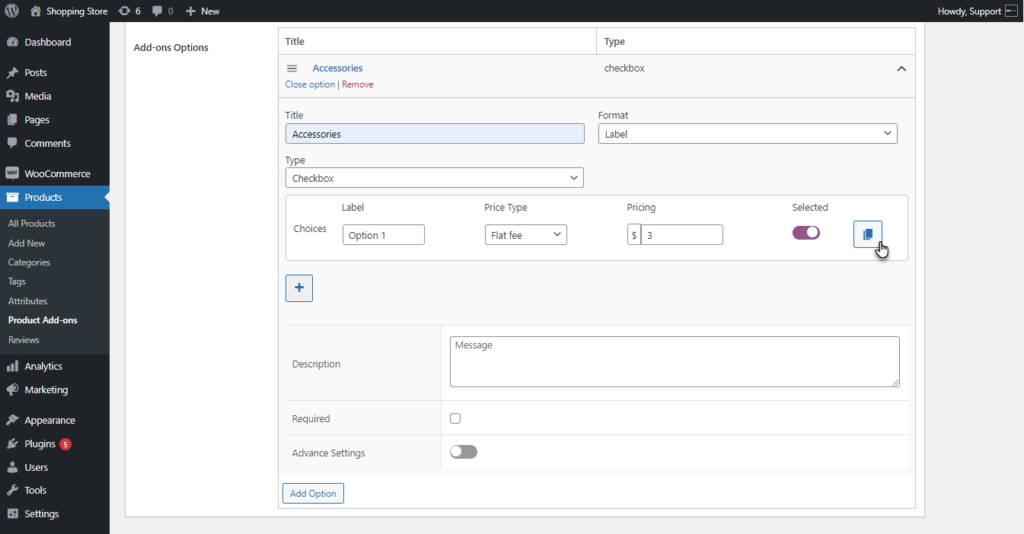
- The Administrator can add a Description of the Addon for the front-end user.
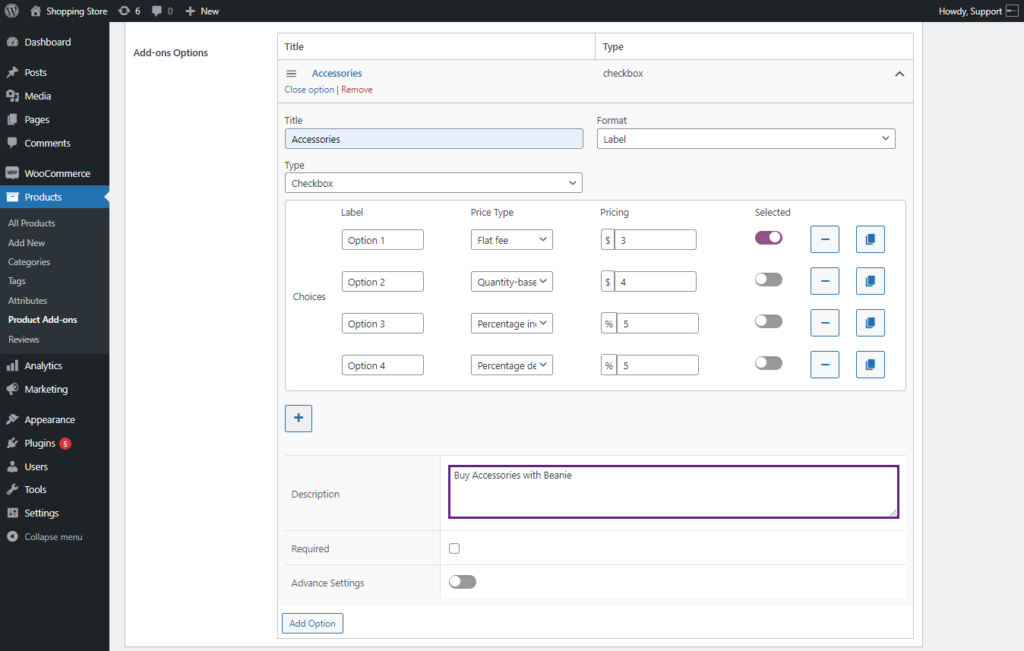
- The Administrator can select the Required check button to set these choices as required.
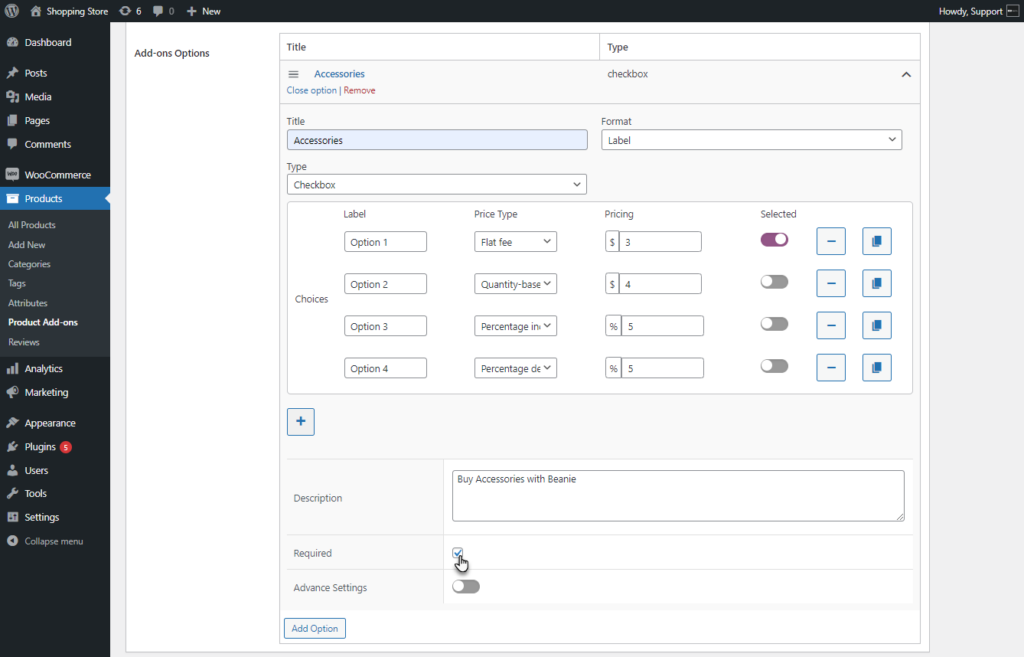
- The Administrator can configure the advance settings for the Addon by enabling the Advance Settings toggle button.
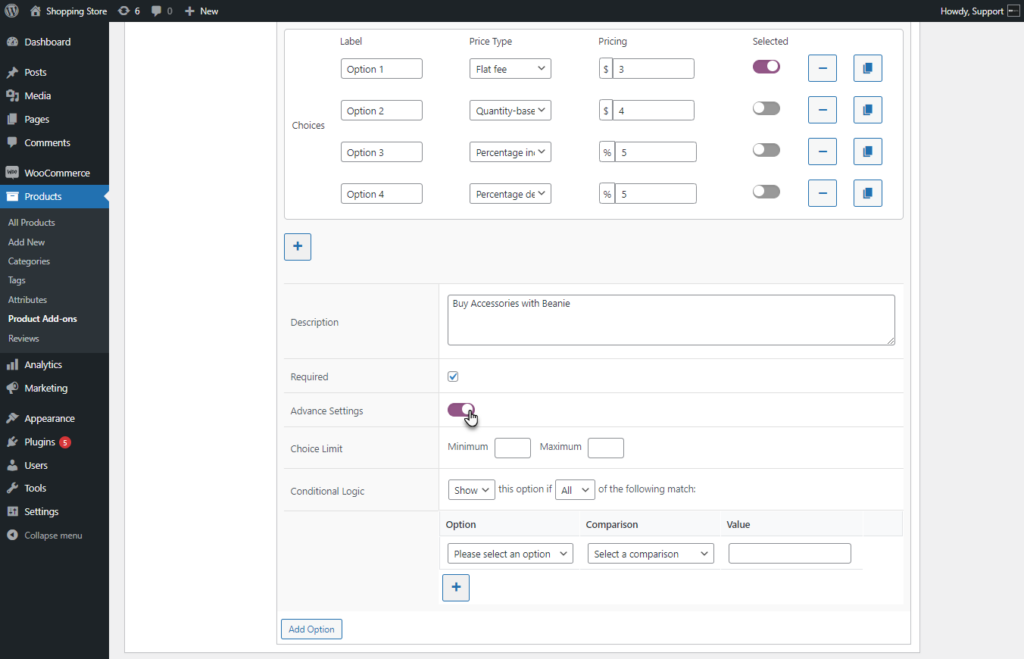
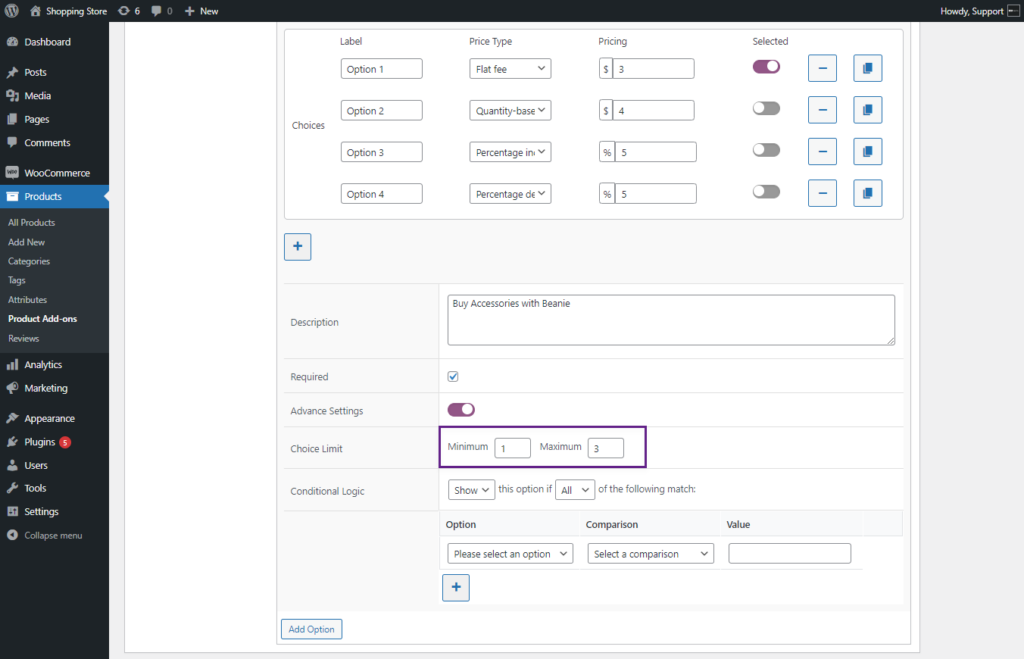
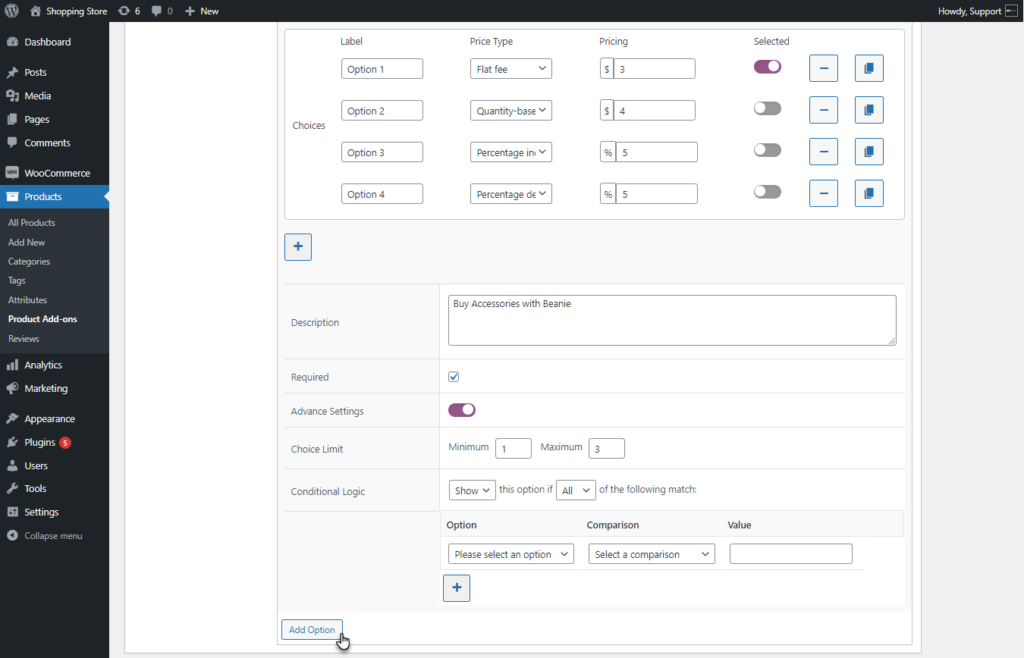
- The Administrator can set the choice limit in the Choice Limit option by providing the Minimum and Maximum values for the Choices. For example, a minimum of 1 or a maximum of 3 choices can be selected.
- There is an option provided as Conditional Logic. The Administrator can add a logic when multiple choices are created. The Administrator can choose to Show/Hide all or Any logic.
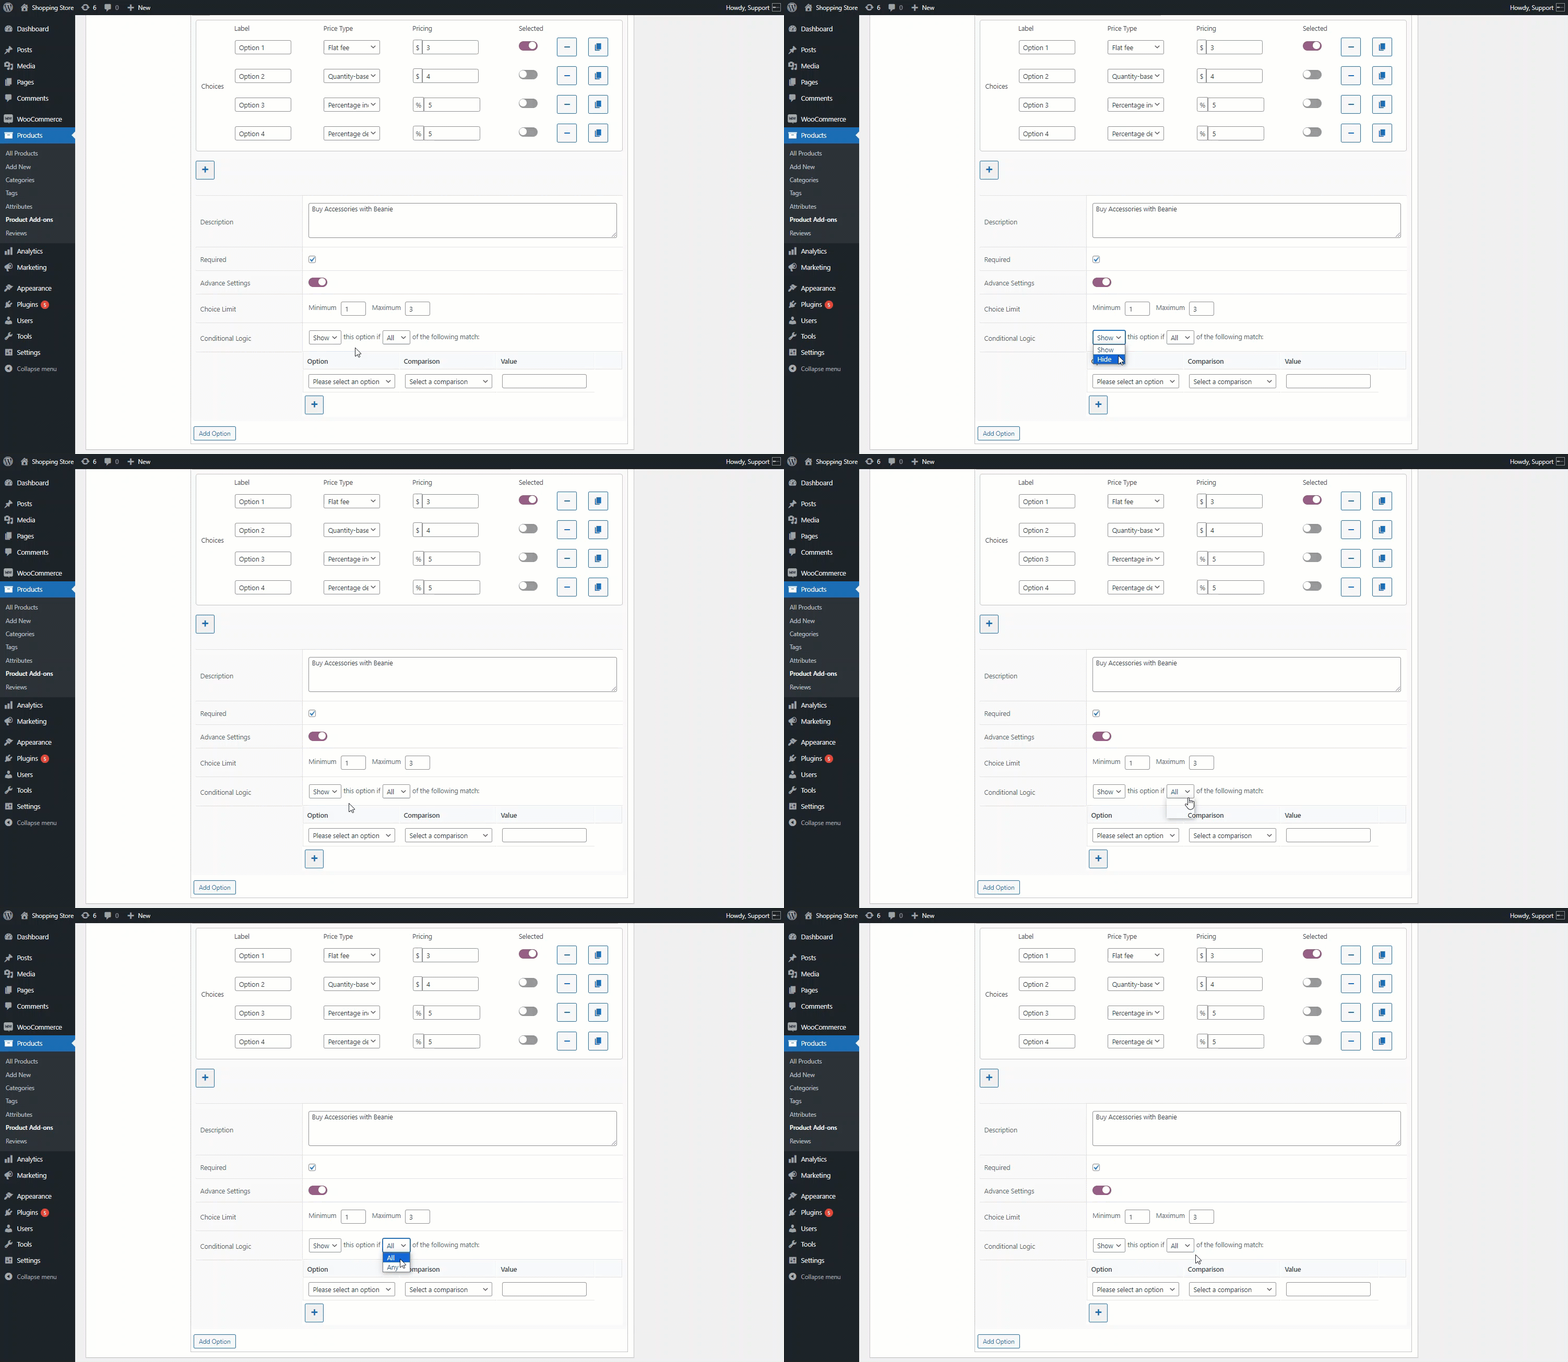
PLEASE NOTE: The Conditional Logic will work when Multiple Addon Options are created.
- The Administrator can add multiple Add-on options by clicking the Add Option Button.
- Another option is created as explained by the same process as Accessories.
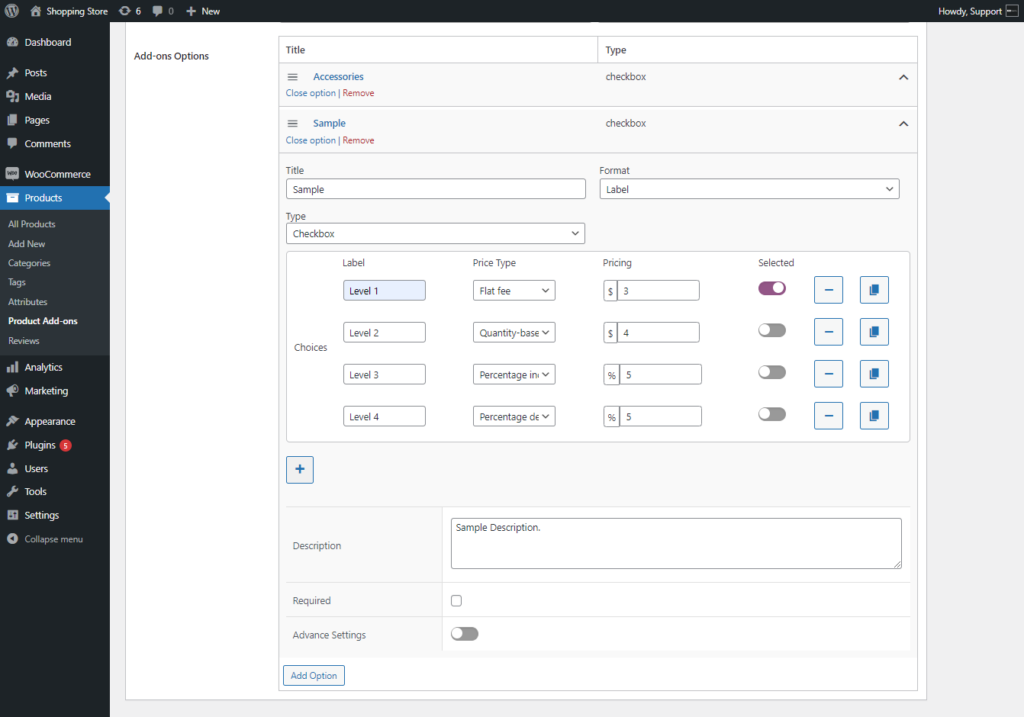
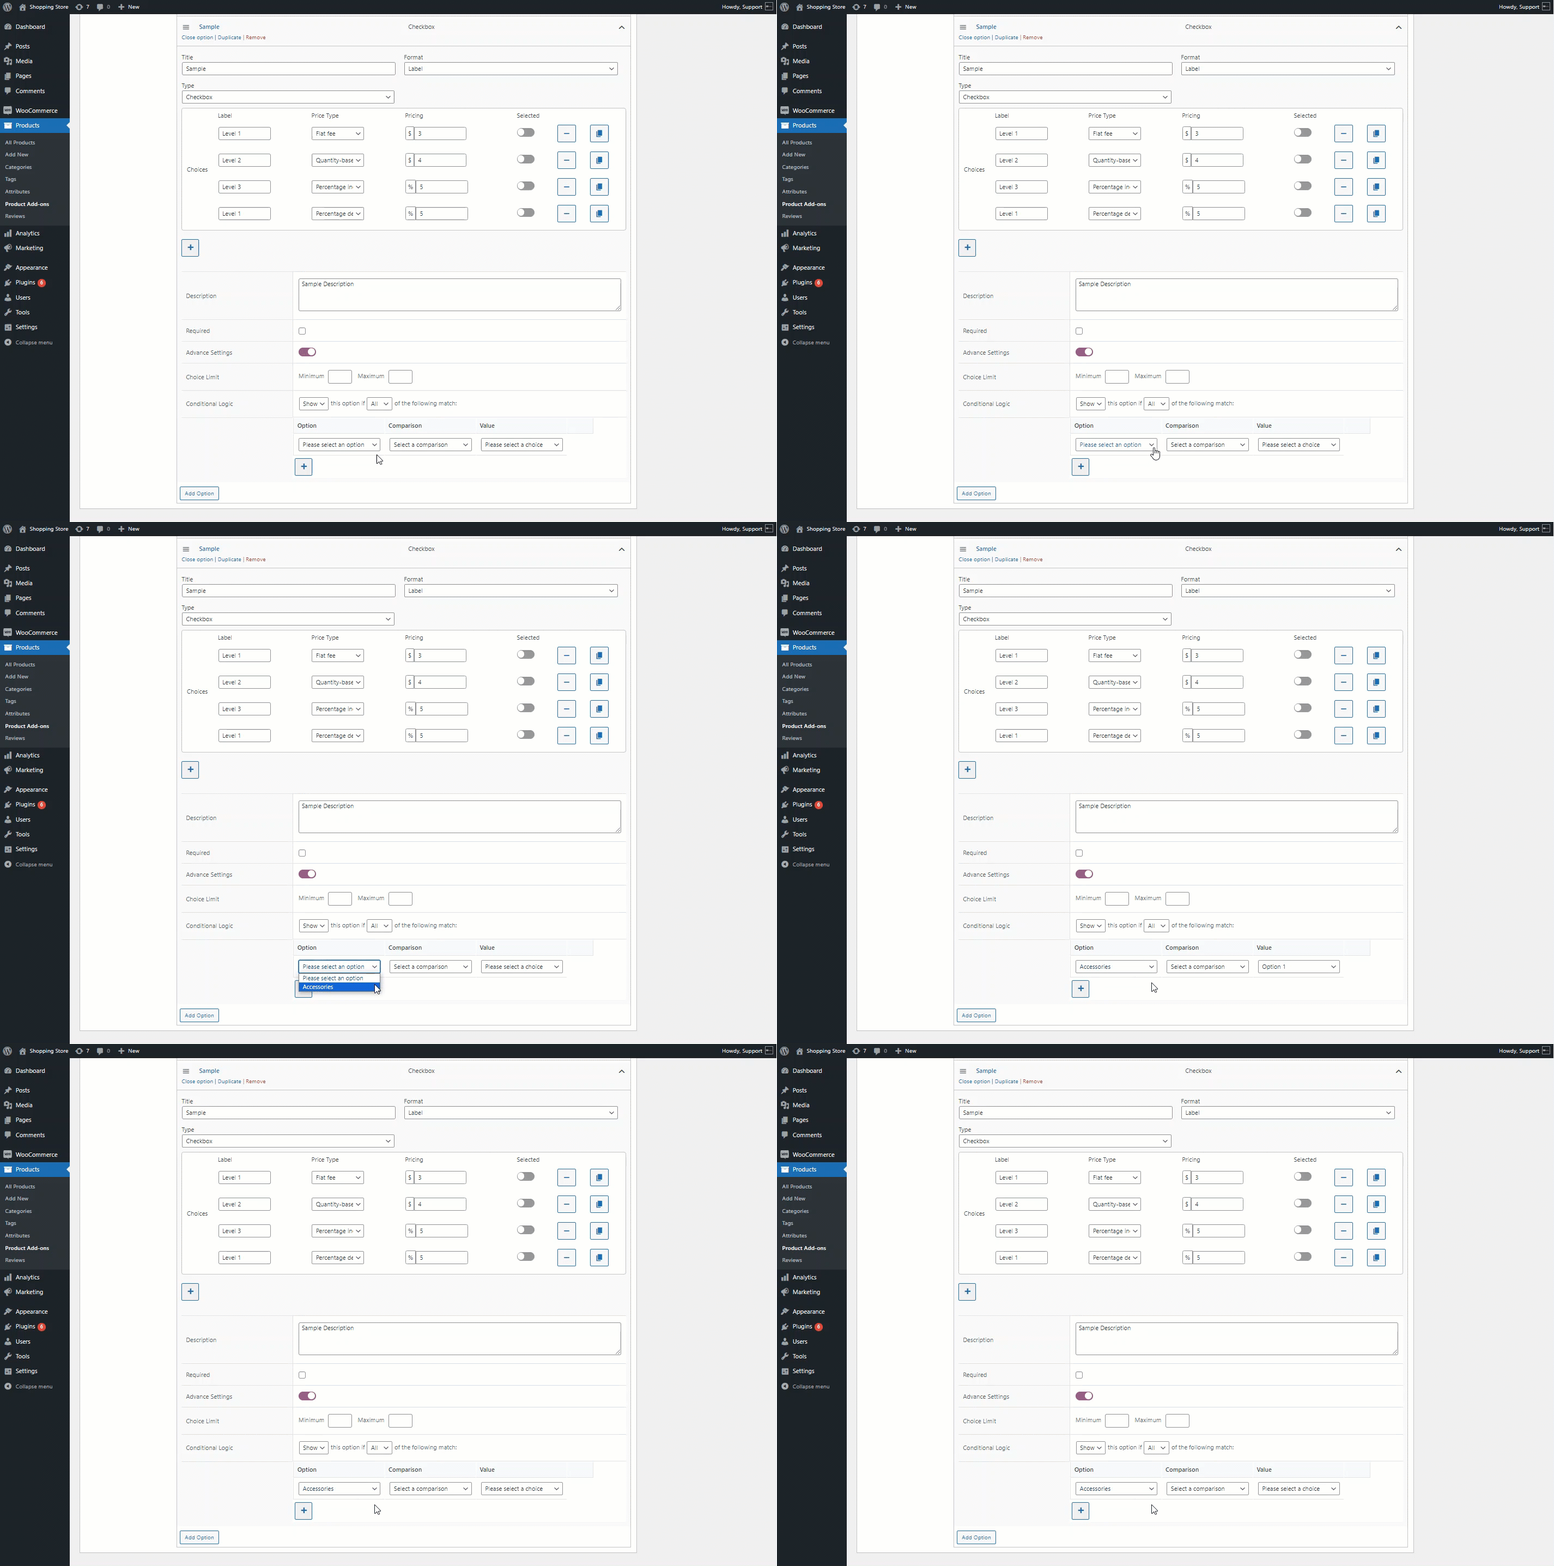
- Once the second option is created, move to the Advance Settings.
- Navigate to the Conditional Logic option. Select the Accessories option from the Option drop-down list.
- Select the Comparison condition in the Comparison option.
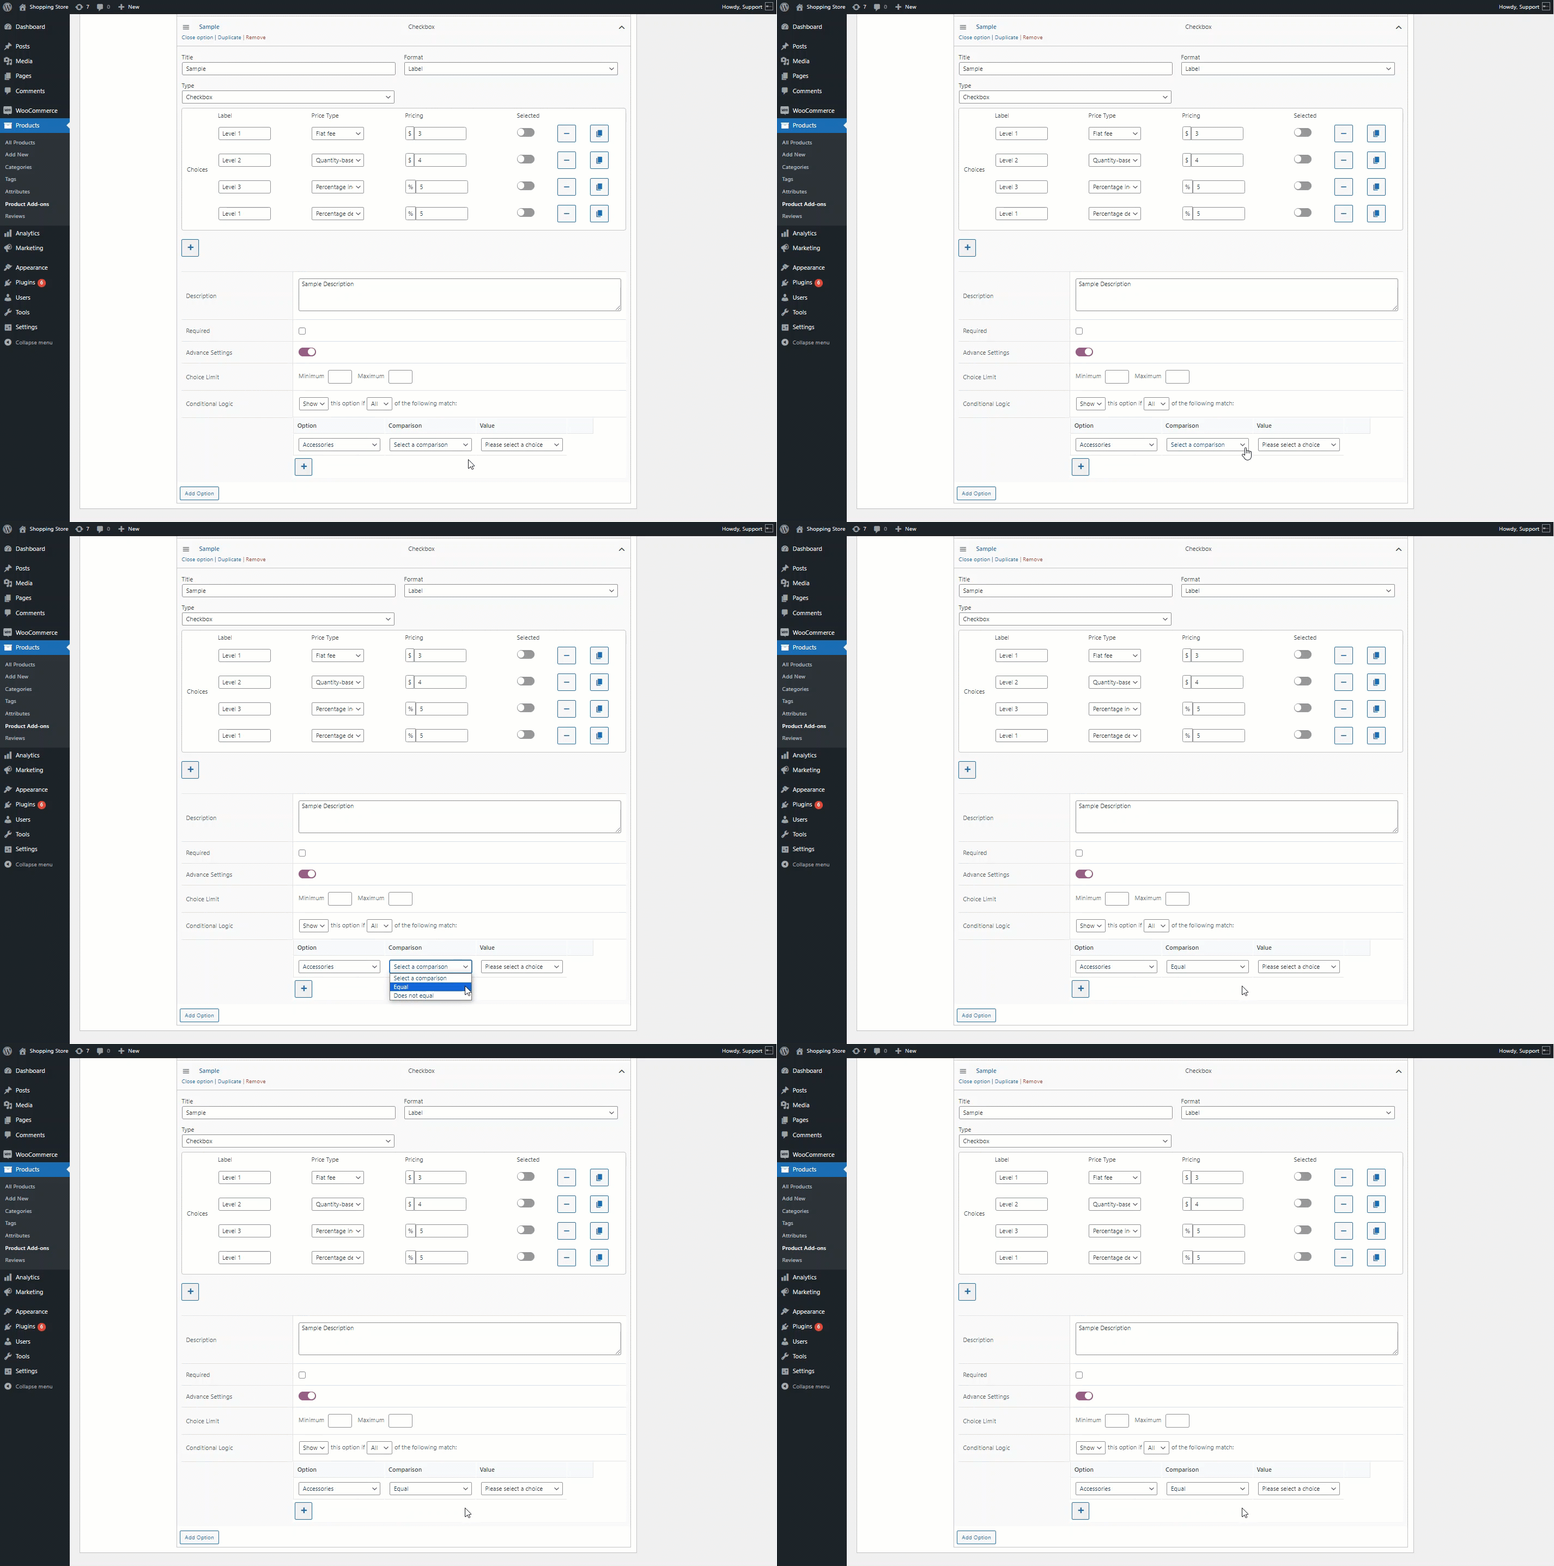
- Select the Value of the First option in the Value drop-down list.
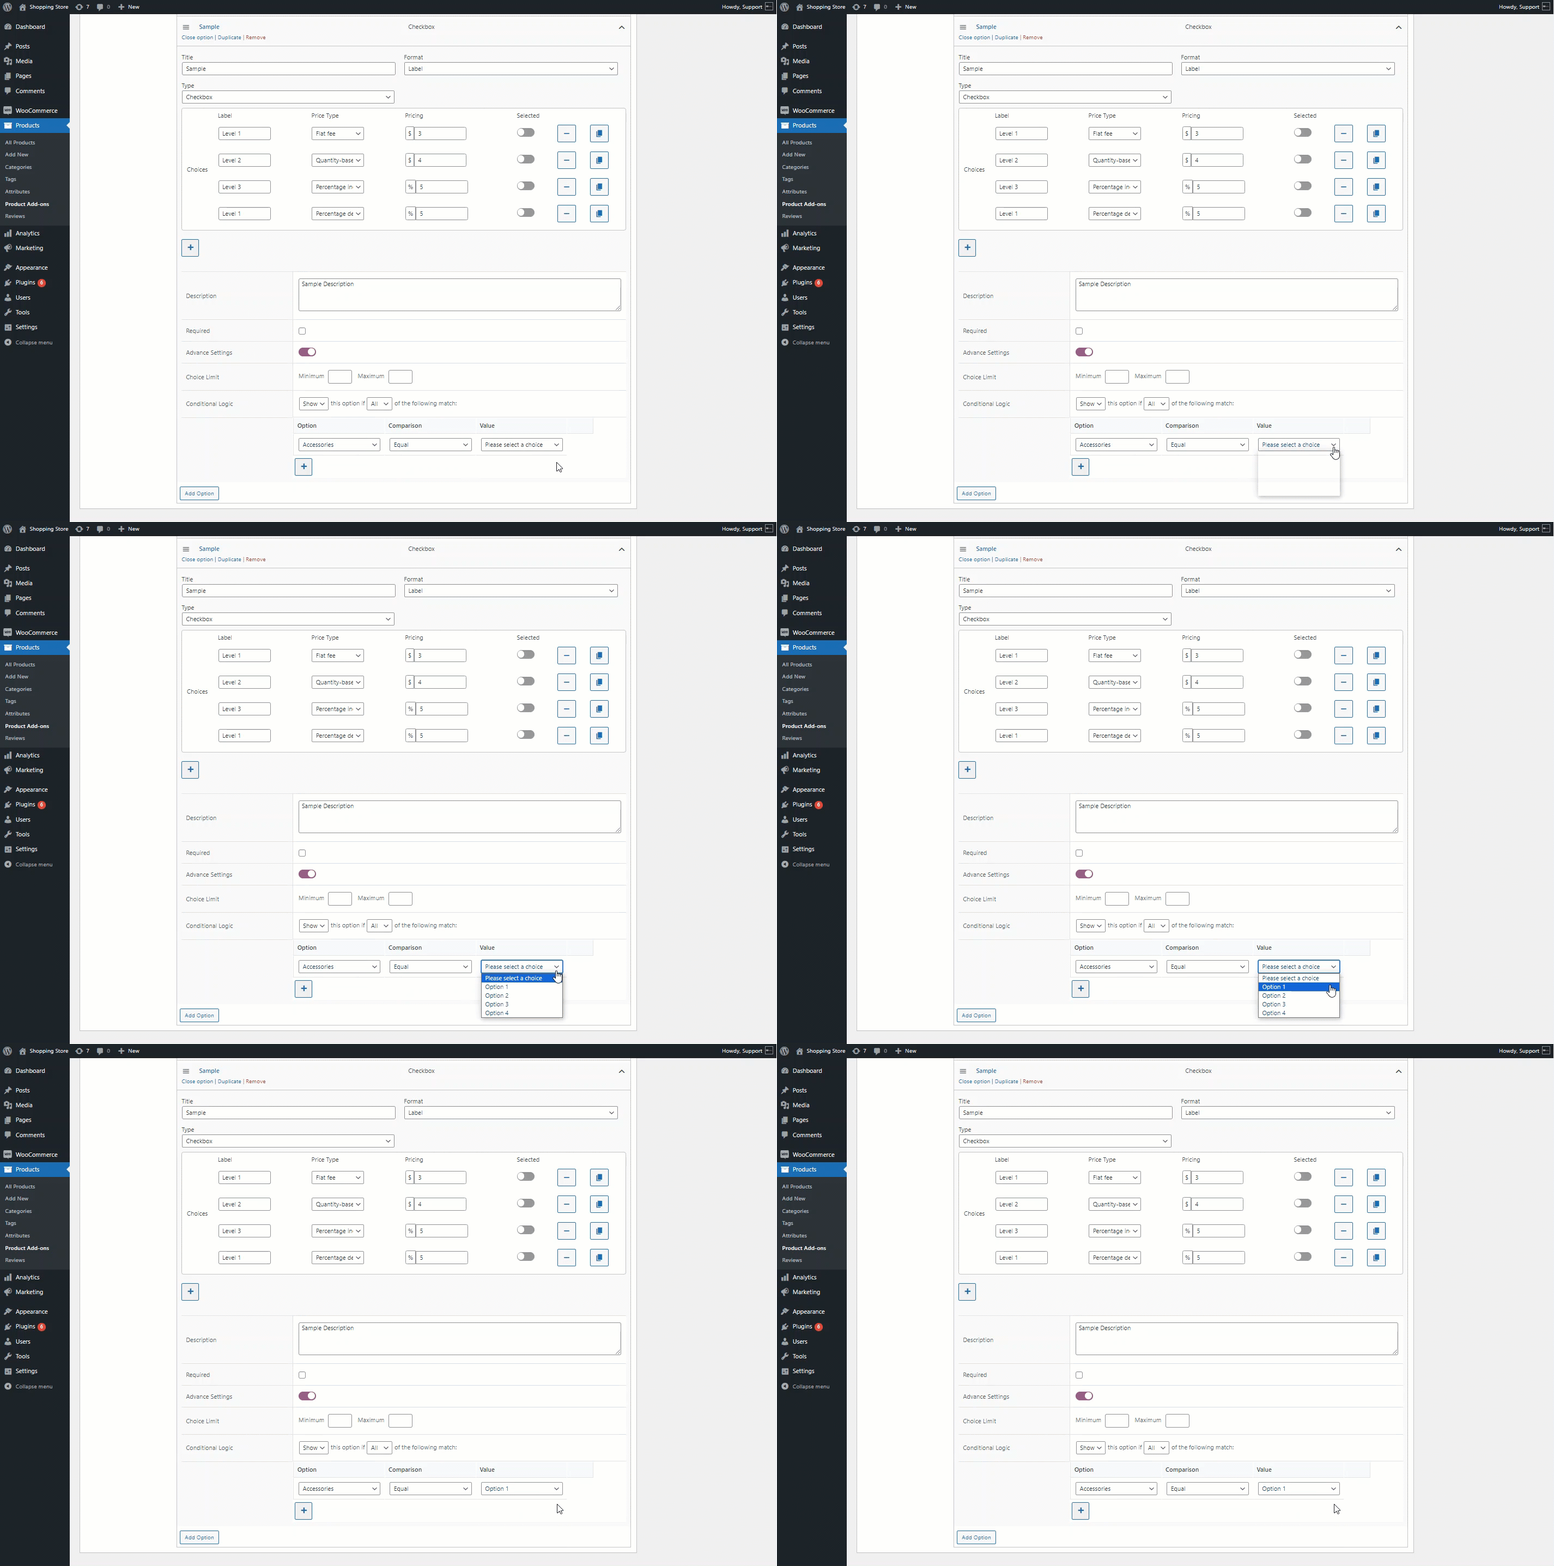
PLEASE NOTE: The Conditional Logic will function such that when Option 1 of the first choice is selected, the levels of the second choice will be displayed.
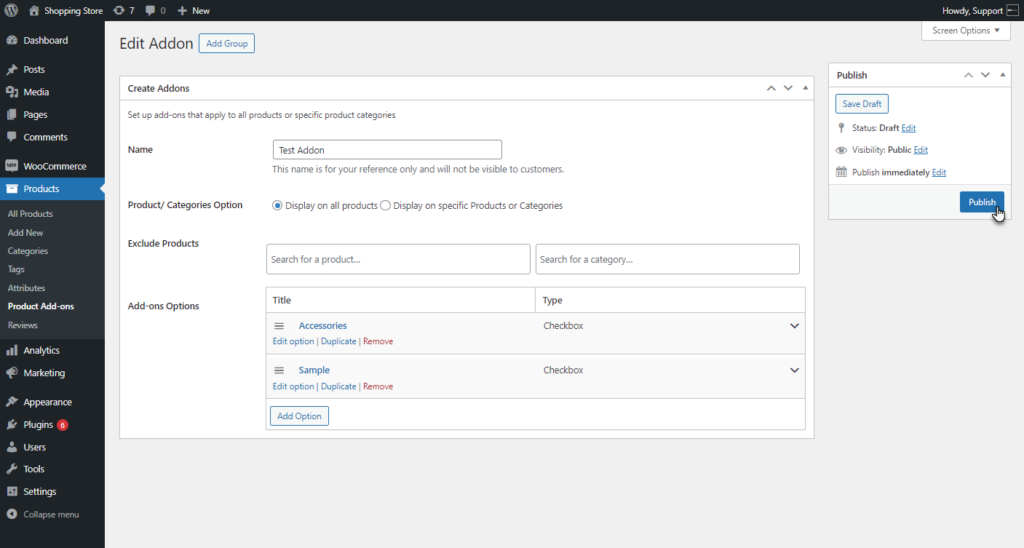
- Once done with the settings, Click the Publish button to publish the Addon.
Front-End Impact #
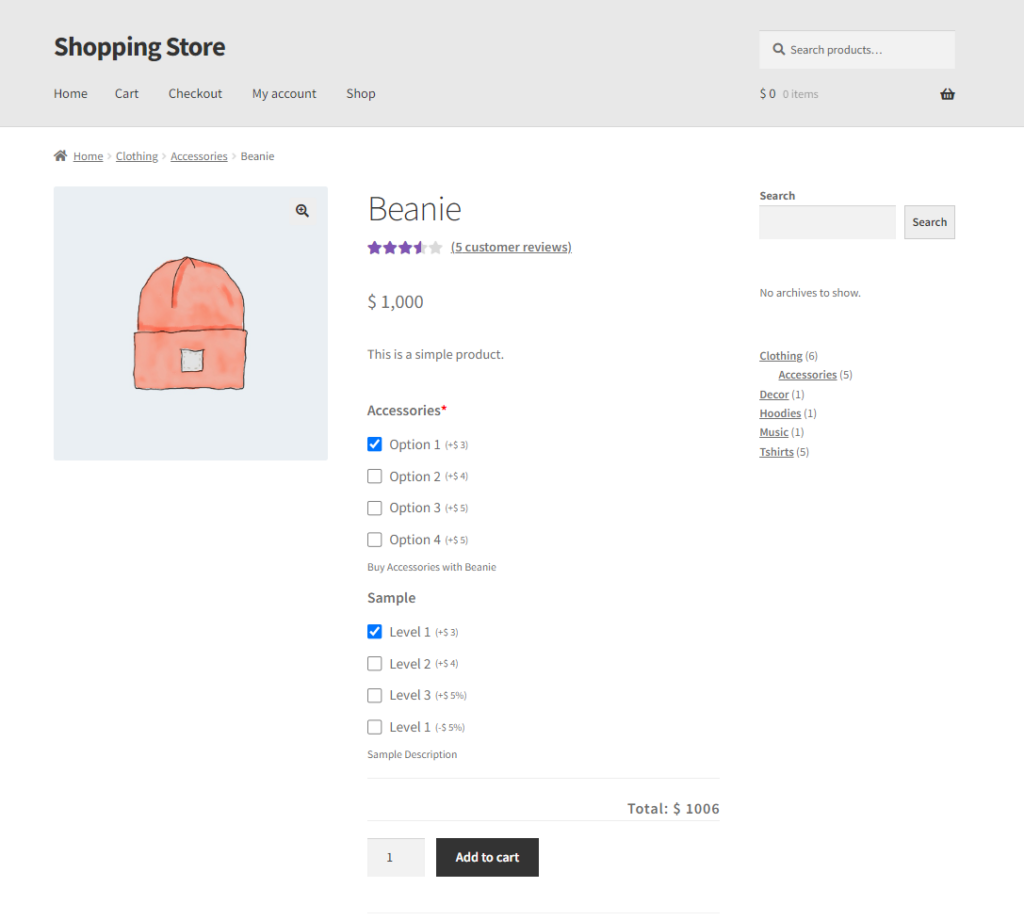
- Go to the Product page.
- The created Addon will be displayed on the product.
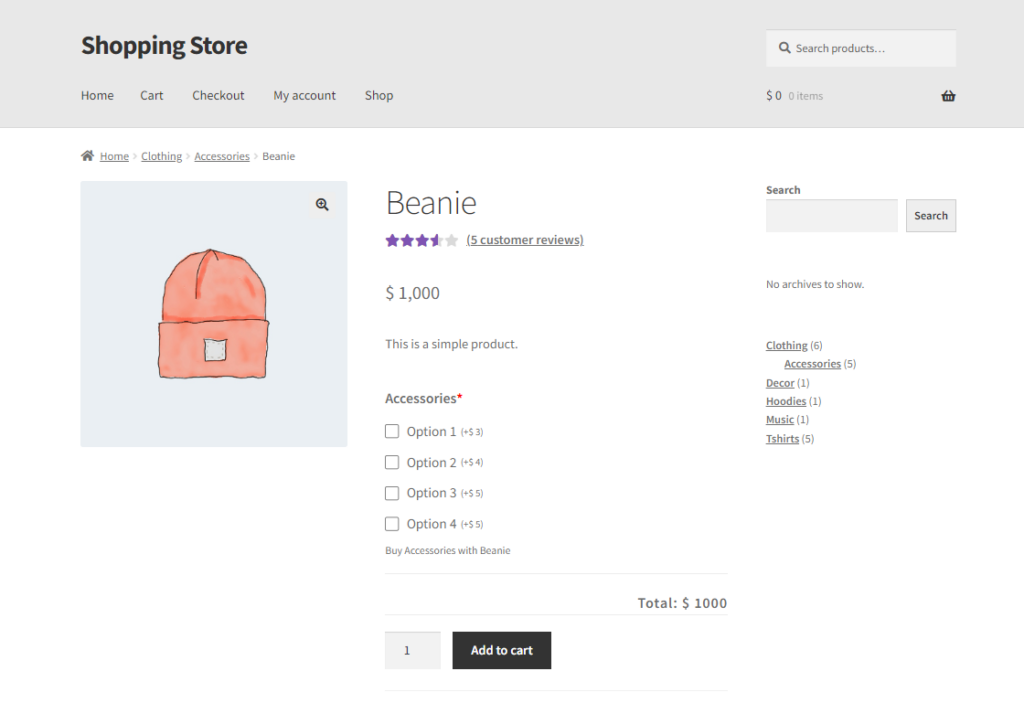
- All the options will be listed in Checkbox style.
- Meet the Conditional Logic by selecting Option 1, and different levels will appear.
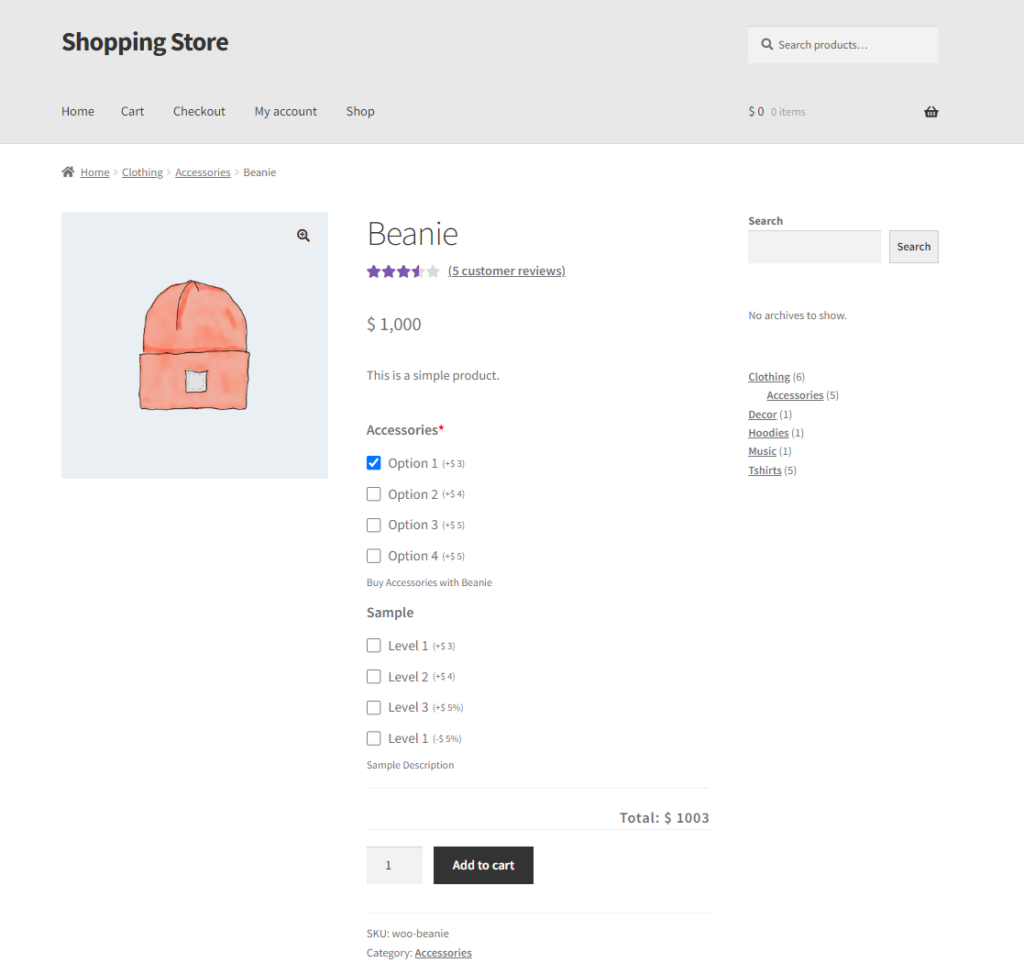
- Select the desired Level checkbox.
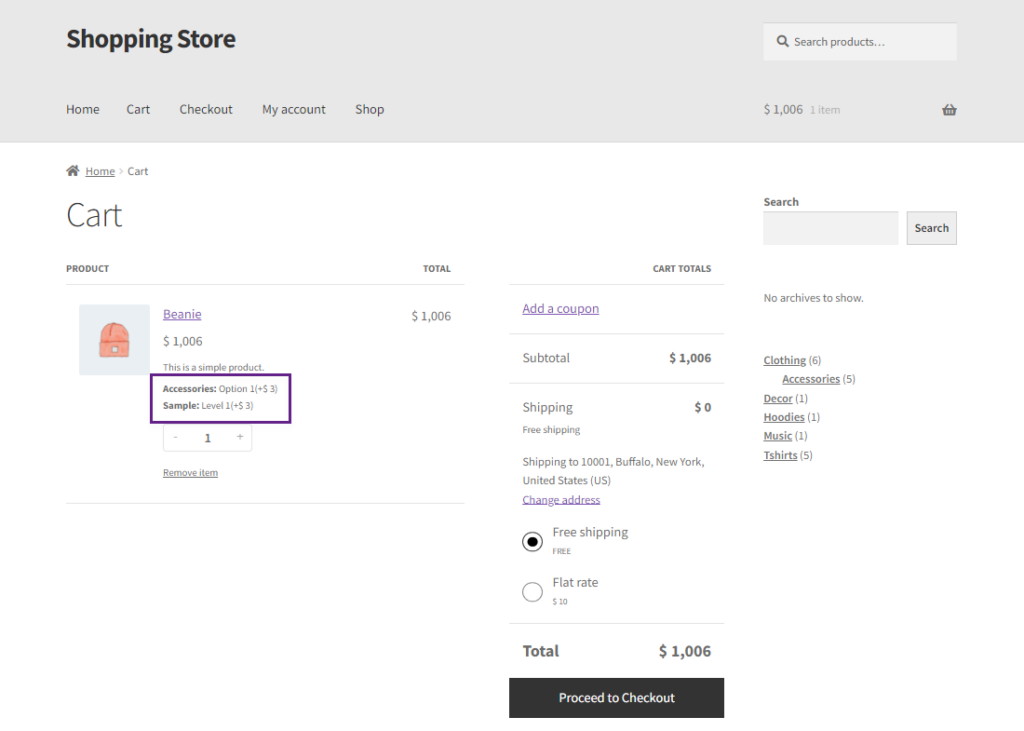
- Proceed to the Cart page by clicking on the Add to Cart button. The product Add-on details will be displayed.
- The add-ons prices will be added in the product price. For example, if the price of the product is $1000 and the add-ons prices are $3 each then $6 will be added to the subtotal and the product price added to the cart will be $1006.
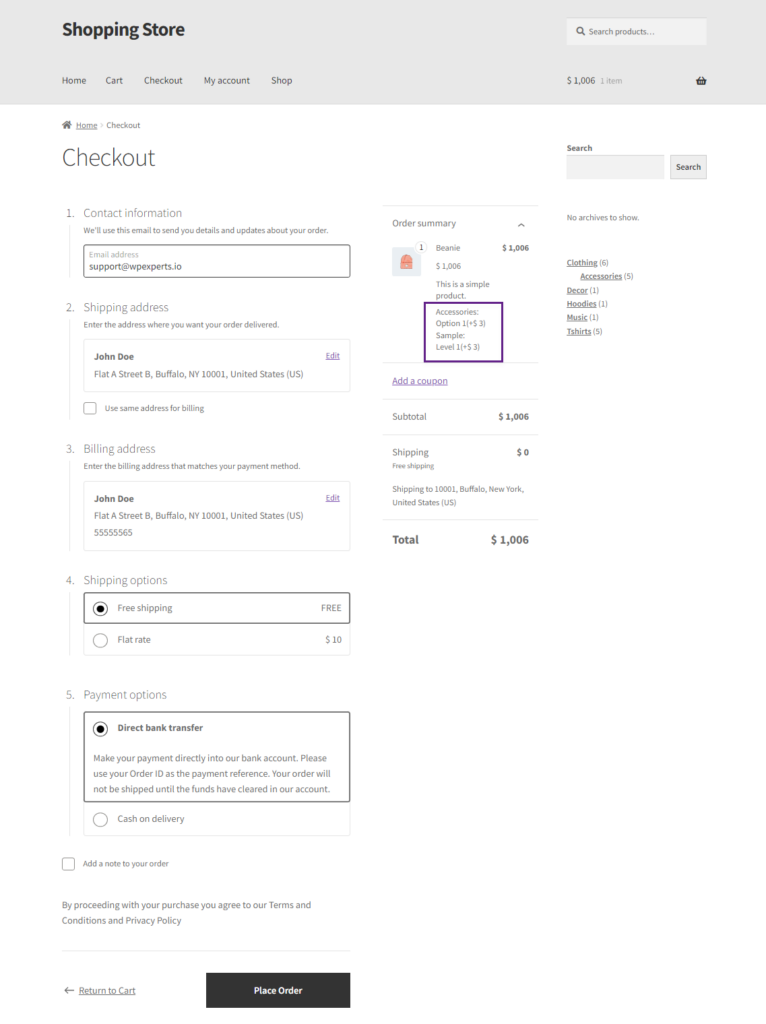
- Proceed to the Checkout page by clicking the Proceed to Checkout button. The product Add-on details will also be displayed.
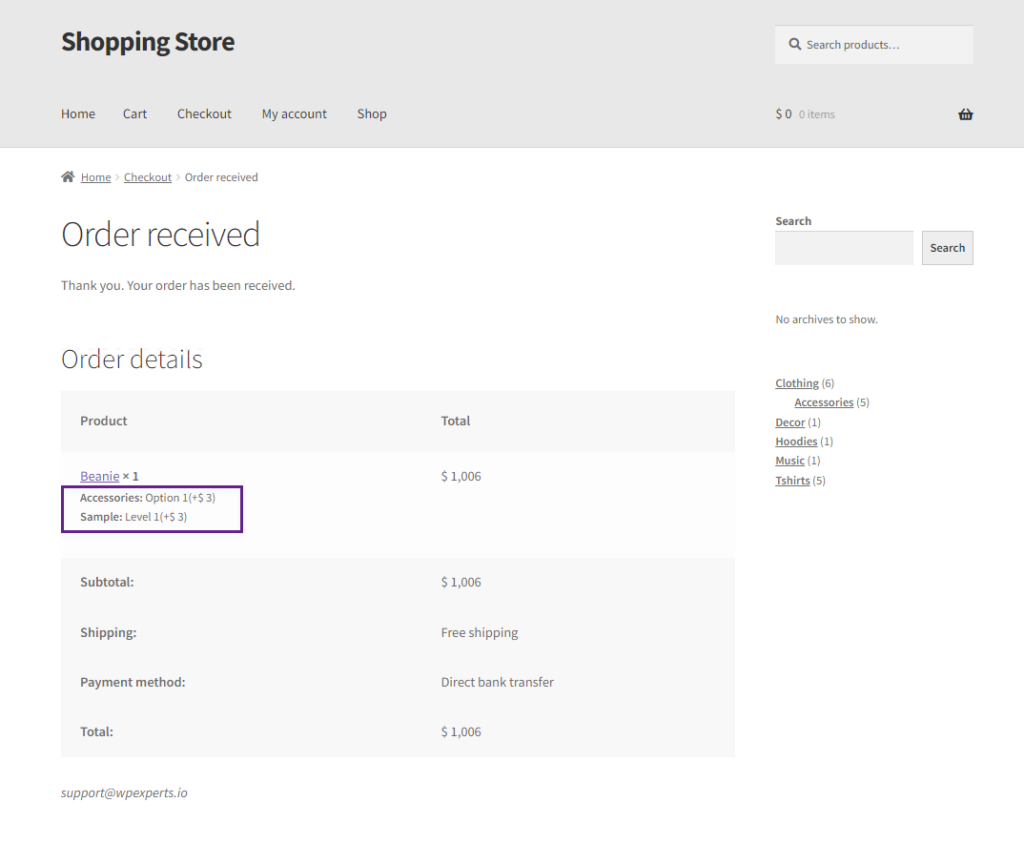
- Click on the Place order button. Your order and Product Add-on details will be placed in the Order Details.
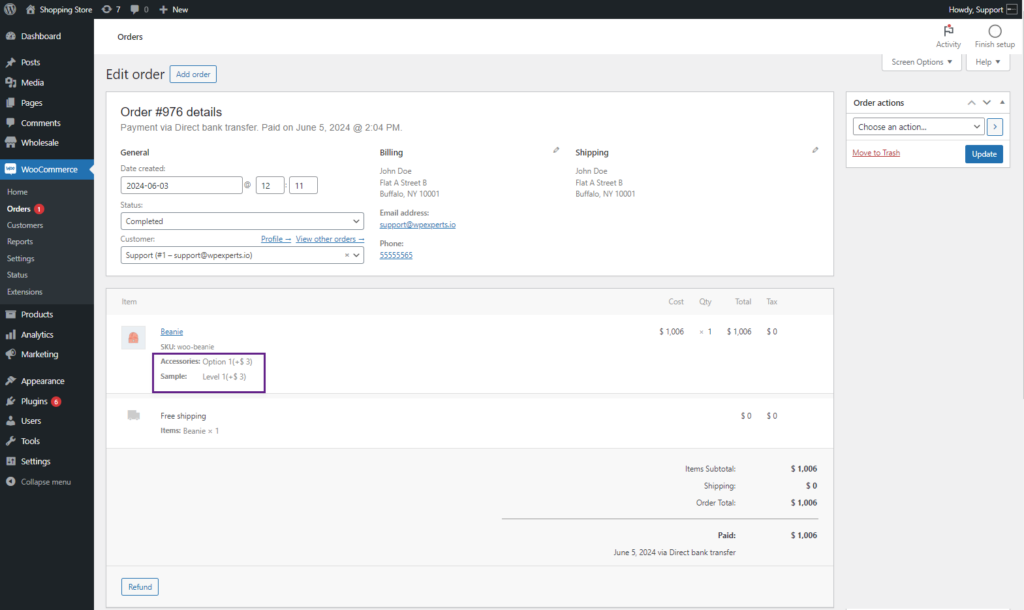
- The Product Add-on details will be available on the Administrator backend Order page.
Radio Button #
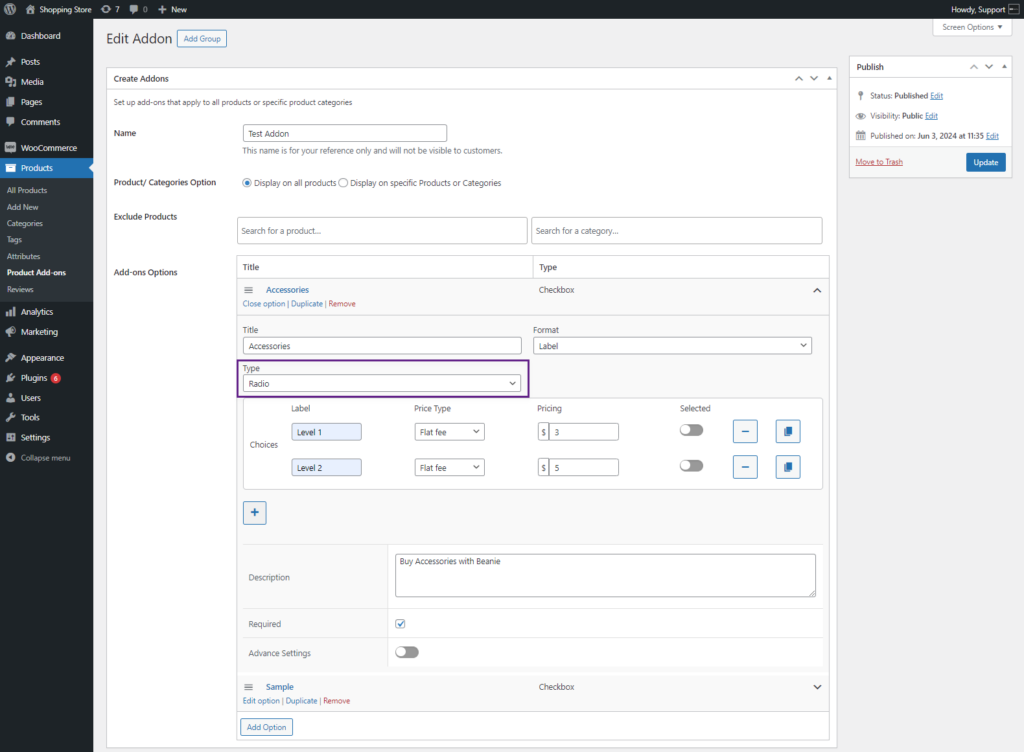
- Select the Radio option from the Type drop-down list. This will add radio buttons in the front end for the users.
- Choices: Administrator can add multiple options from here, there will be an add choice button to add more choices.
- The Administrator can select the price type from the Price Type drop-down list. Five Price type options are provided.
- No Cost – This choice will not affect the total product cost
- Flat Fee – A fixed amount is added to the total product cost, regardless of the quantity ordered.
- Quantity-Based Fee – A fixed amount is added to the total product cost multiplied by the quantity ordered.
- Percentage Increase – This increases the product price by the specified percentage.
- Percentage Decrease – This decreases the product price by the specified percentage.
- Selected toggle button: The Administrator can make any choice option selected by default on the front-end if this option is activated.
- A delete button in front of every option.
- A duplicate button is in front of every option.
- Description: A text box will be used to add descriptive text, which will appear below the choices.
- Required: A checkbox allows the Administrator to make the field mandatory for the user.
- Advance settings: Conditional Logic options will appear when the advance setting toggle is enabled.
Front-End Impact #
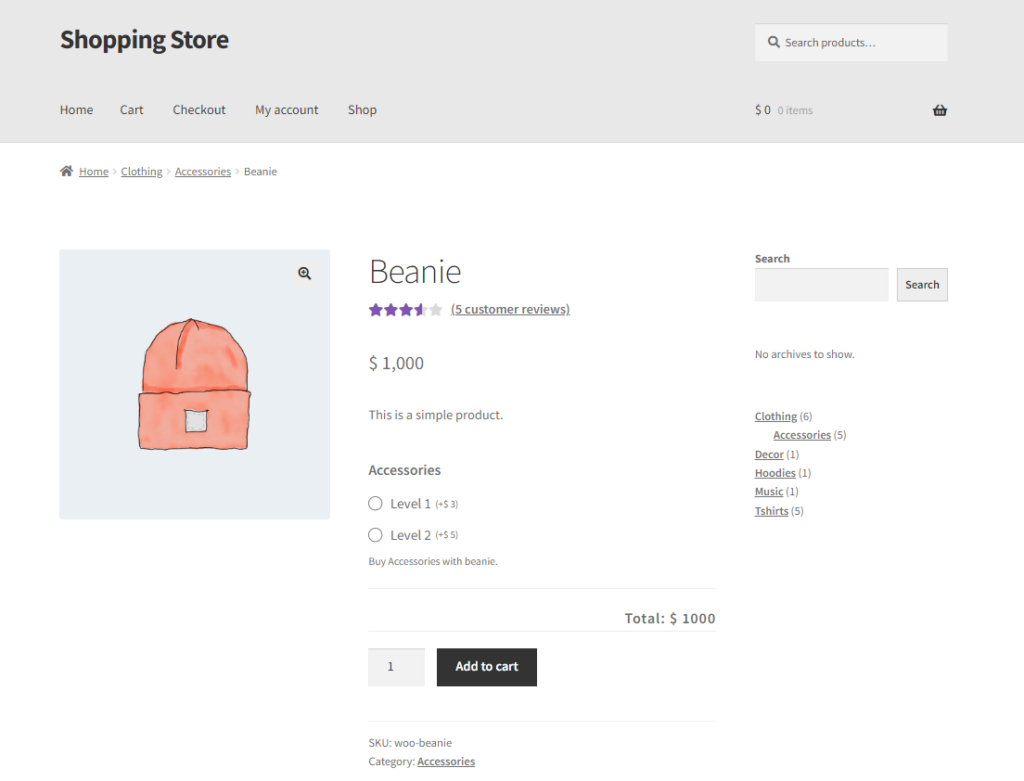
- Go to the Product page.
- The created Radio button Addon will be displayed on the product.
Dropdown #
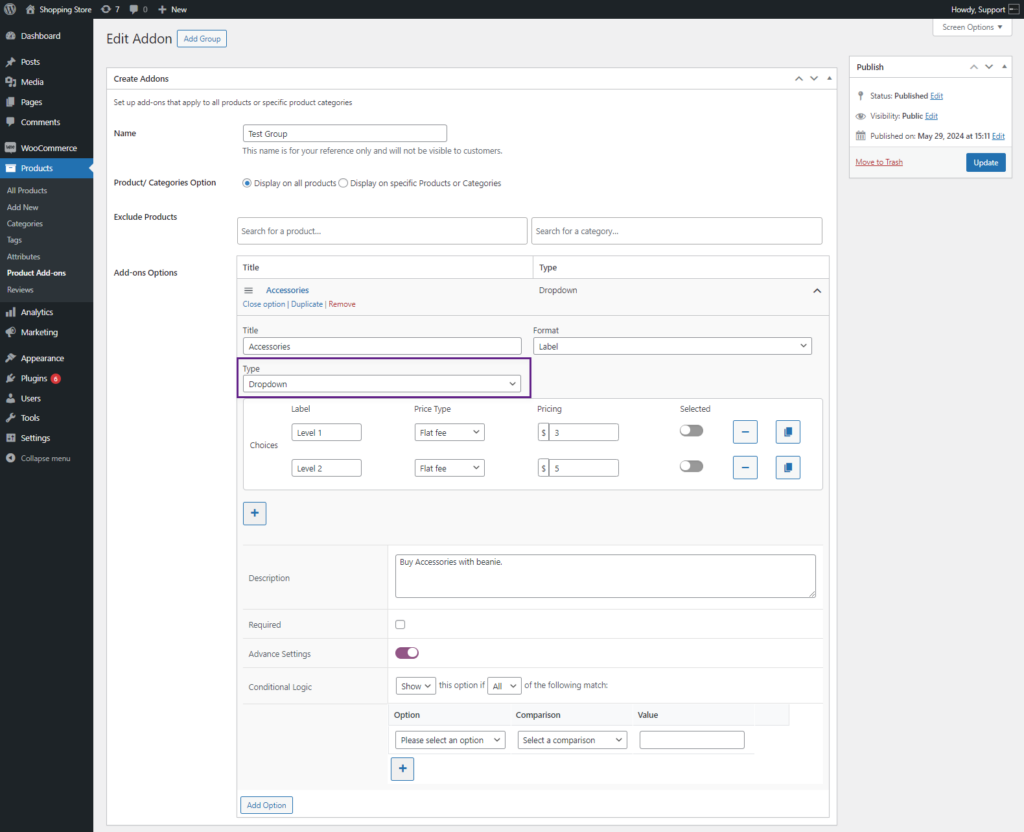
- Select the Dropdown option from the Type drop-down list. This will add a drop-down list of the options created for the product add-on.
- Choices: The Administrator can add multiple options from here. There will be an add choice button to add more choices.
- The Administrator can select the price type from the Price Type drop-down list. Five Price type options are provided.
- No Cost – This choice will not affect the total product cost
- Flat Fee – A fixed amount is added to the total product cost, regardless of the quantity ordered.
- Quantity-Based Fee – A fixed amount is added to the total product cost multiplied by the quantity ordered.
- Percentage Increase – This increases the product price by the specified percentage.
- Percentage Decrease – This decreases the product price by the specified percentage.
- Selected toggle button: The Administrator can make any choice option selected by default on the front-end if this option is activated.
- A delete button is in front of every option.
- A duplicate button in front of every option.
- Description: A text box to add descriptive text which will appear below the choices.
- Required: A checkbox to allow the Administrator to make the field mandatory for the user.
- Advance settings: Conditional Logic options will appear when the advance setting toggle is enabled.
Front-End Impact #
- Go to the Product page.
- The created Drop-down List Addon will be displayed on the product.

Text Field #
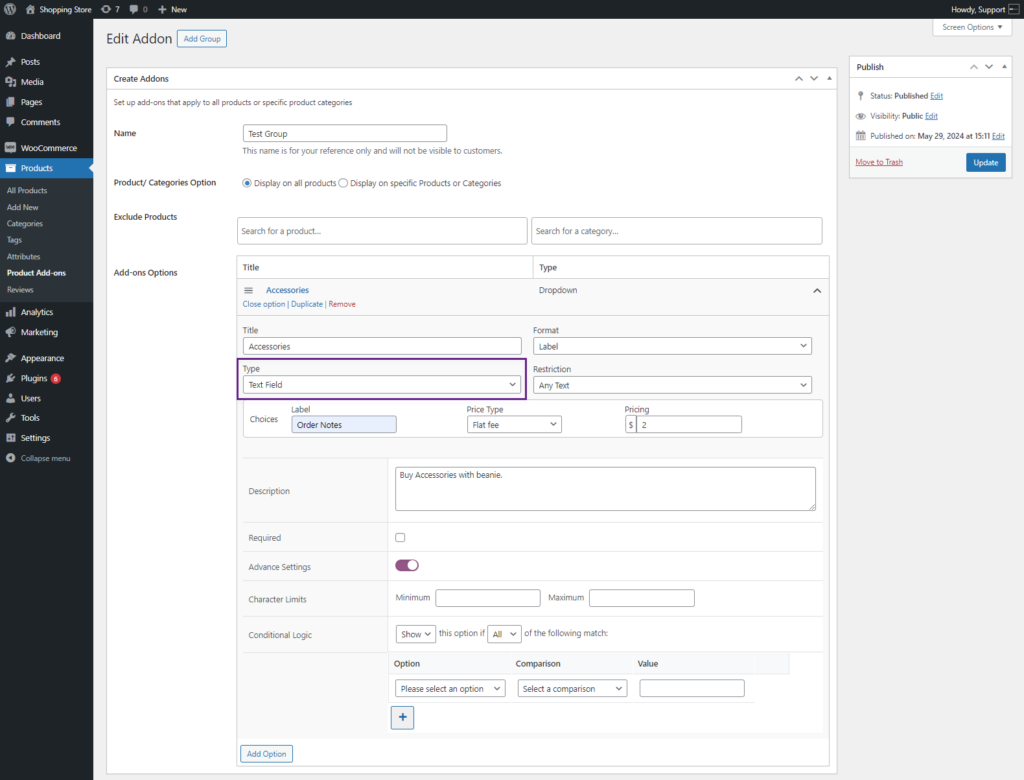
- Select the Text Field option from the Type drop-down list. This will add a text field on the product page.
- Choices: The Administrator can add only one option from here.
- The Administrator can select the price type from the Price Type drop-down list. Six Price type options are provided.
- No Cost – This choice will not affect the total product cost
- Flat Fee – A fixed amount is added to the total product cost, regardless of the quantity ordered.
- Quantity-Based Fee – A fixed amount is added to the total product cost multiplied by the quantity ordered.
- Percentage Increase – This increases the product price by the specified percentage.
- Percentage Decrease – This decreases the product price by the specified percentage.
- Character Count – This allows you to charge a fixed amount for every letter entered. For example, if the character count is $0.50 and the customer enters “Happy Birthday” then the cost of the product will increase by $6.50 (i.e. 13 letters x $0.5).
- Description: A text box will be used to add descriptive text, which will appear below the choices.
- Required: A checkbox to allow the Administrator to make the field mandatory for the user.
- Advance settings: This will be an enable/disable toggle. When enabled, the following options will appear:
- Character Limits: Enter the minimum and/or maximum number of characters. Validate on minimum and maximum character limit on the front-end.
- Conditional Logic: Conditional Logic is explained below at the end.
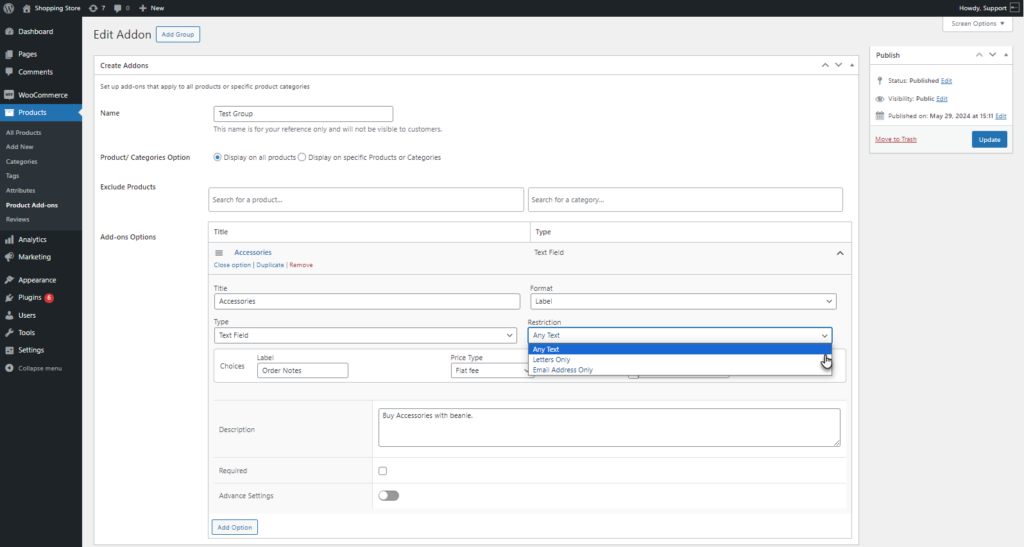
- The Administrator can choose the Letters Only or Email Address Only option from the Restriction drop-down list. This option allows the Administrator to restrict input to either letters only or email addresses only.
Front-End Impact #
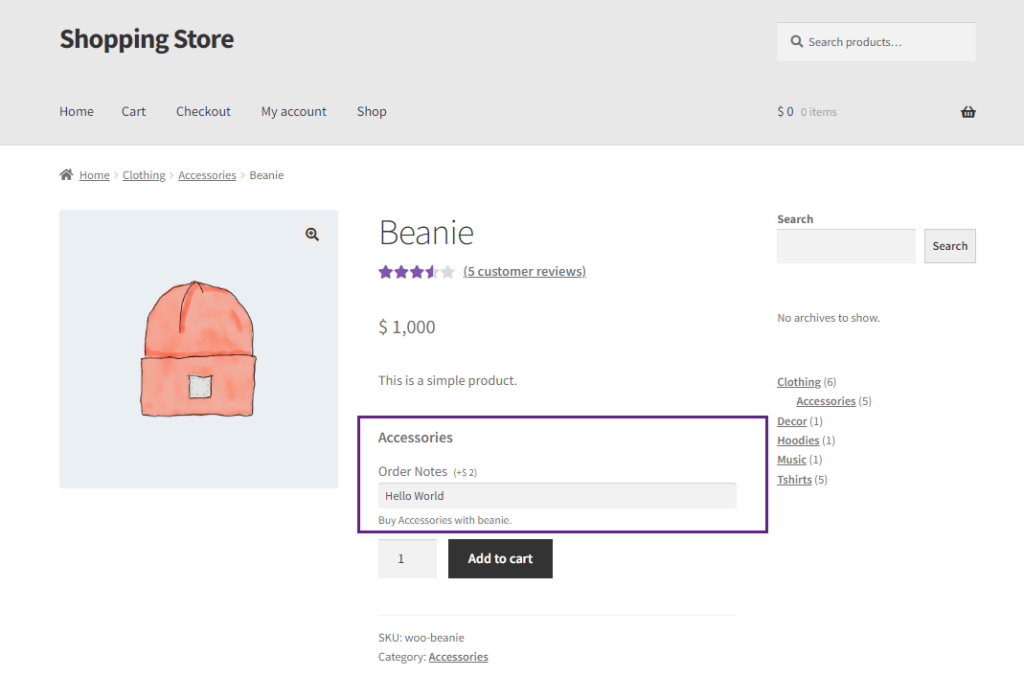
- Go to the Product page.
- The created Text Field will be displayed on the product.
Text Area #
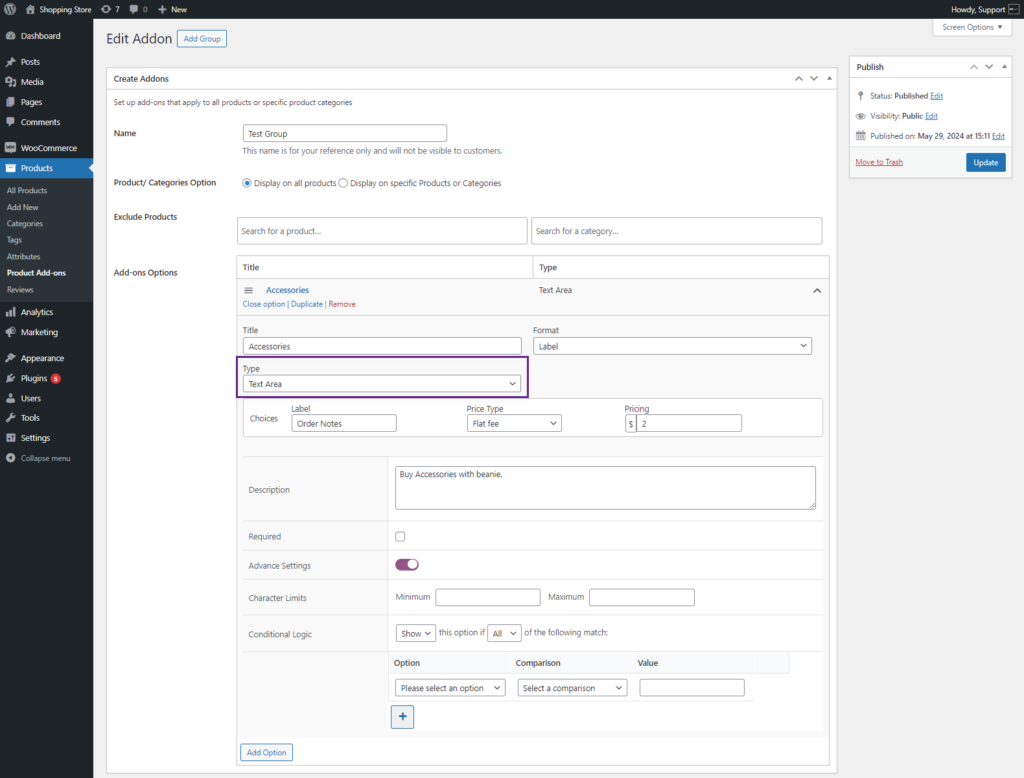
- Select the Text Area option from the Type drop-down list. This will add a text field on the product page.
- Choices: The Administrator can add only one option from here.
- The Administrator can select the price type from the Price Type drop-down list. Six Price type options are provided.
- No Cost – This choice will not affect the total product cost
- Flat Fee – A fixed amount is added to the total product cost, regardless of the quantity ordered.
- Quantity-Based Fee – A fixed amount is added to the total product cost multiplied by the quantity ordered.
- Percentage Increase – This increases the product price by the specified percentage.
- Percentage Decrease – This decreases the product price by the specified percentage.
- Character Count – This allows you to charge a fixed amount for every letter entered. For example, if the character count is $0.50 and the customer enters “Happy Birthday” then the cost of the product will increase by $6.50 (i.e. 13 letters x $0.5).
- Description: A text box will be used to add descriptive text, which will appear below the choices.
- Required: A checkbox to allow the Administrator to make the field mandatory for the user.
- Advance settings: This will be an enable/disable toggle. When enabled, the following options will appear:
- Character Limits: Enter the minimum and/or maximum number of characters. Validate on minimum and maximum character limit on the front-end.
- Conditional Logic: Conditional Logic is explained below at the end.
Front-End Impact #
- Go to the Product page.
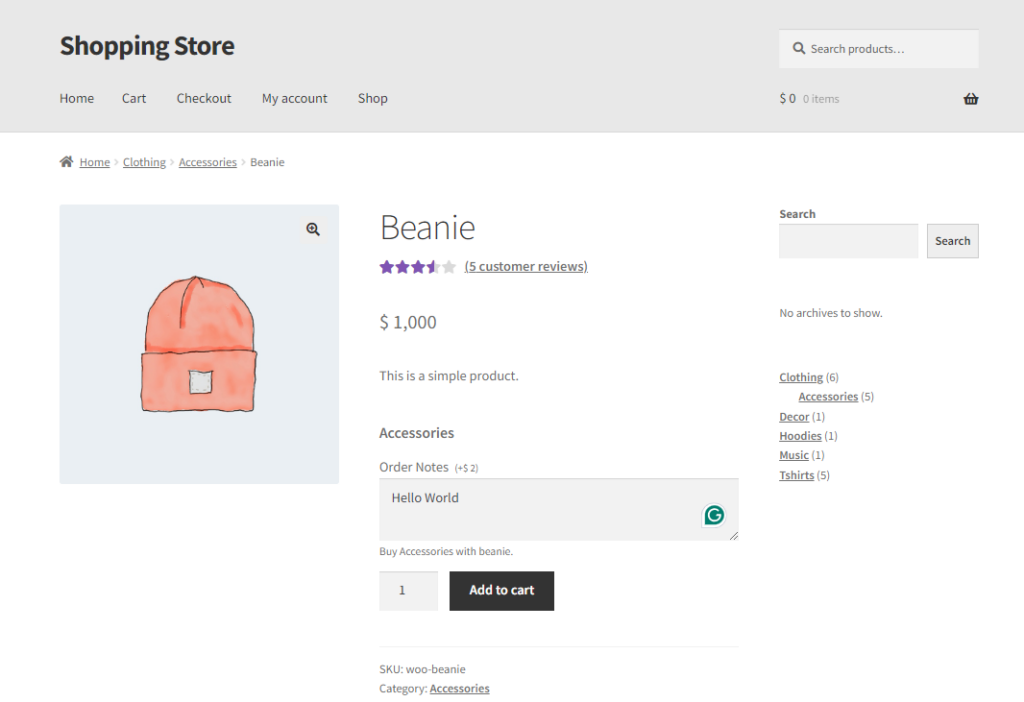
- The created Text Area will be displayed on the product.
Numbers #
- Select the Numbers option from the Type drop-down list. This will add a Number field on the product page.
- Choices: The Administrator can add only one option from here.
- The Administrator can select the price type from the Price Type drop-down list. Five Price type options are provided.
- No Cost – This choice will not affect the total product cost
- Flat Fee – A fixed amount is added to the total product cost, regardless of the quantity ordered.
- Quantity-Based Fee – A fixed amount is added to the total product cost multiplied by the quantity ordered.
- Percentage Increase – This increases the product price by the specified percentage.
- Percentage Decrease – This decreases the product price by the specified percentage.
- Description: A text box to add descriptive text which will appear below the choices.
- Required: A checkbox to allow the Administrator to make the field mandatory for the user.
- Advance settings: this will be an enable/disable toggle when enabled, the following options will appear:
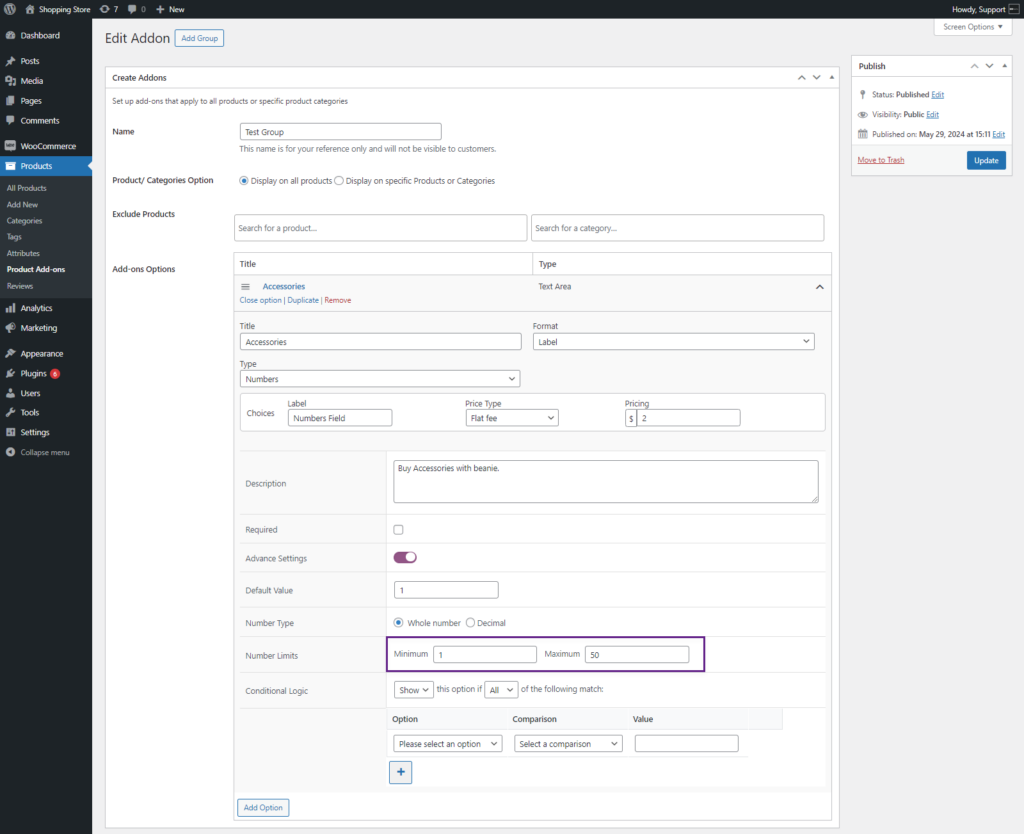
- Default Value: The default number value will be displayed on the front-end on page load.
- Number Type: Whole Number and Decimal.
- Number Limits: Enter the minimum and maximum value. Value entered must not be less or more than the defined value.
- Conditional Logic: Conditional Logic is explained below at the end.
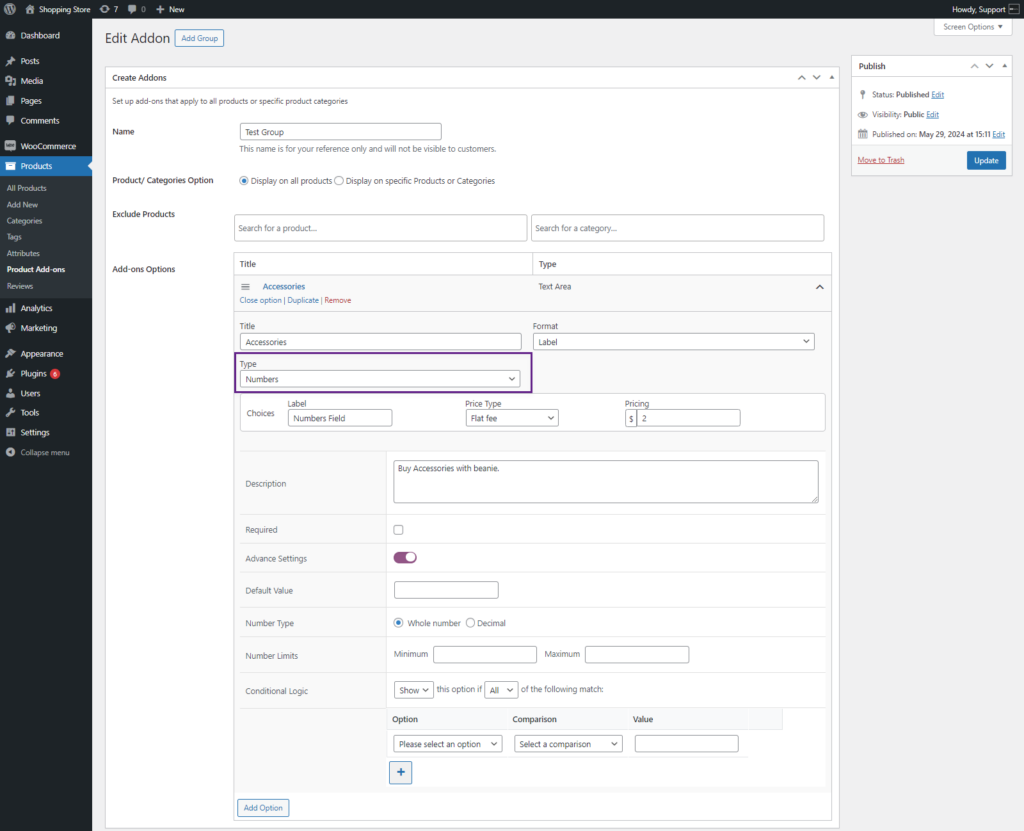
- Set the default value in the Default Value field. This default value will be placed in the Numbers field for the front-end user.
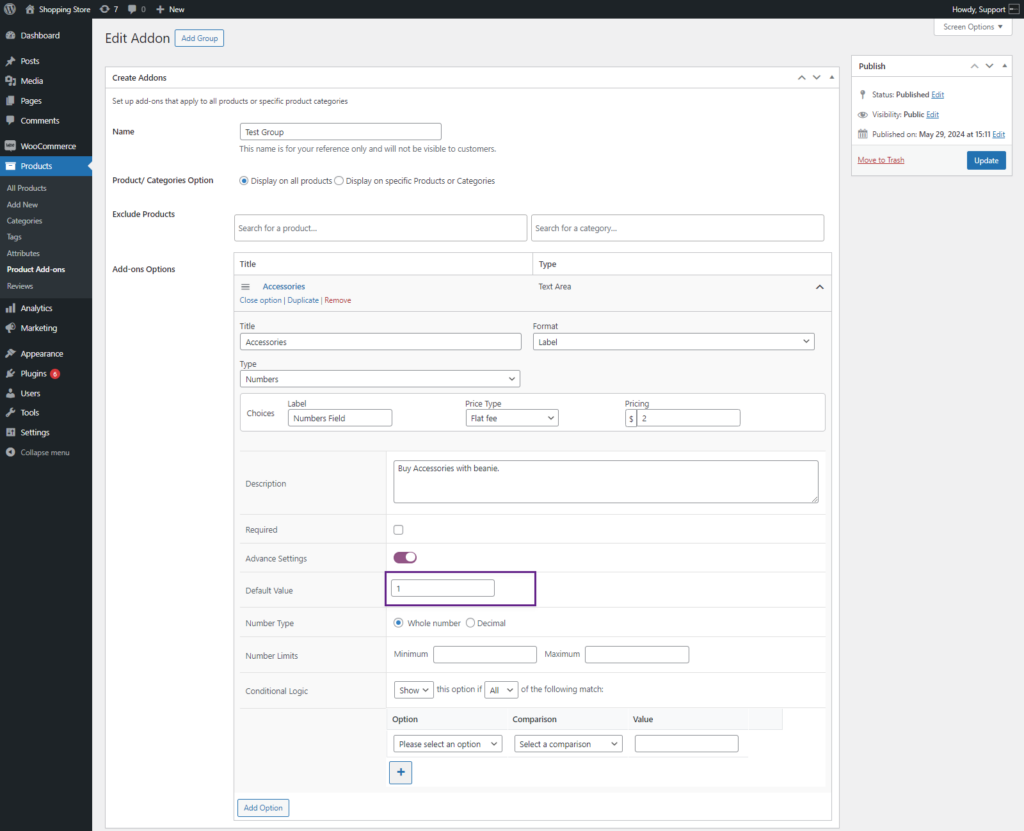
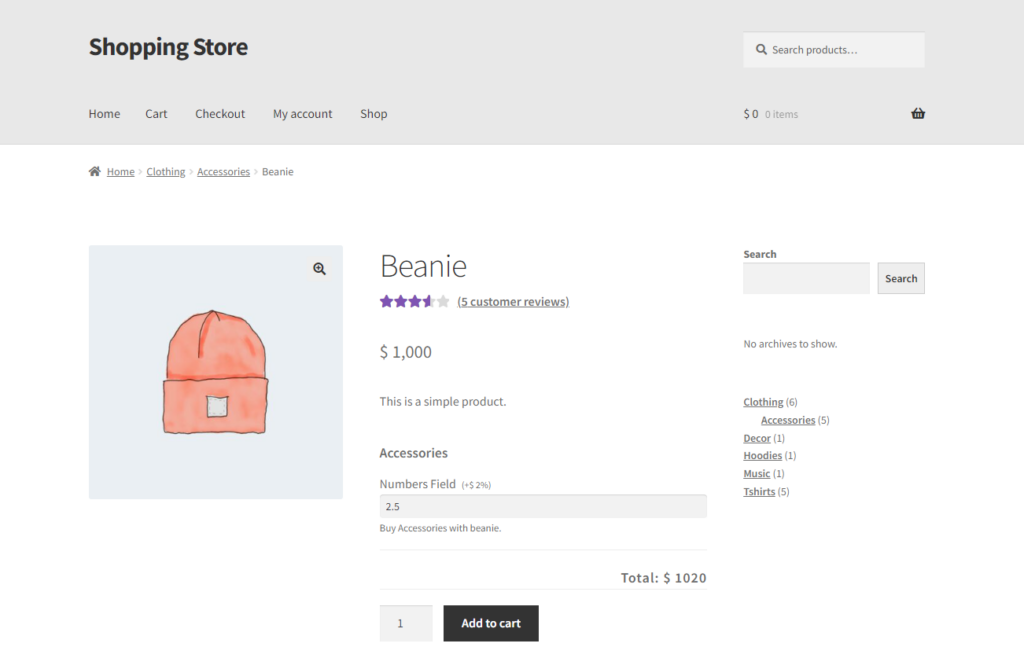
- Select the Number type for the number input. This will enable the front-end user to enter either whole numbers or decimal numbers in the Numbers field as required. If the whole number option is selected then the user can only enter the whole number as input in the numbers field on the front-end. If the Decimal number is selected then the users can also enter the numbers in decimal in the numbers field on the front-end.
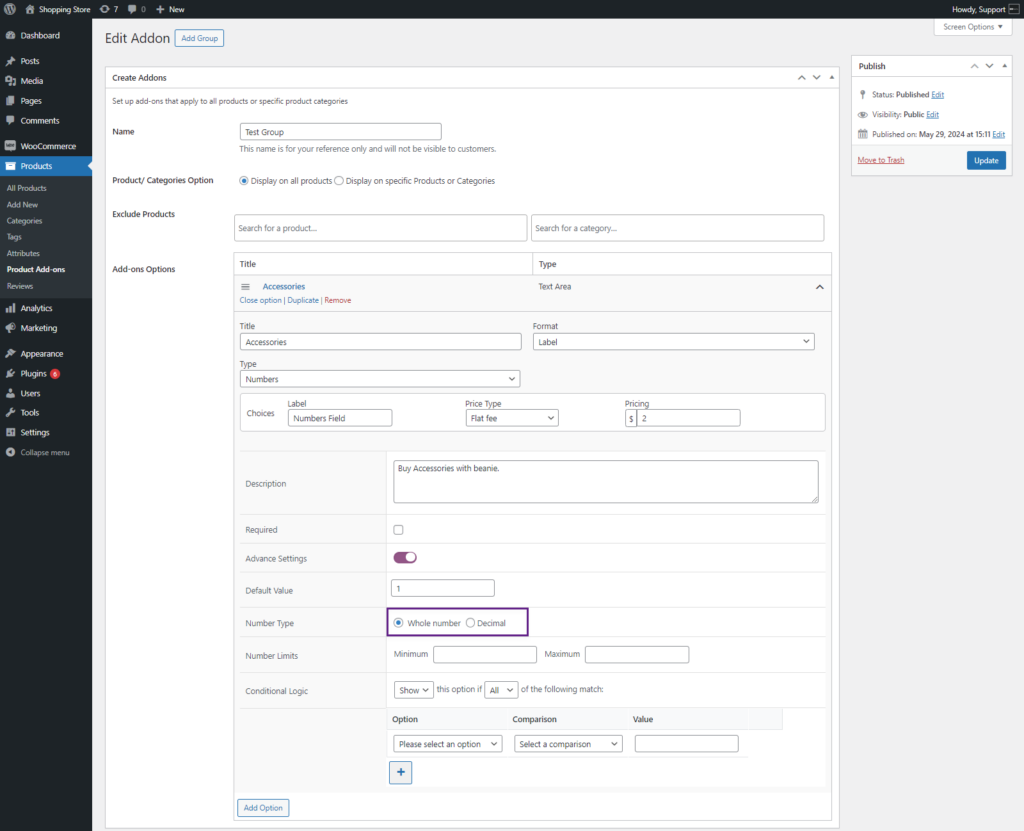
- Set the Minimum and Maximum limit for the numbers. This option will restrict the front-end user from inputting a number within the defined minimum and maximum limits.
Front-End Impact #
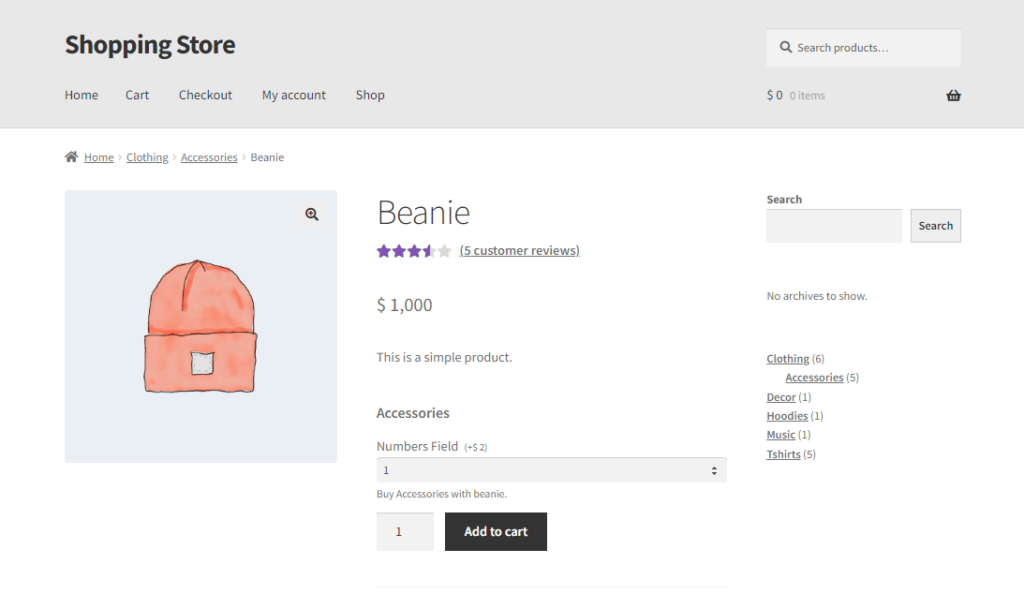
- Go to the Product page.
- The created Text Area will be displayed on the product.
- The user can input Decimal Numbers when Decimal is selected in the Number Type option.
File Upload #
- Select the File Upload option from the Type drop-down list. This will allow the user to Upload a file from the system.
- Choices: The Administrator can add only one option from here.
- The Administrator can select the price type from the Price Type drop-down list. Five Price type options are provided.
- No Cost – This choice will not affect the total product cost
- Flat Fee – A fixed amount is added to the total product cost, regardless of the quantity ordered.
- Quantity-Based Fee – A fixed amount is added to the total product cost multiplied by the quantity ordered.
- Percentage Increase – This increases the product price by the specified percentage.
- Percentage Decrease – This decreases the product price by the specified percentage.
- Description: A text box to add descriptive text which will appear below the choices.
- Required: A checkbox to allow the Administrator to make the field mandatory for the user.
- Advance settings: this will be an enable/disable toggle when enabled, the following options will appear:
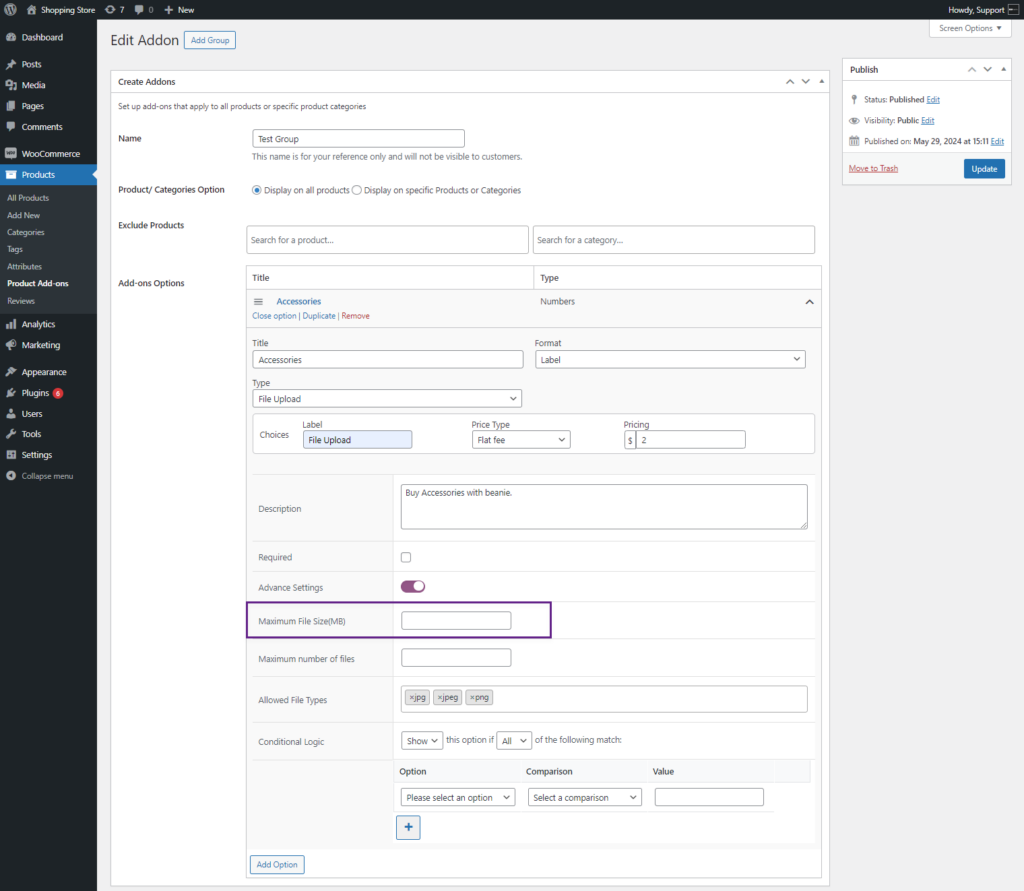
- Maximum File Size (MB): Enter the maximum file size in (MBs). Files bigger than this file size should not be allowed.
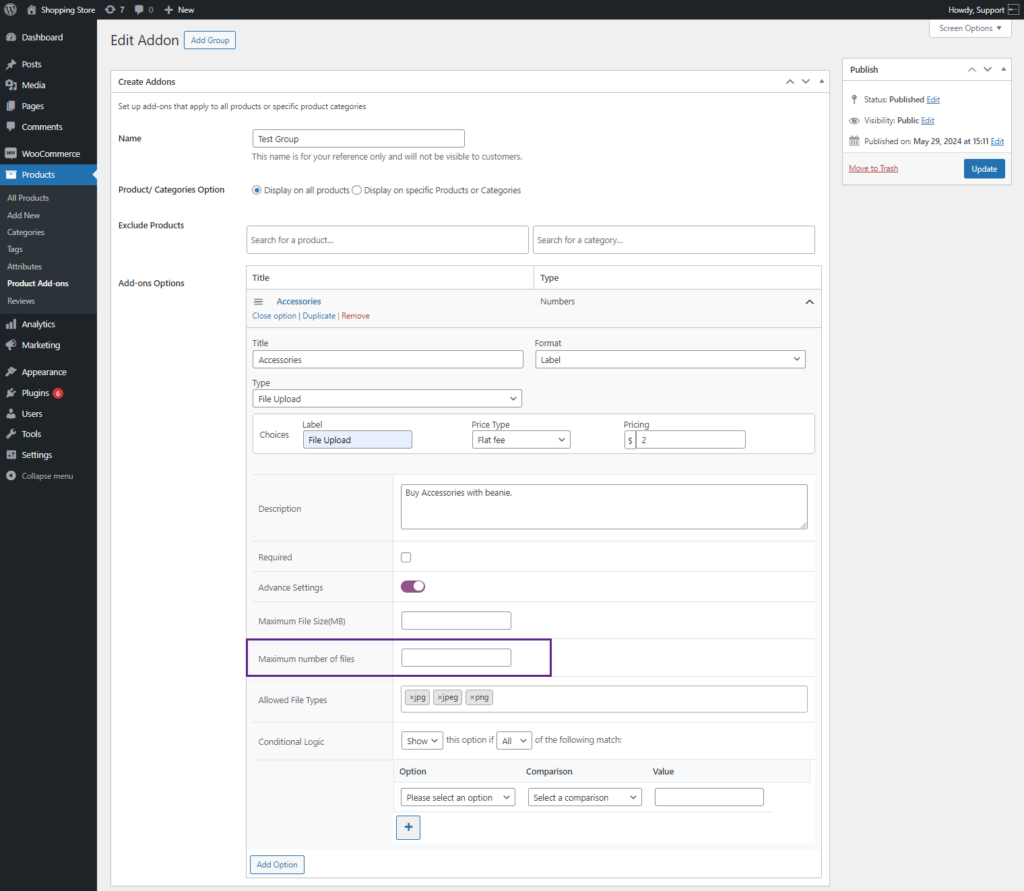
- Maximum Number of Files: By default, it will be 1. It will be a number input field. The Administrator can define the maximum number of file sizes to be uploaded.
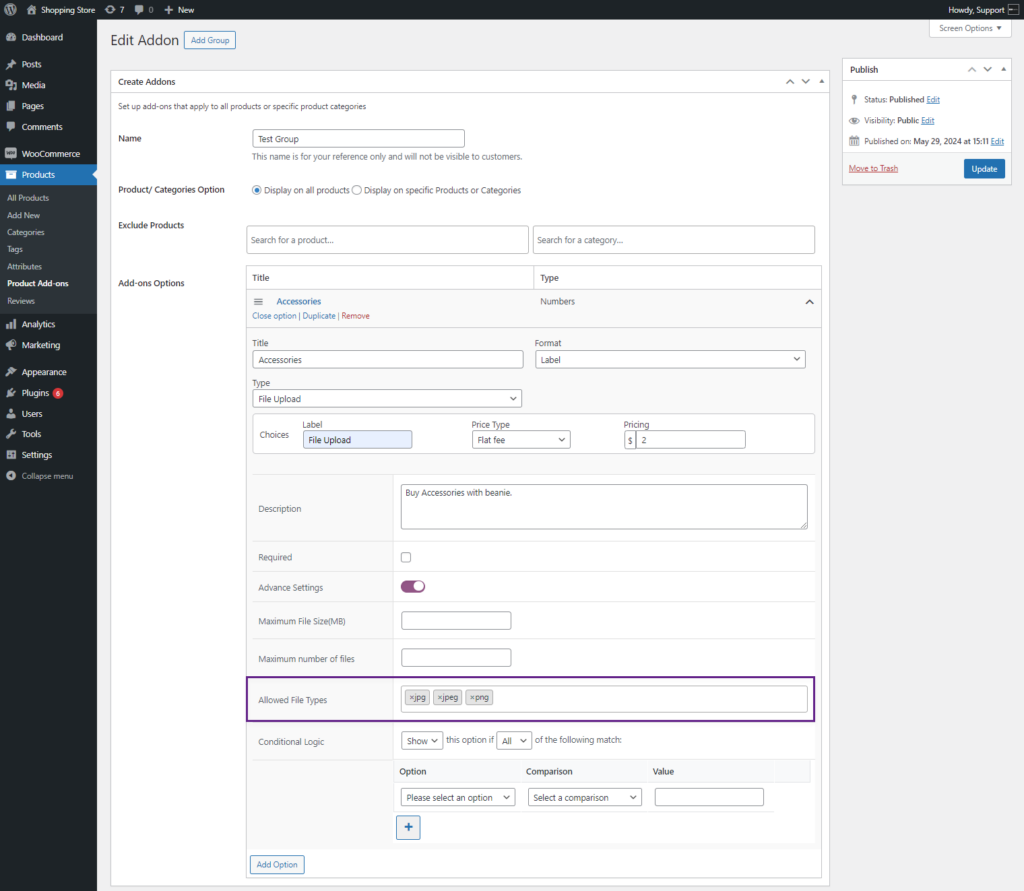
- Allowed File Types: A dropdown field will display the file types’ formats. The Administrator can select multiple file formats (PDF, JPG, JPEG, PNG, DOCX, XLX, PPTX, BMP, GIF, BMP, CSV, and more popular formats).
- Conditional Logic: Conditional Logic is explained below at the end.
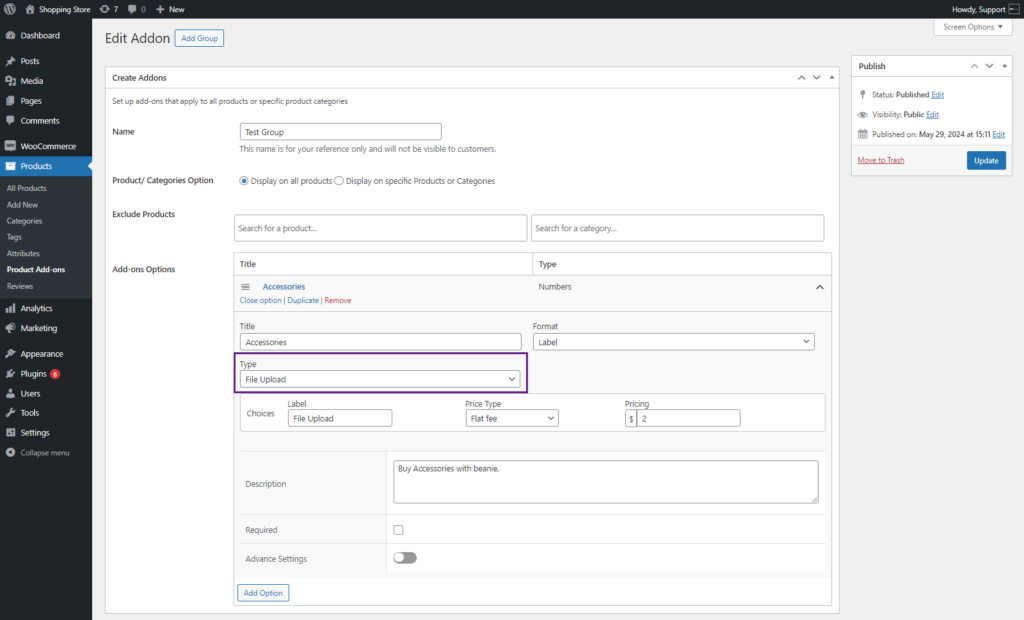
- In the Advance Settings, the Administrator can set the following options:
- Maximum File Size (MB): Enter the maximum file size in (MBs). Files more significant than this file size should not be allowed.
- Maximum Number of Files: By default, it will be 1. Administrator can define the maximum number of files to be uploaded.
- Allowed File Types: it will be a dropdown field displaying the format of the file types, Administrator can select multiple file formats (PDF, JPG, JPEG, PNG, DOCX, XLX, PPTX, BMP, GIF, and CSV).
Front-End Impact #
- Go to the Product page.
- The selected File Upload option will be available on the product page.
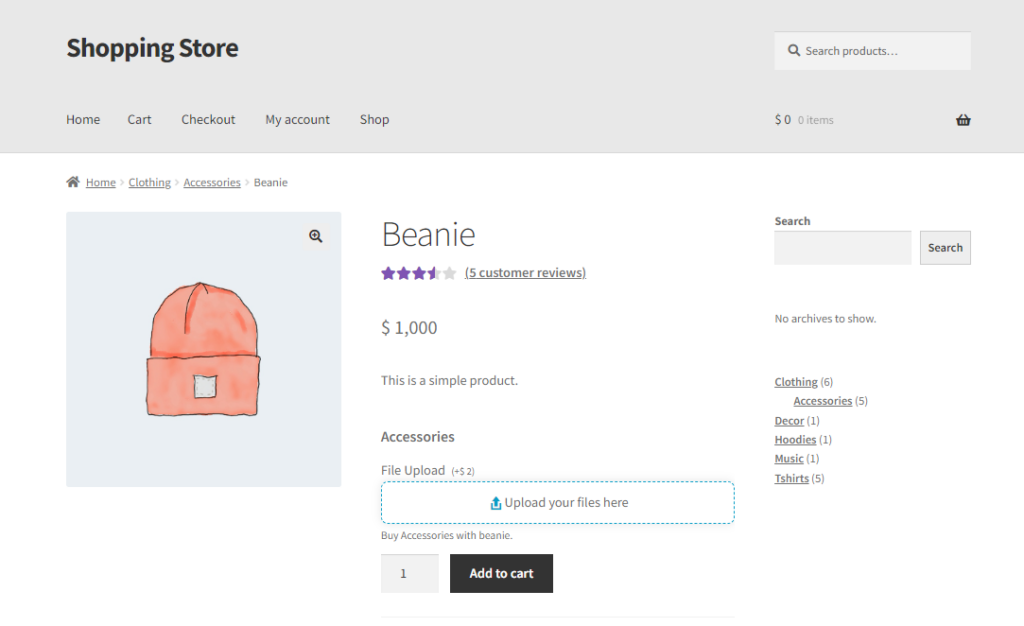
- Click on the Upload your file here.
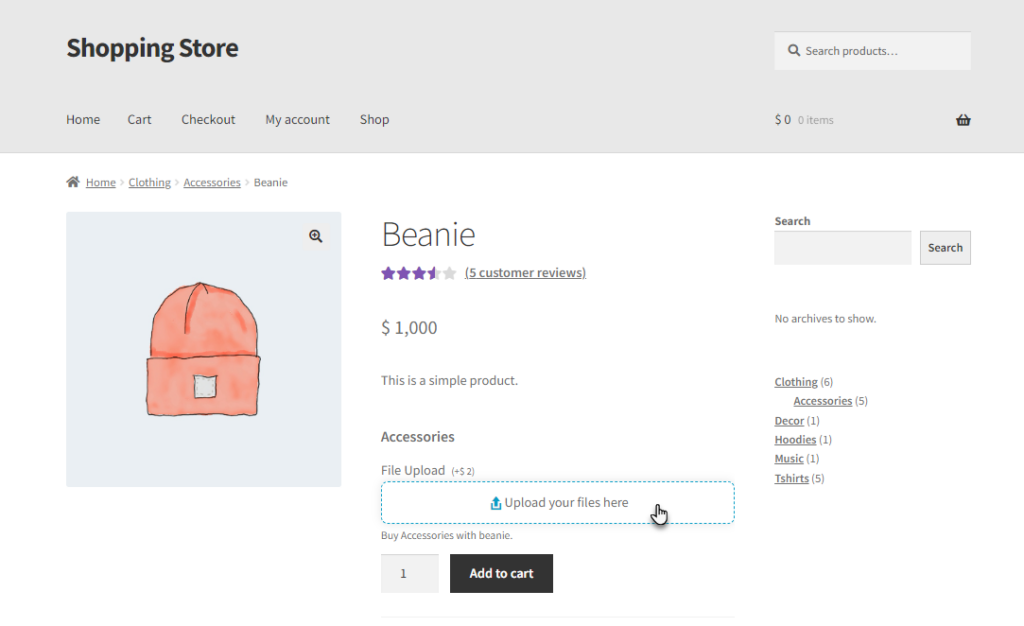
- Select the file from the system.
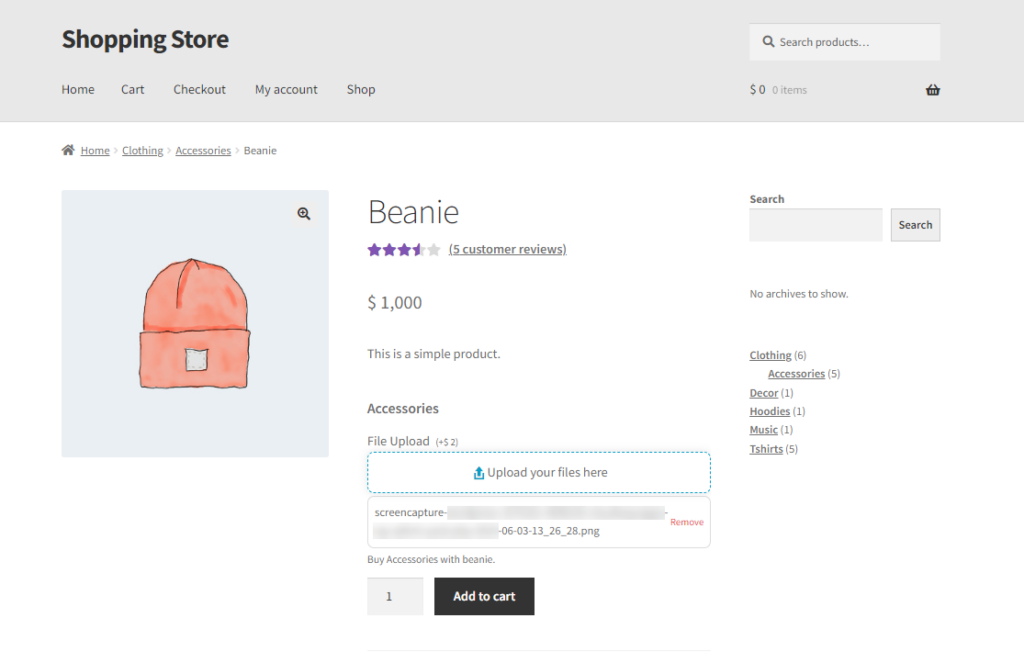
- The File will be uploaded and displayed below.
Images #
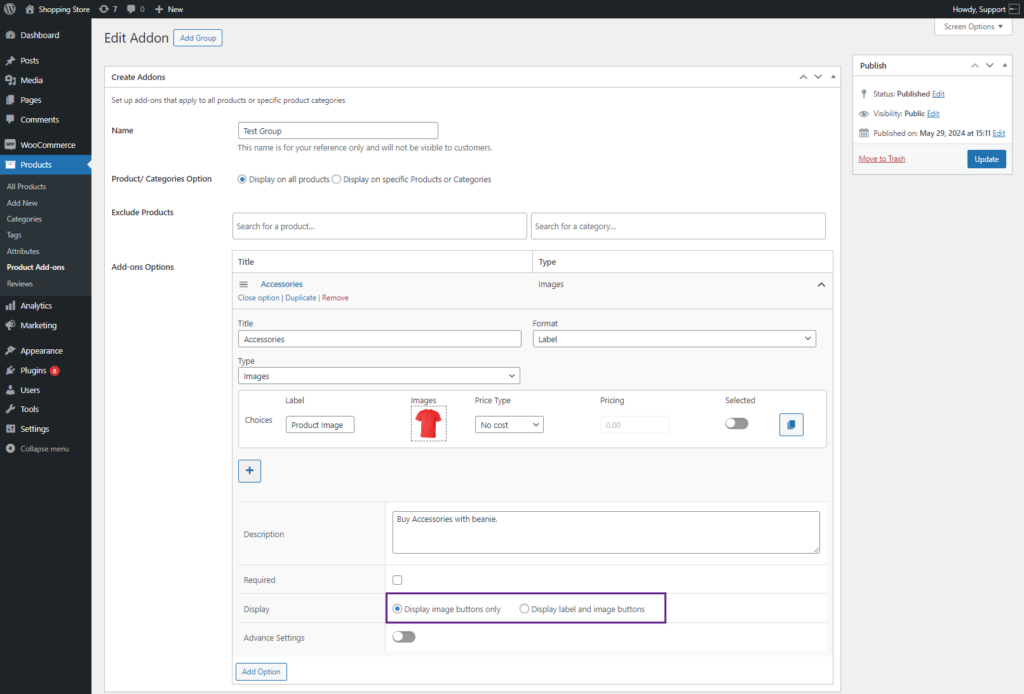
- Select the Image option from the Type drop-down list. This will allow the Administrator to add an image.
- Choices: The Administrator can add multiple options from here. There will be an add choice button to add more choices.
- The Administrator can select the price type from the Price Type drop-down list. Five Price type options are provided.
- No Cost – This choice will not affect the total product cost
- Flat Fee – A fixed amount is added to the total product cost, regardless of the quantity ordered.
- Quantity-Based Fee – A fixed amount is added to the total product cost multiplied by the quantity ordered.
- Percentage Increase – This increases the product price by the specified percentage.
- Percentage Decrease – This decreases the product price by the specified percentage.
- Selected toggle button: Administrator can make any choice option selected by default on the front-end if this option is activated.
- A delete button in front of every option.
- A duplicate button in front of every option.
- Description: A text box will be used to add descriptive text, which will appear below the choices.
- Required: A checkbox to allow Administrator to make the field mandatory for the user.
- Display: There will be two options: it will be radio buttons (Display image buttons only: where images will be displayed only. Display label and image buttons: where text labels and image both will be displayed).
- Advance settings: this will be an enable/disable toggle when enabled following options will appear:
- Quantity limits: Optionally enter the minimum and/or maximum number of choices which are required before customers can add the product to their cart.
- Conditional Logic: Conditional Logic is explained below at the end.
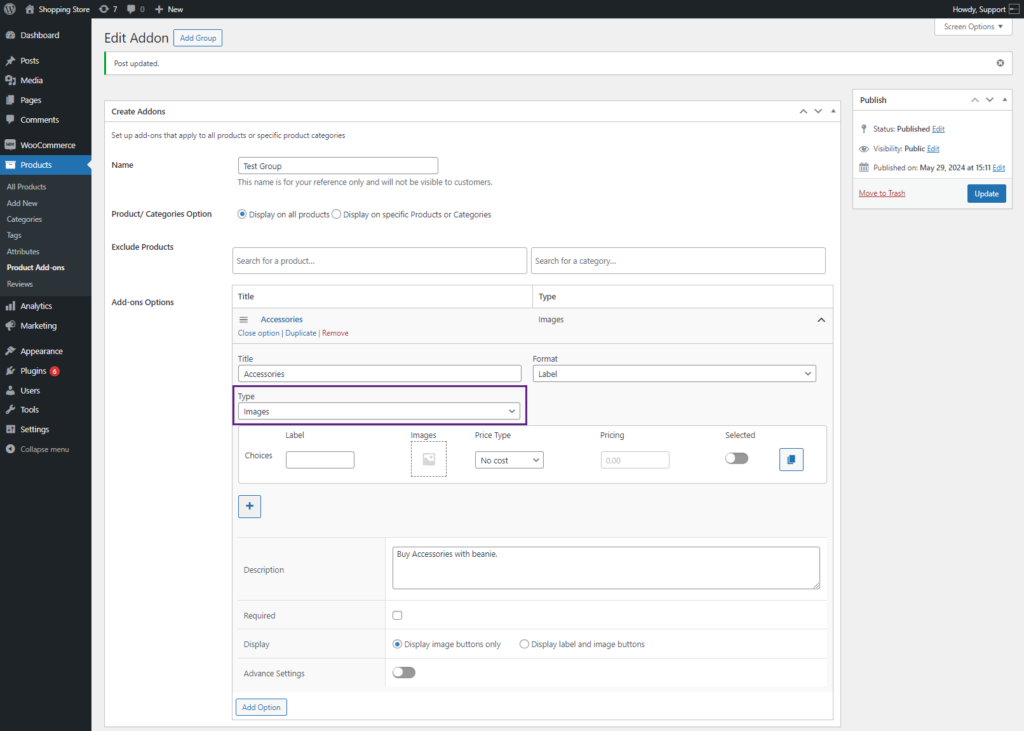
- Add an image in the backend configuration of the add-on. This image will be displayed for the front-end user on the product page.
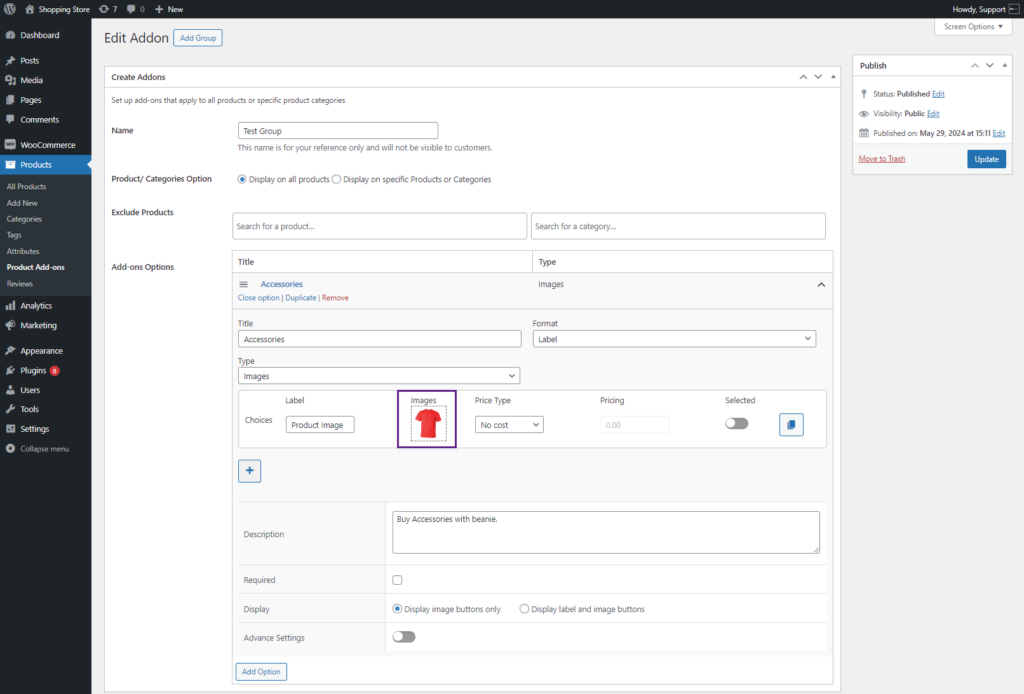
- Select Display type for the image in the Display option. This option allows the Administrator to show the Image button only OR the Label and image.
Front-End Impact #
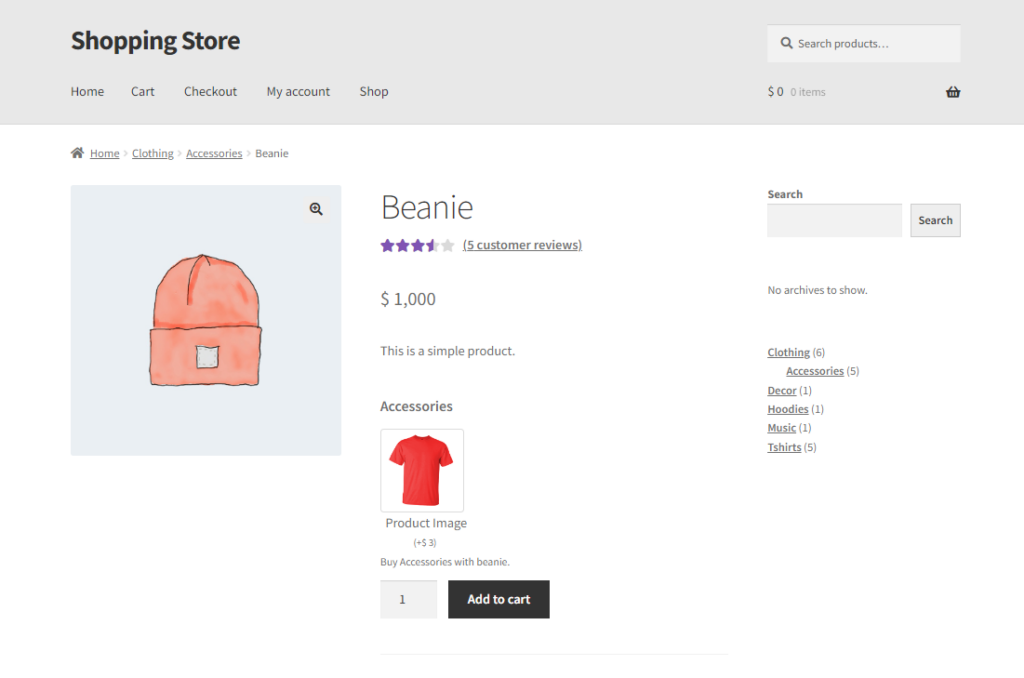
- Go to the Product page.
- The Selected File Upload option will be available on the product page.
Color Swatches #
- Select the Color Swatches option from the Type drop-down list. This will add color blocks on the front end for selecting the choices provided.
- Choices: Administrator can add multiple options from here, there will be an add choice button to add more choices.
- The Administrator can select the price type from the Price Type drop-down list. Five Price type options are provided.
- No Cost – This choice will not affect the total product cost
- Flat Fee – A fixed amount is added to the total product cost, regardless of the quantity ordered.
- Quantity-Based Fee – A fixed amount is added to the total product cost multiplied by the quantity ordered.
- Percentage Increase – This increases the product price by the specified percentage.
- Percentage Decrease – This decreases the product price by the specified percentage.
- Selected toggle button: Administrator can make any choice option selected by default on the front-end if this option is activated.
- A delete button in front of every option.
- A duplicate button in front of every option.
- Description: A text box to add descriptive text which will appear below the choices.
- Required: A checkbox to allow Administrator to make the field mandatory for the user.
- Display: There will be two options: radio buttons (Display color swatches only: where color swatches will be displayed only. Display label and color swatches buttons: where text labels and color swatches both will be displayed).
- Advance settings: this will be an enable/disable toggle when enabled following options will appear:
- Conditional Logic: Conditional Logic is explained below at the end.
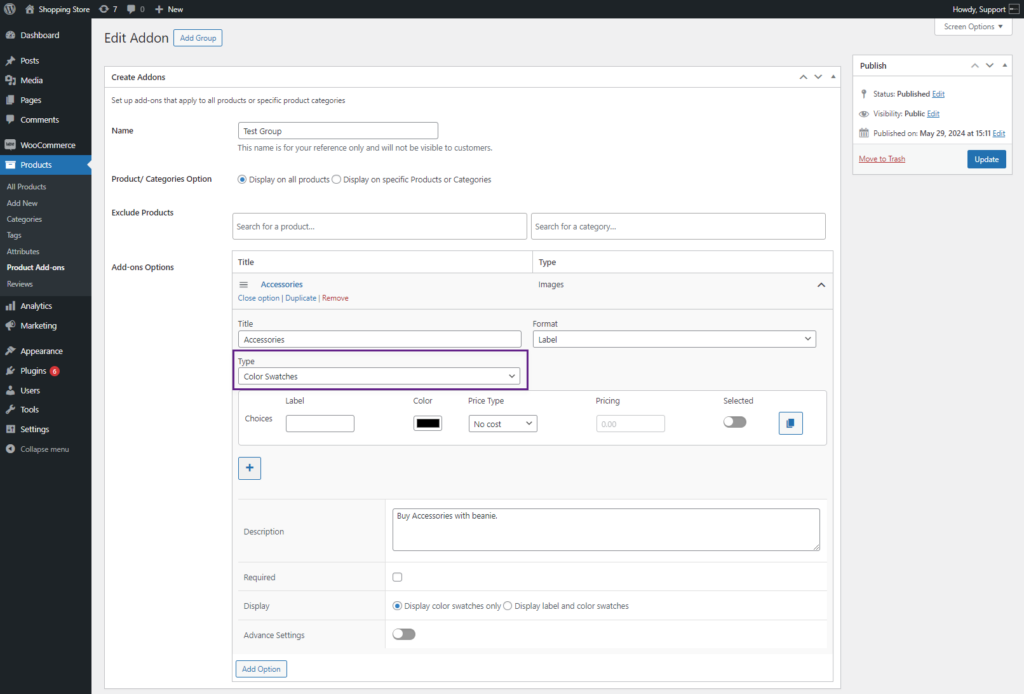
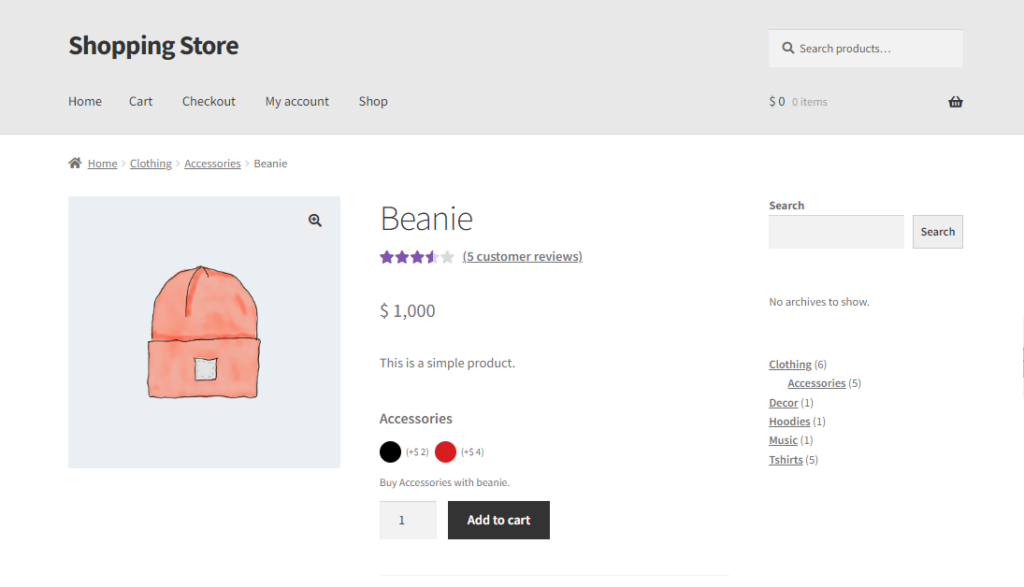
- The Administrator can add different colors from the Choices option.
Front-End Impact #
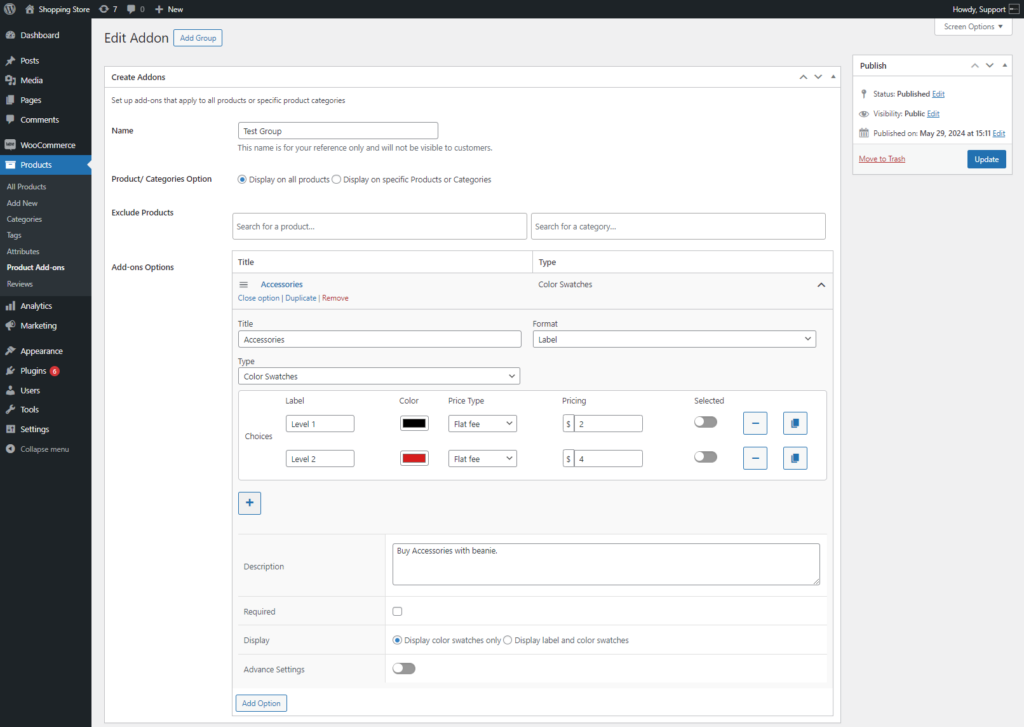
- Go to the Product page.
- The provided Color Swatches option will be available on the product page.
Customer Defined Price #
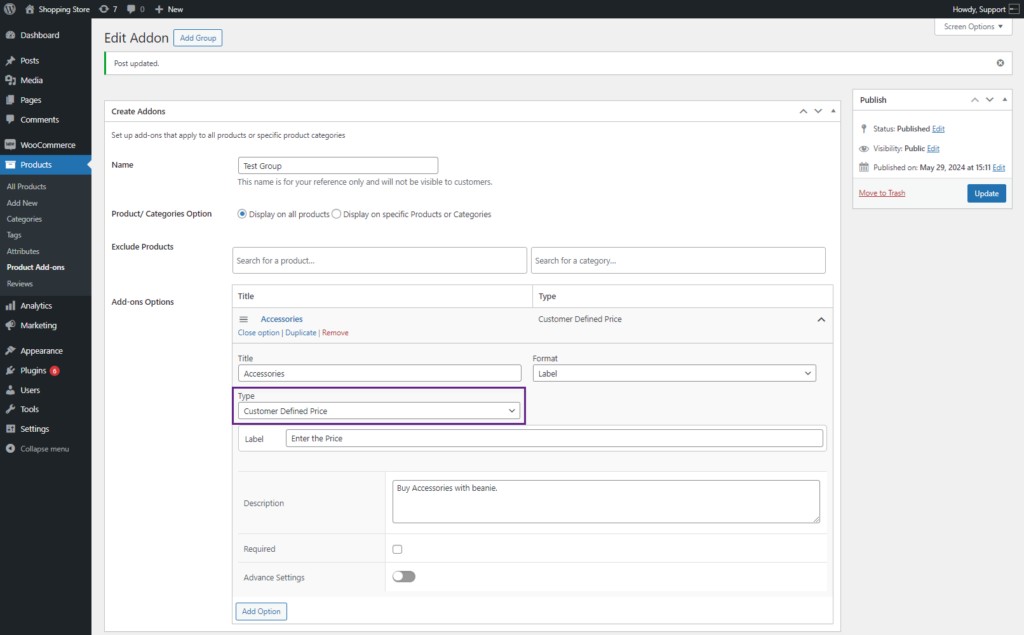
- Select the Customer Defined Price option from the Type drop-down list.
- Description: A text box to add descriptive text which will appear below the choices.
- Required: A checkbox to allow Administrator to make the field mandatory for the user.
- Advance settings: this will be an enable/disable toggle when enabled following options will appear:
- Conditional Logic: Conditional Logic is explained below at the end.
Front-End Impact #
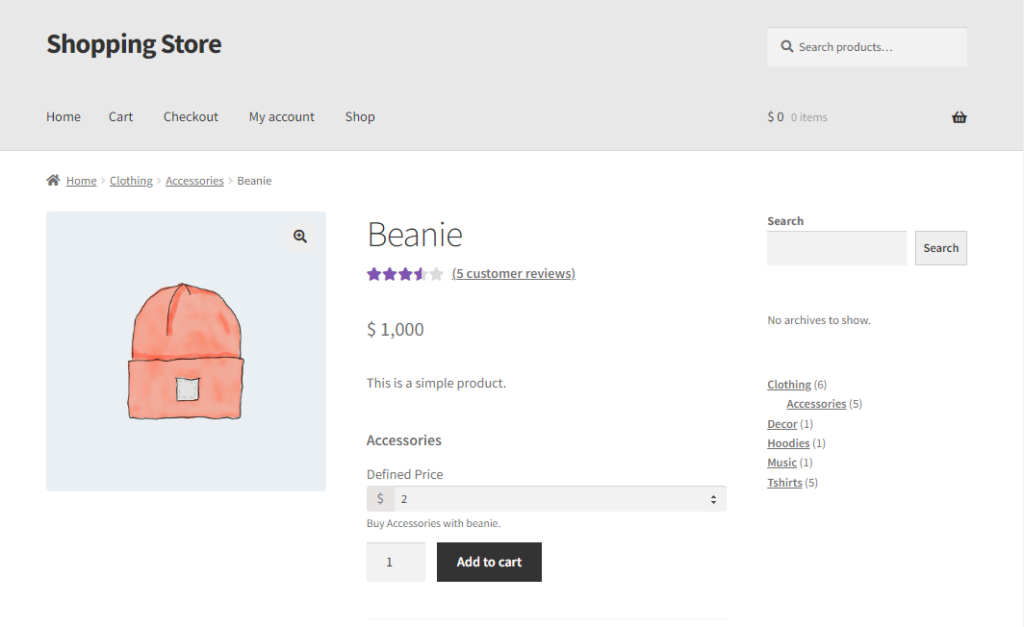
- Go to the Product page.
- The Customer Defined Price option will be available on the product page.
Date #
- Select the Date option from the Type drop-down list. This will add a field where the Administrator can select a date.
- Choices: The Administrator can add only one option from here. There will be following options in the preferences:
- The Administrator can select the price type from the Price Type drop-down list. Five Price type options are provided.
- No Cost – This choice will not affect the total product cost
- Flat Fee – A fixed amount is added to the total product cost, regardless of the quantity ordered.
- Quantity-Based Fee – A fixed amount is added to the total product cost multiplied by the quantity ordered.
- Percentage Increase – This increases the product price by the specified percentage.
- Percentage Decrease – This decreases the product price by the specified percentage.
- Description: Description: A text box to add descriptive text which will appear below the choices.
- Required: A checkbox to allow Administrator to make the field mandatory for the user.
- Advance settings: this will be an enable/disable toggle when enabled following options will appear:
- Conditional Logic: Conditional Logic is explained below at the end.
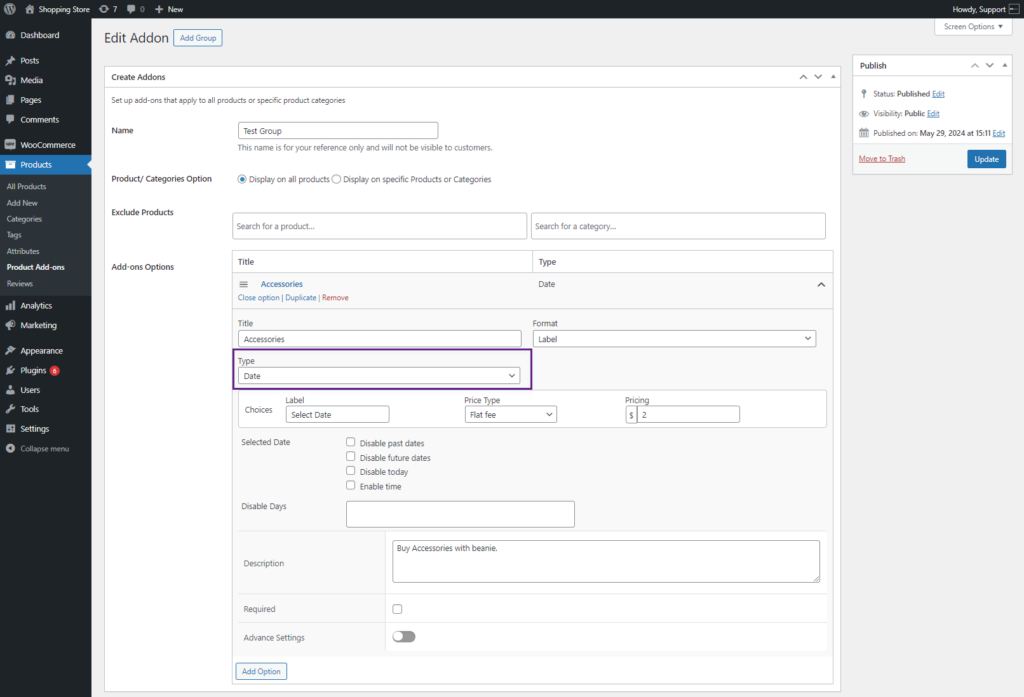
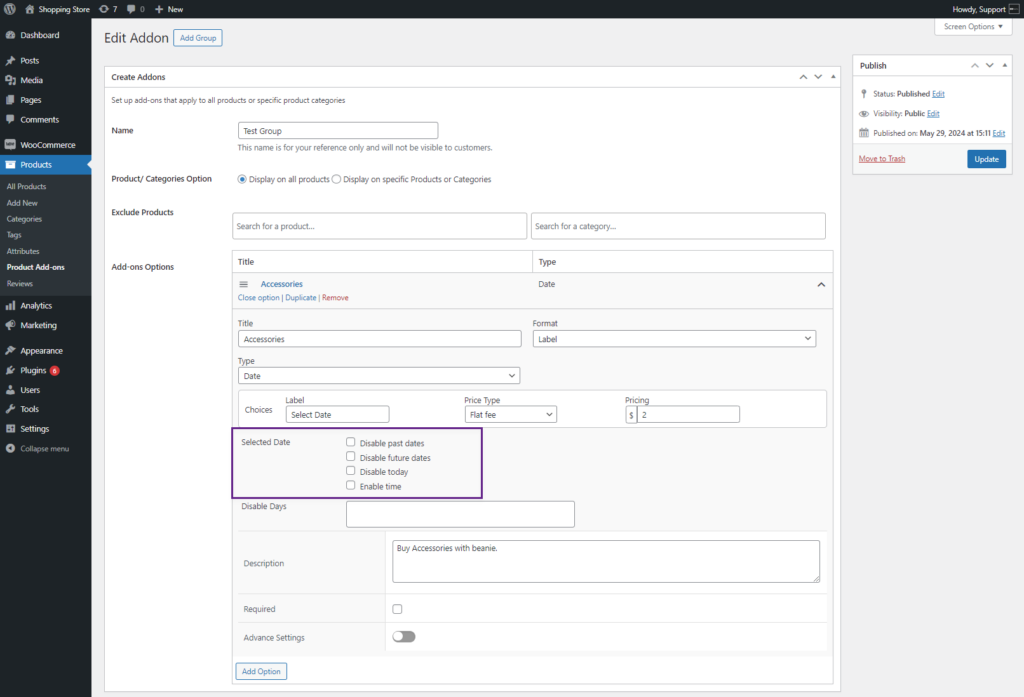
- The Administrator can add filters by using the Selected Date option. There are four options provided.
- Disable Past Dates – This option will hide all dates before the current date.
- Disable Future Dates – This option will hide all dates after the current date.
- Disable Today – This option will prevent the current date from being selected.
- Enable Time – This option will add a time slot selection to the calendar.
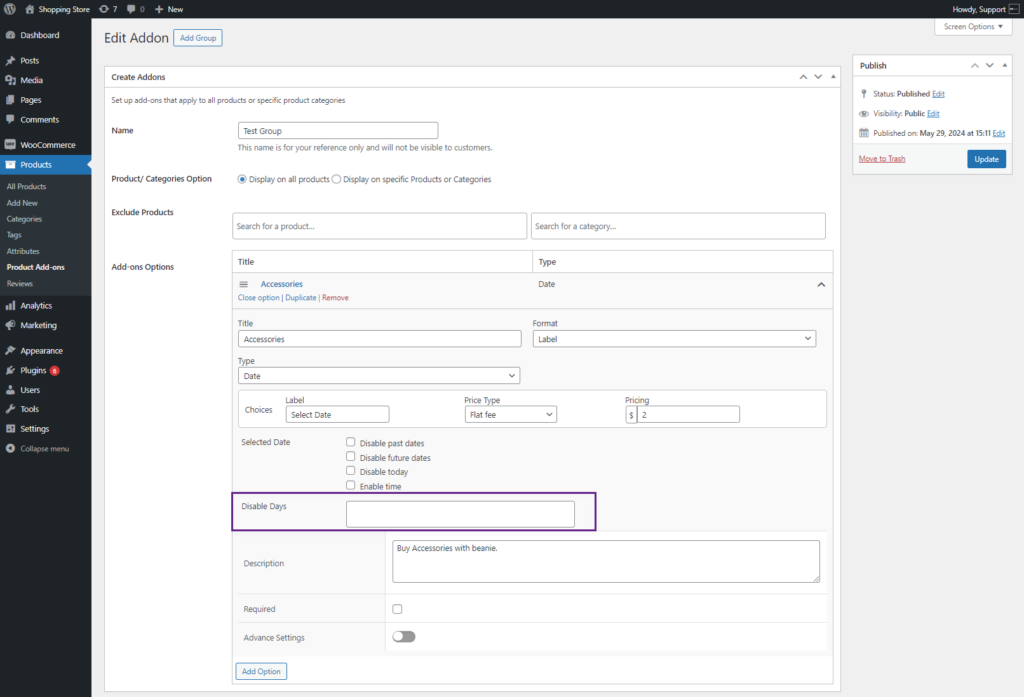
- The Administrator can disable days by using the Disable Days option. The Administrator can select a particular day to be hidden from the selection. It will be a dropdown list displaying the days to select, Administrator can select multiple days from the list. Days selected will be disabled on the calendar on the front-end.
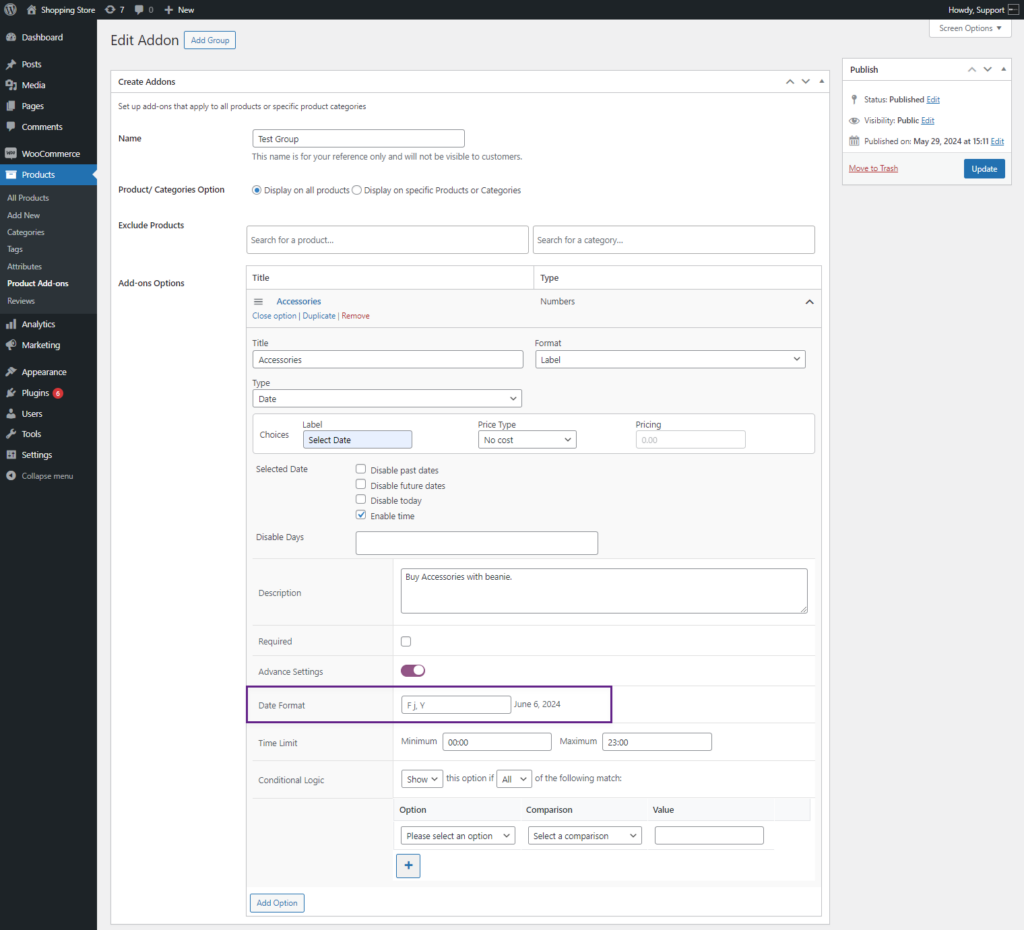
- In the Advance Settings, the Administrator can set the following options:
- Date Format: F (month), j (date), Y (year). The Administrator can set the format accordingly, with the placement of F j Y.
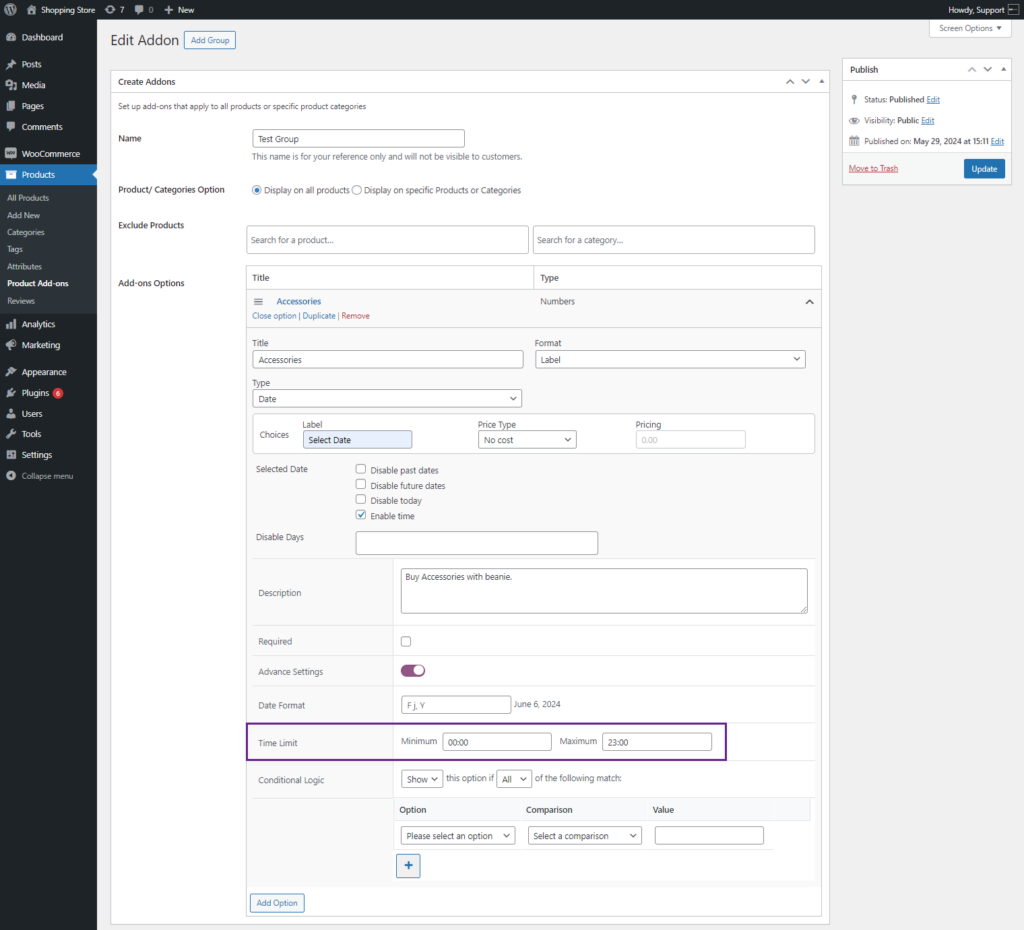
- Time limits: there will be a start and end time field. The time will be displayed according to the start and end time set by the Administrator. To restrict the available times.
Front-End Impact #
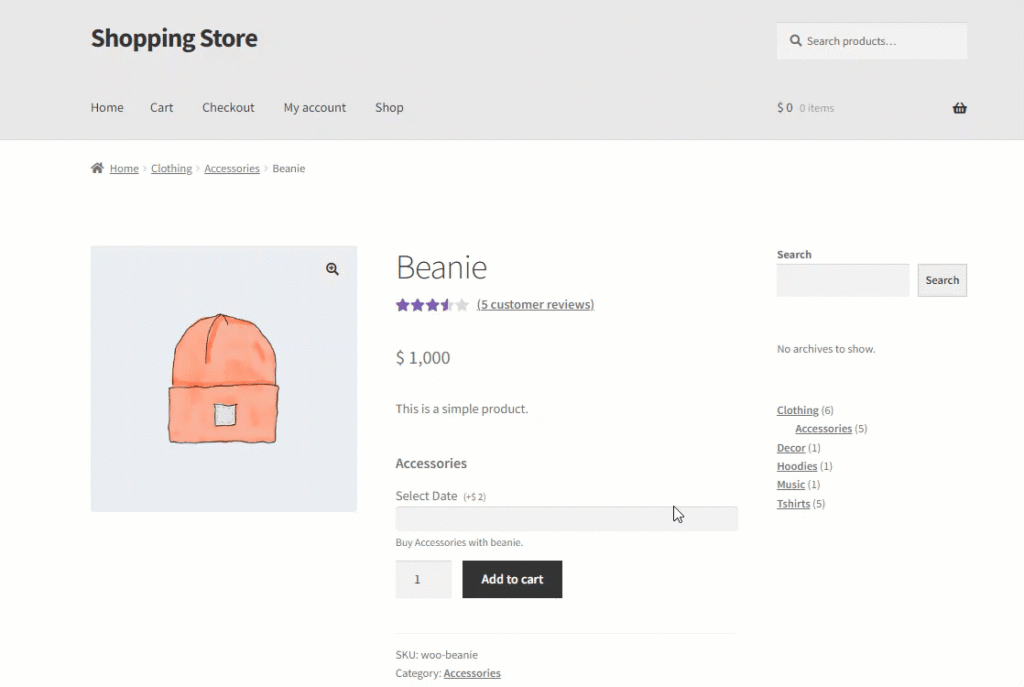
- Go to the Product page.
- The Date option will be available on the product page.
Quantity #
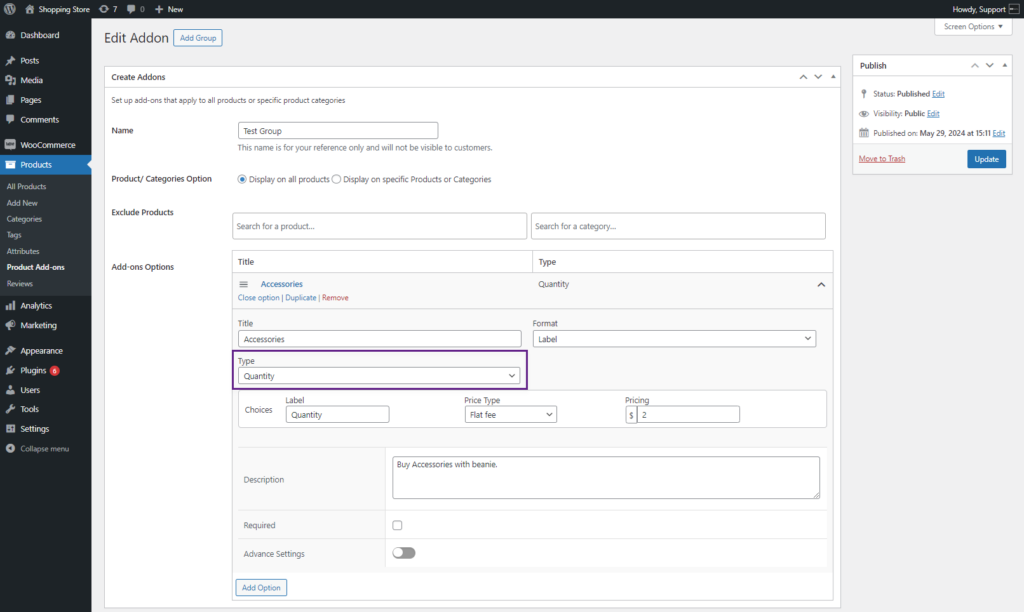
- Select the Quantity option from the Type drop-down list. This will allow the front-end user to add the desired quantity.
- Choices: The Administrator can add only one options from here. There will be the following options in the choices:
- The Administrator can select the price type from the Price Type drop-down list. Five Price type options are provided.
- No Cost – This choice will not affect the total product cost
- Flat Fee – A fixed amount is added to the total product cost, regardless of the quantity ordered.
- Quantity-Based Fee – A fixed amount is added to the total product cost multiplied by the quantity ordered.
- Percentage Increase – This increases the product price by the specified percentage.
- Percentage Decrease – This decreases the product price by the specified percentage.
- Quantity limit: Enter a minimum and maximum value for the quantity limit range. If the value is below the minimum limit or exceeds maximum limit then display the validation message on the front-end.
- Description: A text box to add descriptive text which will appear below the choices.
- Required: A checkbox to allow Administrator to make the field mandatory for the user.
- Advance settings: this will be an enable/disable toggle when enabled following options will appear:
- Conditional Logic: Conditional Logic is explained below at the end.
Front-End Impact #
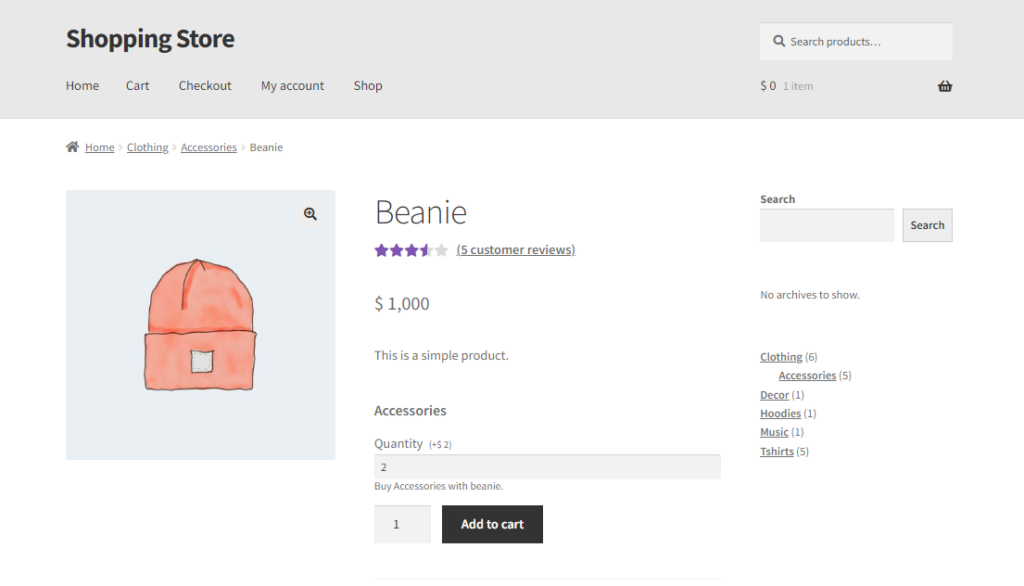
- Go to the Product page.
- The Quantity field will be available on the product page.
Text Labels #
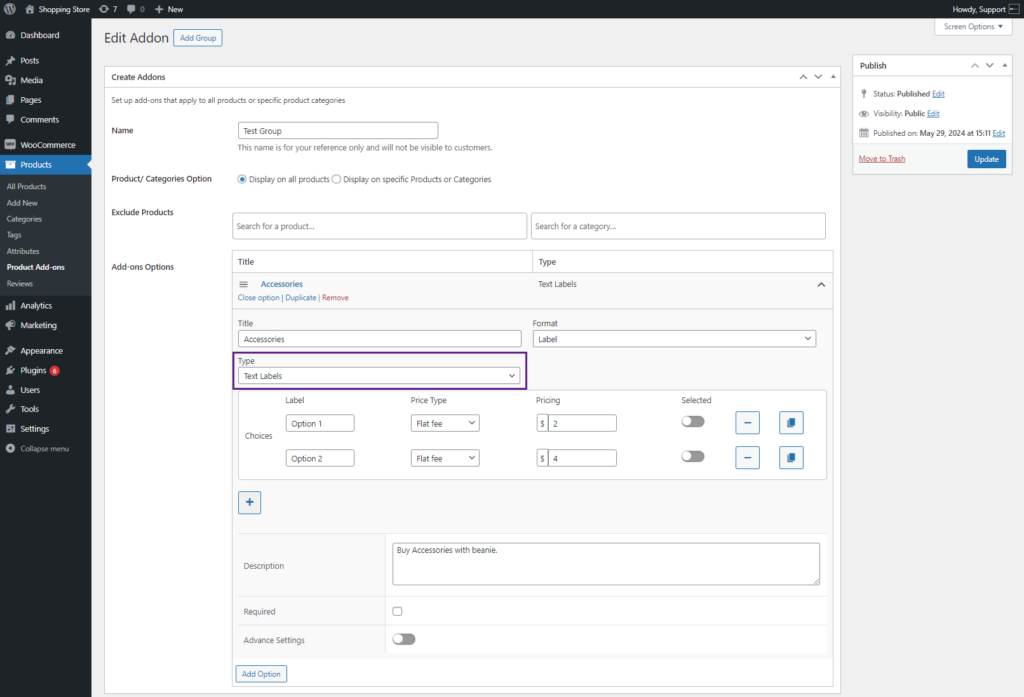
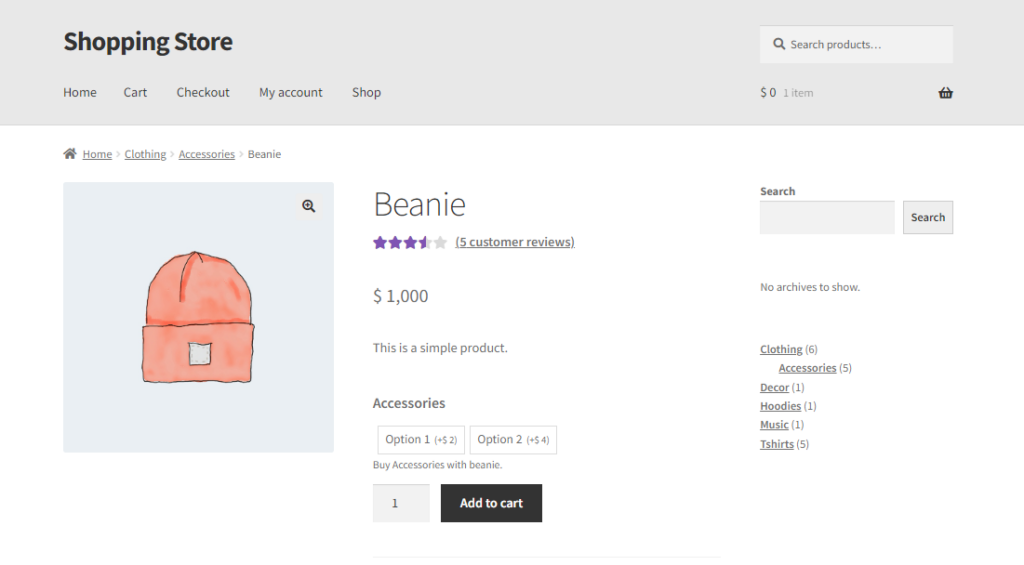
- Select the Text Labels option from the Type drop-down list. This will add labels on the product page.
- Choices: The Administrator can add multiple options from here, there will be an add choice button to add more choices.
- The Administrator can select the price type from the Price Type drop-down list. Five Price type options are provided.
- No Cost – This choice will not affect the total product cost
- Flat Fee – A fixed amount is added to the total product cost, regardless of the quantity ordered.
- Quantity-Based Fee – A fixed amount is added to the total product cost multiplied by the quantity ordered.
- Percentage Increase – This increases the product price by the specified percentage.
- Percentage Decrease – This decreases the product price by the specified percentage.
- Selected toggle button: The Administrator can make any choice option selected by default on the front end if this option is activated.
- A delete button is in front of every option.
- A duplicate button is in front of every option.
- Description: A text box to add descriptive text will appear below the choices.
- Required: A checkbox to allow the Administrator to make the field mandatory for the user.
- Advance settings: Conditional Logic options will appear when advance setting toggle is enabled.
- Quantity limits: Optionally enter the minimum and/or maximum number of choices which are required before customers can add the product to their cart.
Front-End Impact #
- Go to the Product page.
- The Text Labels will be available on the product page.
Visual Editor #
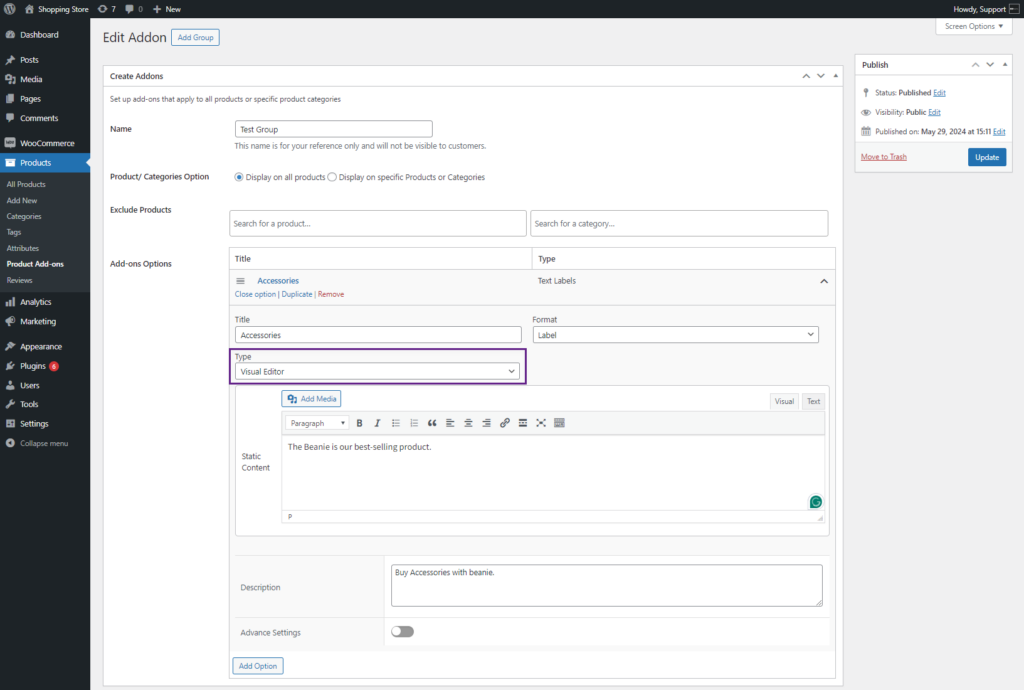
- Select the Visual Editor option from the Type drop-down list. This will allow the Administrator to display static content to the front-end user on the product page.
Front-End Impact #
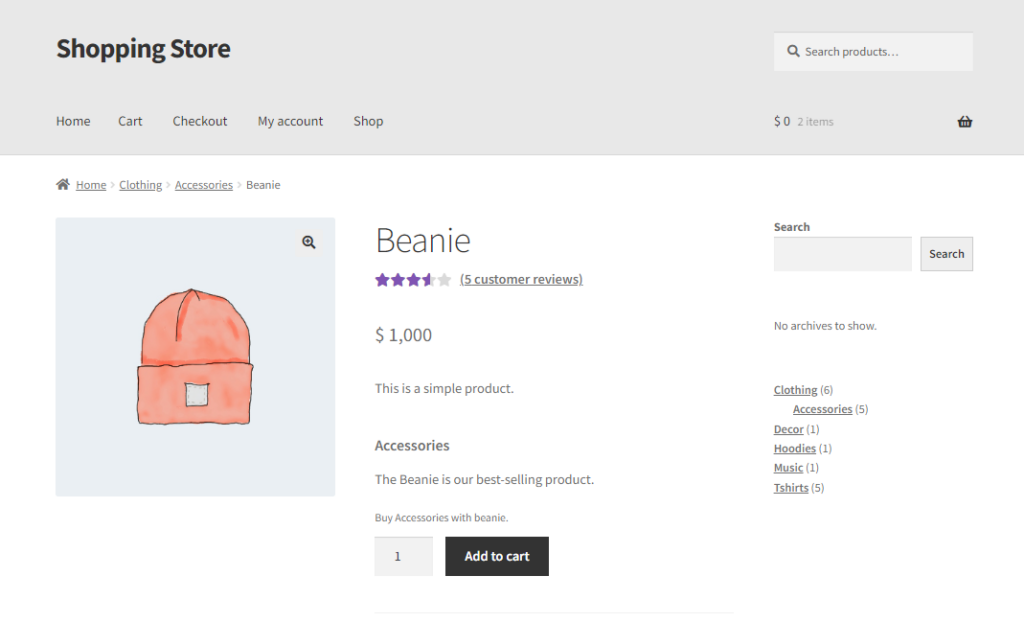
- Go to the Product page.
- The content posted in Visual Editor will be available on the Product page.
HTML #
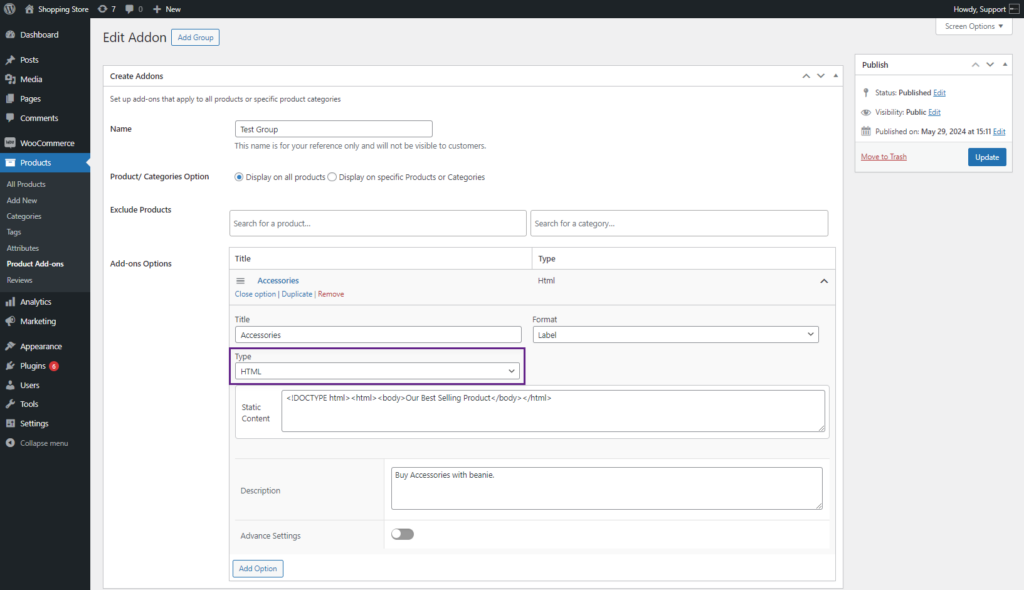
- Select the HTML option from the Type drop-down list. This will allow the Administrator to add HTML content to the product page.
Front-End Impact #
- Go to the Product page.
- The content posted in the HTML field will be available on the Product page.
Conditional Logic #
- There will be a dropdown field of show/hide.
- There will be a dropdown field of all / any.
- The Administrator can select the conditions from the two dropdowns. For example, this option should be shown if all of the following match.
- There will be further conditions fields, including:
- Option: It will be a dropdown displaying the other add-on options that have been added. It will not display the visual editor and HTML option.
- Comparison: A dropdown will display two options (Equals and Does not equal).
- Value: It will be a dropdown displaying the options for the add-on option selected in the option dropdown.
- Use Case: Show this option if All of the following match:
- Option (A) Comparison (Equals) Value (1).
- So, in the above use case, if Addon option A is selected and Choice option 1 is selected, then Display Addon option B (this is the option where you have set up the conditional logic); otherwise, hide Addon option B.
- There will be an add button to add more conditional logic.
- If the All / Any dropdown is selected, all the conditional logic should be met to display the field in which the conditions are set. If any is selected then if any of the conditions are met, display the options field in which the conditions are set.


