WooCommerce makes it easy to create and manage an online store, and customers can buy stuff with just a few clicks. However, to keep these customers coming back, we need a WooCommerce point and reward system.
Now, in the physical world, sellers interact with shoppers face-to-face, and the seller’s behavior and the product he sells create a recurring and loyal customer. The more the customer visits, the stronger the relationship, and a relationship of loyalty is created between the seller and the customer, and they both reward each other.
When it comes to E-Commerce, there is no physical relationship, so there is no way of knowing your customer and creating that “loyalty relationship” that is possible in the physical world. But luckily, the greatest invention is WordPress, which gives us various methods and tools to create a virtual loyalty relationship between the buyer and the seller. Of all these, one program that stands out (for various reasons to be explained later) is myCred.

It is a simple yet very effective and free WooCommerce Points and Rewards plugin that lets you create a loyalty program for your customers and all WordPress-based websites.
So, let’s jump right into it and explore myCred. In this article, we will mainly be focusing on using myCred with WooCommerce. In later sections, we will be exploring the following points:
What is myCred?
So, the big question is, what is myCred? Well, it is a free WordPress point management plugin that lets you create a loyalty program for your users within your WordPress website as well as for the customers of your WooCommerce store.
It helps keep your customers returning and motivates them to make more purchases to build up points towards prizes, discounts, or whatever is on offer. At the same time, helping you increase your revenue.
myCred Features and Add-Ons
The main features in myCred include the following, but of course, it is not limited to these only:
- Point Balances
- Hooks (Auto-Reward System)
- Customization
- Proper Log History
- WordPress Multi-site Support
- Badges
- BuyCred
Those are the few main features/add-ons provided by myCred, but as we mentioned before, the list is not limited to this. Other than these, myCred provides other amazing features/add-ons like the following:
- Email notifications
- Coupons for the store
- Ranking customers according to their points
- Different statistics according to points
- Transferring points between customers and many more
You can check out all myCred add-ons for more detailed functionality.
myCred Installation Guide
Now, we’re getting to the important part: installing the myCred plugin in your WooCommerce store.
Follow these easy steps for myCred installation for your store.
- To install myCred, go to the Dashboard of your WordPress, Plugins -> Add New, and type “myCred” in the search box. In the search results, locate the plugin and click the Install Now button.

- After the plugin is installed, click the Activate button.
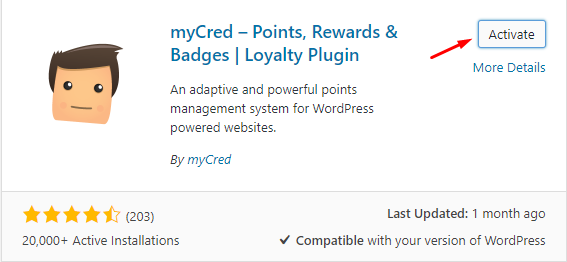
- After installing the plugin, you’ll notice that there is a new option under the Plugins named myCred setup on your dashboard menu.

- The next step will be configuring your store’s myCred plugin. Go to Plugins -> myCred Setup. Before beginning the setup for creating points and such, you’ll need to input some basic units like Labels for points, Formats, and Security features.
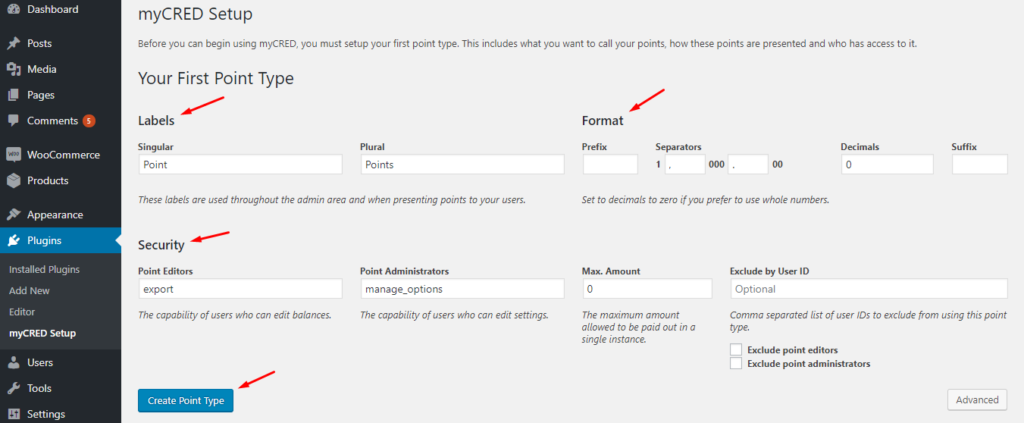
- Once you finish doing this, you’ll get the “Setup Complete” page where you can see options like Setup Hooks, Setup Add-ons, and View Settings.
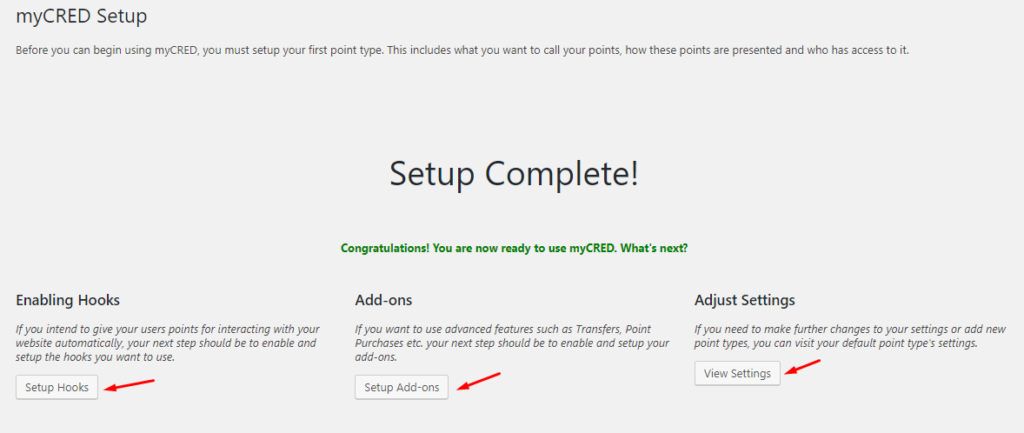
You can start setting these up from here or refresh the page for more detailed options, and you’ll see a new option named Points in the left bar on your Dashboard menu.
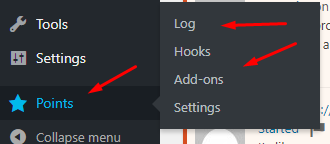
- Go to Points, and you’ll find four options under it, i.e., Logs, Hooks, Add-ons, and Settings
-
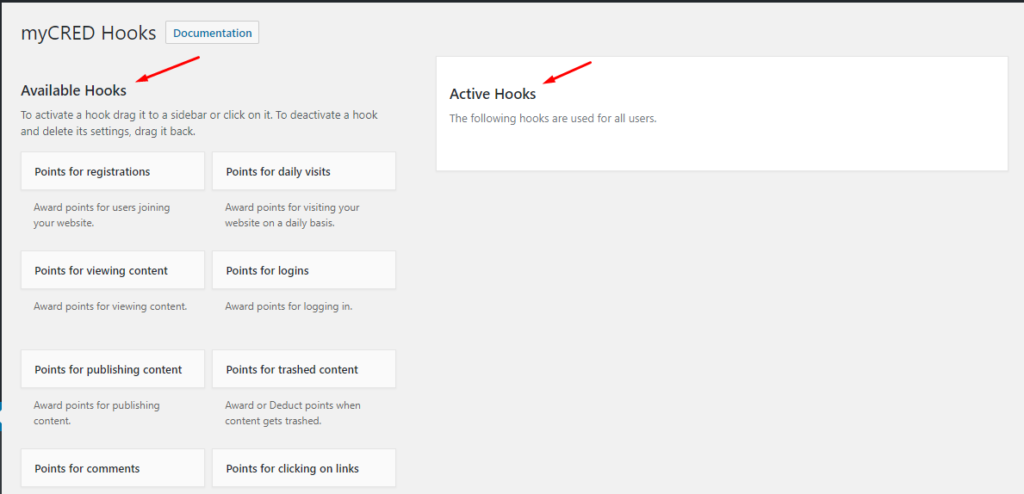
- Hooks: These are the options that let you reward customers with points for each activity they perform. Each Hook can be enabled and disabled as per your requirement.
- Logs: As clear by the name itself, the Logs option shows you detailed reports for all the logs of points increased and decreased in your customer’s history.
-
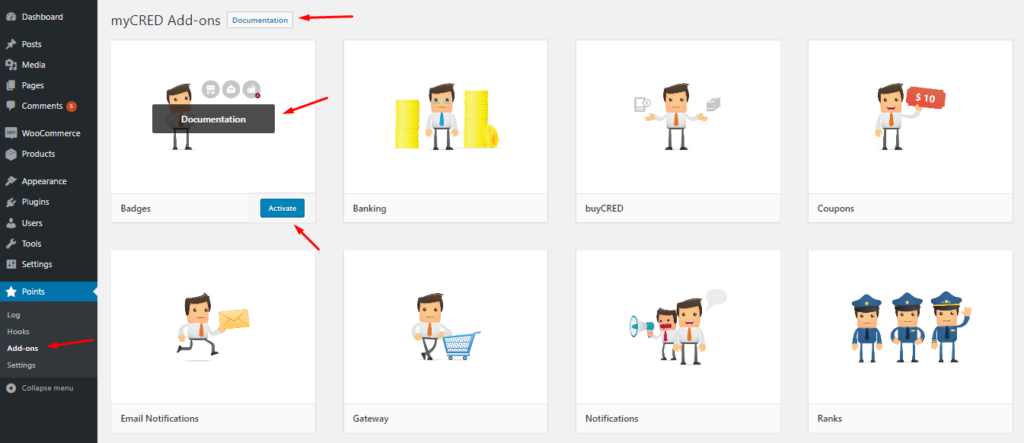
- Add-ons: This lets you enable more functionality for myCred. It gives you wide options like Email notifications, letting your customers buy points in exchange for money, Ranking your customers, transferring points between customers, Statistics, etc.
-
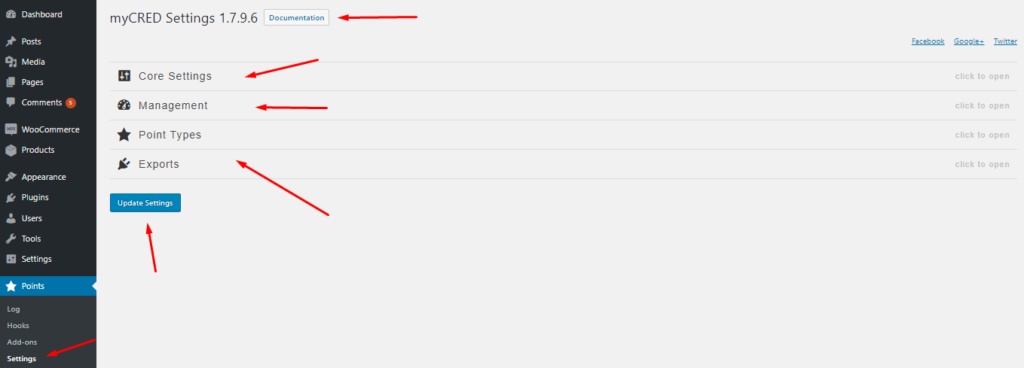
- Settings: The last tab is for settings. This ranges from Core Settings like labels, format, and security (remember the basic settings we did in step 4) to managing your log tables. The point types section lets you add new metadata and labels for your points. The export section lets you export user logs for points and allows customers to export their own logs.
- So, to the final step, how do you actually use myCred for your WooCommerce store? Well, as mentioned before, Hooks are the answer to that. You can let your customers earn points for something as basic as logging on, registering, or visiting to buy an item from the store. An example of that can be seen in the image below, where we have set up a few hooks according to how they can be used for a WooCommerce store. Go to Points -> Hooks -> Available Hooks and click on any hook you want to add.
In our example, we will be adding hooks for:
- Registration
- Login
- Product Reviews
These hooks will encourage customers on each step to move forward and purchase. The best part is that you can ask them to review your product and get a certain number of points, a WIN-WIN situation.
To add hooks, select the one you want to integrate and click on Add Hook, and you’ll see it added on the right side under Active Hooks. After that, you can set reward points for the hook and set a limit (if it’s a task that can be performed multiple times), and then click on Save, and your hook is active.
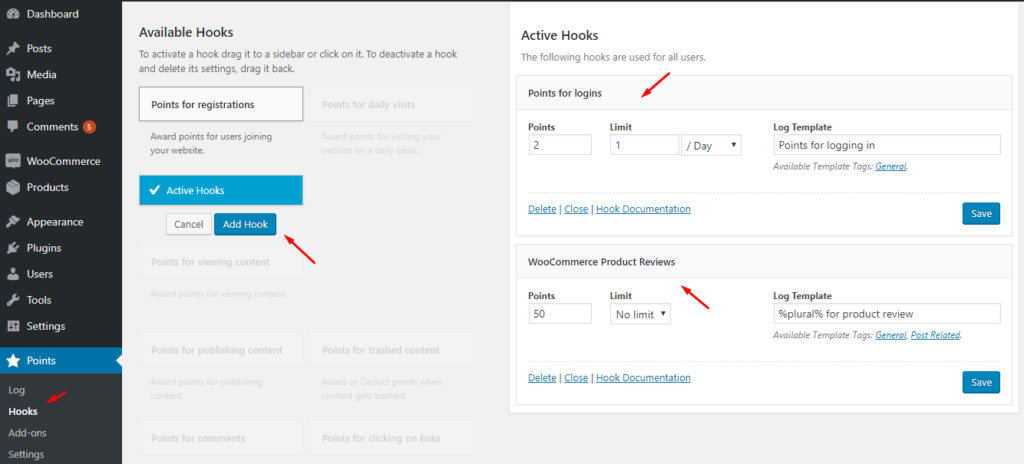
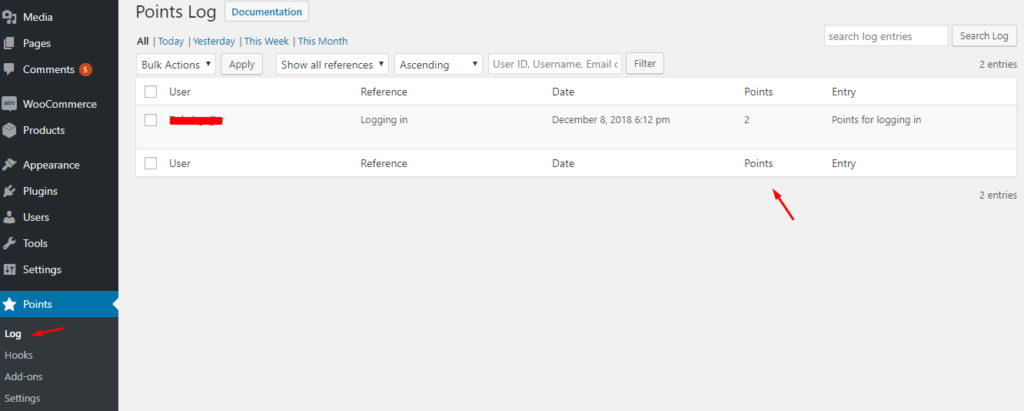
To test the hooks, we set up a hook for login and let the user gain 2 points for login. We set the limit for the user to gain these points to only one login per day. After logging in, we checked the logs, and yes, success!!! The user gained 2 points for logging in.
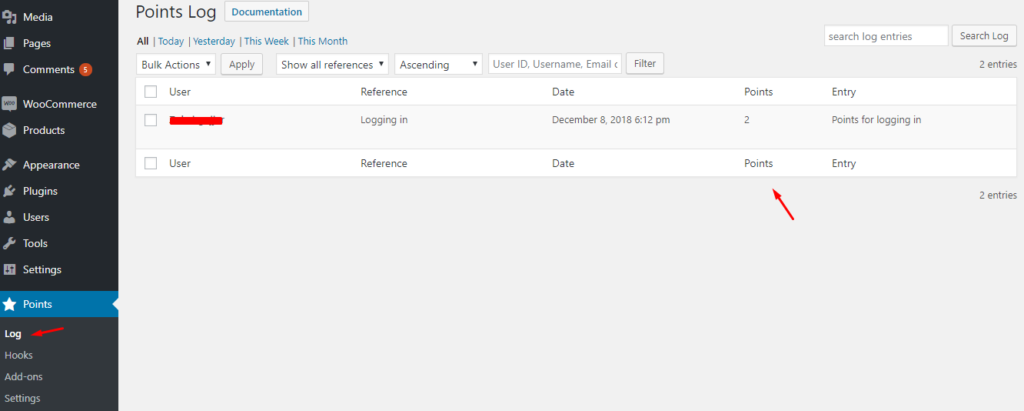
Customers can also check their points history by navigating to Users -> Points History.
That should be it!! Seven simple steps to set up myCred, WooCommerce points, and the reward system. Given myCred’s functionality, I guess going through seven very easy steps to set it up is a no-brainer.
Rewarding Customers With Points for Purchase
As we have discussed before, you can reward your customers when they buy a product from your WooCommerce store. So, as soon as you install and set up myCred with WooCommerce, you can edit each product and award the customers a certain number of points once they buy it. Go to Products on the left menu of your Dashboard, then click on Edit for any product, or add a new product by clicking on Add New.

And you’ll see the following screen. Click on Reward with Points and then add the number of points you want to reward your customers for purchasing that item.

The points given to each product will be multiplied by the number of quantities if the customer buys more than 1 quantity. These points are awarded once the order is paid for, not before; hence, the points can only be used as a payment method for future purchases.
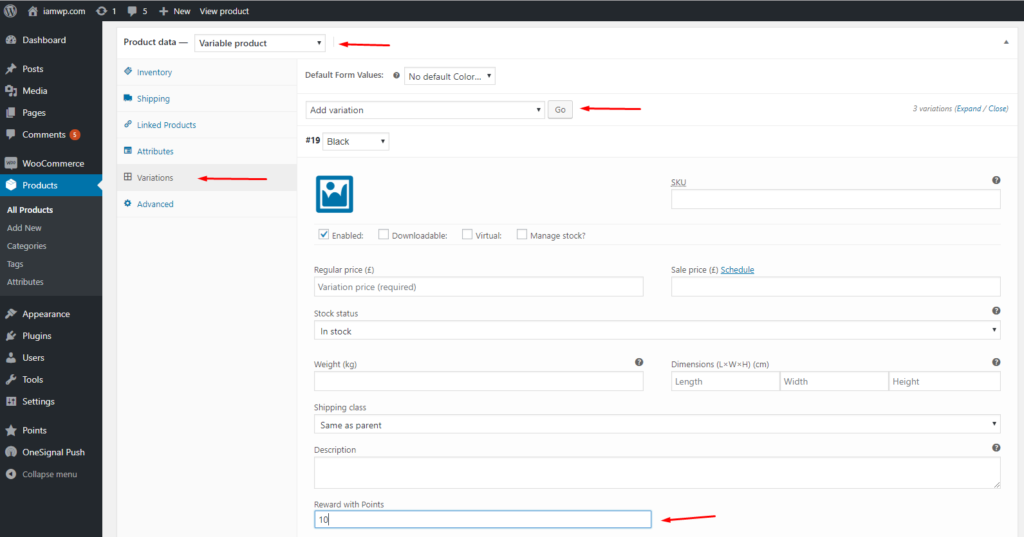
You can also set up different reward points for different product variations. For example, let’s say you are selling phones, and the same phone comes in different variations; you can set points for each variation for its sale.
For this purpose, edit the product, scroll down to the “Product Data” tab, and select “Variable Product.” After that, go to the “Variations” tab (given that you have added variation attributes for the product). Next, click on “GO” and expand the menu, scroll down to find the “Reward with Points” tab, and add points for this variation of the product. If you leave this part empty, myCred will award the default number of points that we set up in the first step.
And you’ll see the following screen. Click on Reward with Points and then add the number of points you want to reward your customers for purchasing that item.
Setting up Payment With Points for Purchase
Now that we have set up point rewards for the customers when they purchase an item, the next step will be to set up a payment method where they can use these points to pay for future purchases (if they have enough points to match the product price).
To set up myCred as a payment option, you must first add the myCred payment gateway to your WooCommerce store. Then, go to the left menu on your WordPress dashboard and go to Points -> Add-ons, find the “Gateway” add-on, and click on activate.
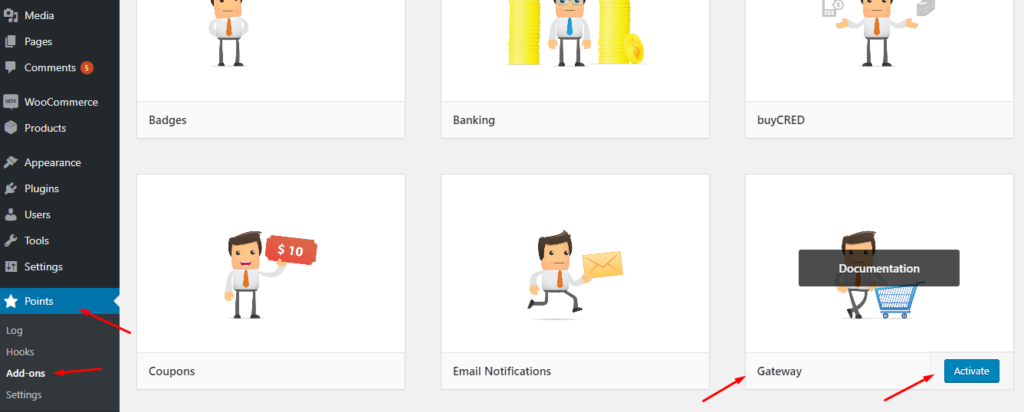
After the gateway has been activated, go to WooCommerce -> Settings -> Payments tab. Scroll down to find myCRED, click on the “Enabled” button, and then click on “Set up”.
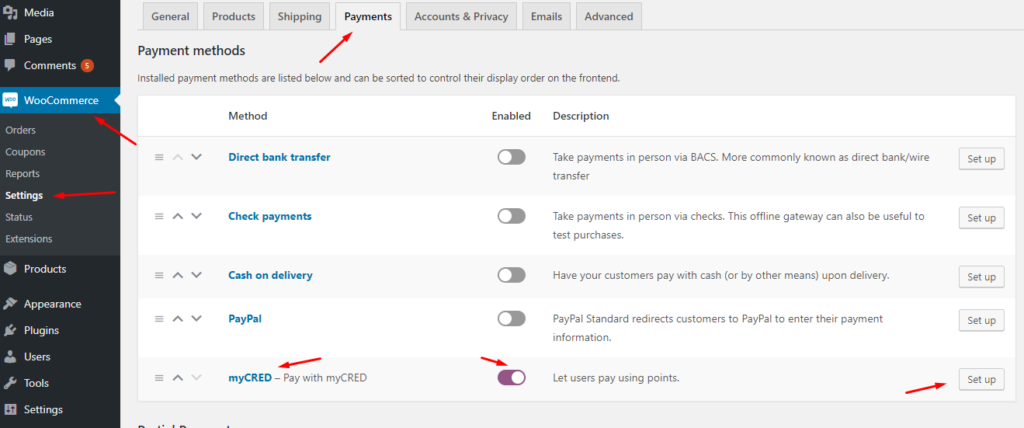
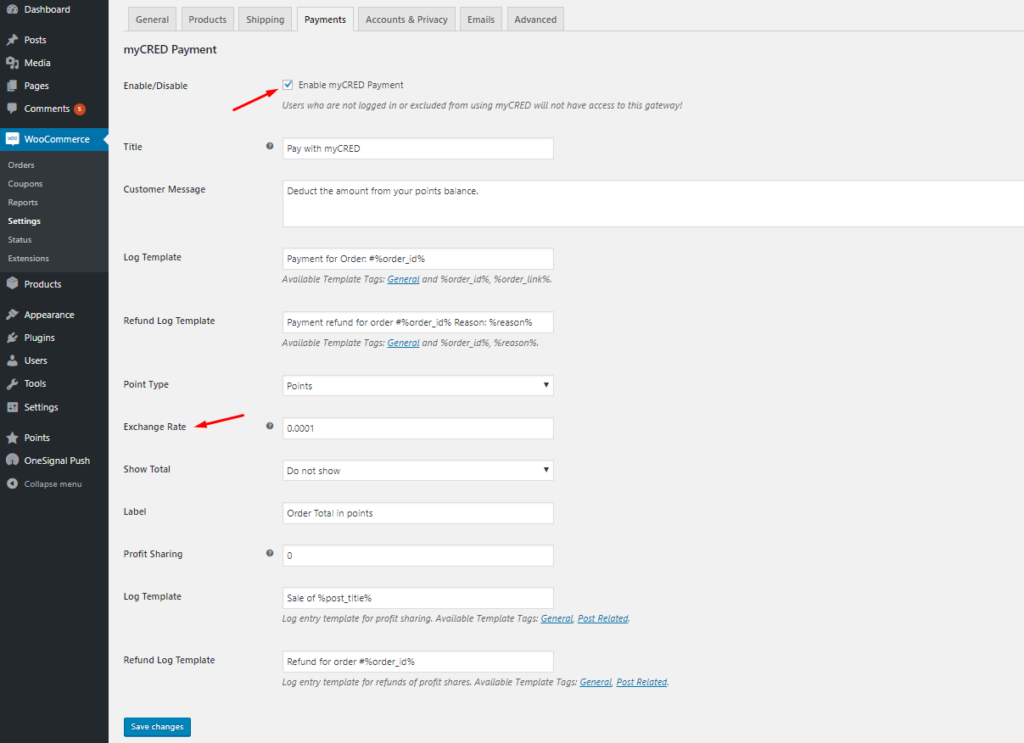
After that, you’ll get to the screen where you can set up your myCred payment gateway. You can set up attributes like a title, customer message, log template, refund log template, etc.
The most important attribute here is the “Exchange Rate.” How important is it? Because it involves the real deal, i.e., Money!!! Here, you can set up how much each point is worth for real-life money (the currency used in your store for payments). After setting up the exchange rate, click “Save Changes,” and you’re good to go.
Setting Up A Points-Based Store
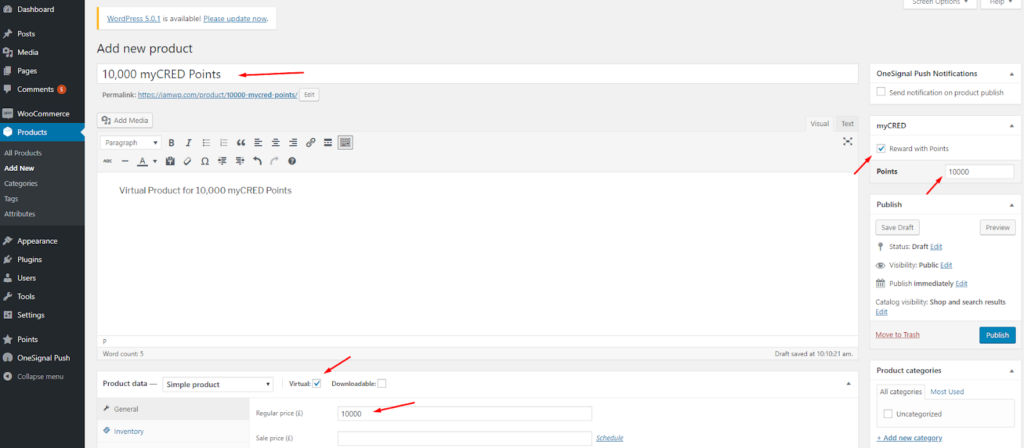
You can also set your store to be a point-based store, i.e., your customers can only pay for purchases using myCred points. There is a very easy way around it; you can set up a dummy virtual product in your store and set up the number of points as a reward for that product’s sale. Once your customer goes through with the purchase, they’ll be rewarded with points that they can use for later purchases. In the next section, we will show you how to do that.
Creating A Product To Sell Points
In order to go through with what we discussed in the above section, follow this procedure. Go to Products -> Add New and give your product a name, e.g., 10,000 myCred points, given that you are selling 10,000 points for that product. Set myCred reward for the sale of that product; we set it up for 10,000 points, set the product as “Virtual,” and give it a real money price. You can check the image below for this process:
Payments With Points And Partial Payments

The problem with WooCommerce is that it doesn’t let you use two modes for the same payment, i.e., your customer can’t partially pay for their order using points. Either the points cover all the payments, or they can’t be used.
To cater to this problem, myCred lets your customers use the Coupon feature of WooCommerce to convert their points into discount coupons, which are then automatically applied to their cart. For this purpose, myCred provides a paid add-on (worth only $49) that can help you get around the partial payments issue with the help of the WooCommerce coupons option.
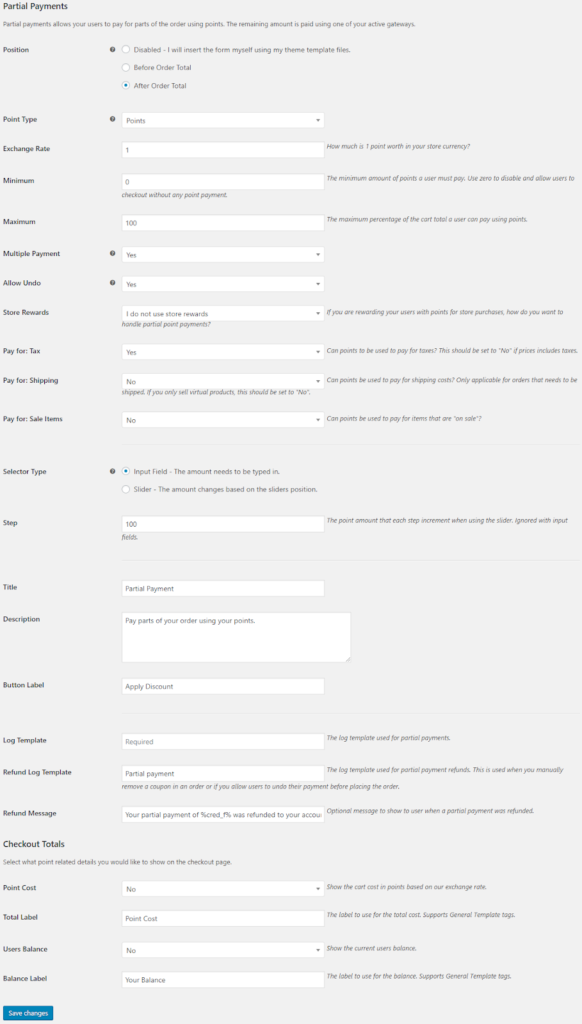
You first need to get it from here and then navigate to Plugins -> Add New and upload the zip file. Once installed, activate the add-on. As shown below, partial payments will appear in WooCommerce -> Settings -> Payments.
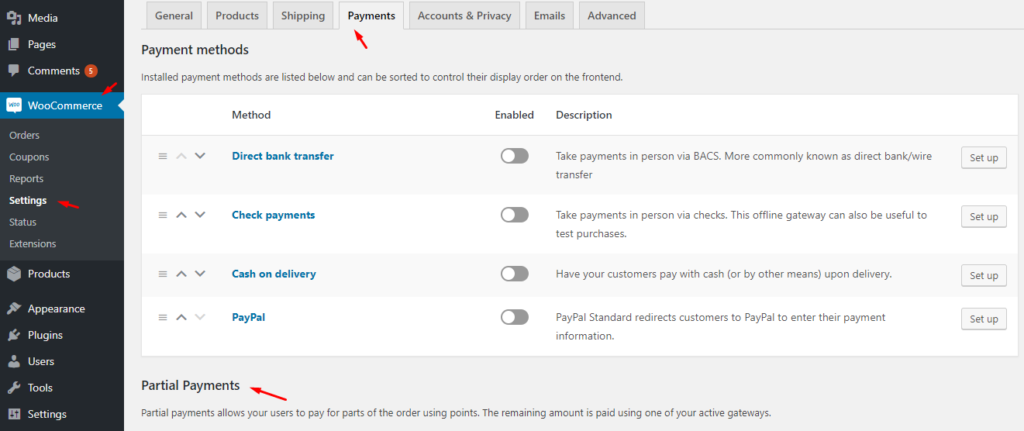
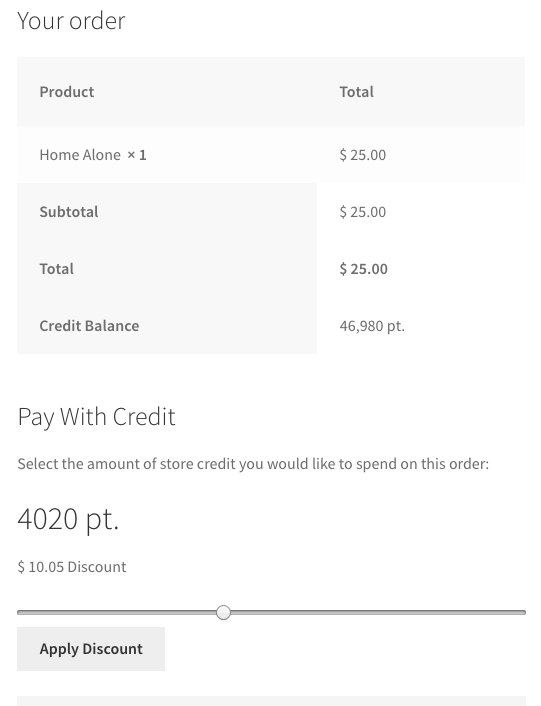
Scroll down a bit and configure your payments accordingly. A simple example of setting up partial payment and then ordering an item and paying for it partially with points and partially with money can be seen in the images below.
As we mentioned, myCred has detailed documentation for all its features. Code snippets and further explanations of these features can be easily found in the myCred documentation. myCred is one of the most feature-rich WooCommerce Points and rewards plugins. Suppose you are looking to create a reward system for your WooCommerce store and increase the revenue at the same time. Go grab yourself a copy of myCred from the WordPress repository.


